The Custom entities module enables Management UI users to extend built-in entities and introduce new entities in the loyalty program management. This expands the range of data fields that Antavo can store and provide through APIs upon request.
To access the configuration page, navigate to the Modules menu and search for the Custom entities module. The page will open to display the list of entities that are already set up.
Label | Label of the entity with the status |
Name | Name of the database collection |
Built-in |
|

Configuring custom entities
Create custom entities
Click the Create new custom entity button in the sidebar
Define the unique ID of the new entity
This is the machine-readable ID used to refer to the entity in Antavo APIs.Add a label
This is the human-readable name of the entity displayed name of the entity in the Management UI and accessible through the API.Write the description of the entity
Select the database collection where the new entity is stored
Enable the Auto increment ID option if you need Antavo to generate IDs for each entity item introduced later
Click Save

Activate an entity
After saving for the first time, the status of the custom entity is inactive, which means it is not usable in API calls and only appears in the list of custom entities on the module configuration page. You can activate the custom entity immediately using the Set active button on the upper right-hand side of the setup page and confirm the activation in the subsequent dialog.
Please note that while custom entities can be created, entity items cannot be added in the Management UI.
Managing custom entities
Edit an entity
Follow these steps to modify the custom entity:
Go to the Custom entities page
Click the Edit button of the entity you would like to update
Make the necessary edits to the entity
Save the changes by clicking Update
Please note that for built-in entities, only the label and description can be edited.
Inactivate an entity
Follow these steps to deactivate the custom entity:
Go to the Custom Entities page
Click the Edit button of the entity you would like to update
Click Set inactive
Confirm in the dialog that subsequently appears
While inactive, the entity cannot be accessed through the API.
Delete an entity
Entities cannot be deleted from the Management UI. To stop using an entity, please deactivate it.
Adding custom entity attributes
When navigating to the Attributes tab of the editor interface of any entity, you’ll first encounter the list of attributes that are already available, along with the following information:
Label | Label of the entity attribute with the status |
Unique ID | Unique ID of the entity attribute |
Type | Type of the attribute |
Tags | Tags associated with the entity attribute |

Create a new attribute
Click the Edit button of the entity to which you’d like to add a new attribute
Click the Create new attribute button in the sidebar
Add a label
This is the human-readable name of the entity that is the displayed name of the attribute in the Management UI that is accessible through the API. Tip: by defining the label of the attribute as ‘label’, you can store the name value of a specific entity in an attribute that is called ‘label’.Define the unique ID of the attribute
A machine-readable ID used to refer to the attribute in the Antavo APIs.
System keywords (e.g.,source,transaction) cannot be used as IDs. If a system keyword is provided as an ID, an error message is displayed, and the attribute cannot be created.Write the description of the attribute
Select the field type
Choose the type of data stored in the field. Ensure that data sent through the API is in the format required by the selected type to prevent API request failures.String
Numeric
Boolean
Select
Add the selectable options by defining possible values.Url
Date
Datetime
Multiple choice
Add the selectable options by defining possible values.List
Image
Choose this attribute type to upload images (.png, .jpeg, .jpg type files) to any entity. Once saved, an image can be uploaded in the new field type (for example, a secondary image for a Reward).Reference
This attribute type is used to link the entity to an individual customer profile. When the reference type attribute is populated with a customer ID, the entity along with all its attributes will appear on the corresponding entity tab of the profile of the referenced customer. This attribute type is not available for built-in entities, and currently, only the customer reference is applicable.Translatable
Challenge entities can be expanded with translatable-type attributes to support multilingual sites. The configuration field of the attribute will appear in the challenge editor with a Translate button. Use this button to input values for all languages added in the Multi-language module. This allows you to query the translations through the Entities API to apply them on your website.
Add a default value (only applicable for String, Numeric, Boolean, and Url type attributes)
You can enter a default value for entity fields. After the new entity attribute is activated, the default value will automatically populate in all the entity items.Format (only applicable for String, and List types of fields)
The format of values can be further specified to Date, URL, Email, and Phone number formats. The API will validate the values accordingly.Add tags, if necessary
Tags define how attributes can be accessed and managed in the system.API: The field is included in the response returned by the Entities API if it is included in the request (fields=<attribute>). If you’d like to include the field without requesting it explicitly, please use the Default API field checkbox.searchable: Any value of the field can be used as a search condition when requesting customer data through the Entities API, by using key-value pairs as query parameters. Additionally, it is available for searching within lists in the Management UI.importable: The value of the field can be updated through the Imports module.groupable: The data values of the field can be grouped when configuring charts to be displayed on the Dashboard.filterable: The field can be used as a filter condition when requesting customer data through the Entities API and filtering the list of entities on module configuration pages. Its impact on performance may vary, so it is important to test each filtered operation to ensure efficiency.
The field can also be used for filtering in the Management UI's list filters and search fields.unique: The same field value can only be registered once and cannot be saved to the same field for any other event. In Workflows, only unique attributes can be selected in the Entity lookup node.
Please be aware that once the unique tag has been added, it cannot be removed once the attribute settings have been saved.
Set the access level
Management UI users from unselected access levels cannot access the attribute in the Management UI.Fieldset
Select or create a group where the attribute will appear on the editor interface.Default API field
Tick the checkbox to enable the attribute to be added to API responses, without including the field in the request.Required
If the attribute is marked as required, ensure to add a default value to this attribute in the valid format. If the value of the required item is empty, you will not be able to make any further updates to the entity without adding a value to the item in the correct format.Click Save

Activate a custom entity attribute
After being saved for the first time, the status of the custom entity attribute is inactive. This means it is not usable in API calls and appears only in the list of custom entity attributes on the module configuration page. You can activate the attribute immediately by using the Set active button located on the upper right-hand side of the setup page. Confirm the activation in the subsequent dialog that appears.
Manage custom entity attributes
Edit an attribute
Follow these steps to modify an entity attribute:
Go to the Custom entities page
Click the Edit button of the entity to which you would like to add the attribute
Navigate to the Attributes tab
Click the Edit button of the attribute you would like to update
Edit the entity attribute
Save the changes by clicking Update
Please note that built-in entities cannot be edited.
If you have set a default value or modified a previously added default value while editing the attribute, the attribute value will be populated on all entity items if the attribute was empty or populated with a previously configured default value.
Inactivate an attribute
Follow these steps to deactivate an entity attribute:
Go to the Custom entities page
Click the Edit button of the entity that you would like to add the attribute to
Navigate to the Attributes tab
Click the Edit button of the attribute you would like to update
Click Set inactive
Confirm in the subsequent dialog that appears
While inactive, the attribute won’t appear as configurable fields on the Management UI and won’t be added to API responses.
Archive an entity attribute
Follow these steps to remove an inactive entity attribute.
Go to the Custom entities page
Click the Edit button of the entity that you would like to add the attribute to
Navigate to the Attributes tab
Click the Edit button of the inactive attribute you would like to update
Click Archive
Confirm in the subsequent dialog that appears
Please note that only inactive entities can be archived.
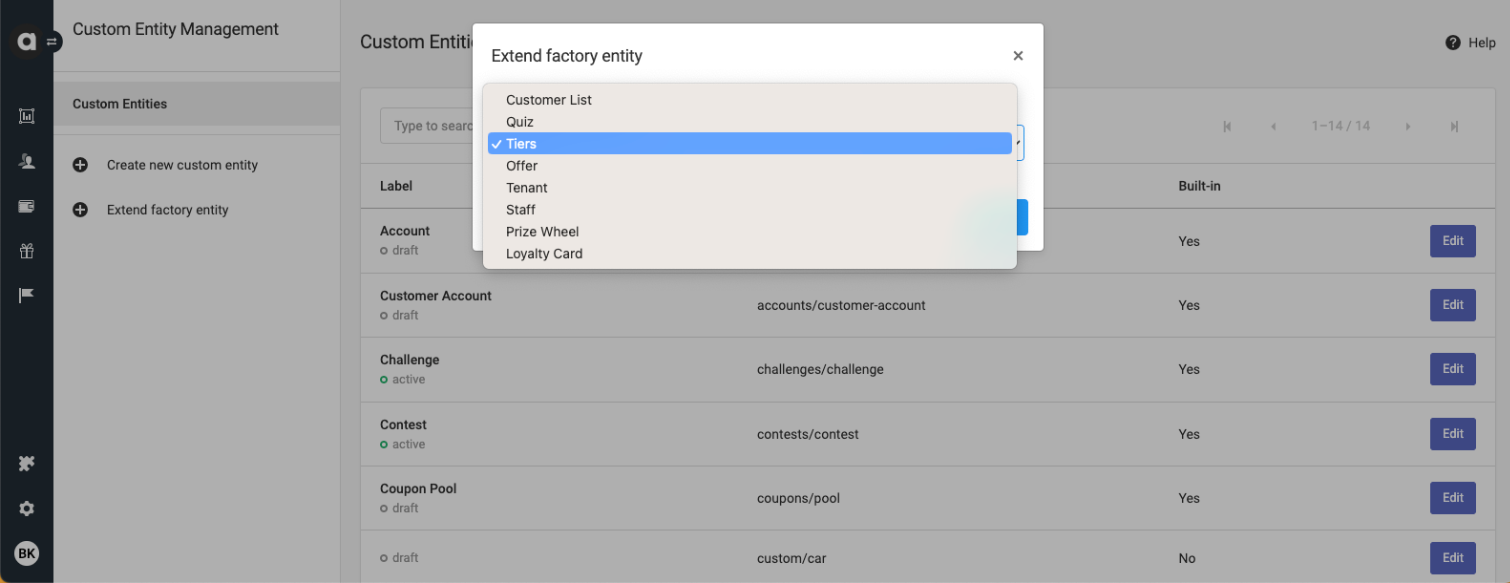
Extending built-in entities
Built-in entities can also be extended with custom attributes within the Custom entities module.
Enable the extension of a built-in entity
Click the Extend factory entity option in the sidebar
Select the built-in entity that you’d like to extend
The following entities may be available if the required module is enabled:
Built-in entity | Module required |
|---|---|
Challenge | |
Customer | - |
Transaction | - |
Tier | |
Store | |
Gamified profiling flow | |
Tenant | Tenants |
Staff | Tenants |
Prize wheel | |
Account | |
Reward | |
Reward category | |
Coupon | |
Coupon | |
Offer | |
Quiz | |
Product | |
Contest |
Click Extend
Click the Save button on the entity editor interface
You can edit the label and the description of the entity here.
Manage factory entities
Once the factory entity has been enabled to be extended, it appears among the list of entities on the module configuration page and can be edited the same way as a custom entity.
Please be cautious when inactivating and archiving factory entities, as it might break the loyalty program's fundamental mechanics. Please contact the Antavo Service Desk before doing so.
Add an attribute to a factory entity
New attributes can be added and later managed as well, please follow the steps of creating and managing a custom attribute explained above.