Manage and define new customer fields within the Customers tab of the Settings menu. The data stored in these listed fields can be used in your loyalty program mechanisms as filters and can also be synchronized with external systems.
Fields
When you navigate to the Customers tab, you’ll find the list of fields available within the customer object, displaying the following details:
Label | Label of the field |
Unique ID | Unique ID of the field |
Field type | Type of the customer data field |
Built-in |
|
Tags | Tags associated with the field |
.png)
Add a new field
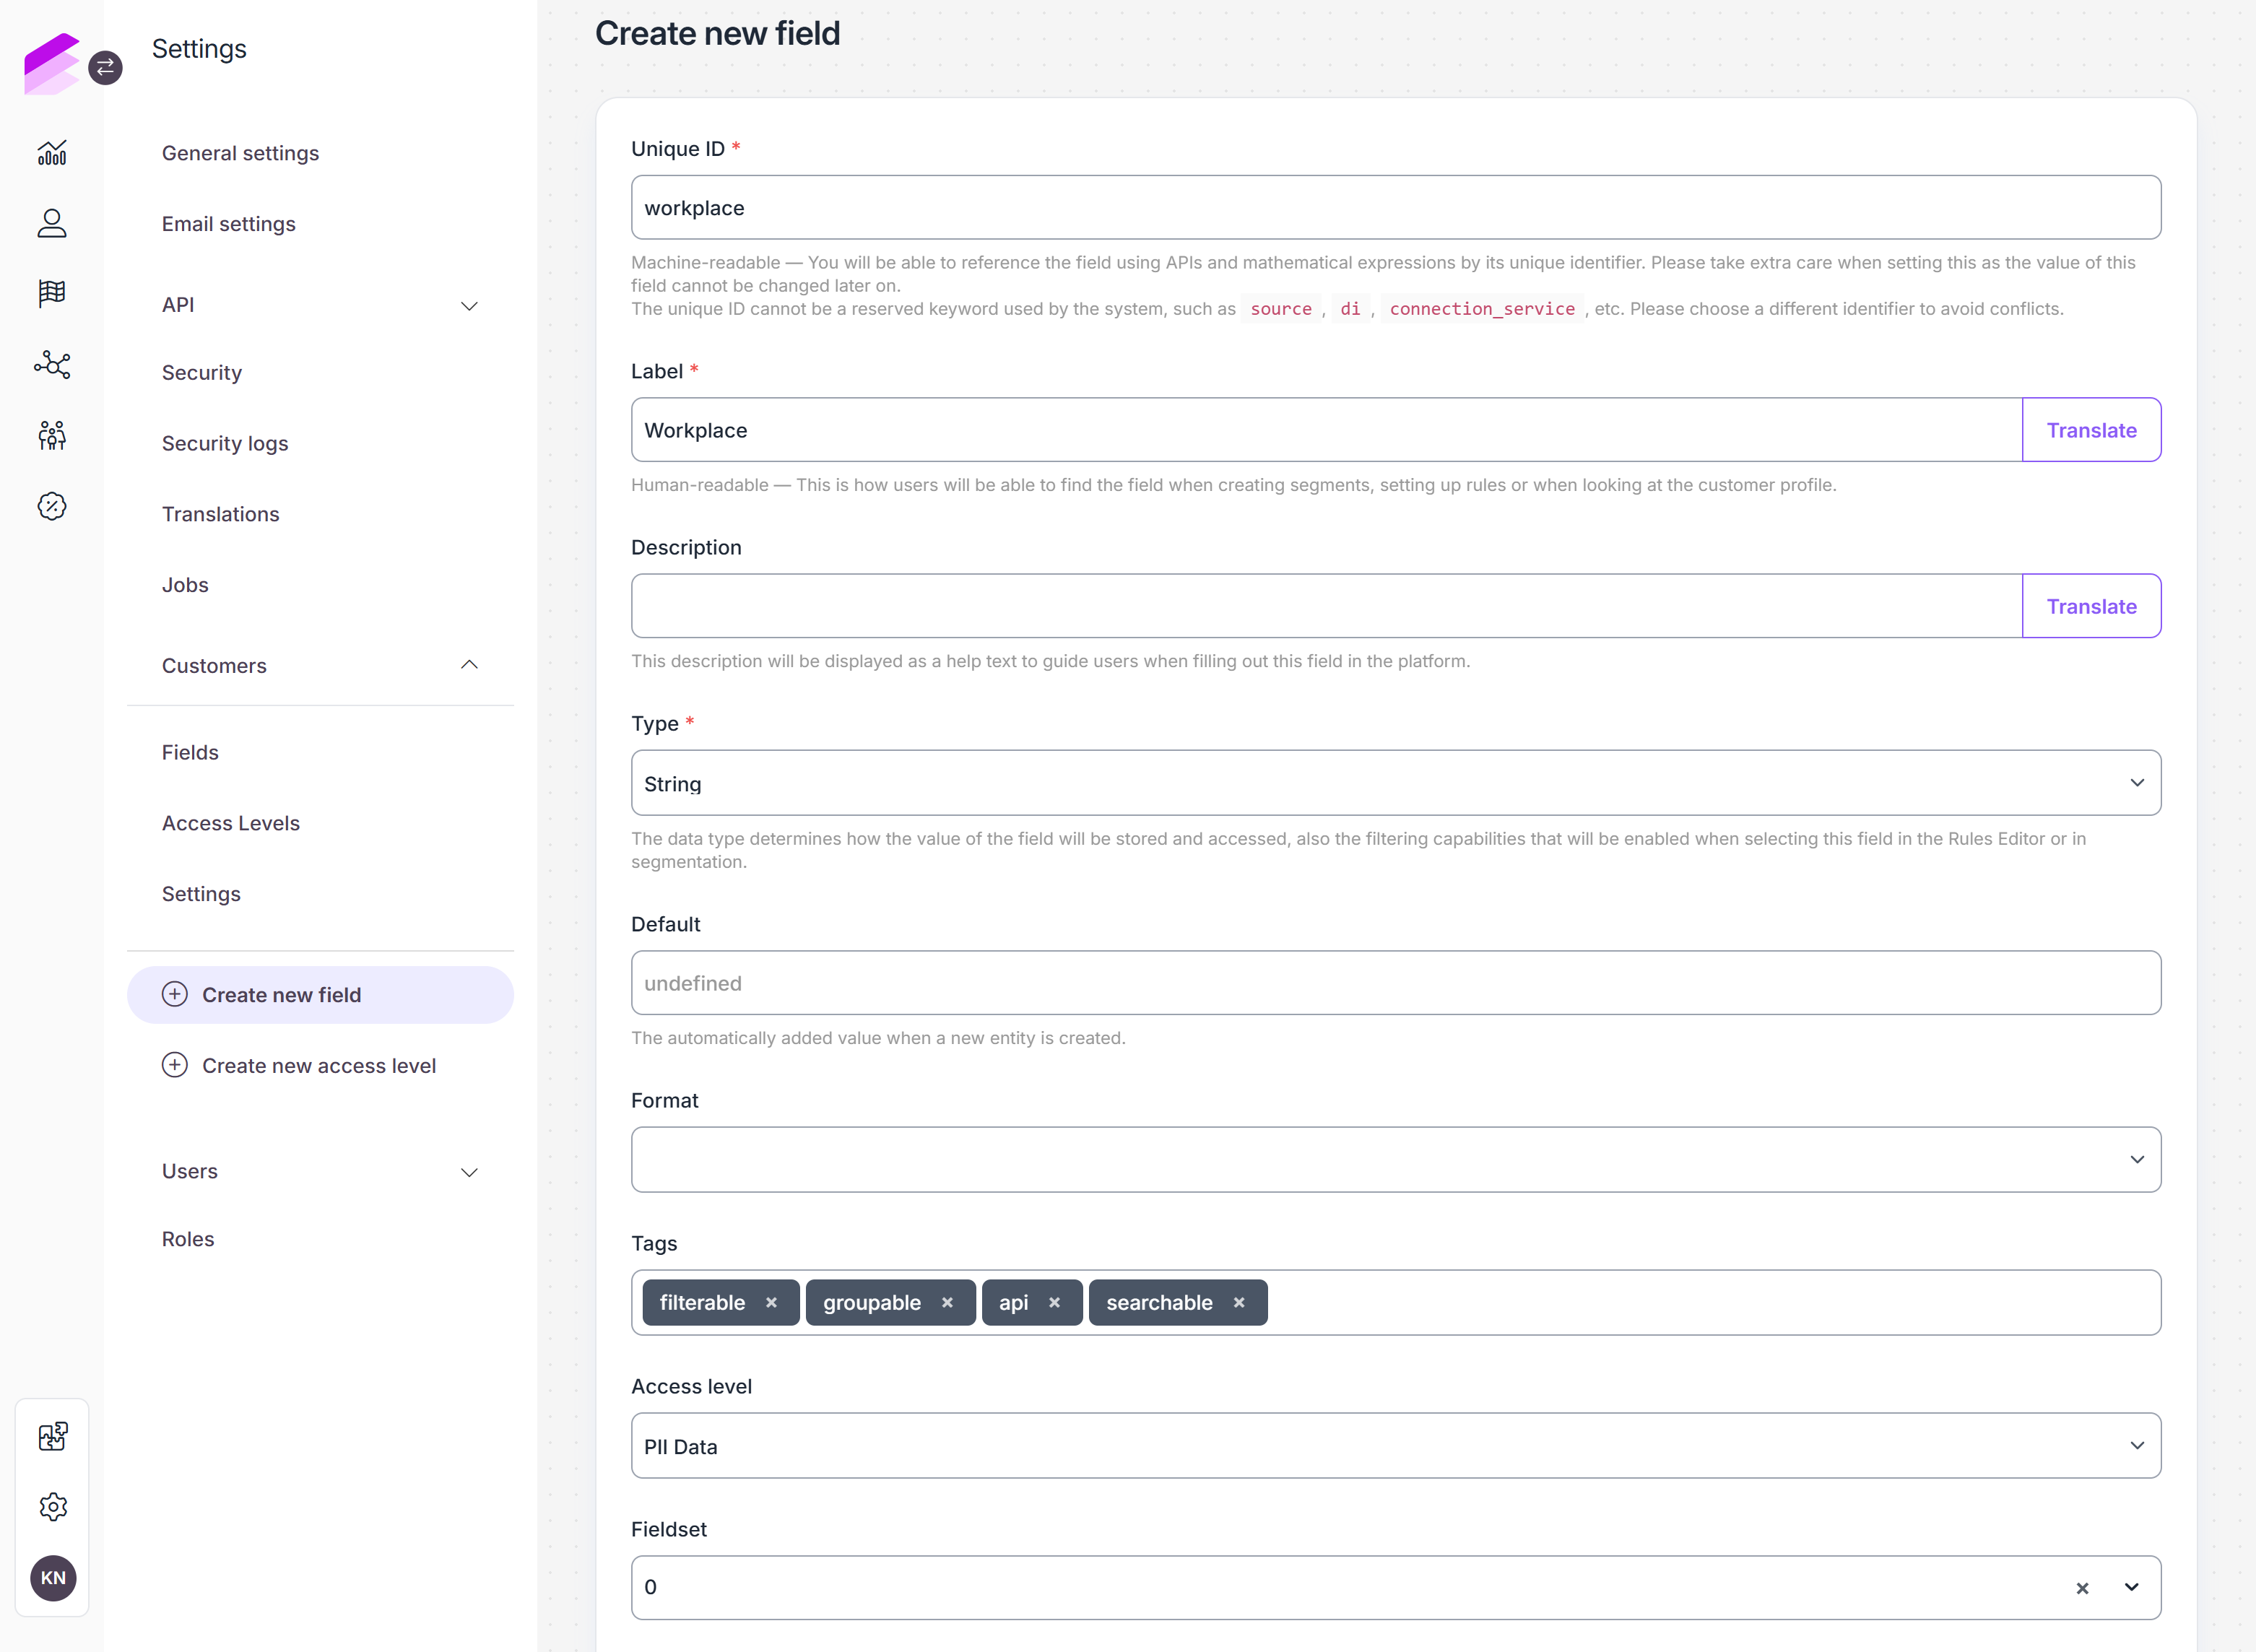
Click Create a new field
Define the unique ID
This is the machine-readable ID of the field used for referencing in API calls and mathematical expressions. Once created, the ID cannot be modified.
System keywords (e.g.,source,transaction) cannot be used as IDs. If a system keyword is provided as an ID, an error message is displayed, and the attribute cannot be created.Add the label
This serves as the identifier for the field throughout the Management UI, used when creating segments, setting up workflows, or viewing customer profiles.Add a description
This description will be displayed under the customer field on the Personal information page of customer profiles, where field values can be edited.Select the field type
Select the type of data that is stored in the field. Ensure the data sent through the API matches the format required by the selected type to avoid API request failures.String
Numeric
Boolean
Select (Define possible values)
Date (format: YYYY-MM-DD)
URL
Datetime (format: YYYY-MM-DD hh:mm:ss)
Multiple choice (Define possible values)
List
Image
Default (only applicable for String, Numeric, Boolean, and URL type attributes)
You can enter a default value for customer fields. After the new customer attribute is added, the default value will be automatically populated in the new attribute of all customers.Format (only applicable for String and List types of fields)
The format of values can be specified as Date, URL, Email, or Phone number formats, and the API will validate the values accordingly.Tags
Tags determine how attributes can be accessed and managed within the system:API: The field is included in the response returned by the Customer API.searchable: Any value of the field can be used as a search condition when requesting customer data via the Customer API by using key-value pairs as query parameters. Additionally, it is available for searching within lists in the Management UI.importable: The value of the field can be updated through the Imports module.groupable: Data values of the field can be grouped when configuring charts for display on the Dashboard.filterable: The field can be used as a filter condition when requesting customer data via the Customer API. Its impact on performance may vary, so it is important to test each filtered operation to ensure efficiency.
The field can also be used for filtering in the Management UI's list filters and search fields.unique: The same field value can only be registered once and cannot be saved to the same field for any other customer.external_ID: The field can be used as a unique customer identifier. It will be available via the Customer API within the external_ids collection and can identify customers in various API calls. A field withexternal_idtag must be a string-type field.
Once the
uniqueorexternal_IDtag is added and attribute settings are saved, it cannot be removed.
Access Level
Select the access level applicable to the customer field. Read more about Access levels below.Fieldset
Choose or create a group under which the attribute will appear on the Personal information tab of the customer profile.
Set data & privacy control rules
PII (Personally Identifiable Information): When checked, the field data will be anonymized upon opt-out.
Built-in PII fields are checked by default and cannot be unchecked.Required: If the attribute is marked as required, ensure you add a default value in the valid format. If this required item’s value is empty, you won’t be able to make further updates to the customer through the
profileevent unless a value is added in the correct format. However, you can still update customers via the Modify event workflow node, even if the required field isn’t populated.Computed: Checking this box will hide the field from being displayed on the customer profile in the Management UI.
Sensitive: Values of sensitive fields aren’t displayed automatically on the customer profile. To view them, you’ll need to enter your Management UI login credentials.
.png)
Make sure you click Save before leaving the page.
Edit fields
Edit configured fields anytime except for the Unique ID. Click the Edit button in the field list to edit a field. Use the search bar to locate specific fields if necessary.
If you set or modify a default value while editing a customer field, this updated value will be applied to all customers. This applies when the attribute was initially empty or had a previously configured default value.
Delete fields
Customer fields cannot be deleted, but you can stop using them in your loyalty program. Before you do, make sure that the Required checkbox is not ticked in the editing interface.
Access levels
Access levels allow you to specify which group of Management UI users can view and edit particular customer attributes.
Within the Access levels tab, you’ll find the list of added access levels with the following information:
Label
Creator: The user who defined the access level.
Creation date
Add a new access level
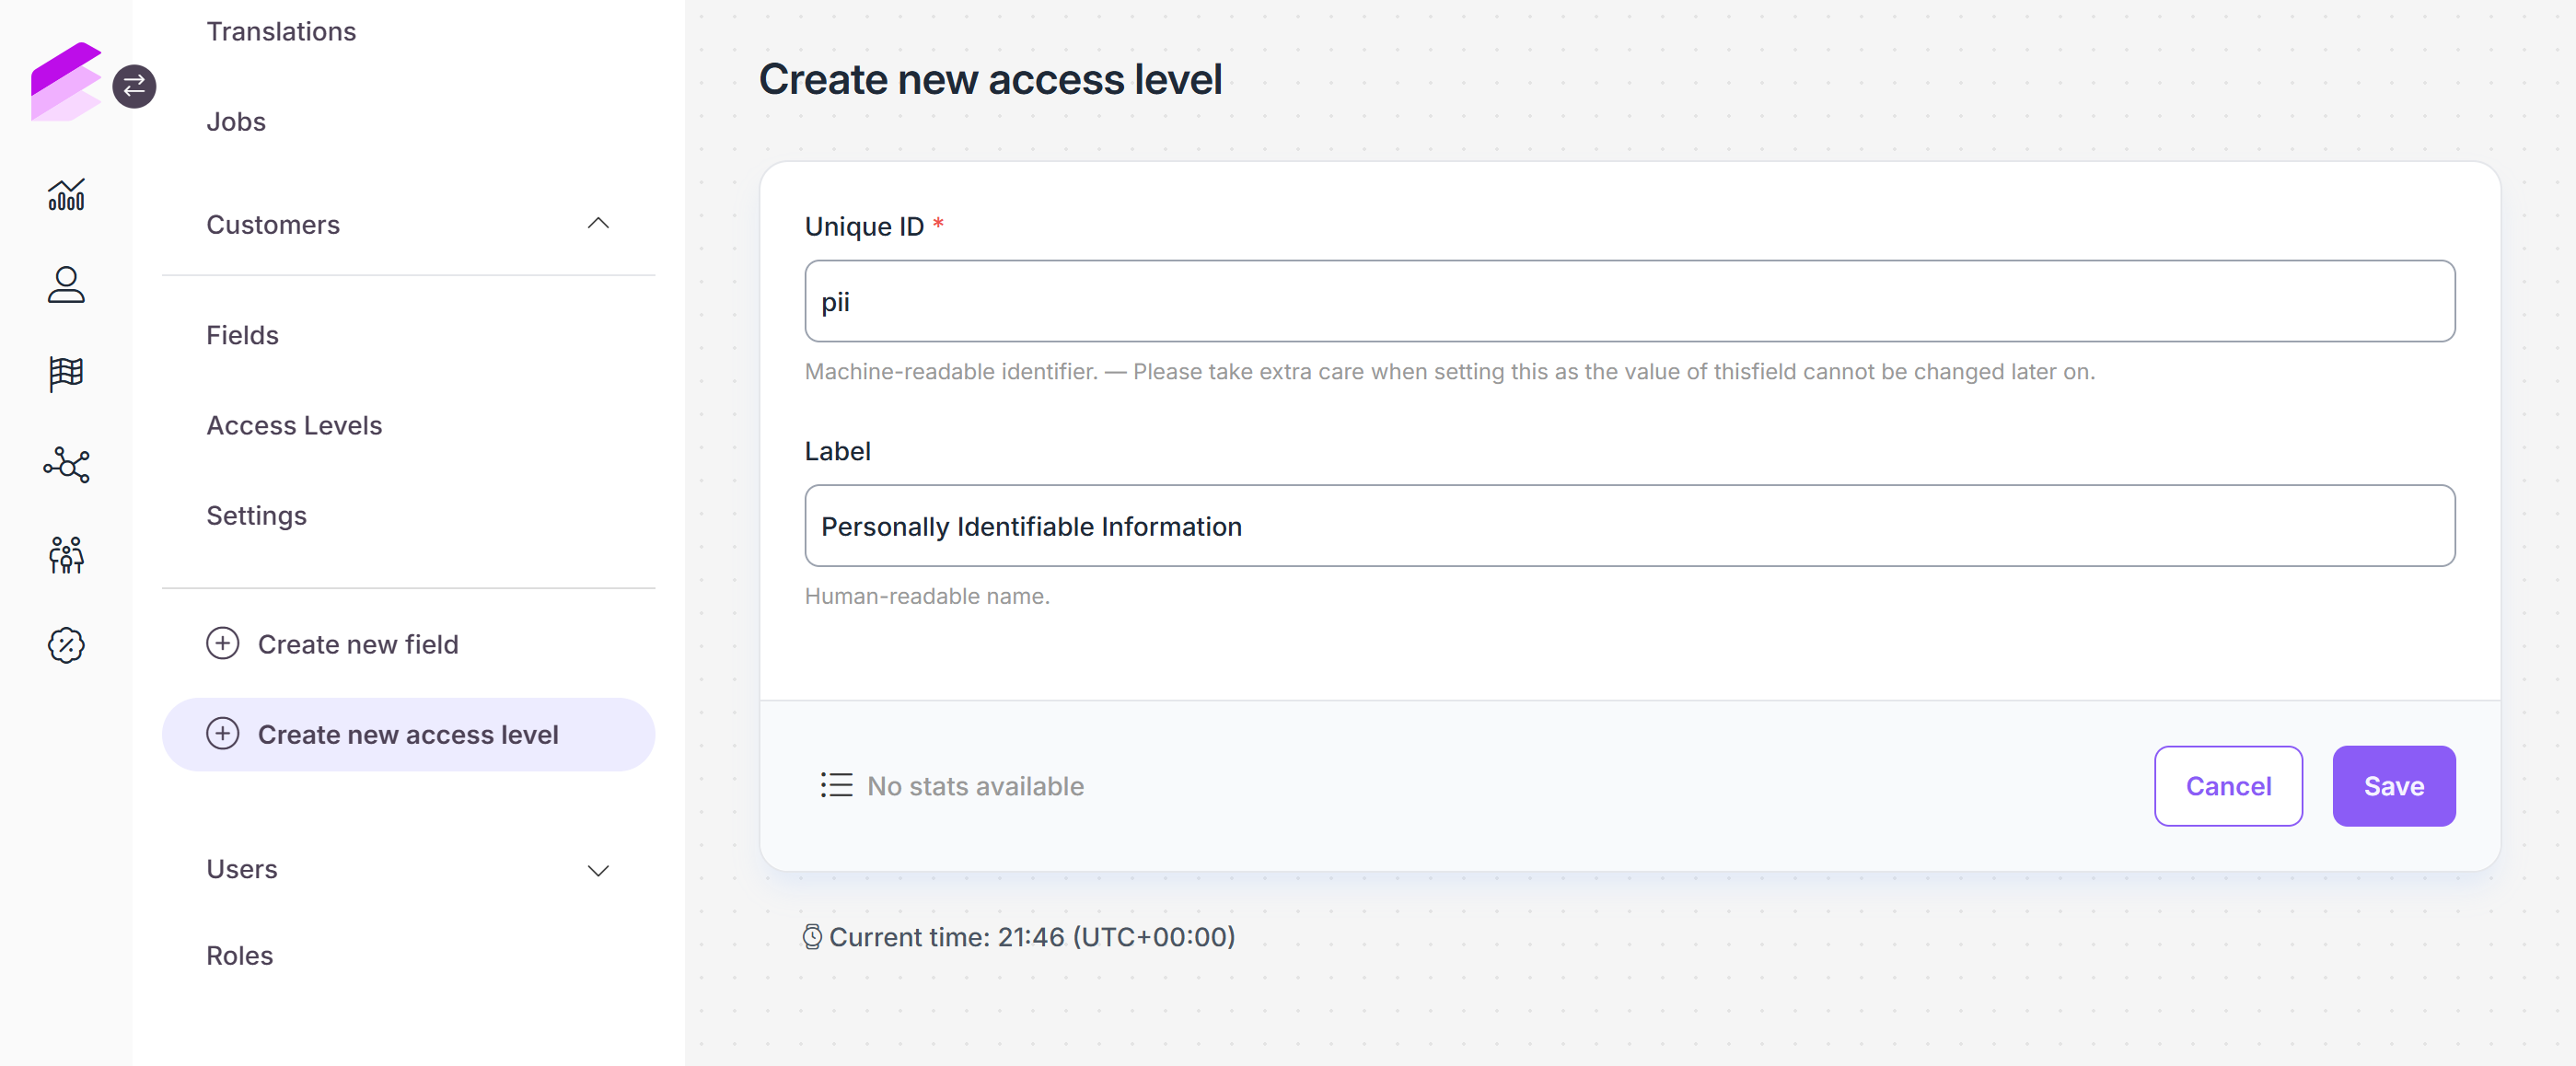
Click Create a new access level
Define the unique ID
The machine-readable ID is assigned to the access level upon creation. Once generated, this ID cannot be modified.Add the label
This label is used to identify the access level throughout the Management UI when assigning it to roles and customer fields.Click Save
Edit access levels
You can modify the label of the access level at any time by clicking the Edit button next to the field in the list. Use the search bar if necessary.
Delete access levels
Access levels cannot be deleted, but you can stop using them.
Add access levels to roles
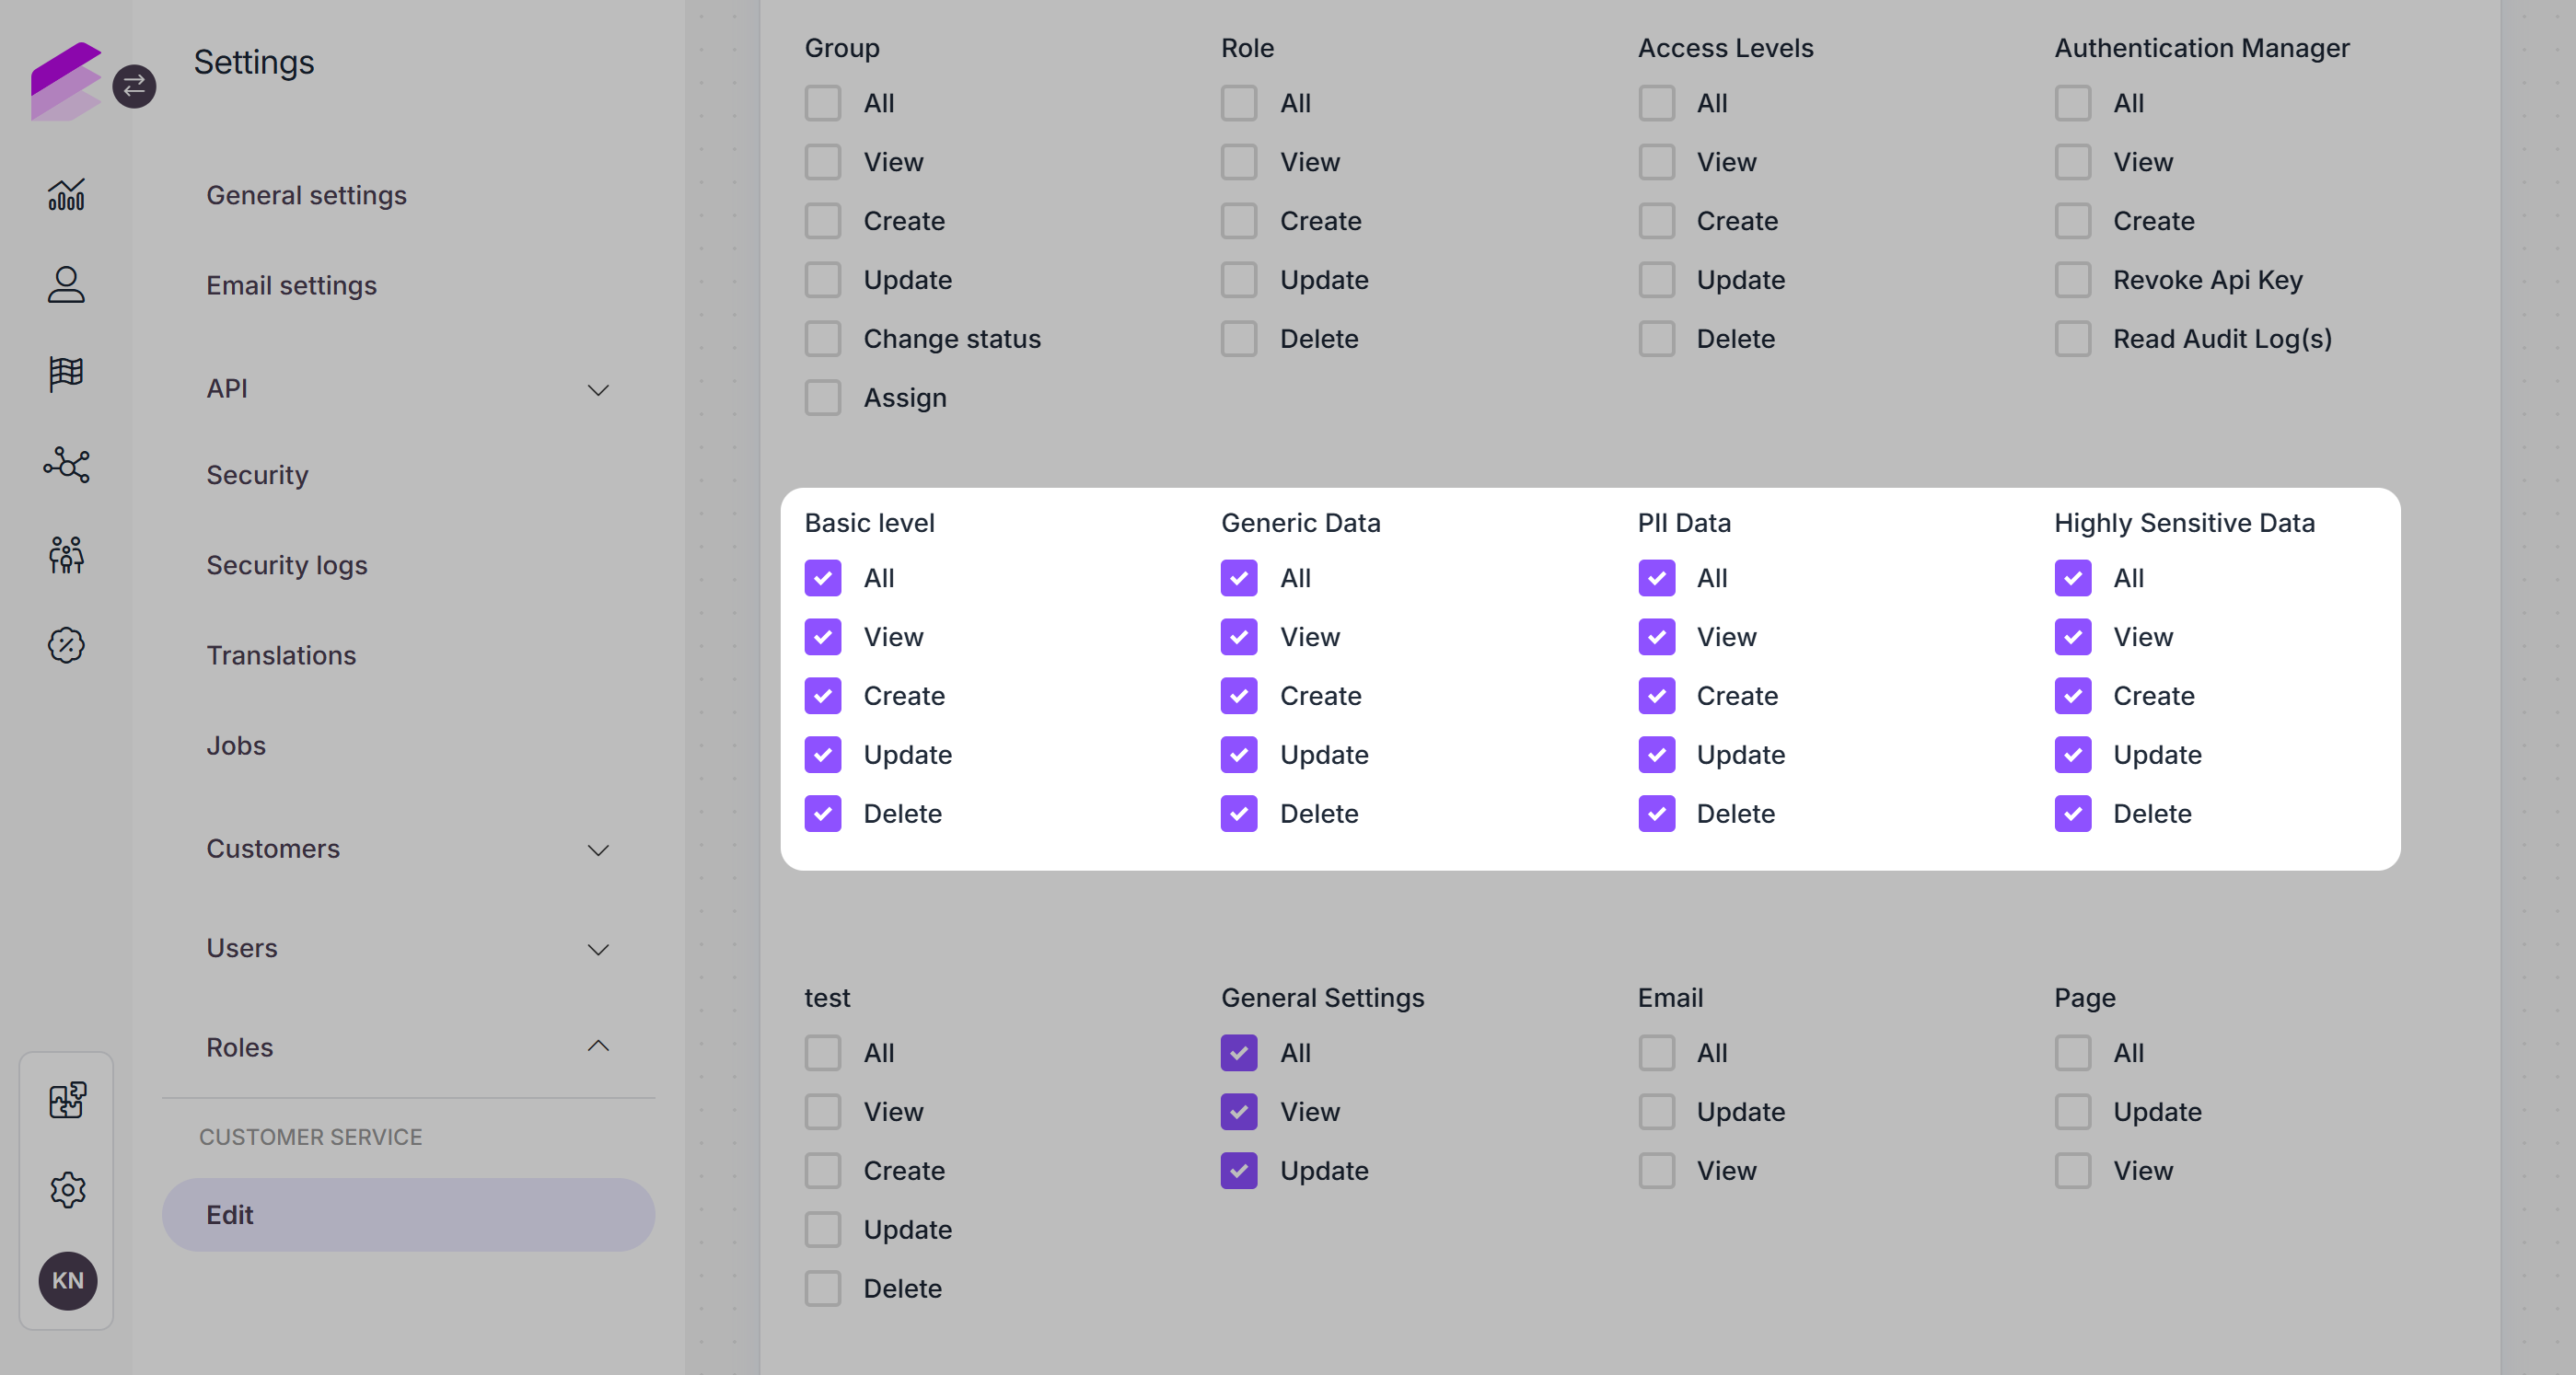
To activate access levels, ensure they are assigned to roles configured under the Roles tab of General settings. By default, all the access levels are included in the Administrator role. To assign access levels to additional roles, edit the respective roles and activate the options in the Permission mask section. All access levels, along with their labels, are listed in the Permission mask.
Settings
This menu item is accessible only if the Customers module is enabled. If you don’t see the Settings tab and wish to use any of the features mentioned below, please contact the Antavo Service Desk.
Under the Settings tab, you can define basic settings that affect all customers.
Minimum age
This feature is useful if you’d like to prevent the registration of minors in the loyalty program.
Activate the age limit by turning on the corresponding radio button
When activated, the Birth date field becomes a mandatory attribute for the Optin event.Set the age limit in years
The minimum age limit must be 13 years. If the Birth date value of the Optin event is below this minimum age, the event will be rejected automatically.
Make inactive customer data available through API
If this option is enabled, the endpoints of the Customer API will return the data for both active and inactive customers. Inactive customers are those who haven’t been registered in the loyalty program via an Optin event. Learn more about customer statuses in the Customer insights user manual.
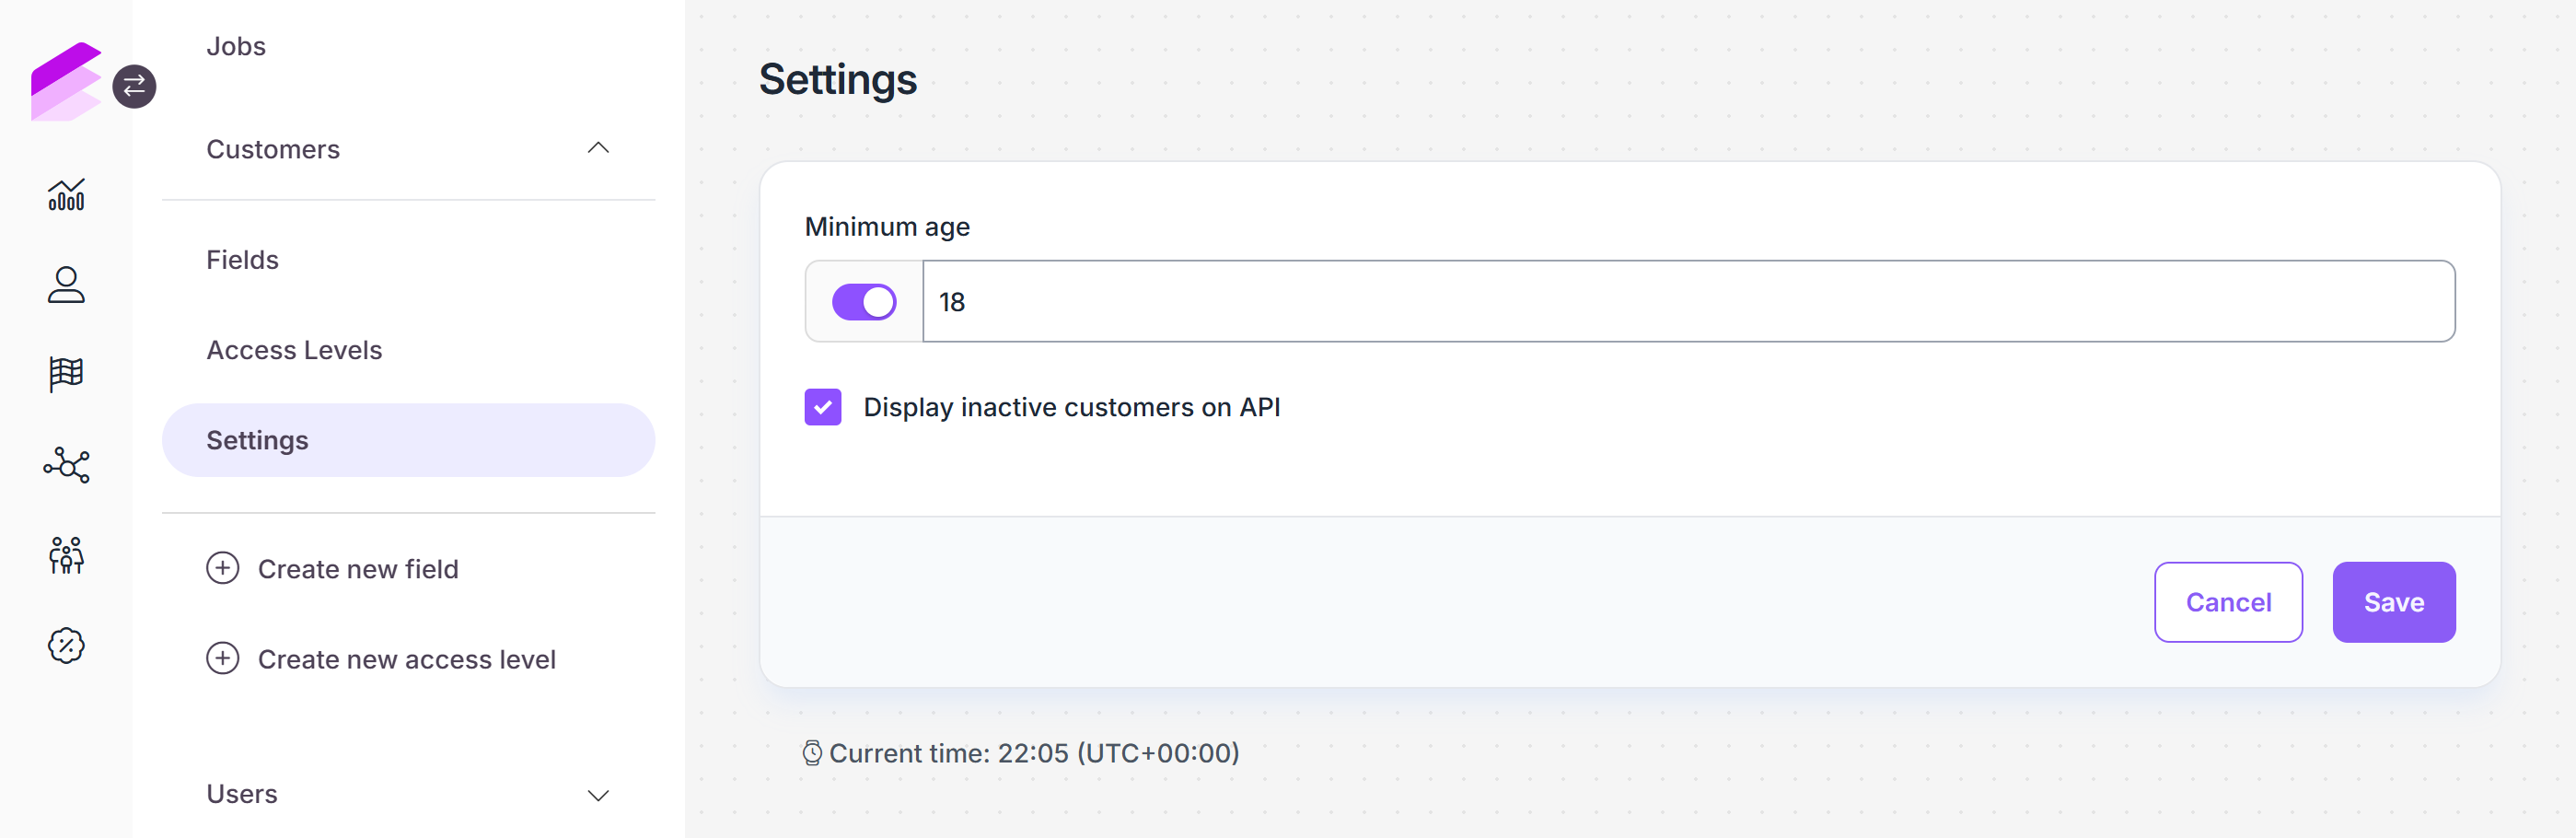
Before leaving the page, please click Save to make sure your changes are effective.