mParticle is a customer data platform (CDP) for omnichannel consumer brands, facilitating customer data management throughout the entire customer lifecycle. Its integration with Antavo enables brands to effectively synchronize customer data and actions.
This document outlines the process of configuring the two-way connection between the two platforms to enable seamless field and event synchronization. Additionally, two use cases will be briefly discussed to demonstrate the key functionalities of the integration.
This integration supports two-directional synchronization, allowing data to be exchanged between Antavo and mParticle in both directions.
To access the configuration interface, navigate to the Modules menu and search for mParticle integration in the list.
Setting Up Antavo with mParticle
This connection allows data to flow in both directions, ensuring accurate customer data management. To enable data synchronization between Antavo and mParticle, access credentials are required for configuration at the appropriate locations.
Enabling Antavo in mParticle
Navigate to the Directory in mParticle
Search for the Antavo Loyalty Cloud and click Setup
Select the integration type(s) based on your needs
Input/Feed: Synchronization of customer data and customer event data from Antavo to mParticle.
Output/Event: Synchronization of mParticle events to Antavo.
Click Configure
Input (outbound from Antavo) must be enabled to use the Output (inbound from Antavo).

Configuring Input/Feed integration (from Antavo to mParticle)
Enter a configuration name
Toggle the Feed status to active
.png "image-1024x500.png")
Click Save or Save & Next configuration
Once saved, mParticle provides:
Server to Server Key
Server to Server Secret
These can be accessed later under Setup → Feeds → Antavo Loyalty Cloud.

Navigate to the Settings tab of the mParticle module in the Antavo Management UI.
Complete the Outbound settings form with the following details
API URL:
https://s2s.mparticle.comis added by defaultAPI key and API secret: Paste the Server to Server Key and Server to Server Secret obtained from mParticle.
Development: Check this box if you want the data sent to be treated as development data, which will be kept separate from your production data.
Sync only configured identifier fields: When enabled, this ensures only the selected identifier fields are included in outbound payloads, excluding any unselected default fields (for example, if only
customer_idis selected, onlycustomer_idwill be sent, whileemailwill be excluded).Antavo Identifier Field: Select the Antavo customer attribute to be used for identifying members when connecting Antavo data to mParticle.
Customer Identifier Field: Choose the mParticle user identity field to link mParticle data with Antavo customers.
Click Save at the bottom of the page
.png)
Configuring Output/Event integration (from mParticle to Antavo)
Input (outbound from Antavo) must be enabled to use the Output (inbound from Antavo).
Navigate back to the Output: Event Configuration interface of the mParticle integration directory
Enter a configuration name (mandatory)
Set Development and/or Production environment. Use the checkbox to determine if you want to apply the same configuration settings for both the Development and Production mParticle environments. If unchecked, you can toggle between Development and Production to set different configurations for each environment.
Add the Loyalty Environment
Specify the Antavo loyalty engine environmentAdd the Loyalty Authentication Token
Copy the Authentication token from the Authentication token field under the Inbound settings section of the Antavo Management UI. This token will only appear after you have configured the Outbound settings during the Input/Feed configuration.Click Save & Close

Navigate to the mParticle module’s configuration page in the Antavo Management UI through the Modules menu
Complete the Inbound settings form with the following details
Authentication token: Antavo automatically generates the authentication token. This token was used in the previous step when configuring the output settings in mParticle.
Customer identifier field: Select the customer field from mParticle that will be used as an identifier when sending data from mParticle to Antavo.
Antavo identifier field: Select the appropriate Antavo-side customer attribute from the dropdown menu. Antavo will match incoming data from mParticle with this Antavo customer attribute to identify the customer.
Track audience data: When enabled, this allows Antavo to process audience information sent from mParticle. Audience segments received from mParticle are interpreted as customer lists: Antavo will create, update, or delete these lists and manage their members accordingly.
For example, if mParticle sends an audience named VIP Customers with a list of members, Antavo will create a customer list with that name and add the members to it. If the audience is later updated or removed in mParticle, Antavo will reflect those changes as well. Please note that customers cannot be added to inactive lists.
If the checkbox is not selected, Antavo will ignore incoming audience data from mParticle—no customer lists will be created or modified, and no logs will be generated in this case.
Click Save to apply the settings
.png)
If auto-subscribe is enabled, any inbound event from mParticle for a customer who does not yet exist in Antavo will automatically create the customer with an inactive status.
Field synchronization from Antavo to mParticle
Once the outbound connection is established, you can proceed to configure the field synchronization between the two systems. This involves customer data synchronization and can be done under the Sync Fields page in Antavo’s Management UI.
Click Add new field +
The items in the left column’s dropdown, called Loyalty fields, show the fields within Antavo
Remote fields represent the equivalent fields in mParticle
Add more field mappings by inserting new rows at the bottom
Click Save
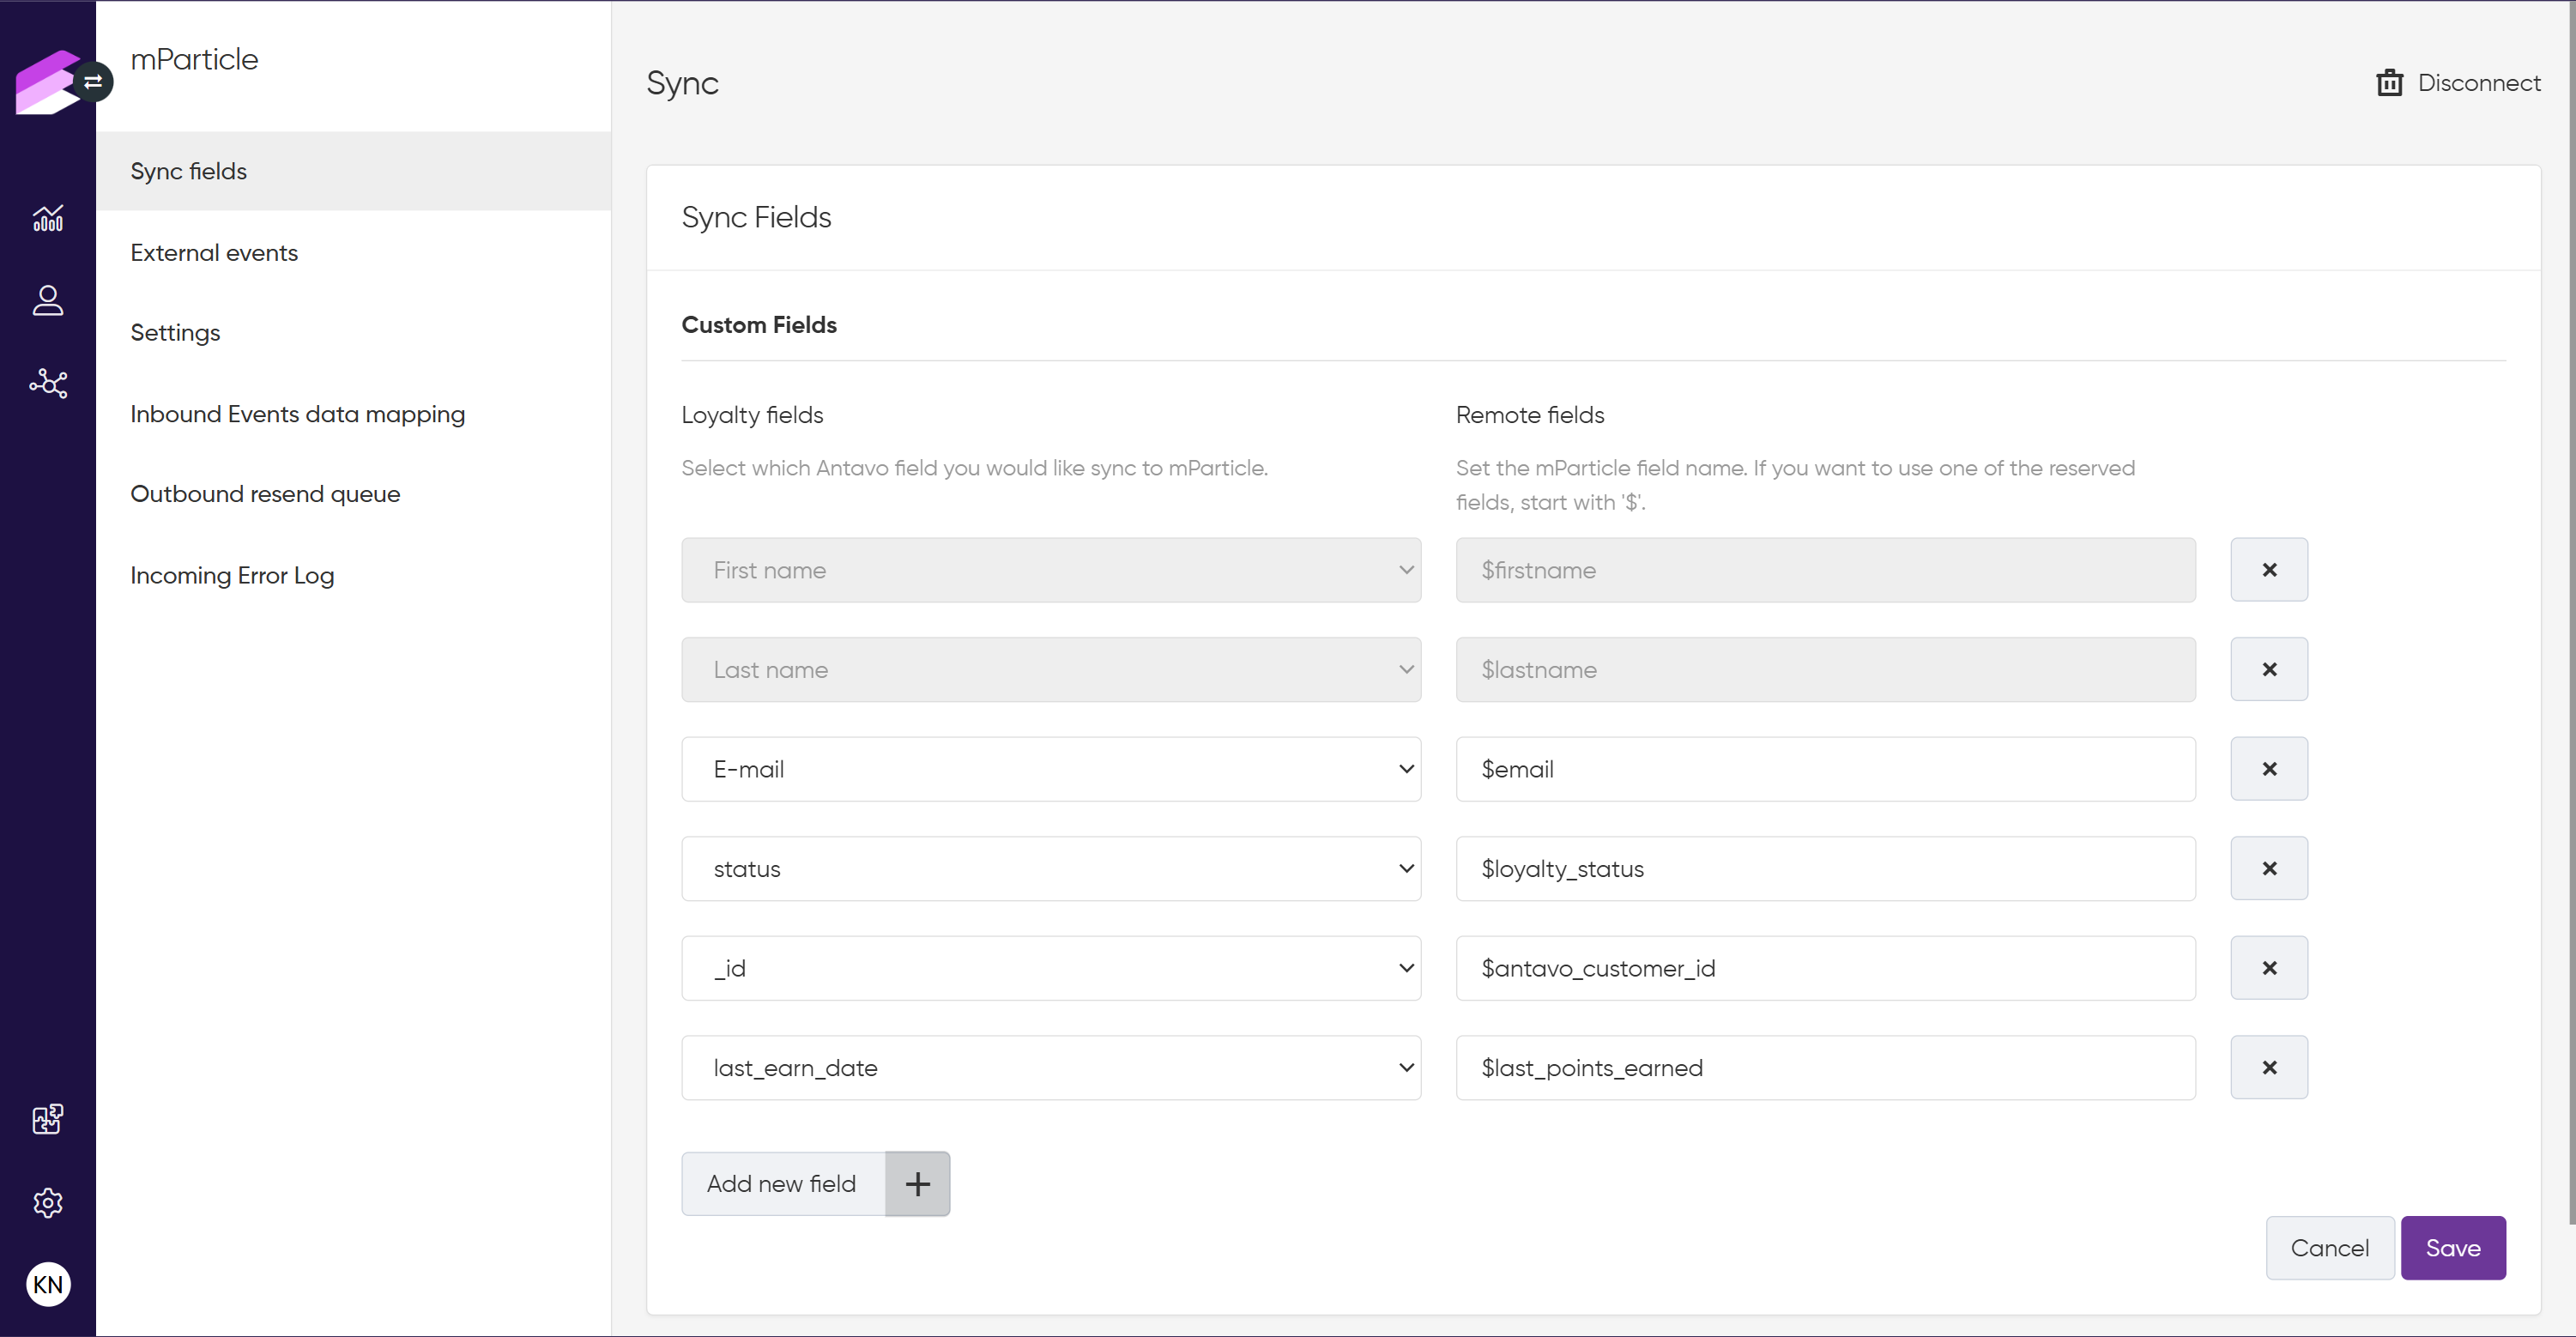
The prefix ‘$’ before the remote field indicates that these properties are reserved attributes that trigger specific behaviors in mParticle’s platform. The following list contains these built-in attributes:
"$age" "$gender""$country""$zip""$city""$state""$address""$firstname""$lastname""$mobile"
Custom user attributes can also be defined within Antavo without using the ‘$’ prefix. These will be created in mParticle’s system and can be viewed under the Data Master page, as seen in the example of the customer_id or language on the screenshot below.
Using the prefix ‘antavo’ can make custom fields easier to identify for mParticle users. For example, you could use
antavo_customer_id.
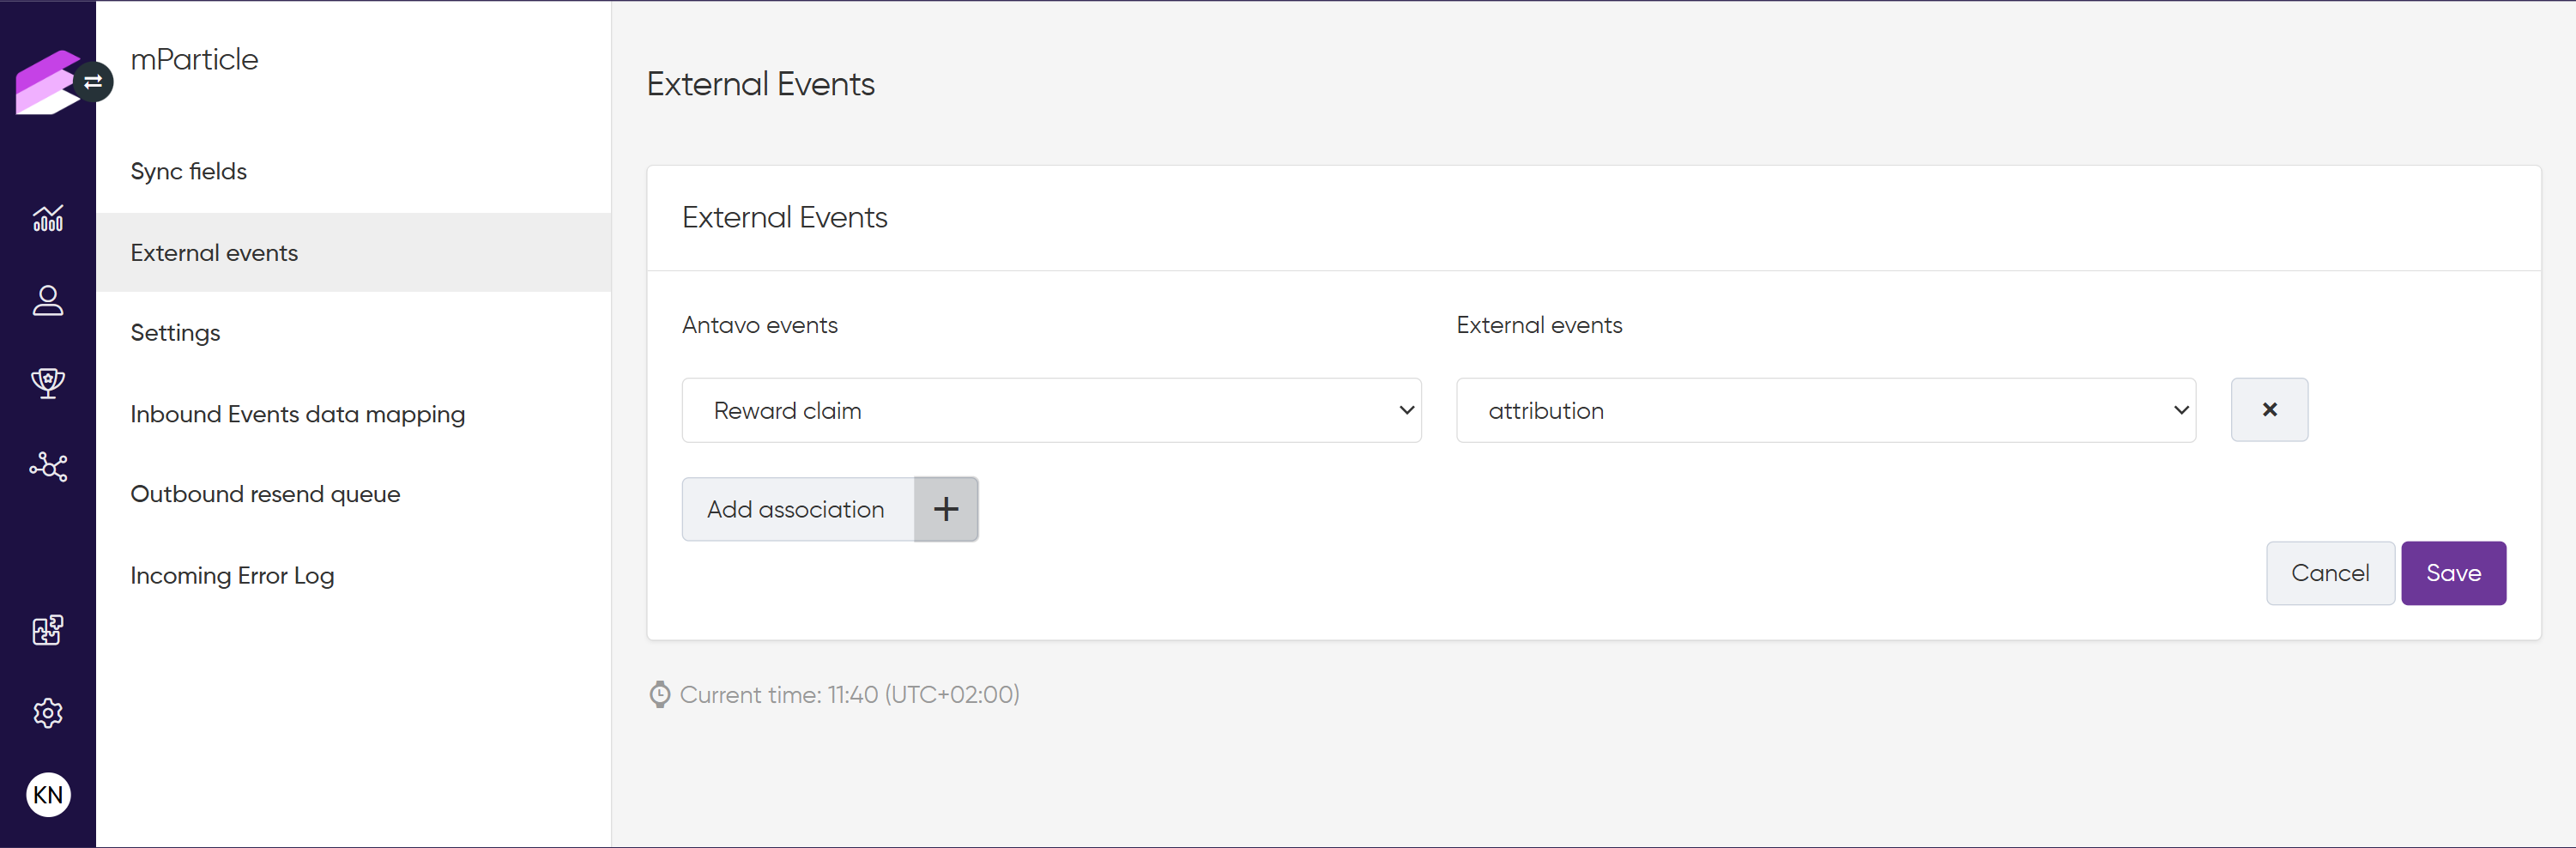
External events
The mParticle module’s External events page allows you to configure custom events that can be pushed from Antavo to mParticle.
Click Add association +
In the left column’s dropdown labeled Antavo events, you’ll find the names of the events Antavo uses for various loyalty actions
In the External events column, you can select the equivalent actions in mParticle
Add new events by inserting new rows at the bottom
Click Save
.png)
Refer to the use case at the end of this article for an example scenario illustrating the outcome of this event synchronization.
Inbound events data mapping
The Inbound Events Data Mapping tab allows configuring the synchronization of incoming events from mParticle to Antavo. Here, events can be selected for registration, and field mapping can be configured accordingly.
Select the Antavo event to be registered from the dropdown menu and click the + button to add it
Choose the corresponding mParticle event from the Event type dropdown
If you select Custom event type, specify the event name.Define event priority to set the processing order of inbound events. Use this field to control the execution sequence when multiple event mappings apply.
This ensures that time-sensitive events are handled before others. Lower values are processed first.Under Event field mapping, define which mParticle payload fields should populate the attributes in the Antavo event
Enter the mParticle payload field name (e.g.,{coupon_code}). If entered without curly brackets, the system will automatically treat it as a value.
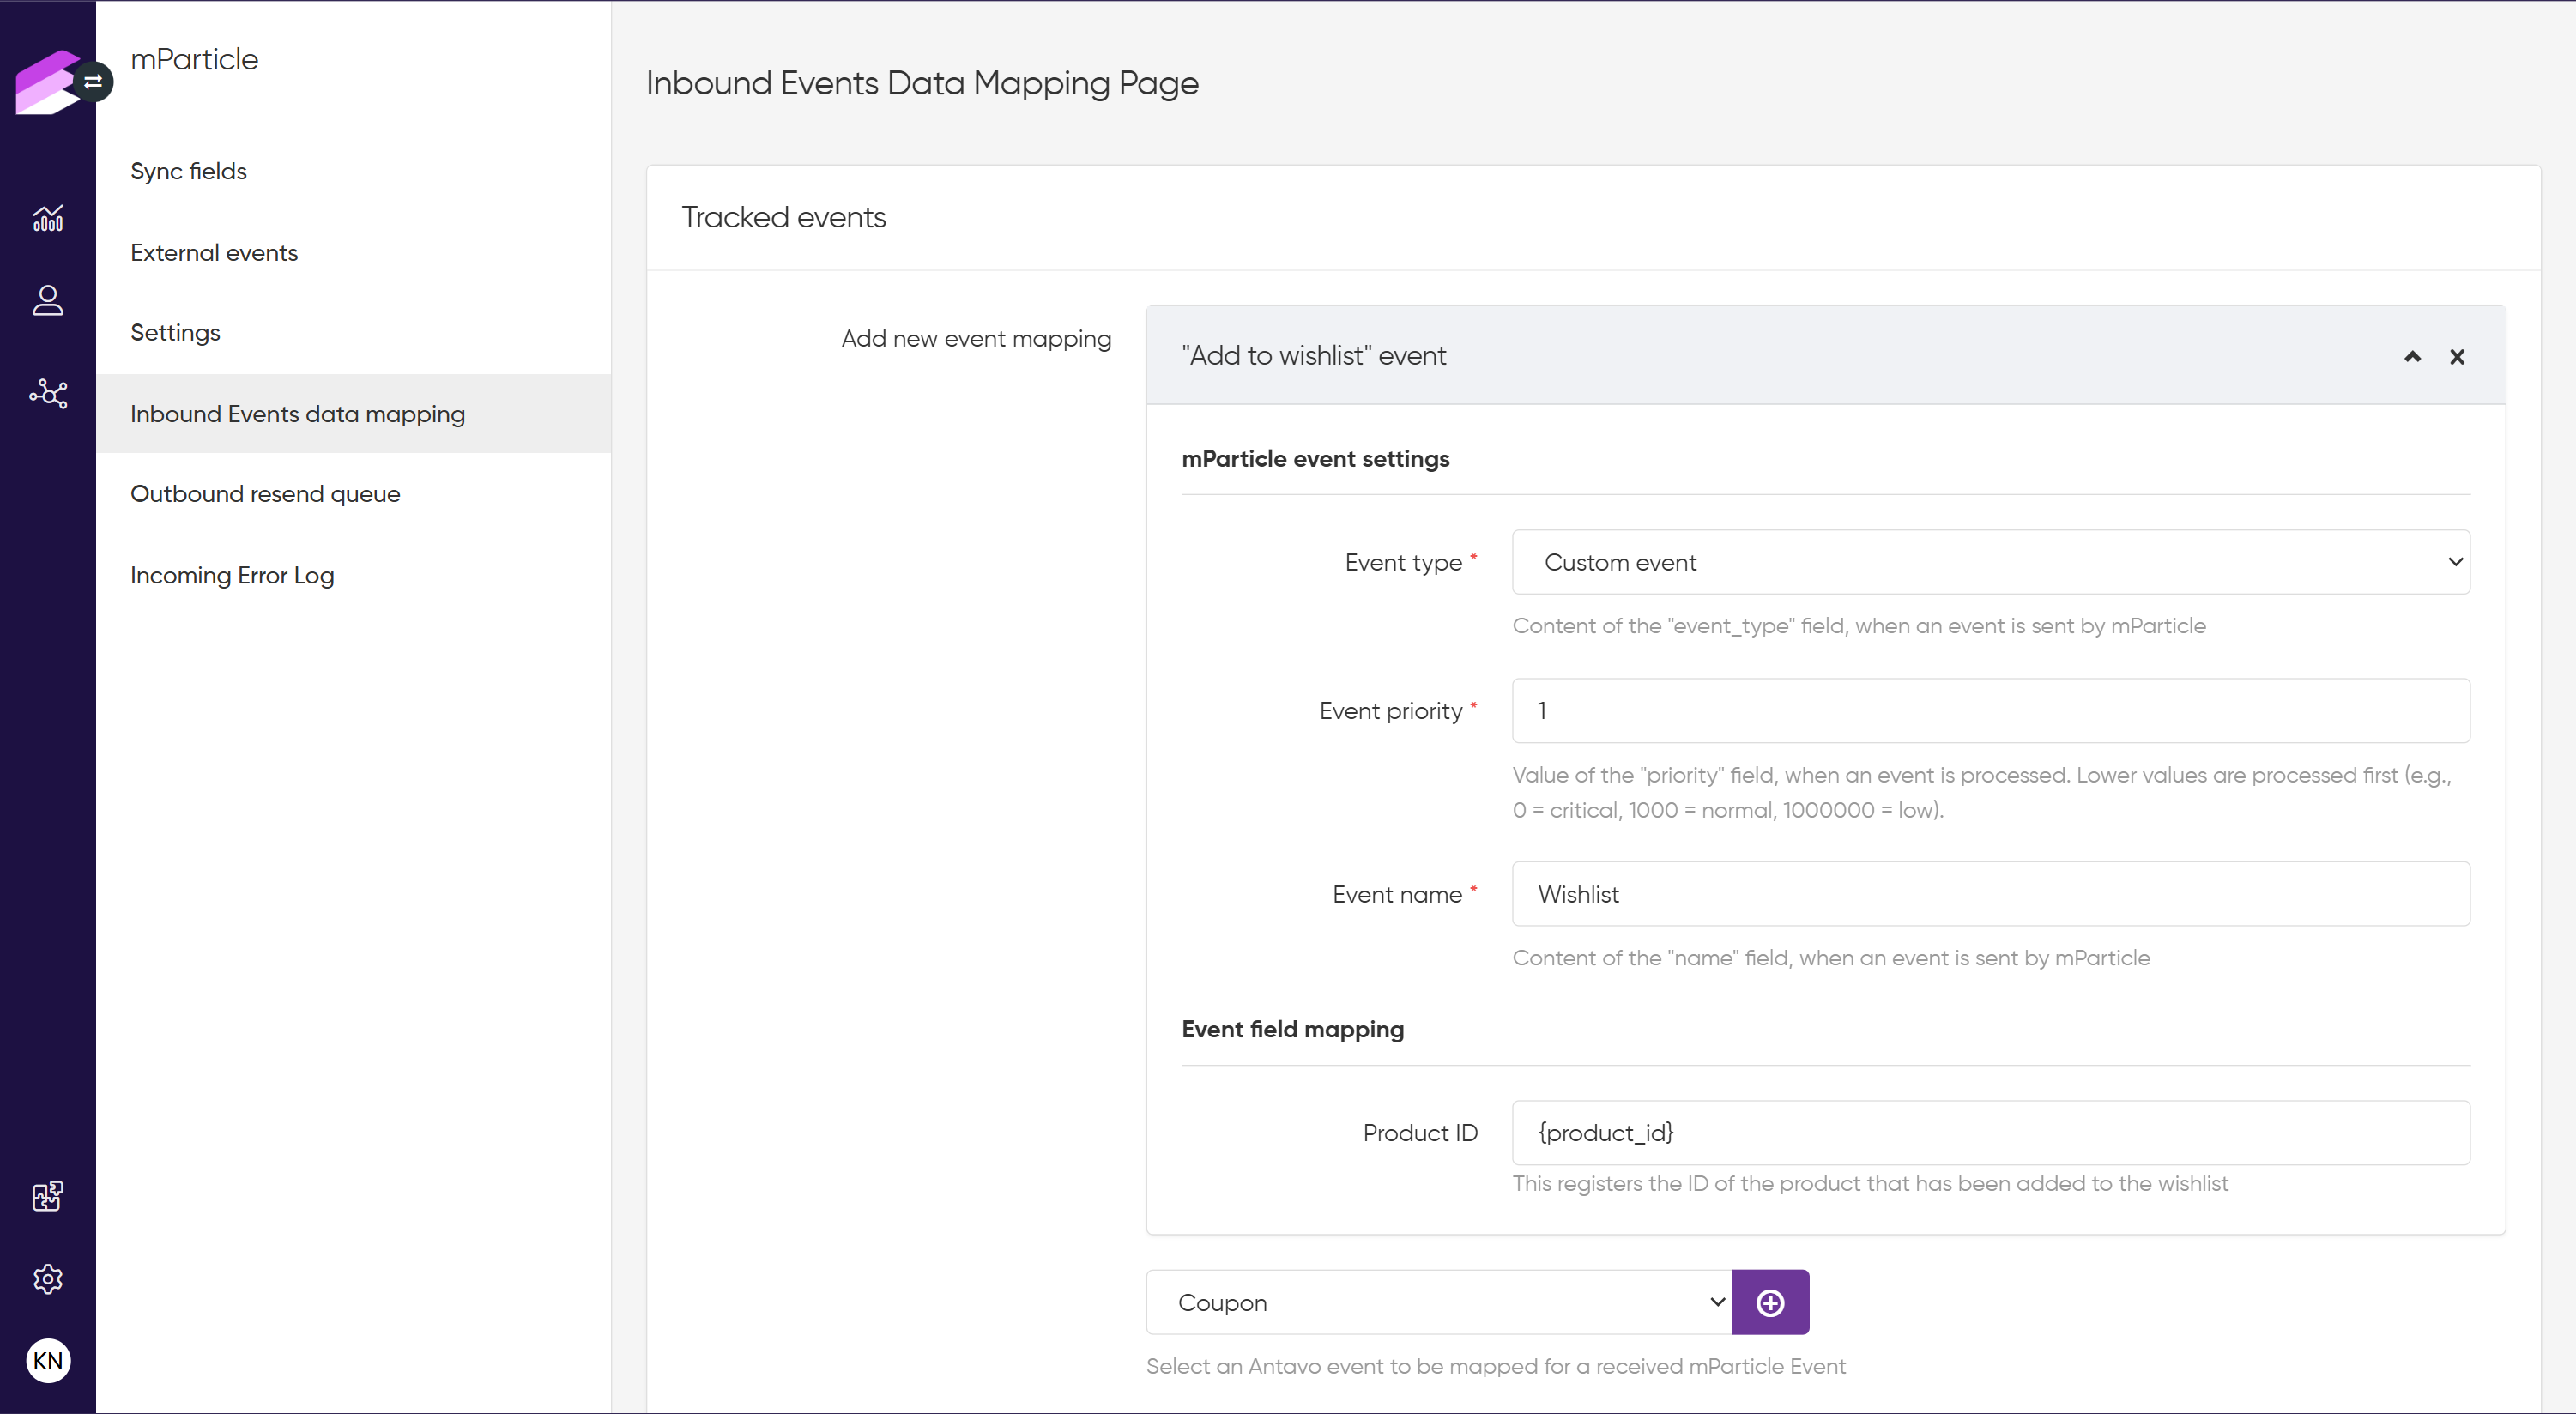
Ensure correct alignment of event names and attributes between mParticle and Antavo, and validate the data after synchronization.
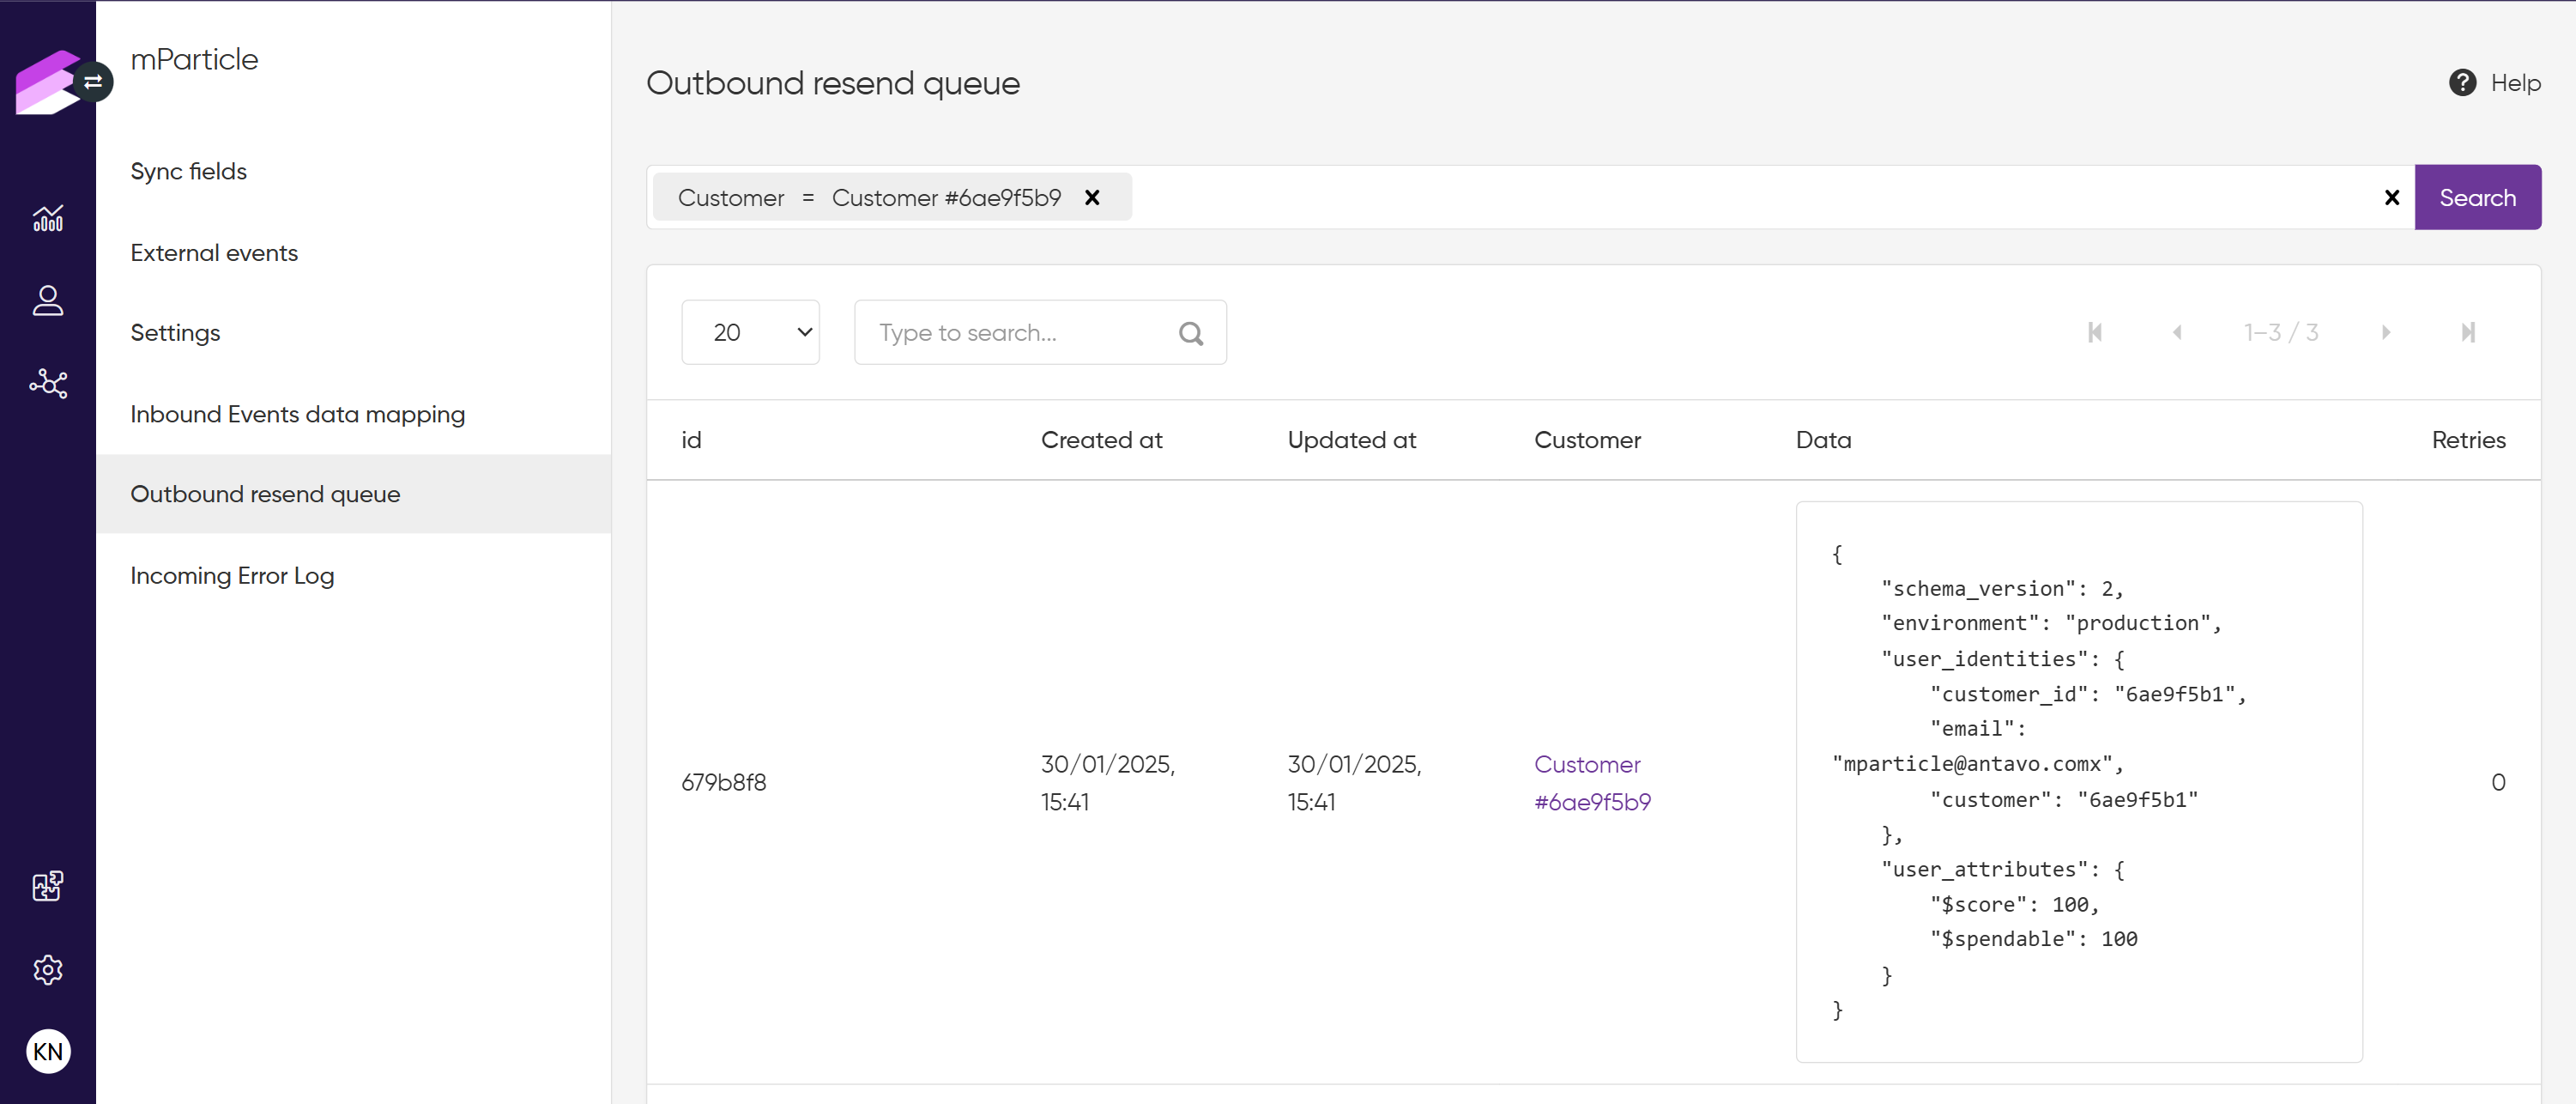
Outbound resend queue
Antavo features a resend mechanism and an Outbound resend queue page within the module, which queues outbound messages for delivery. A service automation is configured to attempt resending these messages up to five times, ultimately clearing the queue. Messages may be resent under the following conditions:
Failure due to a lost connection caused by a timeout
Failure due to hitting the rate limit of the customer’s mParticle account (HTTP response
429)Failure due to an internal server error in mParticle
Incoming error log
The Incoming error log page allows you to view and track failed mParticle integration requests. It provides an overview of the errors encountered during request processing, enabling you to understand and investigate possible reasons for failure.
Please note that logs are retained for 90 days.
The error log lists important details for each failed request:
Request ID | Unique identifier of the incoming request. |
Error code | Error code returned by Antavo. |
Message | Short explanation describing why the request failed. |
Error source | Where the error happened during processing:
|
Created at | Timestamp when the incoming request was created. |
Logged at | Timestamp when the error was registered. |
You can filter and sort the list based on any of these fields for easier navigation.
Expandable request details
Each error entry can be expanded to see additional details. When expanding an error entry, the request payload is displayed in a clear, scrollable code block format.
You can copy the request payload or download it as a beautified JSON or TXT file; if no payload is available, these options are disabled.
Event synchronization use cases from Antavo to mParticle
There are two methods for synchronizing Antavo events with mParticle. One approach involves configuring the synchronization within the Workflows module. The other method entails configuring the synchronization through the external events page within the mParticle module.
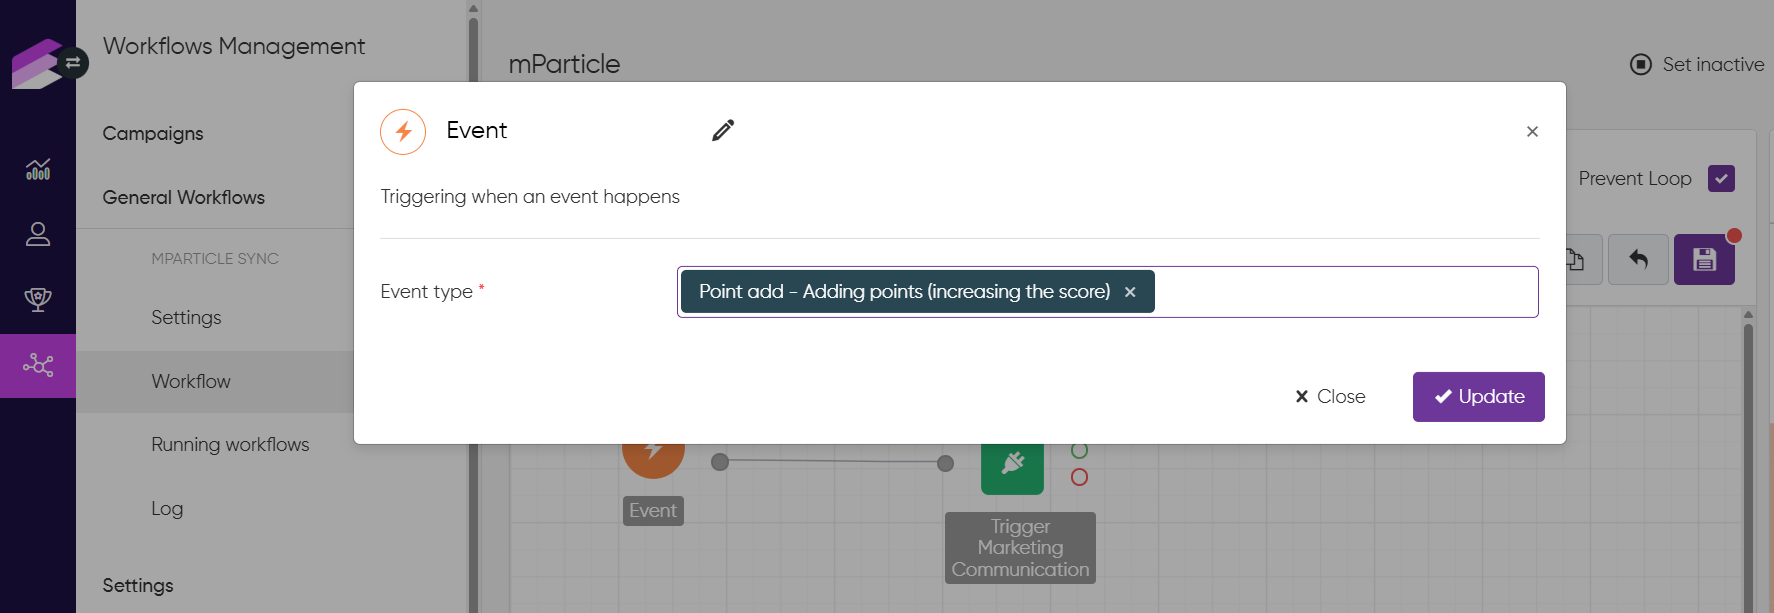
Point add synchronization and communication through the workflow editor
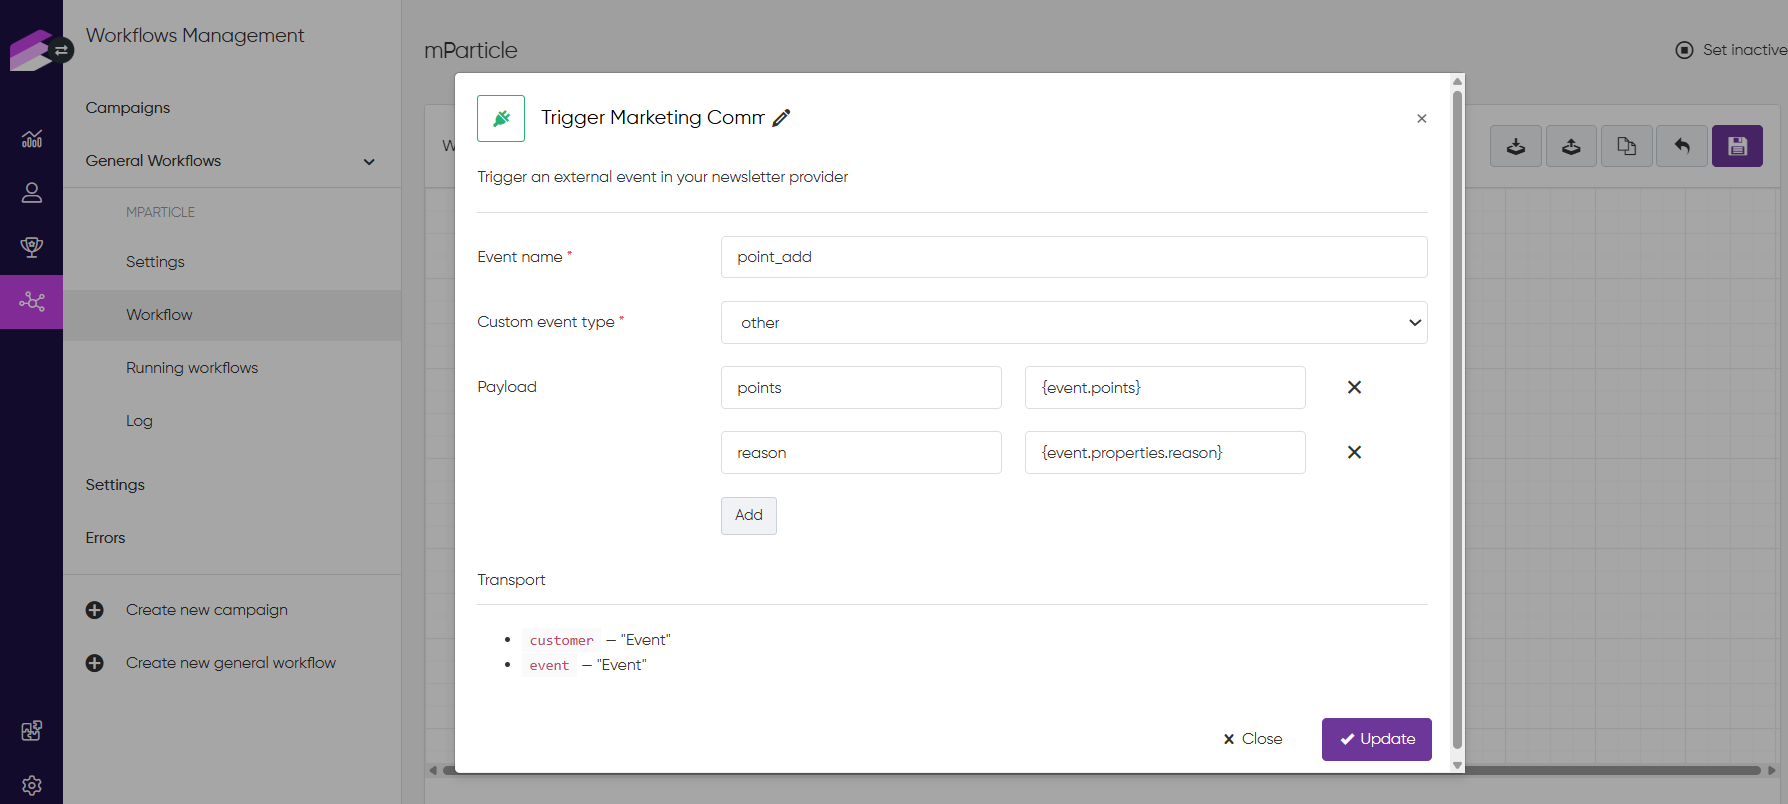
This example demonstrates setting up a workflow to trigger an automated email campaign when points are added to a customer.
Follow these steps to create this workflow:
Open Workflows and click the Create new general workflow page
Name the workflow and click Create
Drag and drop the Event trigger node from the right sidebar onto the empty canvas
Specify the type of event on which the workflow should run. This should be configured to be triggered on a Point Add event so that this workflow activates whenever such an event occurs.
Click Update
Scroll down to the actions and drag and drop the Trigger marketing communication node to the canvas
Enter point_add as the event name (mandatory)
Select the type of event as it appears in mParticle (mandatory)
Enter the key and value of the event data to be sent in the payload (the information about the event that needs to be sent to mParticle). Add multiple data fields to the payload using the Add button.
Click Update
Once points are added to a customer, you can verify the workflow outcome by checking the Workflow logs in Antavo’s Customer Insights pages. Additionally, if the Development mode checkbox is enabled, you can view the Live Stream in mParticle.
Reward claim synchronization through external events
To configure the event for a reward claim scenario, navigate to the External events page and provide the Field assignments. Select the appropriate event type, ensuring that when a customer claims a reward, the mParticle event is triggered successfully.
You can verify the success of the event by checking the Live Stream log under the Data Master page, which should include the claimed reward’s ID.

Disconnecting mParticle from Antavo
If you decide to disconnect mParticle from Antavo, navigate to the Sync fields page, click Disconnect in the upper right-hand corner, and confirm your action. This will immediately discontinue the integration between mPartile and Antavo, causing all configured mechanisms to cease functioning.
If you disconnect, both inbound and outbound mappings will be removed. Reconnecting will require reconfiguring both directions.