Actions represent the outcomes of your workflow, executing the tasks defined within the workflow. You can incorporate multiple actions into a workflow, on separate branches or sequentially.
Please note that certain actions and their configuration options may only appear if the relevant module is enabled in your loyalty program. If a node is not available, please contact the Antavo Service Desk for assistance.
Module dependencies of actions
Action node | Module required |
|---|---|
Trigger Marketing Communication | |
Sync Bloomreach event | |
Sync Braze event | |
Sync Klaviyo event | |
Add to Klaviyo list | |
Sync data | |
Sync multiple fields | |
Webhook message | |
Webhook message | |
Update a Wallet pass | |
Update a Google pass | |
Assign pass | |
Set tier | |
Change tier | |
A/B test | - |
Assign coupon | - |
Entity lookup | - |
Add to list | - |
Remove from list | - |
Remove tier | |
Campaign bonus | - |
Complete challenge | |
Trigger event | - |
Coupon transfer | - |
Push notification | |
Switch Pass Template (beta) | |
Pass Lookup | |
Create custom entity | |
Referral bonus | |
Participate in contest | |
Revoke from contest | |
Reward claim |
Action outputs
Each action type listed below, except for the A/B test node, has two types of outputs: success (green) and failure (red).
|
|
Action Types
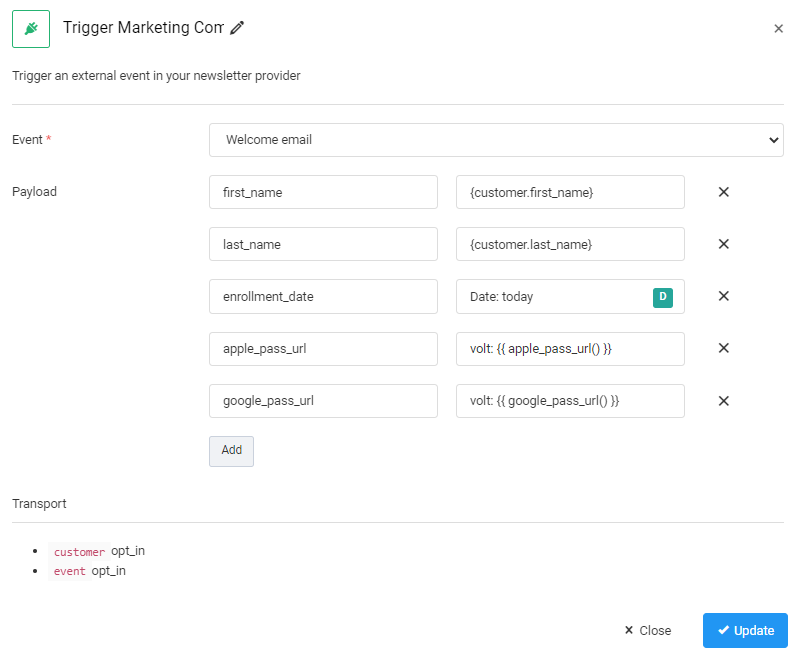
Trigger Marketing Communication
Triggers an event in your integrated newsletter provider (for Bloomreach event sync, use this node; for Braze, use this node; for Klaviyo, use this node).
Select the external event to be triggered using the dropdown list
Enter the key and value of the event data to be sent in the payload of the event
You can add multiple data fields to the payload using the Add button.
You can find all the triggered events (POST requests) and associated responses under the Sync tab of the customer profile.
Sync Bloomreach event
Triggers an event in an integrated Bloomreach project.
Insert the Antavo identifier of the customer who should receive this event. The event should not necessarily be registered for the customer making the triggering action, and you can use that as well. (e.g., {customer.referrer}). Leave it empty to trigger an event for the current customer.
Select the external event to be triggered using the dropdown list
Enter the key and value of the event data to be sent as payload within the event
You can add multiple data fields to the payload using the Add button.
You can find all the triggered events (POST requests) and associated responses under the Sync tab of the customer profile.
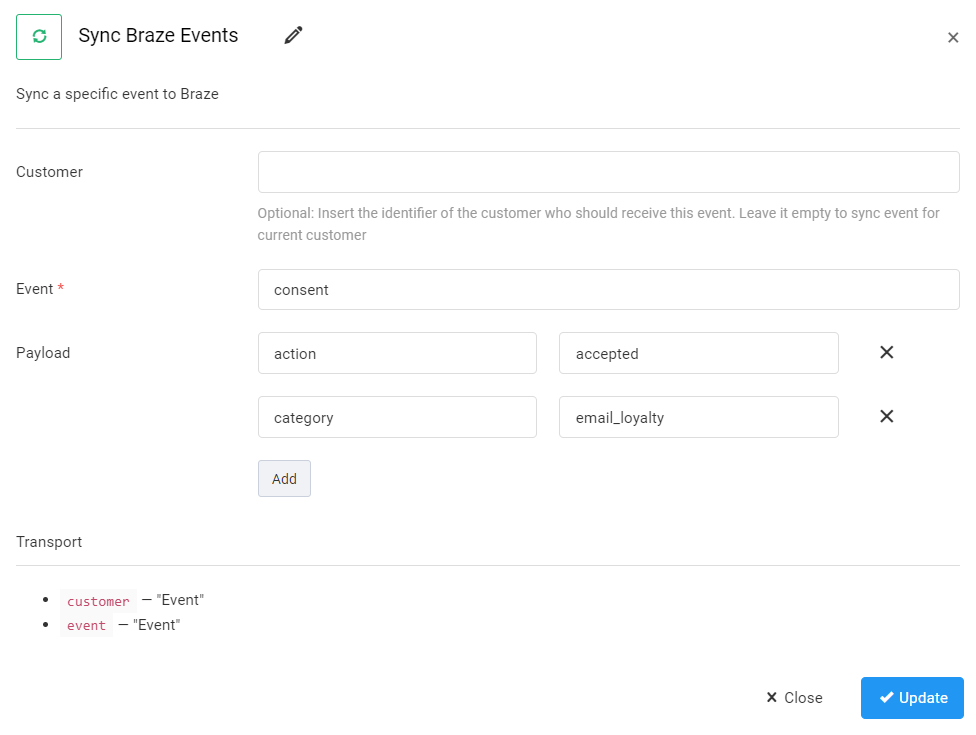
Sync Braze event
Triggers an event in an integrated Braze workspace.
Insert the Antavo identifier of the customer who should receive this event. The event should not necessarily be registered for the customer making the triggering action, and you can use that as well (eg. {customer.referrer}). Leave it empty to trigger an event for the current customer.
Enter the external event to be triggered
Enter the key and value of the event data to be sent as payload within the event
You can add multiple data fields to the payload using the Add button.
You can find all the triggered events (POST requests) and associated responses under the Sync tab of the customer profile.
Sync Klaviyo event
Triggers an event in an integrated Klaviyo account.
Select the external event to be triggered using the dropdown list
Enter the key and value of the event data to be sent as payload within the event
You can add multiple data fields to the payload using the Add button.
.png)
You can find all the triggered events (POST requests) and associated responses under the Sync tab of the customer profile.
Add to Klaviyo list
Adds customers to a selected Klaviyo list.
Select the Klaviyo list that customers should be added to
Select the Send mode
Sync: Immediately sends the API request to Klaviyo during workflow processing.
Async: Queues the customer and list data for later processing, recommended for handling larger volumes efficiently.
Even if a customer is already on the selected list, the workflow will continue running on the success (green) output of the Add to Klaviyo List action.
.png)
Manage Klaviyo marketing channels
Manages customer communication preferences for email and SMS channels in Klaviyo.
Select whether to subscribe or unsubscribe the customer
Use the Subscribe/Unsubscribe toggle to define the intended action for the selected channels.Select the channels to update
Use the Yes/No options for Email and SMS (transactional and marketing) to choose which channels to apply the action to. The node will only attempt subscription if the customer has a valid email address or phone number.
⚠️ Note: SMS transactional is not available if No is selected for SMS marketing.Select the Klaviyo list
You can also specify a list to add or remove the customer from during the update.
.png)
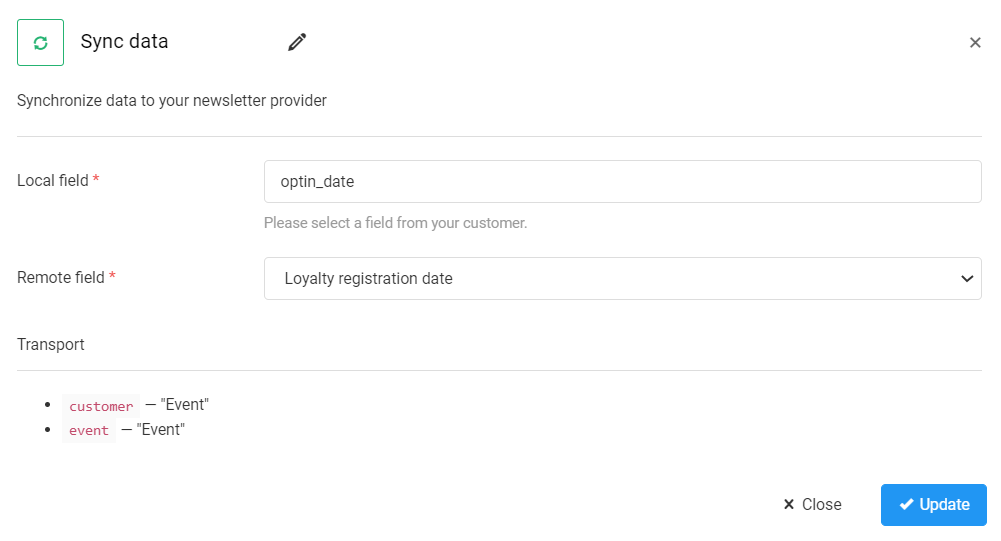
Sync data
Synchronizes the value of one single customer data field to your integrated newsletter provider.
The Sync data action node is no longer supported and will soon be deprecated. Please use the Sync multiple fields node instead which entirely covers the functionality of this node.
Add the Unique ID of the Antavo (local) field to be synced
Enter or select (depending on the newsletter provider you use) the (external/remote) field to be updated to the value of the selected Antavo field
You can find all the synchronization attempts (POST or PUT requests depending on the requirement of the recipient newsletter provider) and associated responses under the Sync tab of the customer profile.
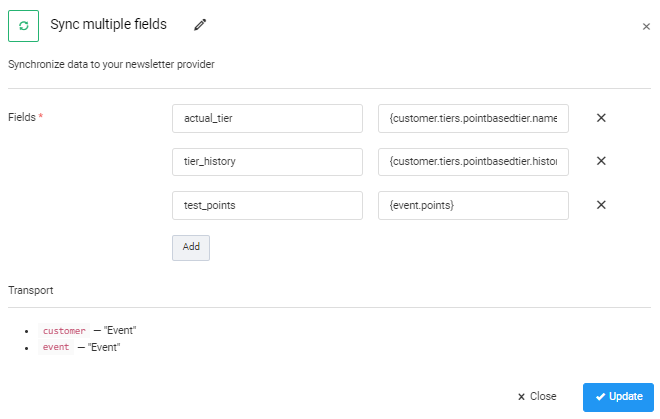
Sync multiple fields
Synchronizes the value of multiple customer data fields to your integrated newsletter provider at once.
Enter or select (depending on the newsletter provider you use) the (external/remote) field to be updated
Enter the field value to be synced to the selected remote field
You can enter a constant value or use expressions of transported variables as well.
Use the Add button to add more fields to be synced within one request.
You can find all the synchronization attempts (POST or PUT requests depending on the requirement of the recipient newsletter provider) and associated responses under the Sync tab of the customer profile.
Shopify coupon sync
Uploads a coupon and assigns it to the customer in Shopify. It connects the workflow in Antavo with the coupon sync functionality described in the Shopify documentation.
Select the workflow variable that contains the coupon object to sync.
In most workflows, this variable is automatically named coupon, but if your setup uses a custom variable name, enter that instead.Select the connected Shopify shop to sync the coupon to
Only active shops appear in the list.Shopify Collection ID (optional)
Use this field to restrict the synced Shopify discount code to specific collections.
You can enter a single collection ID (e.g.522174595377), multiple collection IDs separated by commas (e.g.522174529841,522174595377), or a variablee (e.g.{reward.cf_shopify_collection_id}).
.png)
Add multiple nodes if you need to target multiple shops or different coupon variables.
Webhook message LEGACY
Sends a webhook message to any web service.
Please ensure that you syntonize the webhook message actions you use in workflows and the webhook messages configured in the Webhooks module (legacy) to avoid problems caused by duplicated webhook messages in your systems.
Paste the URL of the endpoint where the webhook message should be sent
You can add a dynamic URL by inserting a variable (e.g., {customer._id}).Set a soft timeout value for the webhook request in seconds Please note that the actual timeout duration may slightly differ from the configured value.
Select the content type of the webhook message
Select the request method (
POSTorPUT)Use the Add button to define the key and values of the headers and payload of the webhook message
Click the Add button as many times as the number of headers and data fields you want to include in one request.Decide if you want a proxy with a static IP address to be used to send requests
Select No if Antavo should send the coupon request to the endpoint directly (various IP addresses might be used)
Select Yes if Antavo should use a proxy with a static IP address to send requests (all requests will be sent from the same IP address)
Decide if you want Antavo to use an async method of webhook messaging
Select Yes if you don’t want Antavo to wait for the web service on your end before sending the next webhook message
Select No if you want Antavo to wait for the response to a webhook message before sending the next one (this option might delay the workflow execution if it takes longer for the endpoint to process the requests)
Enabling the async method for the first time requires the webhook processQueue background service configured.
.png)
You can find all the webhook messages sent under the Log page of the Webhook (legacy) module.
Webhook message
Sends a webhook message to any web service. This node conveniently offers a dropdown list containing the sites added and activated earlier through the Trusted sites module.
Choose the pre-configured authentication from the Site dropdown menu
Select the request method (
GET,POST,PUT,DELETEorPATCH)Add a dynamic parameter to the URL path field
This extends the pre-configured trusted site path.Use the Add button to define the key and values of the headers and payload of the webhook message
Click the Add button as many times as the number of headers and data fields you want to include in one request.Decide if you want Antavo to use an async method of webhook messaging
Select Yes if you don’t want Antavo to wait for the web service on your end before sending the next webhook message
Select No if you want Antavo to wait for the response to a webhook message before sending the next one. This option might delay the workflow execution if it takes longer for the endpoint to process the requests.
Enabling the async method for the first time requires the webhooks processQueue background service configured.
You can set a timeout for webhook messages in the Max response time (seconds) field to customize response waiting duration. Please note that the specified duration must be between 0 and 120 seconds. Please note that while the system tries to respect the maximum response time set here, there could be occasions when the request will not be terminated in this given timeframe due to certain steps in the HTTP request taking longer, including but not limited to building the TCP connection, performing the SSL handshake, etc. It is generally advised to take this into account and not work with the assumption that the request will be cut off exactly at the time that you set in here.
.png)
You can find all the webhook messages sent under the Log page of the Webhooks module. Webhook requests targeting an invalid or misconfigured trusted site are also preserved in the workflow log. This allows for a retry after the trusted site configuration has been corrected.
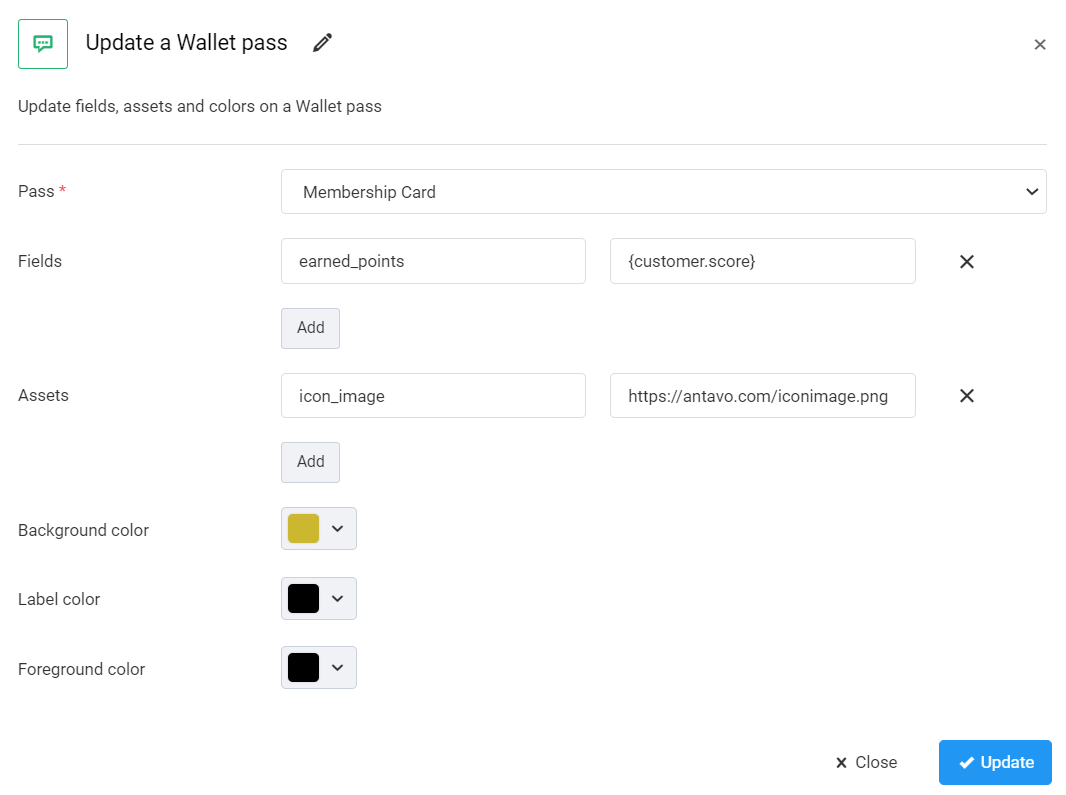
Update a Wallet pass EARLY ACCESS
Triggers field and display updates on assigned Apple passes added in the Wallet module.
Select the pass to be updated
Enter the key (the headers of fields configured in the Wallet module) and the new value of the pass field
You can add multiple fields using the Add button.Configure asset (image) updates on the pass
The new asset value should be a URL where the image is accessible.Define the new colors of the pass using hexadecimal color codes
You can find further information about the structure of passes in the Wallet Developer Guide.
Update a Google pass EARLY ACCESS
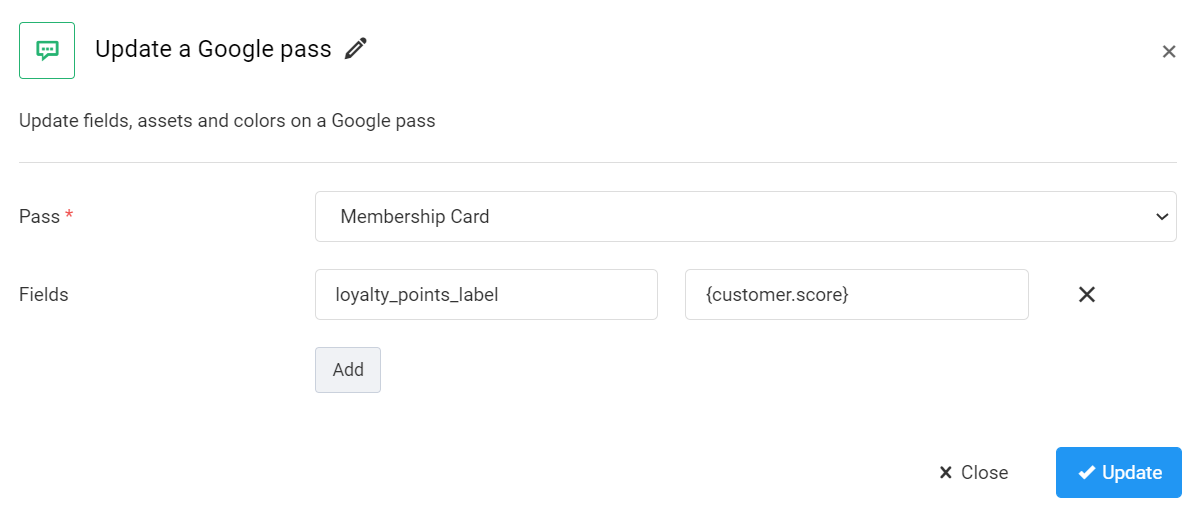
Triggers field updates on the customer’s Google pass added in the Wallet module.
Select the pass to be updated
Enter the key and the new value of the pass field
You can add multiple fields using the Add button. Please contact the Antavo Service Desk if you need help with adding the keys of Google pass fields.
Assign pass
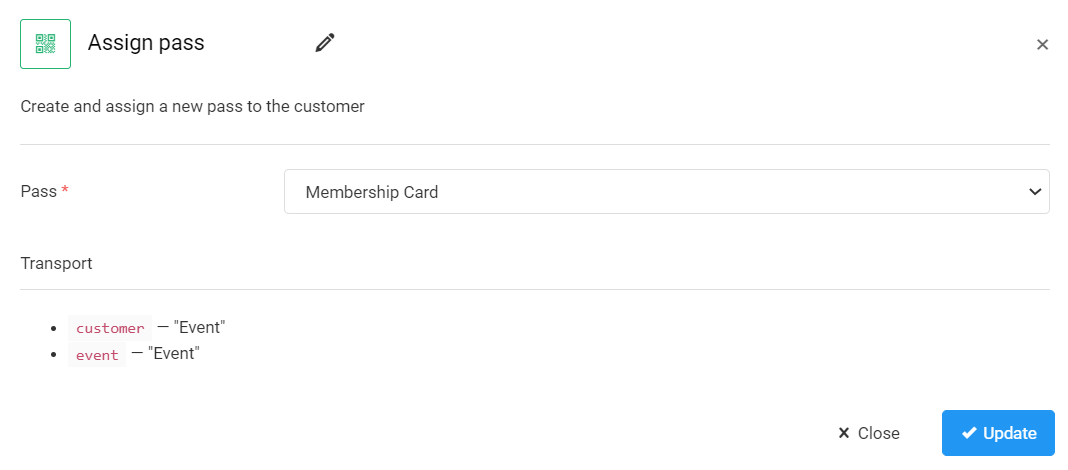
Assigns a Wallet pass to the loyalty member.
Select the pass to be assigned to the customer
You can only select active passes.
The Assing pass action registers an Assign pass event, and you can find the new pass under the Passes tab of the customer profile.
Set tier
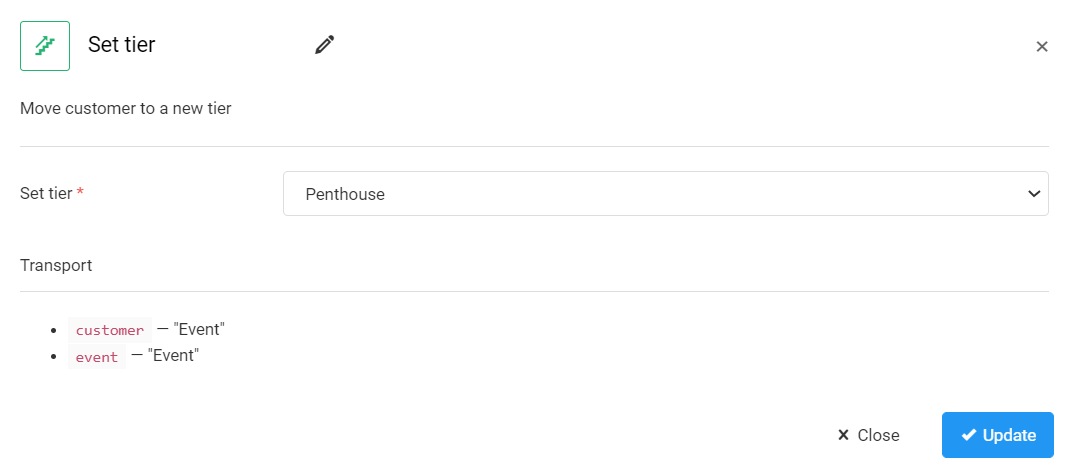
Moves customers to a specific tier.
Select the tier that the workflow should assign
You can only select active tiers grouped by tier structures in the dropdown field. If a customer is already a member of the selected tier, no update will be triggered, but the execution of the Set tier action will still be considered a success.
The Set tier action registers a Tier up or Tier down event depending on the customer’s current tier and the newly set tier will be displayed on the customer profile page. If the customer is already on the selected tier, no event is registered and the tier information will not change on the customer profile.
Change tier
Changes the expiration of customers' tier memberships.
Select the tier membership to be updated
You can only select active tiers grouped by tier structures in the dropdown field.Set the new expiration date or leave it empty if the tier membership should never expire
The new date should be inserted in a date: YYYY-MM-DD format.Select the expiration method:
Select Date if you have entered a date in the previous field.
Select Never if you left the previous field empty.
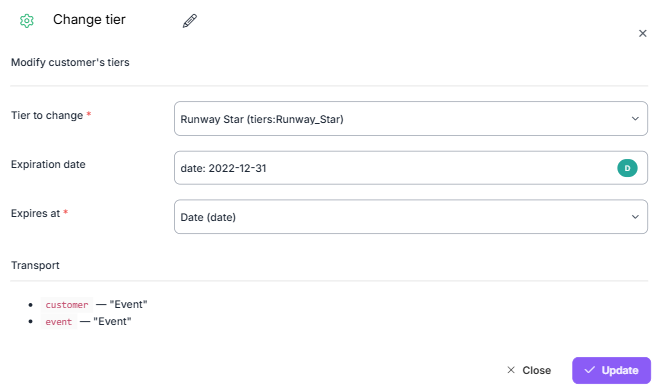
The Change tier action registers a Tier change event with the new expiration date of the tier affected.
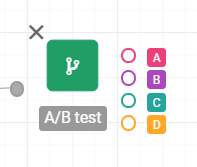
A/B test
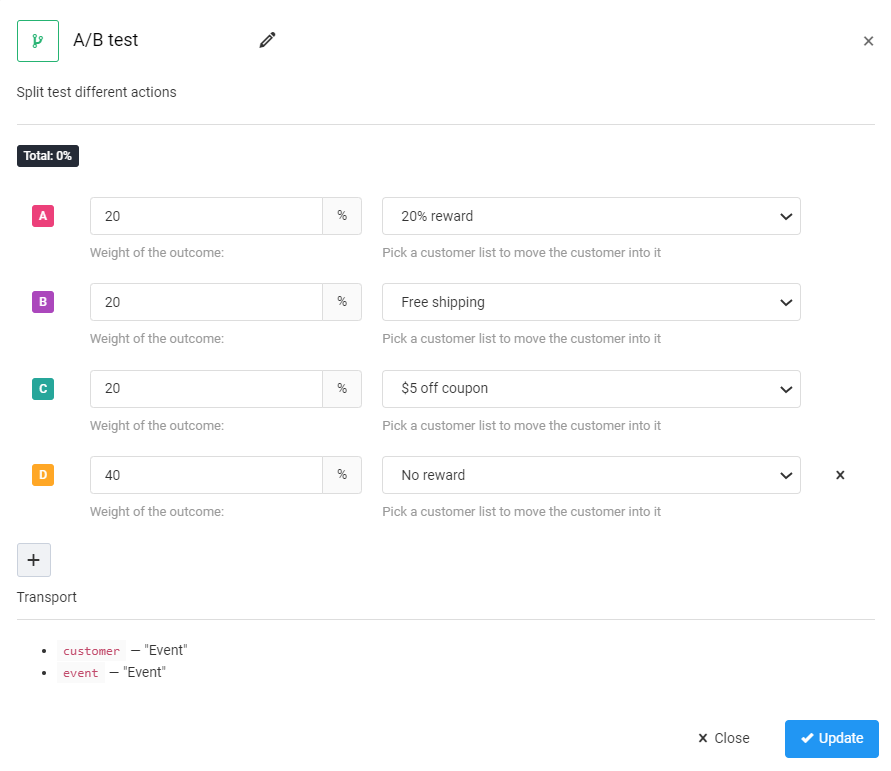
Divides the audience to test different actions and adds customers to predefined lists.
Define the percentage of the test groups
Select the list the test group should be added to
This step is optional; adding customers to lists is not required.
Click the + button to divide the audience into a maximum of 20 groups within one A/B test node. The total percentage of all the groups cannot exceed 100%.
As mentioned before, the A/B test node has a different set of outputs than the rest of the action nodes.
| Each group added in the A/B test will populate an output of the node. All nodes added to each output will be applied to the associated customer group. |
You can find the customers added to each list if you open the selected lists under the Customer lists tab of the Customer Insights menu.
Assign coupon
Issues a coupon to the customer.
Please note that customers will not receive information about the coupon assignment automatically. You must inform customers and send the coupon codes through your newsletter provider by setting up a webhook message or external event action at the end of your workflow.
Select coupon source
Generate: Antavo will generate codes.
Remote: Antavo sends a request to an endpoint which provides a coupon code to be assigned to the customer. This option allows you to have more control over coupon management.
Add the coupon type and value
Decide whether you want to assign a percentage-off coupon or a fixed-amount discount and set the coupon value.Define the pattern of the coupon code to be assigned
#denotes a digit (0-9)@denotes an alphabet character (a-z)^denotes a capital alphabet character (A-Z)*denotes an alphanumeric character$denotes a capital alphanumeric characterAll other characters should be copied into the generated code as literals (eg. if you set ‘@##COUPON’, a generated coupon code could be G11COUPON or T35COUPON). If you would like to assign a generic coupon code to all customers, don’t use pattern characters, only literals (eg. if you set ‘SPRINGCOUPON’, all coupons codes to each customer will be generated as SPRINGCOUPON)
Set the coupon expiration time
You can add a period so that the expiration date of the coupon will be dynamically set when the coupon is assigned (eg. Date: 1 week, Date: 2 months, etc.), or set a predefined date (eg. Date: 2012-08-31). If you don’t want the coupon to expire, leave the field empty.If you chose to use a remote endpoint as the coupon source, set a callback URL endpoint
Set the type of the request root
Select Direct if Antavo should send the coupon request to the endpoint directly (various IP addresses might be used).
Select Use proxy if Antavo should use a proxy with a static IP address to send requests (all requests will be sent from the same IP address).
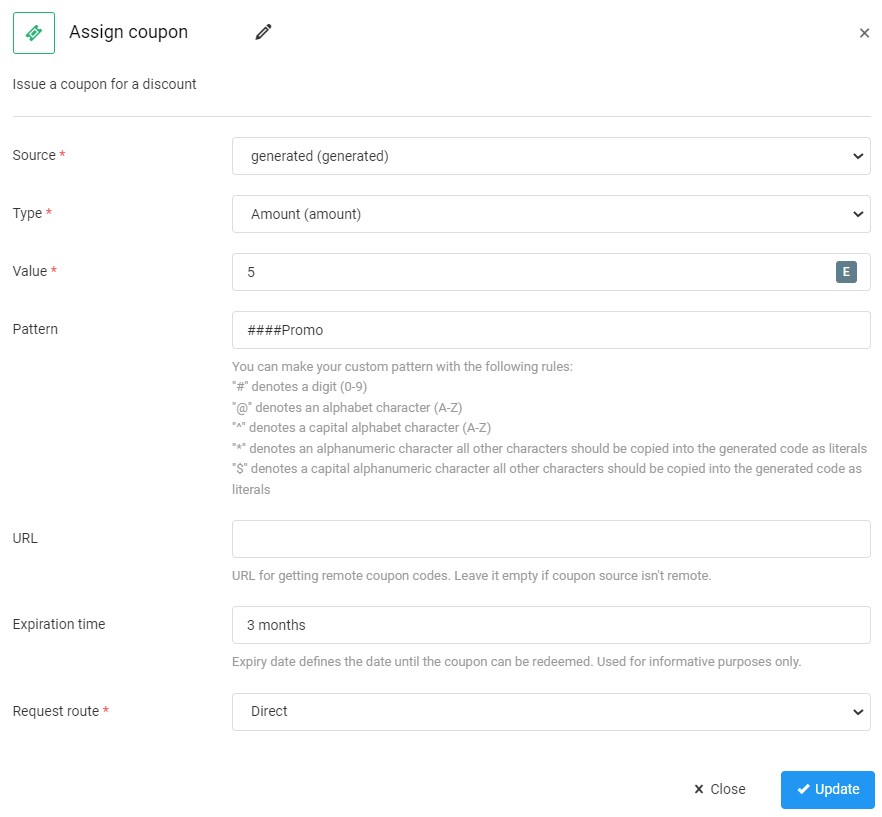
Please keep in mind that Antavo doesn’t handle coupon expiration. This time only serves to inform customers and will be included in the reward claim notification email. This information only serves administrative purposes, this will not influence the value of the coupon code at checkout.
The Assign coupon action registers a Coupon assign event on the customer’s event history, and the new coupon is added to the list of coupons under the Coupons tab.
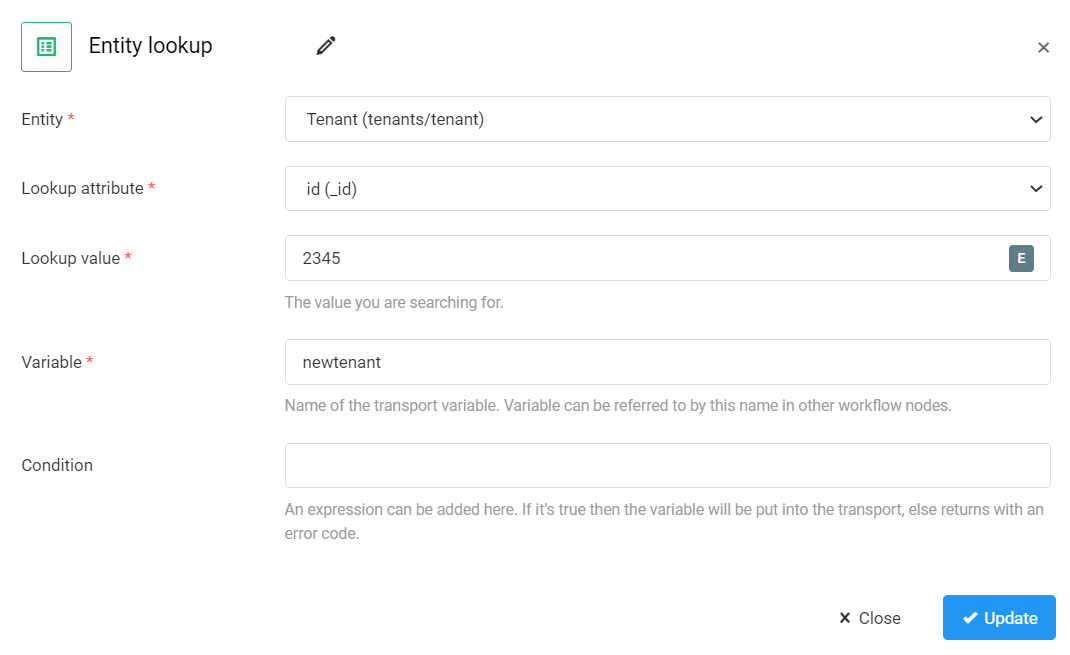
Entity lookup
Looks up a specific entity item of an entity type you select and adds it to transport, so that the entity can be used in other workflow nodes.
Select the entity type from the dropdown list (contains all factory and custom entity types)
Select the filter attribute from the dropdown list (contains all attributes of the previously selected entity)
You can use any attribute that has auniquetag, meaning that the attribute value of each entity is unique.Enter the value of the attribute you are searching for
Enter the transport variable name of the filtered entity item
You can refer to the filtered entity item by this name in nodes following this one within the workflow.Add further filter conditions, if necessary
You can use Mongo expressions to define conditions, please contact the Antavo Service Desk to help with advanced use cases.
Add to list
Adds customers to predefined lists.
Select the list that customers should be added to
Even if a customer is already on the selected list, the workflow will continue running on the success (green) output of the Add to list action.
 (1850 x 1200 px) (1850 x 1018 px) (1850 x 835 px) (1850 x 630 px).png)
You can keep track of the members in the selected list if you open the list under the Customer lists tab of the Customer Insights menu.
Remove from list
Removes customers from predefined lists.
Select the list that customers should be removed from
If a customer is not in a selected list, the workflow will continue running on the failure (red) output of the Remove from list action, please make sure you configure that as well, if necessary.
 (1850 x 1200 px) (1850 x 1018 px) (1850 x 835 px) (1850 x 630 px) (1850 x 497 px).png)
You can keep track of the members in the selected list if you open the list under the Customer lists tab of the Customer Insights menu.
Remove tier
Removes customers from a selected invitation-only tier structure.
Select the tier structure from which the customer should be removed
You can only select active tier structures. Use the Remove all option to remove the customer from all the invitation-only tier structures if they are part of more structures.
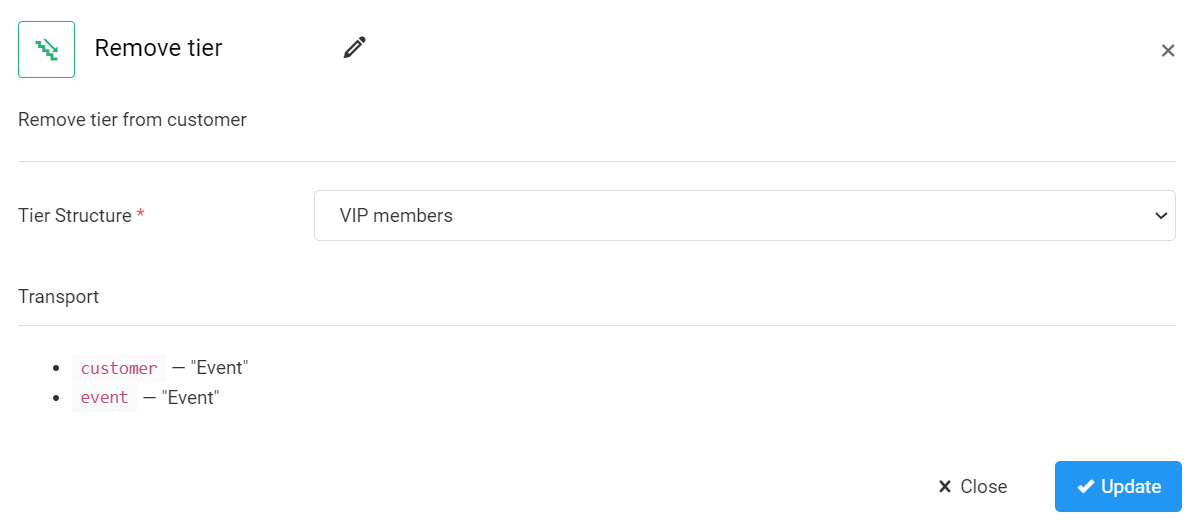
The Remove tier action registers a Tier remove event. This event is only operational with workflows, it cannot be submitted through the Events API or manually added on the Management UI.
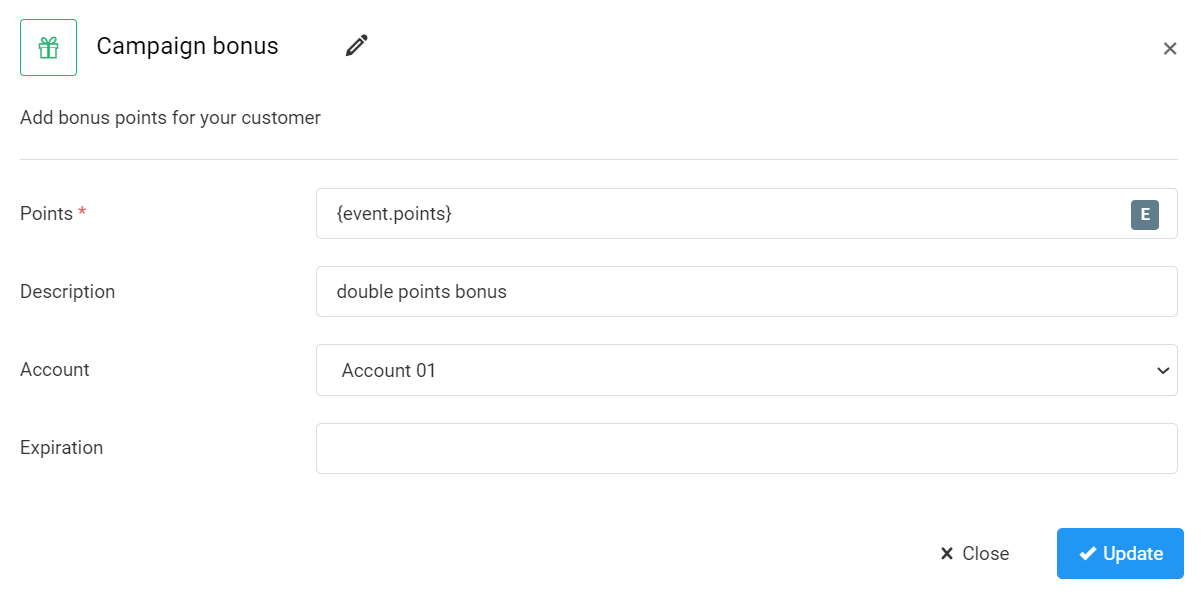
Campaign bonus
Rewards loyalty members with bonus points.
Specify the number of points the customer will receive as a bonus
Add a description
The description will be registered in the Campaign bonus event.Select the account for the bonus points in case you use the Multi-accounts module
Set the expiration date of the points
Use the format ‘date: YYYY-MM-DD format. If no date is added, the points will not expire. If you use the Expiring points module, the expiration date will be set automatically based on the configured logic.
The Campaign bonus action registers a Campaign bonus event on the customer’s event history.
Please note that the campaign bonus adds extra points for customer actions, supplementing the points applied on the configuration pages of the affected modules.
Campaign bonus logic with pending points
If you use pending points in your loyalty program, campaign bonuses may also initially be registered as pending instead of immediately spendable. This behavior depends on how the campaign is triggered and which modules apply the pending mechanism.
If the Checkout accept module is enabled and the campaign is triggered by a Checkout event, the bonus points are first registered as pending through the registration of a Pending campaign bonus event.. Once the purchase is confirmed via a Checkout accept event, the corresponding campaign bonus is automatically granted, converting the pending points into spendable points. During the pending period, updates to the original Checkout event will adjust the number of pending bonus points.
If the campaign is triggered by a Checkout item event, bonus points will not be registered as pending, even if the Checkout accept module is enabled. In this case, points are granted immediately and will not be recalculated if changes are made during the pending period.
If the Pending events module is enabled and a non-checkout event triggers the campaign, the bonus points are granted only after the defined pending period ends. Once the triggering event is validated, the corresponding Campaign bonus event is registered, and the points are added as spendable points.
Please note that campaign bonus points are not revoked in case of a purchase refund after the pending period has passed and the points have already been granted.
Multiple pending campaign bonuses per checkout
When the Checkout accept module is enabled, workflows may include multiple Campaign bonus nodes that add points during the pending period between checkout submission and acceptance. Each node registers its own Pending campaign bonus event.
All pending bonuses linked to the same checkout are converted into spendable points once the checkout is accepted. This ensures that every eligible bonus configured within the workflow is awarded and that multiple bonuses can be accumulated and granted for a single checkout.
Complete challenge
Registers the completion of a predefined challenge and awards the associated points. This node adds the challenge completion even if the customer does not meet the criteria configured in the challenge editor. However, the maximum completion setting still applies, meaning that the workflow will not assign the challenge if the customer has reached the completion limit.
Any progress the customer might have earned previously will not be reset. If the challenge is repeatable, the customer can continue completing the challenge from where they left off.
Select the challenge that should be assigned to the customer
You can only select active challenges.
The Complete challenge action registers a Challenge event on the customer’s event history. The new challenge is added to the list of completed challenges on the customer overview page.
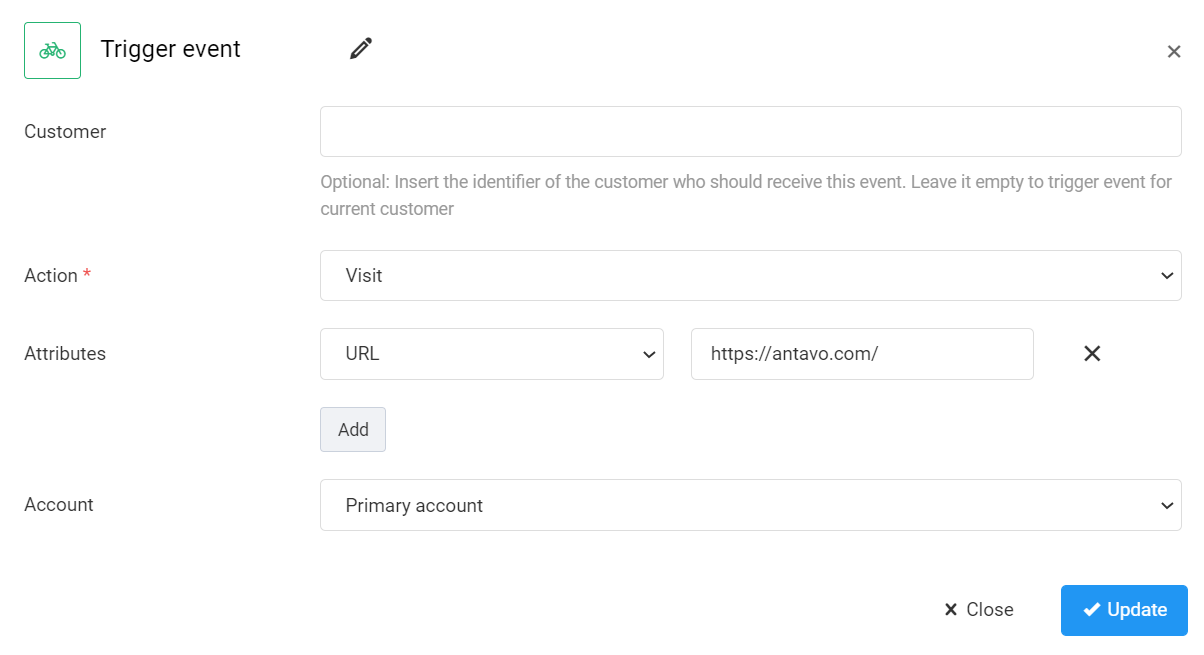
Trigger event
With the Trigger event action, you can initiate the registration of any event.
Insert the customer who should receive this event
This field allows you to trigger the event to any member, not necessarily the customer involved in the current workflow execution. You can add the ID of a specific customer or use a variable (e.g., {customer.referrer}) as well.Select the event to be registered
Add event attributes, if necessary
Select the account to which the event should be registered, in case you use the Multi-accounts module
The Trigger event action registers the selected event on the customer’s event history with all the defined attributes.
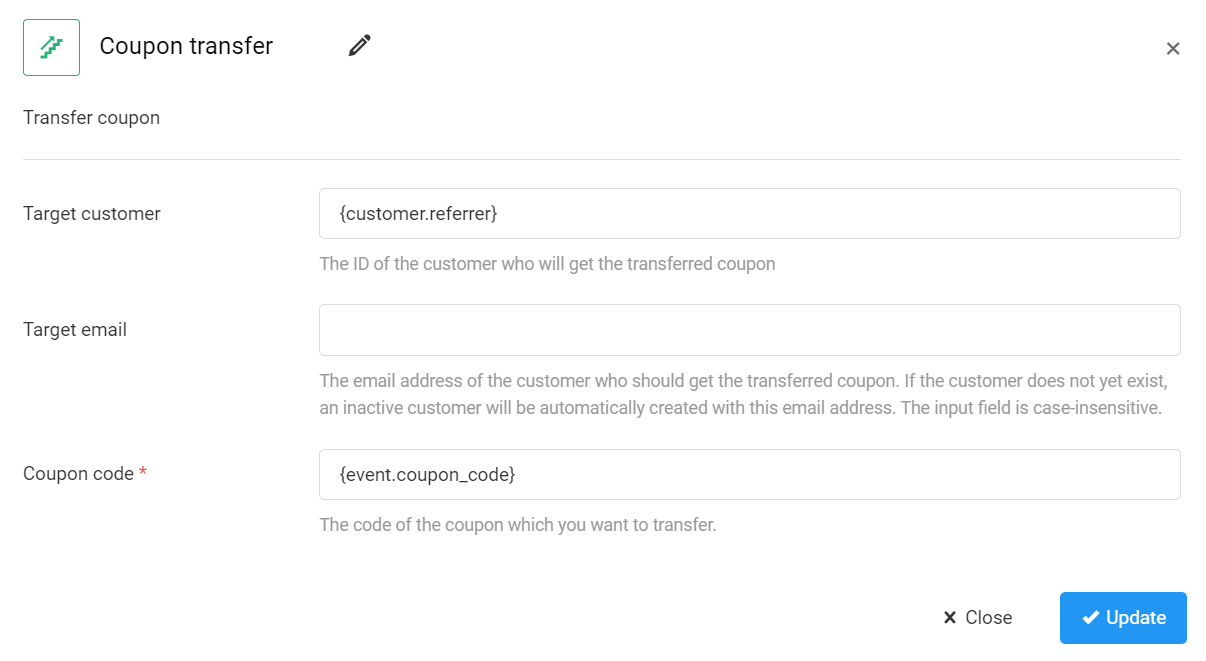
Coupon transfer
This node allows for the reassignment of a coupon that has been previously assigned to a customer.
Add the ID and/or email address of the target customer
If the customer does not exist in the Antavo database, a new inactive customer will be created to which the coupon gets assigned. You can target a specific customer or use a variable in the Target customer field (eg. {customer.referrer}) instead.Define the coupon code to be transferred
You can add a specific coupon code or use a variable (eg. {event.coupon_code}) instead.
The Coupon transfer action registers a Coupon receive event in the event history of the recipient.
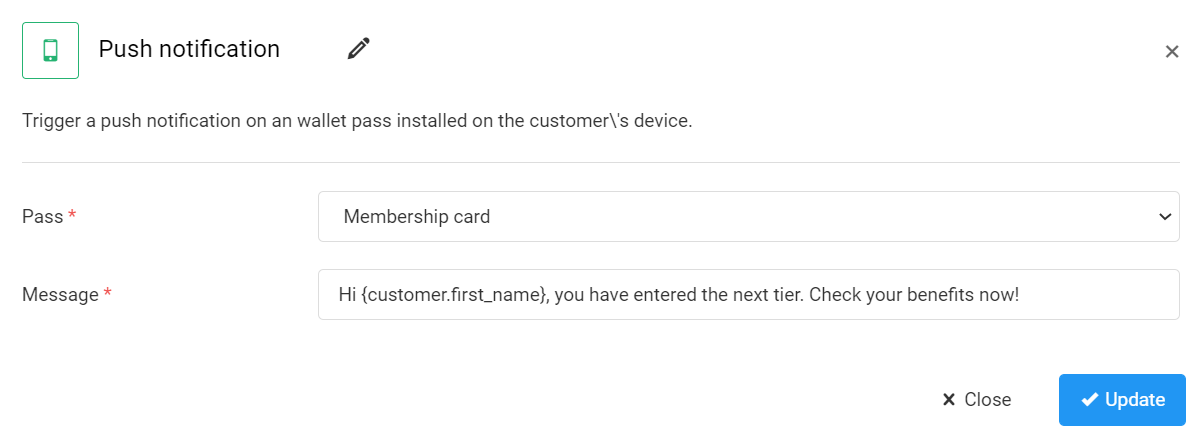
Push notification EARLY ACCESS
Sends push notifications to a specific pass saved on the customer’s device.
Select which wallet pass should be the subject of the notification
Add a message that will pop up on the screen
You can insert variables (eg. {event.coupon_code}, {customer.first_name} or volt expressions in the notification.
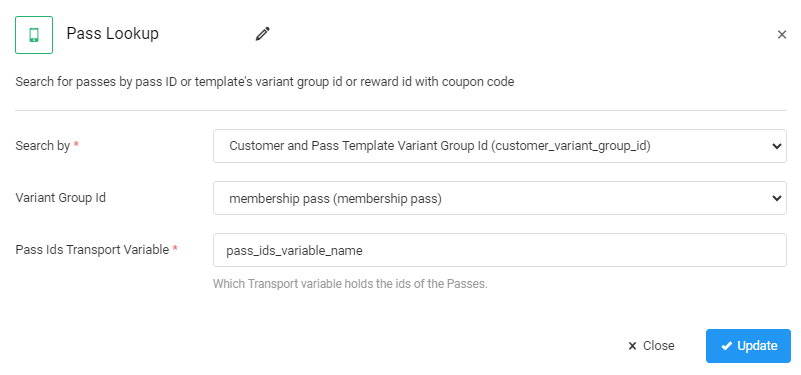
Pass Lookup EARLY ACCESS
Looks up a customer pass or passes and adds the pass ID(s) to the transport, so that the template of the pass(es) can be modified through a Switch Pass Template node later in the workflow.
Select the search method:
Pass ID: Enter the ID of the pass in the Pass ID field to search for a specific customer pass by the ID.
Customer and Pass Template Variant Group ID: Select the Variant Group ID to search for the pass(es) that use the selected Variant group ID.
Customer and Coupon Reward: Enter the coupon code and the ID of the reward to search for a pass that was assigned when the coupon reward was claimed.
Enter the transport variable name of the filtered pass(es) in the Pass ID Transport Variable field. You can refer to the filtered pass(es) by this name in nodes following this one within the workflow.
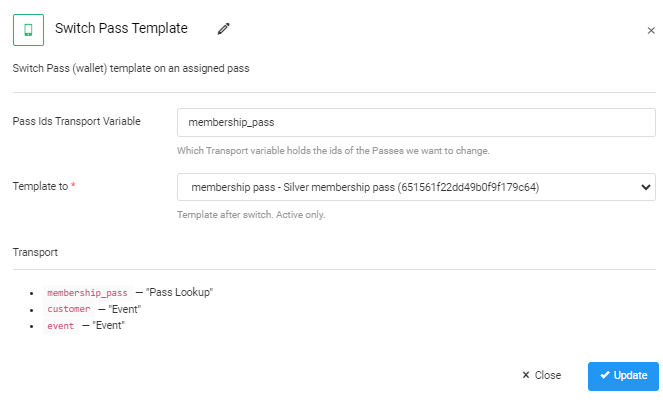
Switch Pass Template (beta) EARLY ACCESS
Replaces the current pass template of an assigned pass with a new one. The pass(es) to be modified should be added to a transport variable in a preceding Pass Lookup node.
Enter the transport variable name that has been defined in the Pass Lookup node previously
Select the new template to be assigned to the transported pass(es)
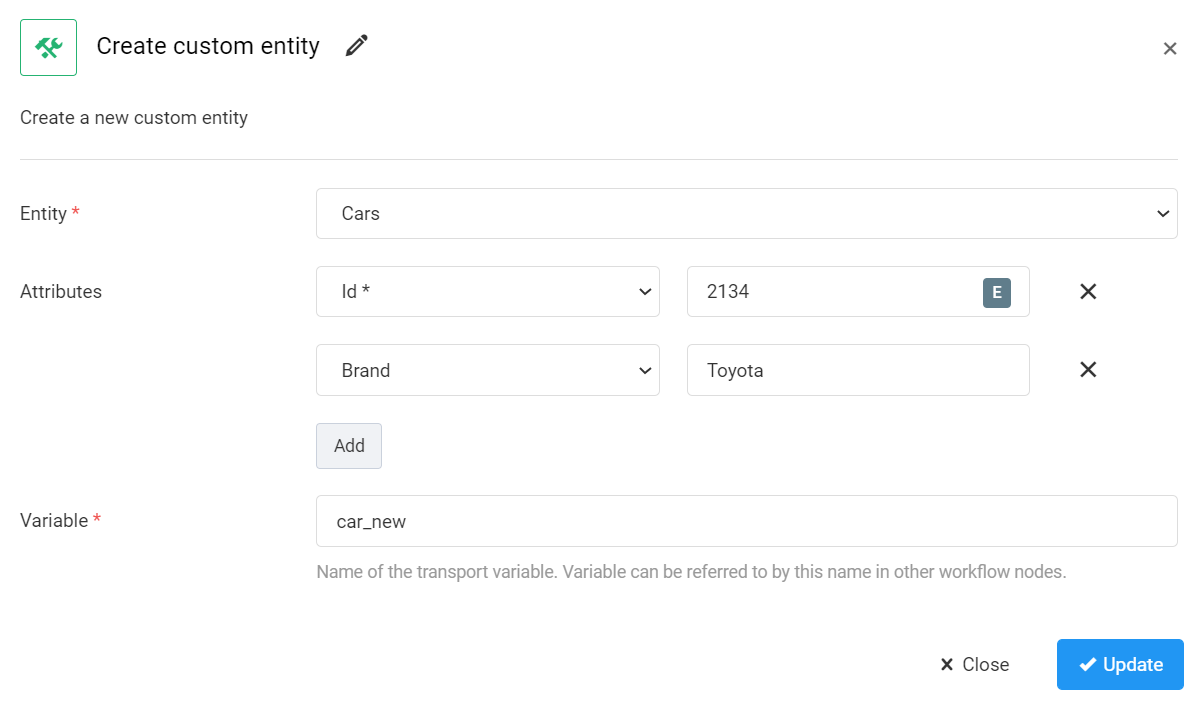
Create custom entity
Creates an entity item that will appear in the appropriate custom entity collection.
Use the dropdown field to select the type of entity that you want to create (eg. car)
Enter the key and the new value of the new entity item (e.g., brand of the new car entity)
You can add multiple fields using the Add button. Make sure you add all the required (*) entity fields (eg. ID)Enter the transport variable name of the new entity item
You can refer to the new entity item by this name in nodes following this one within the workflow.
You can find the new entity that is created through the Create new entity node under the specific entity page of the Custom entities module.
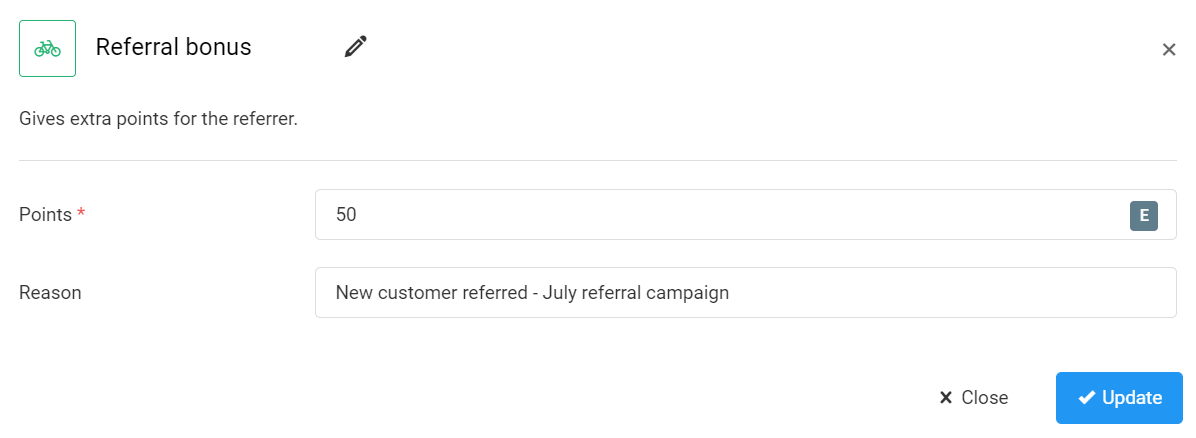
Referral bonus
Rewards referrers with bonus points based on the actions of their invited friends.
Set the number of points to be added to the referrer of the customer who is the subject of the current workflow execution. If the Referral bonus action is added to a workflow that uses an On date trigger, the bonus will be added to all active customers who have ever referred a friend in the loyalty program.
Optionally, you can add a reason why the bonus was added.
The Referral bonus action registers a Referral bonus event on the referrer’s event history with the defined reason (if any).
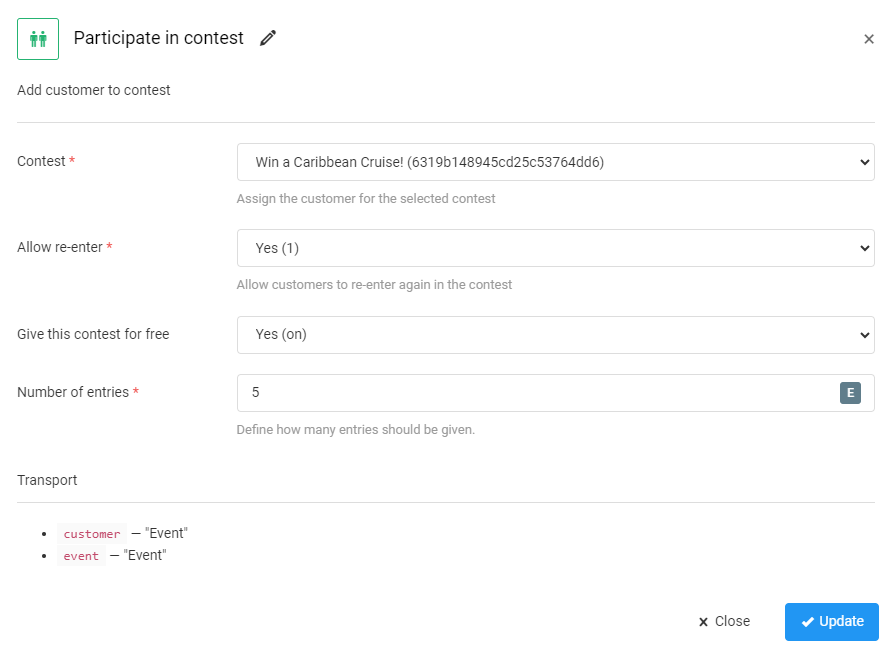
Participate in contest
Adds customers to the participants of a currently active promotion configured in the Contest lite module. Entries can be added between the start and end dates of the contest, while it is active.
Select the contest in which the customer should participate
Decide if customers are allowed to re-enter the contest
If re-entry is not permitted and the customer has already entered the contest, the workflow will proceed on the failure (red) output of the action.Decide if the entry will be free or if the entry point price (configured in the Contest lite module) will be deducted from the customer’s point balance
Set the number of contest entries you’d like to grant to customers
The number of entries you can add is unlimited.
The Participate in contest action registers a Promotion enter event on the customer’s event history with the configured number of entries recorded in the count event attribute.
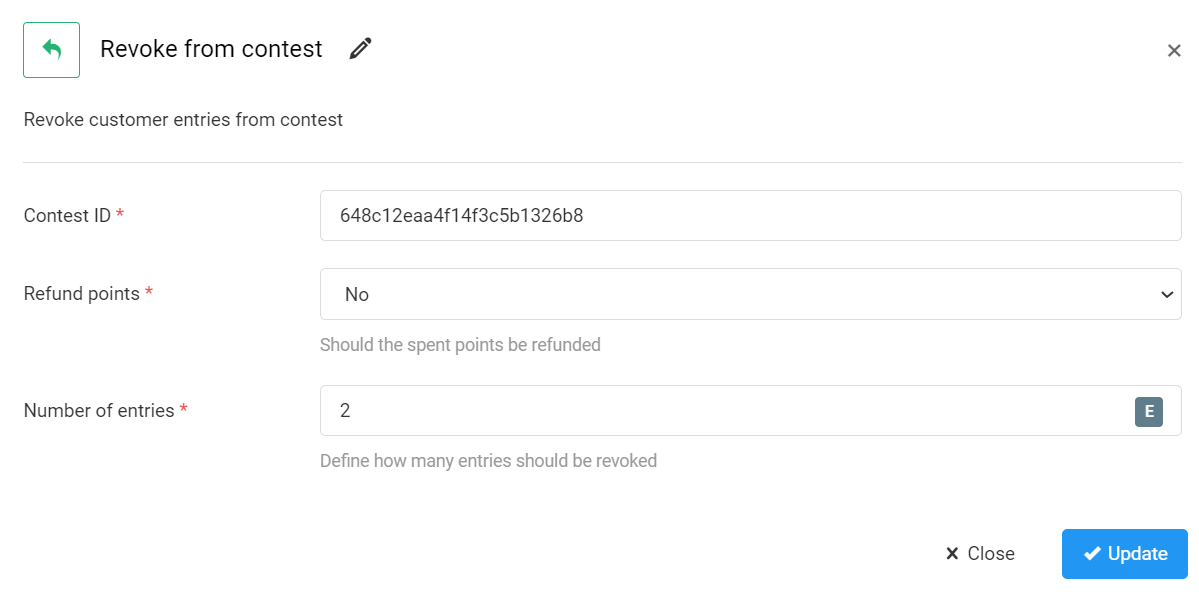
Revoke from contest
With the Revoke from contest node, you can invalidate customers' previous contest entries, reducing the number of entries they have in a specific contest configured in the Contest lite module. Entries can be revoked from the activation of the contest until the winner is selected, while the contest is active.
Copy and paste the ID of the contest
You can find the ID of the contest at the end of the URL of the contest editor configuration page.Decide if you want to give back the points that the customer spent to enter the contest
If the customer received the entry (entries) for free and no points were spent, points cannot be given back.You can revoke multiple contest entries at the same time
If the number of entries to be revoked is greater than the customer’s current number of entries, the number of entries will be set to 0.
Reward claim
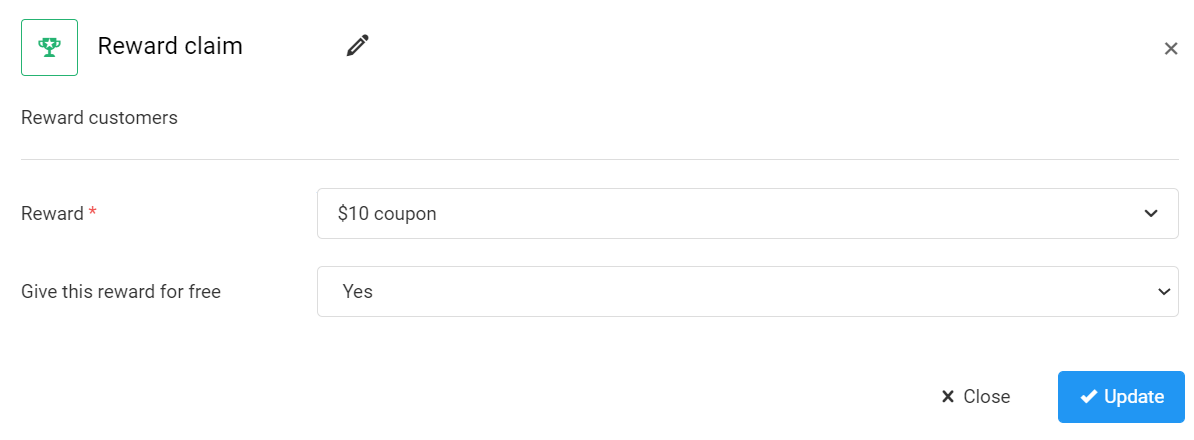
The Reward claim action assigns rewards, previously set up in the Rewards module, to loyalty members.
Use the dropdown field to select the reward to be claimed
Only active rewards can be selected.Choose whether to assign the reward for free or deduct the point price of the reward (set in the Reward editor) from the customer’s point balance.
The Reward claim action registers a Reward event on the customer’s event history. The newly assigned reward is added to the list of claimed rewards on the customer overview page.
Toast message DEPRECATED
The Toast message action triggers a toast notification on the customer’s screen.
The toast message functionality is available through the implementation of the Antavo Javascript SDK. Please note that the JavaScript SDK has been deprecated, please contact the Antavo Service Desk for further information.
Add a message that will pop up on the screen
You can insert variables (e.g., {event.coupon_code}, {customer.first_name} or volt expressions in the notification.
.png)
.PNG)
