Use Customer Insights to get actionable information about your loyalty members and their activities in your loyalty program, as well as to manage customer profiles. The built-in segmentation scheme facilitates targeting customers with personalized offers.
Customers page
To access the Customer insights menu, click on the customer icon located in the sidebar. This action will redirect you to the Customers page, where you can view the current list of customers enrolled in the loyalty program.
The searchable list provides the following information:
Name | Name of the customer |
Email address | Email address of the customer |
Score | Number of points earned |
Spent | Number of points spent |
Expired | Earned points that expired without being spent |
Spendable | Number of points currently available to spend |
Last login | The last time the /auth endpoint was used to authenticate a customer as a loyalty member |

The left-hand side menu bar provides the following actions:
Create customer | Add new customers one by one manually. |
Create segments | Define specific groups of customers based on chosen criteria. |
Import segments | Upload pre-defined customer groups for targeted campaigns. |
Create customer label | Labels are specific customer segments that can either be populated here or appended by integrations. |
Export customers | Extract customer data from Antavo’s database by downloading a .csv or JSON file. |
Import customers | Mass-enroll customers in the loyalty program or update their data stored in Antavo’s database by uploading a .csv or JSON import file. |
You can find the Filter button in the top-right corner to refine the customer list based on status, gender, country, and tier information.

Customer profile
To access a specific member’s profile, simply click the corresponding Open button. This will direct you to the Overview tab of the Profile page.
Please be aware that if the User group module is enabled in your brand, the content of the following sections of the customer profile may be filtered according to the configured user group settings:
Available rewards under the Overview tab
Claimed rewards under the Overview tab
Claim a reward button under the Overview tab
Specific coupons under the Coupons tab
Overview
Under the Overview tab, you’ll find a comprehensive profile of your customer, encompassing all information collected within the loyalty program and submitted via the API. This includes:
Points statistics
Points currently available to spend
Total points earned since the customer joined the loyalty program (also referred to as score)
Points spent
Pending points
Reserved points
Expired points
If the Multi-accounts module is enabled and multiple accounts are added, the point statistics of each account will be listed in alphabetical order based on the Account ID.

Personal information
ID
Name
Email address
Gender
Status
Inactive: This status is assigned to customers during pre-enrollment activities. It’s mainly used for data migration purposes, as it reserves IDs for existing customers from other integrated systems, reducing the risk of data conflicts or loss. The use of this status depends on local data processing regulations and policies.
Please note that if auto-subscribe is enabled under General settings, inactive customers are evaluated by workflows. To exclude inactive customers from workflow execution, add a customer attribute filter to your workflow and specify the condition to exclude inactive customers.
Active: Customers with this status are consenting members of the loyalty program. The profile event can be used to update customer attributes and their activities can be tracked by searching their profiles in the Antavo Management UI.
The active status should not be confused with active member statistical metrics.
Opted-out: Customers who deliberately leave the program are marked as opted-out. Opting out results in the complete anonymization in Antavo’s database. This status can also be applied forcibly (banned) for violations of terms and conditions.
Suspended: Customers may be suspended by a Management UI user due to fraudulent behavior. Suspended members cannot be merged with other customers. The suspend/unsuspend actions can be executed manually from the Management UI, via API or by initiating a workflow using the Trigger event node.
While suspended, members can still earn points but cannot spend them. They can be unsuspended at any time.Pending: This status is assigned to customers who have started the registration process but haven’t completed it by verifying their email address. It indicates that registration is incomplete.
Email verification is optional and can be enabled through the Customer login module.
Birthdate
Additional profile information (answers to profile questions, custom attributes in the profile event)

When customers begin using social media modules, a multitude of Facebook connect attributes are synchronized into Antavo’s system based on their Facebook profile information. These overwritten attributes are stored on the Antavo customer profile. The following attributes originate from the Facebook application’s side:
handler: Facebook nickname or first name of the customer.
facebook_id: Facebook Graph API ID of the customer.
image_url: URL of the Facebook profile picture of the customer.
facebook_access_token: Access token used to connect to Facebook.
gender: The gender of the customer, overwritten from Facebook.
first_name: First name of the customer, overwritten from Facebook.
last_name: Last name of the customer, overwritten from Facebook.
facebook_profile_link: URL of the Facebook page of the customer.
Club point statistics
Only available if the Clubs module is enabled, and the customer is a member of a club.
Club account: The name, identifier, and status of the club.
Club template: The name, identifier and status of the template used to create the club.
Role: The customer’s role in the club with status.
Contribution: The points contributed to the club’s point balance by the customer.
Spent: The number of club point spent by the customer.
Club spendable: The current number of club points that can be spent by the club members.

Statistic cards
The information available may vary depending on your workspace settings. If you require additional information to be displayed, please contact the Antavo Service Desk for further assistance.

List of completed challenges

List of claimed rewards and available rewards

Latest actions

Segments that the customer is a part of

Coupon statistics

Profile actions
Additionally, you can access basic profile actions in the upper-right corner. Click the More button to reveal all available options.
Merge customers: Combine customer profiles. Additional information is available below.
Claim a reward: Manually claim a reward for the customer.
Please note that bidding-type rewards cannot be claimed using this button. They are only available through the bid endpoint of the Display API.
Depending on the point souce setting of the selected reward (Club points or Accounts), you may need to select where the reward should be claimed:If the source is Club points: select the club. The
club_idof the selected club is stored in the reward claim event.If the source is Accounts: select the account. The
account_idof the selected account is stored in the claim event.
Resync: Trigger a synchronization to the marketing automation provider.
Opt out: Remove the customer from the loyalty program
They can rejoin at any time, but their historical data will be lost. Read more about the opt-out process in the API docs.Suspend, Unsuspend: Restrict the customer from spending points after suspicious behavior, or unsuspend them at any time.
Tier up, Tier down: Manually update the customer’s tier status in the selected tier structure. Once manually upgraded, customers cannot be downgraded until they either exceed the threshold of the manually set tier and reach a higher tier or until the manually set tier expires. If you use the Keep the highest reached tier level expiration method, customers cannot be manually downgraded to a tier lower than the one they qualify for based on the number of tier points they've collected.
Change tier expiration date: Manually change the expiration date(s) of the customer’s current tier(s).
Please note, that the tier expiration date is automatically recalculated when the next customer action is registered, based on the configured mechanisms.
The availability of certain action buttons may vary depending on your access level and the modules enabled. If any of the listed options are not accessible to you, please contact your administrator for assistance.

Personal information
Navigate to the Personal Information tab on the left-hand side to manually update customer data.

Labels are descriptive tags that can be manually attached to customers or added by integrations.
If the Shopify extension is activated, you’ll find a list-type field named Tags among the Additional fields.
Tags added to a customer’s profile are updated in Antavo via a profile event. However, editing tags on the Management UI does not synchronize them back to Shopify.
These tags can be used for automatic segmentation.
Events
An Antavo event is a micro document that logs an action executed within the Antavo Loyalty Cloud in association with a specific customer (e.g., purchases, point additions or subtractions, or tier promotions).
The Events tab provides a comprehensive event history detailing all customer events conducted on the membership site and transmitted through the API, along with all associated attributes. If an event’s registration resulted from a workflow, the Source information indicates the workflow name and provides a link to its configuration page.
List of events where workflow source information is available
Campaign bonus
Coupon assign
Point add
Point spend
Point sub
Referral bonus
Tier change
Tier up
Reward
Promotion enter
Customer list - add
Customer list - remove

By clicking the Transaction ID values linked with purchase-related events (e.g., Checkout, Checkout update, Refund, and Point unburn), you can filter events based on the specific Transaction ID.
Additionally, all event labels can be displayed in your preferred language. For more information refer to the Translations and Multi-language module documentation.
Event statuses
The status of event points is indicated by the following labels next to the Points attribute when the event has an expiration date:
: All points earned through the event have been spent already. The
pointsattribute value matches theused_pointsattribute value.: The points earned through the event have expired.
: The points earned through the event are about to expire the next time the scheduled expiration service runs.
No label: The event does not have an expiration date, and there are points earned through the event that have not been spent already
The expired and expiring labels are only available if you use the Expiring points module in the loyalty program.
Event details
The Event history provides an overview of some event attributes recorded within the event document. However, by clicking the Details button of each event log item, you can access the entire list of attributes associated with that event.
Furthermore, at the bottom of this page, you will find a list of workflows triggered by the event in the last 3 months (this interval may vary based on workspace configuration). Clicking the Details button of each workflow item will direct you to the dedicated subpage of Workflow logs, where all the steps of the triggered workflow processes are explained.
Add events manually
You can also manually add events to a customer’s events history. If the event rewards loyalty points, the associated points will be added to the customer’s point balance.
To add an event for a customer:
Click the Add action button on the upper right-hand side of the Events page
Use the Action dropdown field to select the event to add
Add event attributes as needed
Click Save
For a list of all events and a description of their required attributes, see API events.

If the event has been successfully added, a confirmation message will appear, and the event will be displayed on the Events history page.
Filters
Events can be filtered based on their type. Additionally, you can search Checkout events based on the transaction ID.
Points history
On the Points history tab, all the events that affect the customer’s point balance are displayed, allowing you to track changes in point balances.

Manage points
To manually add or deduct points from customer accounts, follow these steps:
Click the Manage points button on the upper right-hand side of the Points history page
Select one of the following options:
Add points: Increase the score and spendable points by registering a Point add event. Note that this modification may affect the customer tier.
Sub points: Decrease the score and spendable points by registering a Point sub event. This modification may also affect the customer tier.
Spend points: Decreases the spendable points and increase the number of spent points by registering a Point spend event This modification does not affect the customer tier.
Enter the point value
Enter the expiration date of added points, if applicable
Select the customer account to which the point modification should be applied. Note that this field is only available if you use the Multi-accounts module.
Add the reason for the point modification for traceability
Click Submit
Modify points expiration
If you use the Expiring points module, you’ll have access to the Modify Point Expiration button, allowing you to select multiple point-based events and define their new expiration date.
On the Modify point expiration page, click the Set expiration date button and select a new date using the date picker that appears. Once saved, the customer's expiring point balance will be adjusted accordingly with the remaining usable points.

Please note that if the Content approval module is active in the Management UI with the Events option enabled, only users with Approver rights can make immediate manual customer updates on the Management UI. An Approver must approve any modifications made by other users before the changes go live.
Coupons
The Coupons tab displays coupons added to the customer through the following methods:
Claiming a coupon type of Reward
Claiming an Offer
A workflow set up in the Workflow editor
The searchable list provides the following information about the assigned coupons:
Claimed at | Date of the coupon assignment |
Code | Coupon code |
Type | Available types include amount, percentage, free shipping, and gift card |
Amount | The value of the coupon |
Balance | Current value of the coupon |
Expiration date | The expiration date of the coupon |
Redeemed at | Date of redemption |
Usages | Number of coupon redemptions |
Using the hamburger button at the end of the row, you can manually trigger the following actions:
Redeem: Mark the coupon as used. The coupon status changes to redeemed.
Invalidate: Invalidate the coupon. The coupon status changes to invalid.
Unassign: Remove the assignment of the coupon. The coupon status changes to unassigned.
Transfer: Assign the coupon to another customer. The coupon status changes to transferred.
If you click Transfer, the next window will prompt you to enter the ID and/or email address of the customer to whom the coupon should be transferred. The input field is case-insensitive.Change expiration: Modify the expiration date of the coupon. The coupon status might change to expired or claimed according to the new expiration date.
.png "coupons_customer (1).png")
Please note that Antavo does not take part in handling coupon validation and redemption. Antavo displays redemption information if the coupon usage is included within the transactional data coming from your systems.
Transactions
The page will display a list of every transaction made by the customer, including the following information:
Account | The account to which the transaction was registered |
Transaction ID | The alphanumeric ID of the transaction |
Checkout date | Date of the transaction submission in the format DD/MM/YYYY, HH:MM |
Points rewarded | Number of points collected for this transaction |
Points burned | Number of points redeemed for this transaction |
Status |
|
The Details button provides a comprehensive set of information including:
Transaction ID
The total value of the purchase
Refunded value
Below that, you’ll find a list of items involved in this transaction, showing:
Product name and ID
Quantity
Price
Discount
Subtotal value of each item
![]()
Filters
Transactions can be filtered based on:
Transaction ID
Customer ID
Transaction status (draft, accepted, pending, rejected, refunded)
Account name
Workflow logs
The Workflow logs page displays all the workflow runnings initiated for the customer in the last 3 months (this time interval might vary based on workspace configuration).
The list provides the following information:
Status | Indicates whether the workflow execution was successful or failed |
Workflow | Name of the workflow with a link to the workflow editor page |
Triggered by | The trigger of the workflow execution |
Timestamp | The date and time when the workflow execution started |
Time | The duration of the workflow running |
If you click the Details button on any list item, you’ll be redirected to the detailed log page under the Log tab of the specific workflow.
Passes
This tab is available if you use the Wallet module in your loyalty program. The page includes all the passes that have been assigned to the customer with the following columns:
Identifier | Identifier of the pass |
Template | Membership pass template |
Created at | Date when the pass was assigned |
Last update | Date of the last update of the pass |
Reward | The reward redeemable through the pass |
Type | Type of the pass (membership, event, or coupon) |
Status | Status of the pass (currently, only the assigned status is available) |
Each row includes two action buttons:
Email: Applicable if you use Antavo’s infrastructure to send pass emails to customers (legacy feature).
Push: Send a request to the pass provider to update the pass.

Tiered campaigns
If the Tiered campaigns module is enabled, the Tiered campaigns tab will show the number of points the customer has earned through tiered campaigns. Each campaign occurrence appears on the list if the customer has an eligible transaction associated with it. The results of campaign occurrences are grouped by campaigns. The columns of the page include:
End date | End date of the campaign occurrence |
Status | Status of the occurrence (Completed, Grace period, or Active) |
Pending points | Customer’s number of pending points within the occurrence |
Awarded points | Customer’s number of earned points within the occurrence |

Sync
Under the Sync tab, you can track all the requests sent by Antavo to your marketing automation whether through integration settings or workflow actions. The list contains the entire content of the requests and the response provided by the external party. The result of each sync attempt is indicated with an icon.
✅ : Successful synchronization. The external provider responded with a success message.⚠️ : Synchronization failed. The external provider responded with an error message.
A Resync button is available in the top right corner. You can use this button to trigger the sync of all customer fields that have been added to the customer synchronization page of the integration settings.

Merging customer profiles
To merge two loyalty member profiles owned by the same person into one:
Click Merge at the top of the Overview page of the customer you want to merge — this is the source customer profile
On the page that appears, select the customer ID of the target customer profile — the source customer profile will be merged into this customer
Suspended customers cannot be selected as the source or target of a customer profile merge.
Also, the status of the target customer ID cannot be merged.
Click Search

The source and target customer profiles are displayed for you to review along with additional information about the merge action.
The section displaying the source customer profile data is marked with a red border on its left. The status of this profile will be changed to merged after the merge action. The section displaying the target customer profile data is marked with a green border on its left. The status of this profile will remain active after the merge action.
Select the type of the merge action
Partial: when this option is selected, only the
score,spent,expired,pending,reserved,purchase_total,purchase_count,purchase_item_count,purchase_last_date,last_earn_date, andlast_spend_datecustomer attributes of the source customer profile are merged into the target customer profileFull: when this option is selected, all customer attributes of the source customer profile are merged into the target customer profile
The option you select here affects only the customer attributes that will be merged. All other customer data such as customer events, transactions, customer purchases, multi-account data, challenges data, expiring points, coupons, rewards, and passes will be merged into the target customer profile regardless of whether the partial or full merge option is selected.
Click Merge to complete the merge action
.png "Merge.png")
Customer merge results
When a customer merge is completed:
The values of the
score,spent,expired,pending,reserved,purchase_total,purchase_count, andpurchase_item_countattributes of the target customer are increased with the values of the respective source customer attributesThe values of the
purchase_last_date,last_earn_date, andlast_spend_dateattributes of the target customer are replaced with the values of the source customer attributes if the latter are more recentAll events, transactions, purchases, expiring points, coupons, rewards, and passes of the source customer are reassigned to the target customer
The accounts, tiers, and challenges are updated on the target customer
(Full merge only) Customer attribute values that already exist on the target customer remain unchanged. Attribute values on the source customer which do not exist on the target customer are added to the target customer. This also applies for nested custom attributes.
The source customer profile remains in the database, but its status is changed to merged
A new customer cannot be registered with the source customer’s ID
It’s important to check the target customer’s even stream to ensure that there are no duplicate points resulting from identical actions. See the Manage points section for more information on point removal.
Filtering customers
On this page, you can filter the customer list based on key customer attributes.
The filtered list provides the following information:
Name | Name of the customer with the last 10 characters of the membership ID |
Email address of the customer | |
Score | Number of points earned |
Spent | Number of points spent |
Spendable | Number of points currently available to spend |
Last login | The last time the /auth endpoint was used to authenticate a customer as a loyalty member |
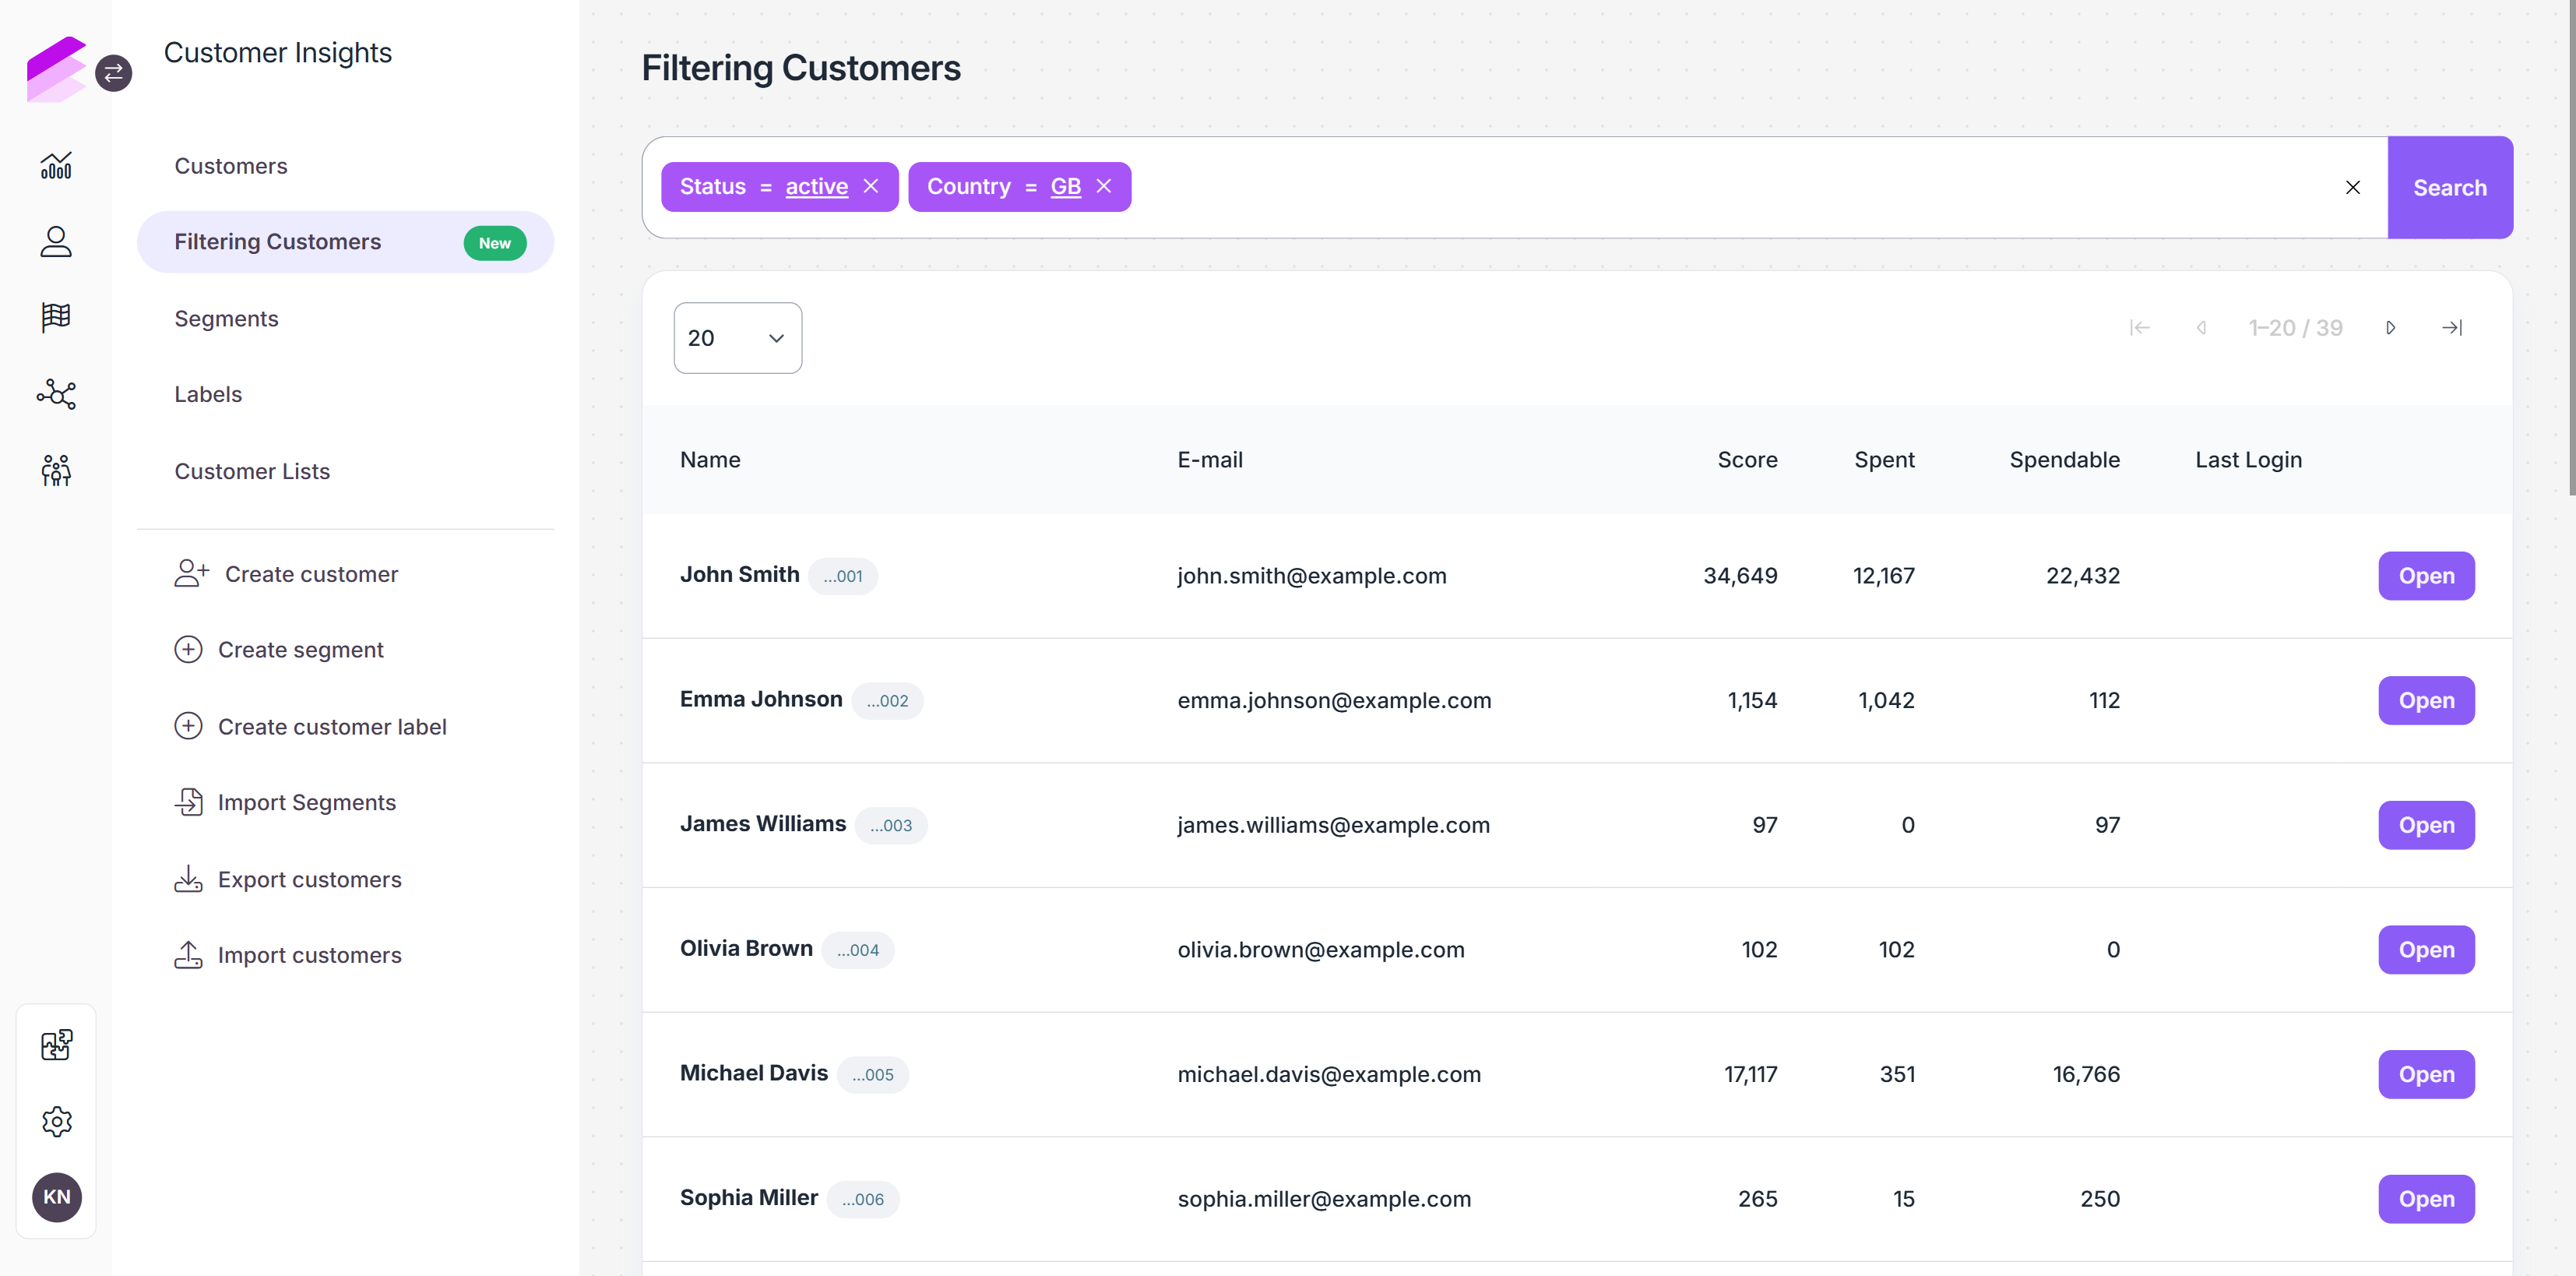
You can navigate to the customer’s profile page using the Open button.
Using the filter bar
Using the filter bar at the top of the page, you can filter the customer list based on the following attributes: first name, last name, status, email, membership ID, and country.
The available operators for filtering are:
Equals to
Not equals to
Is less than
Is less than or equal
Is greater than
Is greater than or equal
Is in
Is not in
When you apply multiple filters, they are combined using an "and" relation. This means that all the filter conditions must be met for a customer to appear in the filtered list.
To filter the list, click the Search button.
To remove a specific filter, click the X next to it. To clear all filter parameters and reset the list, click the X at the end of the row.
Please note that the filtering is case-sensitive.
Segments
The Segment editor is a valuable tool for personalizing and targeting your members with loyalty incentives. You can view, create, and edit segments by navigating to the Segments tab under the Customer Insights menu.
Labels
The Labels tab contains a listing page of customer labels which are descriptive tags that can be attached to customers. These labels can be created and assigned by workspace owners or automatically generated and appended by integrations.
Several Antavo features are capable of generating labels:
Opt-in process: Labels can be initialized upon opting into the loyalty program.
Profiling events: Labels can be assigned to a customer when gathering information about their preferences through profiling questions.
Imports: The Labels field can be imported to the Management UI under the Customers data model.
Incoming webhooks: See this use case of how incoming webhooks can be used to assign a label to a customer who has just opted into the loyalty program.
Upon opening the Labels tab, a searchable, alphabetically ordered list appears, providing the following information:
Identifier | Label ID |
Status | Active or Inactive |
Customer counter | The number of customers assigned to this label |
The Edit button allows you to rename the customer label ID. Once changes are made to the label, the updated version will be applied to all customers currently assigned to this label.
The View button lists the customers under the specific label (Identifier, Status, First name, Last name) and leads to their customer profiles.
