Antavo’s Imports module facilitates the configuration of various entities and mass enrollment of customers in the loyalty program by having settings and data fields imported from CSV or JSON files.
Find the configuration page of the Imports functionality by navigating to the Modules menu and searching for the Import module. The page will open to the list of files that have already been uploaded.
The columns represent the following information:
Created at | Date of the imported file upload |
Created by | Management UI user who uploaded the import file |
Model | The type of data set imported (challenge, coupon pool, coupon, customer field, customer mapping rule, customer, customer_import, event, historical transaction, product, reward, store, user group) |
Status |
|
Filename | Name of the imported file |
Filesize | The size of the import file is in bytes |
.png)
Creating a new import
Imports can be used to create new entity items or modify existing ones in Antavo. If the entity or any of its field values in the input files already exist in the loyalty program, the input file will result in updating the specific entity upon a successful match. The only exception is the Historical transaction import where existing transactions and their related events cannot be re-imported or modified, nor can new events be added to existing transactions.
To begin creating a new import, click the Create new import button on the left sidebar.
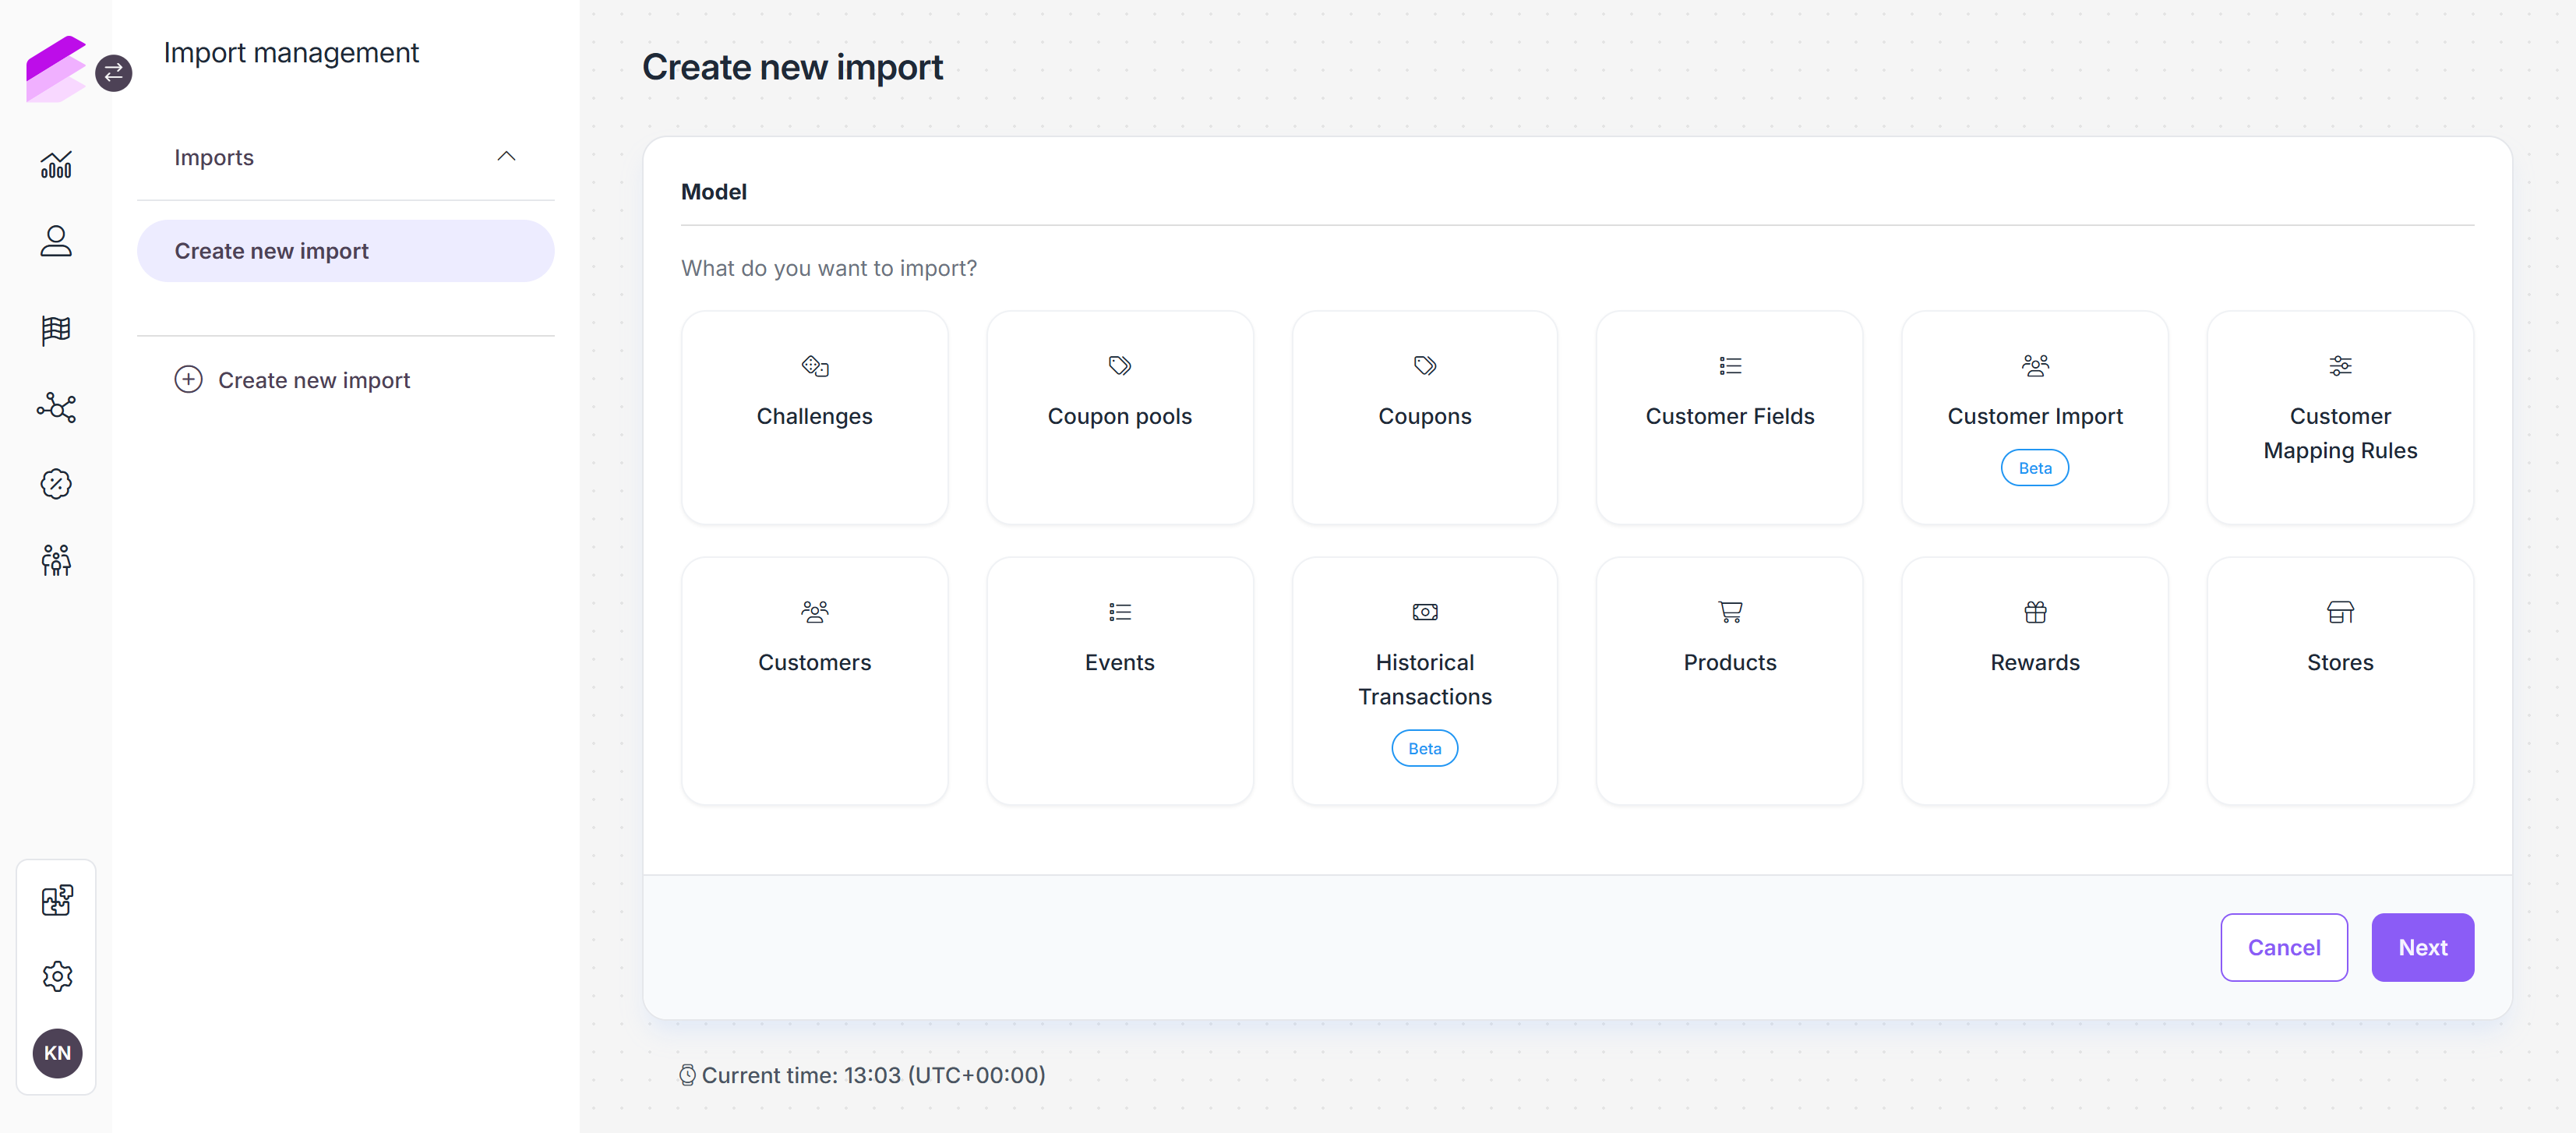
Data model
First, select the data model to import and click Next. The available data models are:
Challenges (deprecated): Create new challenges that are set up in the Challenges module. Challenge import is executed without including the image of the challenge to facilitate imports more effectively. Please note that images still need to be added when editing a challenge afterward to ensure it can be displayed properly on the membership site.
Coupon pools: Create or update coupon pools in the Coupons module. If the pool uses a set of uploaded coupons as the source of the coupons, ensure to upload them through the Coupon import feature mentioned earlier.
Coupons: Import coupons to be used as uploaded coupons of rewards, friend referral coupons, or coupon pools. Alternatively, coupon imports to coupon pools can also be initiated through the Coupons module.
Customer fields: Import new customer data attributes.
Customer mapping rules: Create new mapping rules to update customers.
Customers: Import new loyalty members or mass update customer data, including labels appended by third-party integrations. This import follows the standard import flow and is best suited for smaller updates.
Please note that calculated customer data cannot be imported. If you need to insert such values, contact the Antavo Service Desk.Customer import (beta): Import and migrate customer records during go-live or large-scale data migrations using a structured, multi-step workflow with pre-processing, mapping, and validation.
The import procedure for customer imports (beta) is different from that of other data models. Please see the details under the Customer imports article.Events: When creating an event import file, ensure that you always include the customer and action columns, which should contain the ID of the customer and the event in the data rows of the import files, respectively.
Historical transactions (beta): Import complete historical transaction records, including related events such as checkout details, item purchases, and partial or full refunds. Please note that the imported transactions cannot be modified or updated later.
The import procedure for historical transactions is different from that of other data models. Please see the details under the Historical transaction imports article.Products: Import new products or update existing products added in the Product catalog module.
Rewards: Create new rewards or update existing rewards configured in the Reward module. Please note that when importing rewards, the process is executed without including the image of the reward to facilitate more efficient imports. Ensure that you upload the reward image(s) through the reward editor interface to properly display them on the membership site.
Stores: Import new stores or update the existing stores configured in the Stores module.
User groups: Import new groups to the User groups module.
The process of configuring Customer Import (beta) and Historical Transaction (beta) models vary from the processes associated with other data models.
Learn more about Customer imports
Learn more about Importing historical transactions
Data source
Downloading a template file
To import data, you will need to create an import file. Once a data model is selected, the system provides an interface where template files can be downloaded in both JSON and CSV formats. These templates reflect the file structure supported by the system.
For detailed instructions on how to construct the import file, please refer to the Creating an import file section of this document.
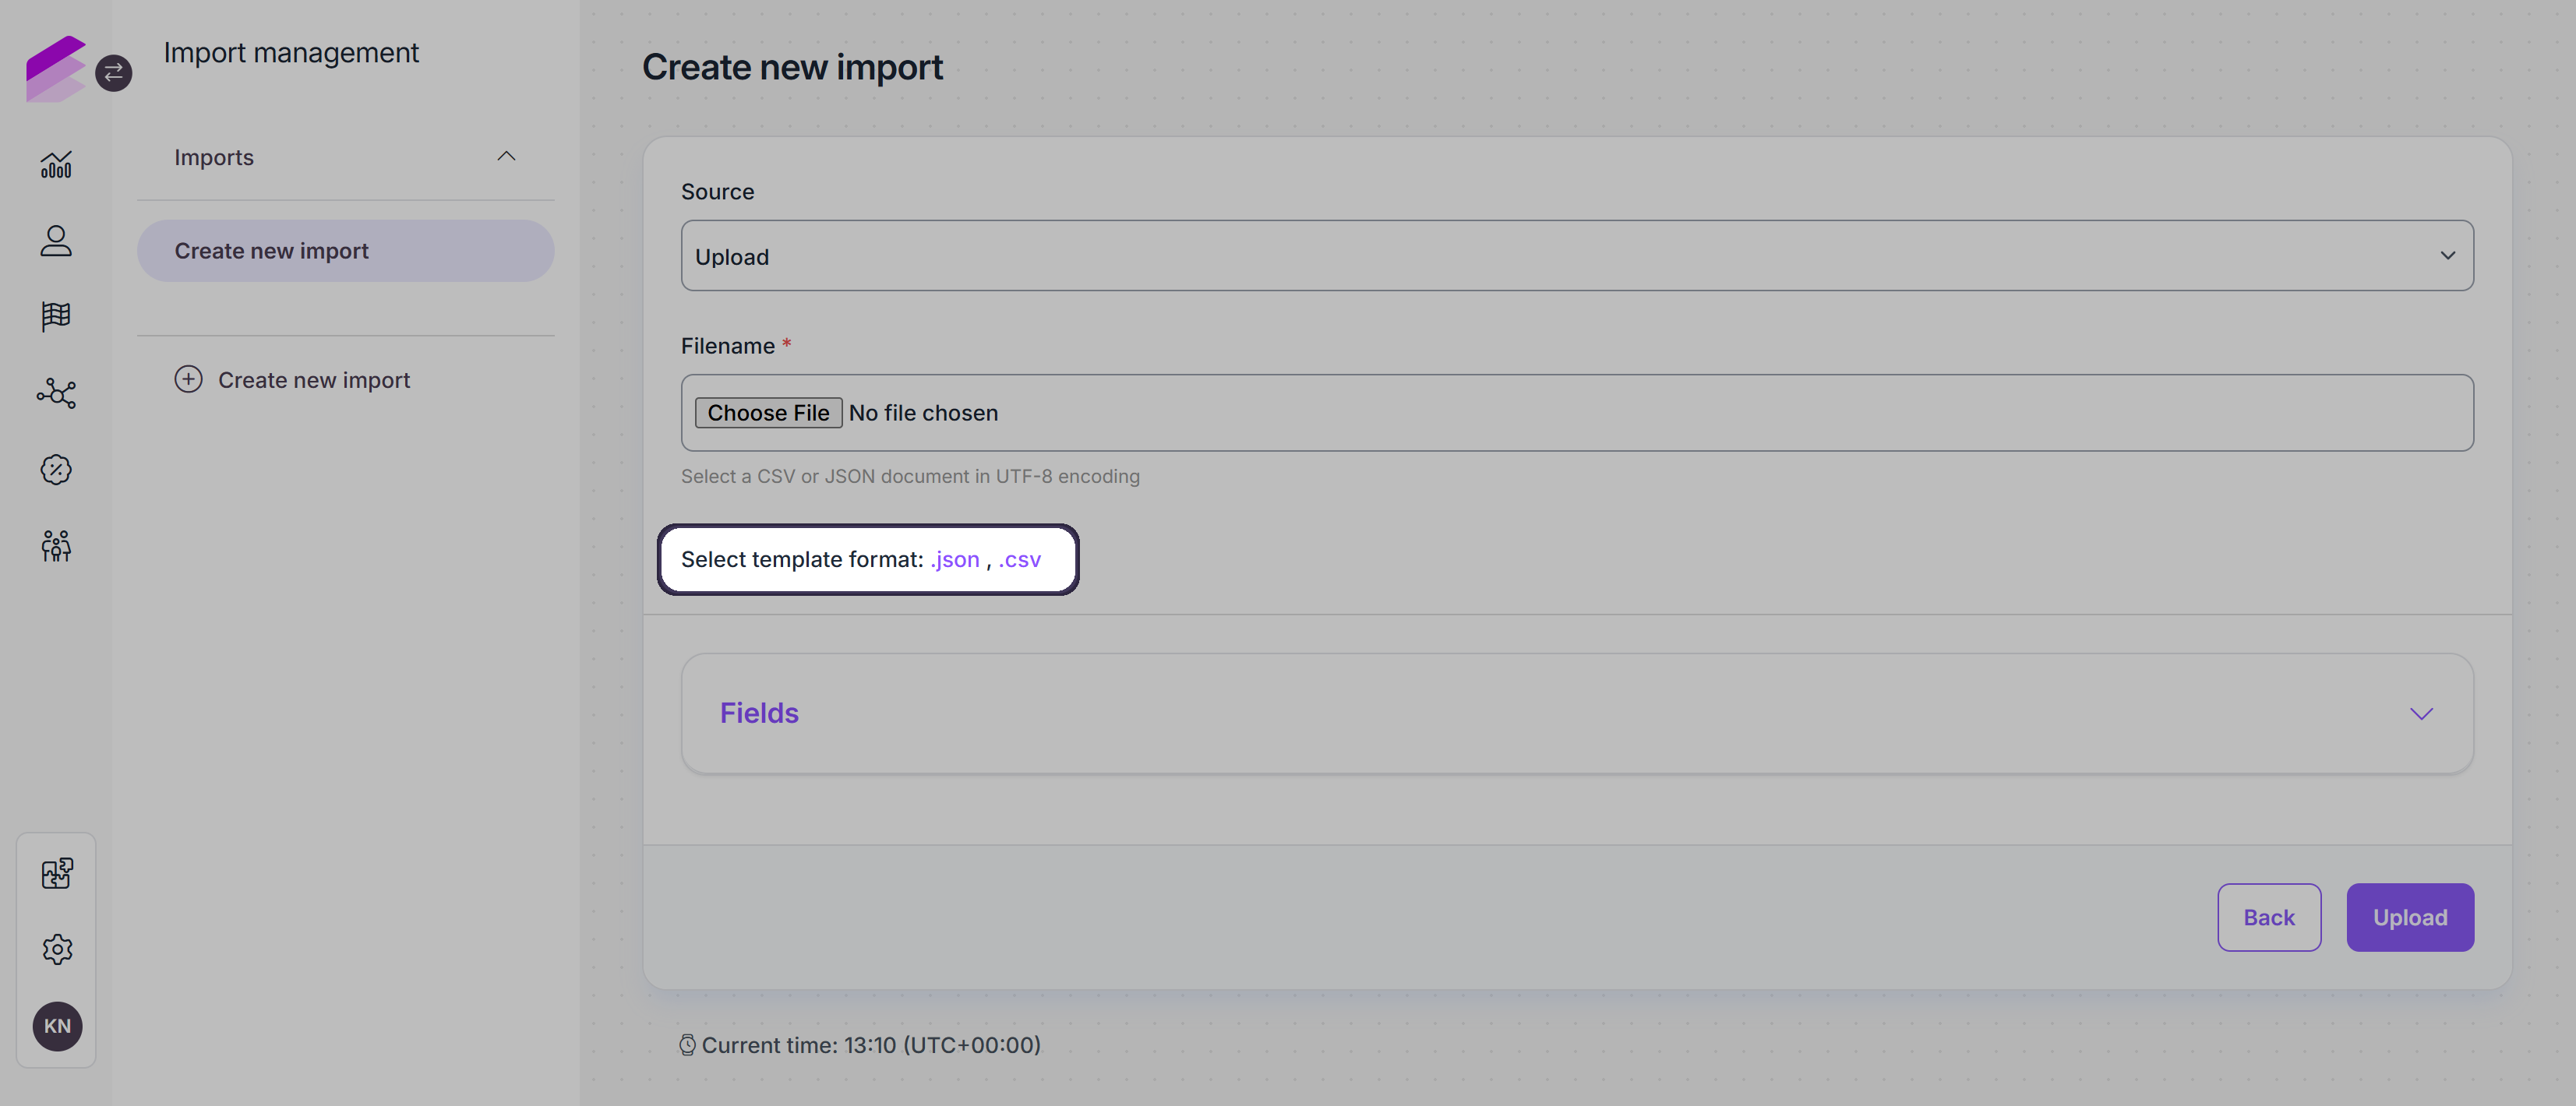
Selecting the data source
In the Source dropdown field, you’ll need to select the source from which Antavo can access the import file. Here are the available options:
Upload: You can upload the CSV or JSON file directly by selecting the file using the Choose file button in the Filename fields. You can download a template CSV file or JSON file containing all the necessary fields by clicking the name of the corresponding file extension.
Please note that the import of child events, likecheckout_item, are only supported in JSON format.URL: If the import file is accessible via a URL, you can insert the URL into the Url field.
SFTP or FTPS file transfer protocols: If you're using SFTP or FTPS, you'll need to define the connection details, including Host, Port, User, Pass, and Path. Additionally, you can select a Cleanup method to rename or delete the import file after it has been processed.
.png)
Fields
If you open the Fields collapsible section, you’ll find the attributes that need to be filled based on the selected data model. The list includes the following details for each field: Key (ID), Name, Data Type (e.g., text, date, select, numeric), Required status, Computed status, Possible values (if applicable), and Description (if provided).
Both built-in and custom attributes are importable and will be added to the list of fields.
Use the Only required fields checkbox to display only the essential attributes of the entity that need to be imported.
.png)
If you translate the values of text attributes to different languages on applicable module interfaces, then translations should be imported into separate attributes. The name of translation attributes should be constructed from the ID of the parent attribute and the ISO 639-1 code of the specific language. For example, English, Spanish, and French translations of the Name attribute should be added to the import file in attributes like name.en, name.es and name.fr.
Coupon Import Field Requirements
If the coupon pool feature is enabled, include the
poolandparentcolumn in the import file and populate it with the ID of the coupon pool where the coupons should be imported.
If the coupon pool feature is not enabled, include the code column in the import file with unique coupon codes.
In both cases, these columns are mandatory, otherwise, the import will fail.
Once you’ve uploaded the import file with all the necessary attribute values, remember to click the Upload button at the bottom of the page.
Import setup
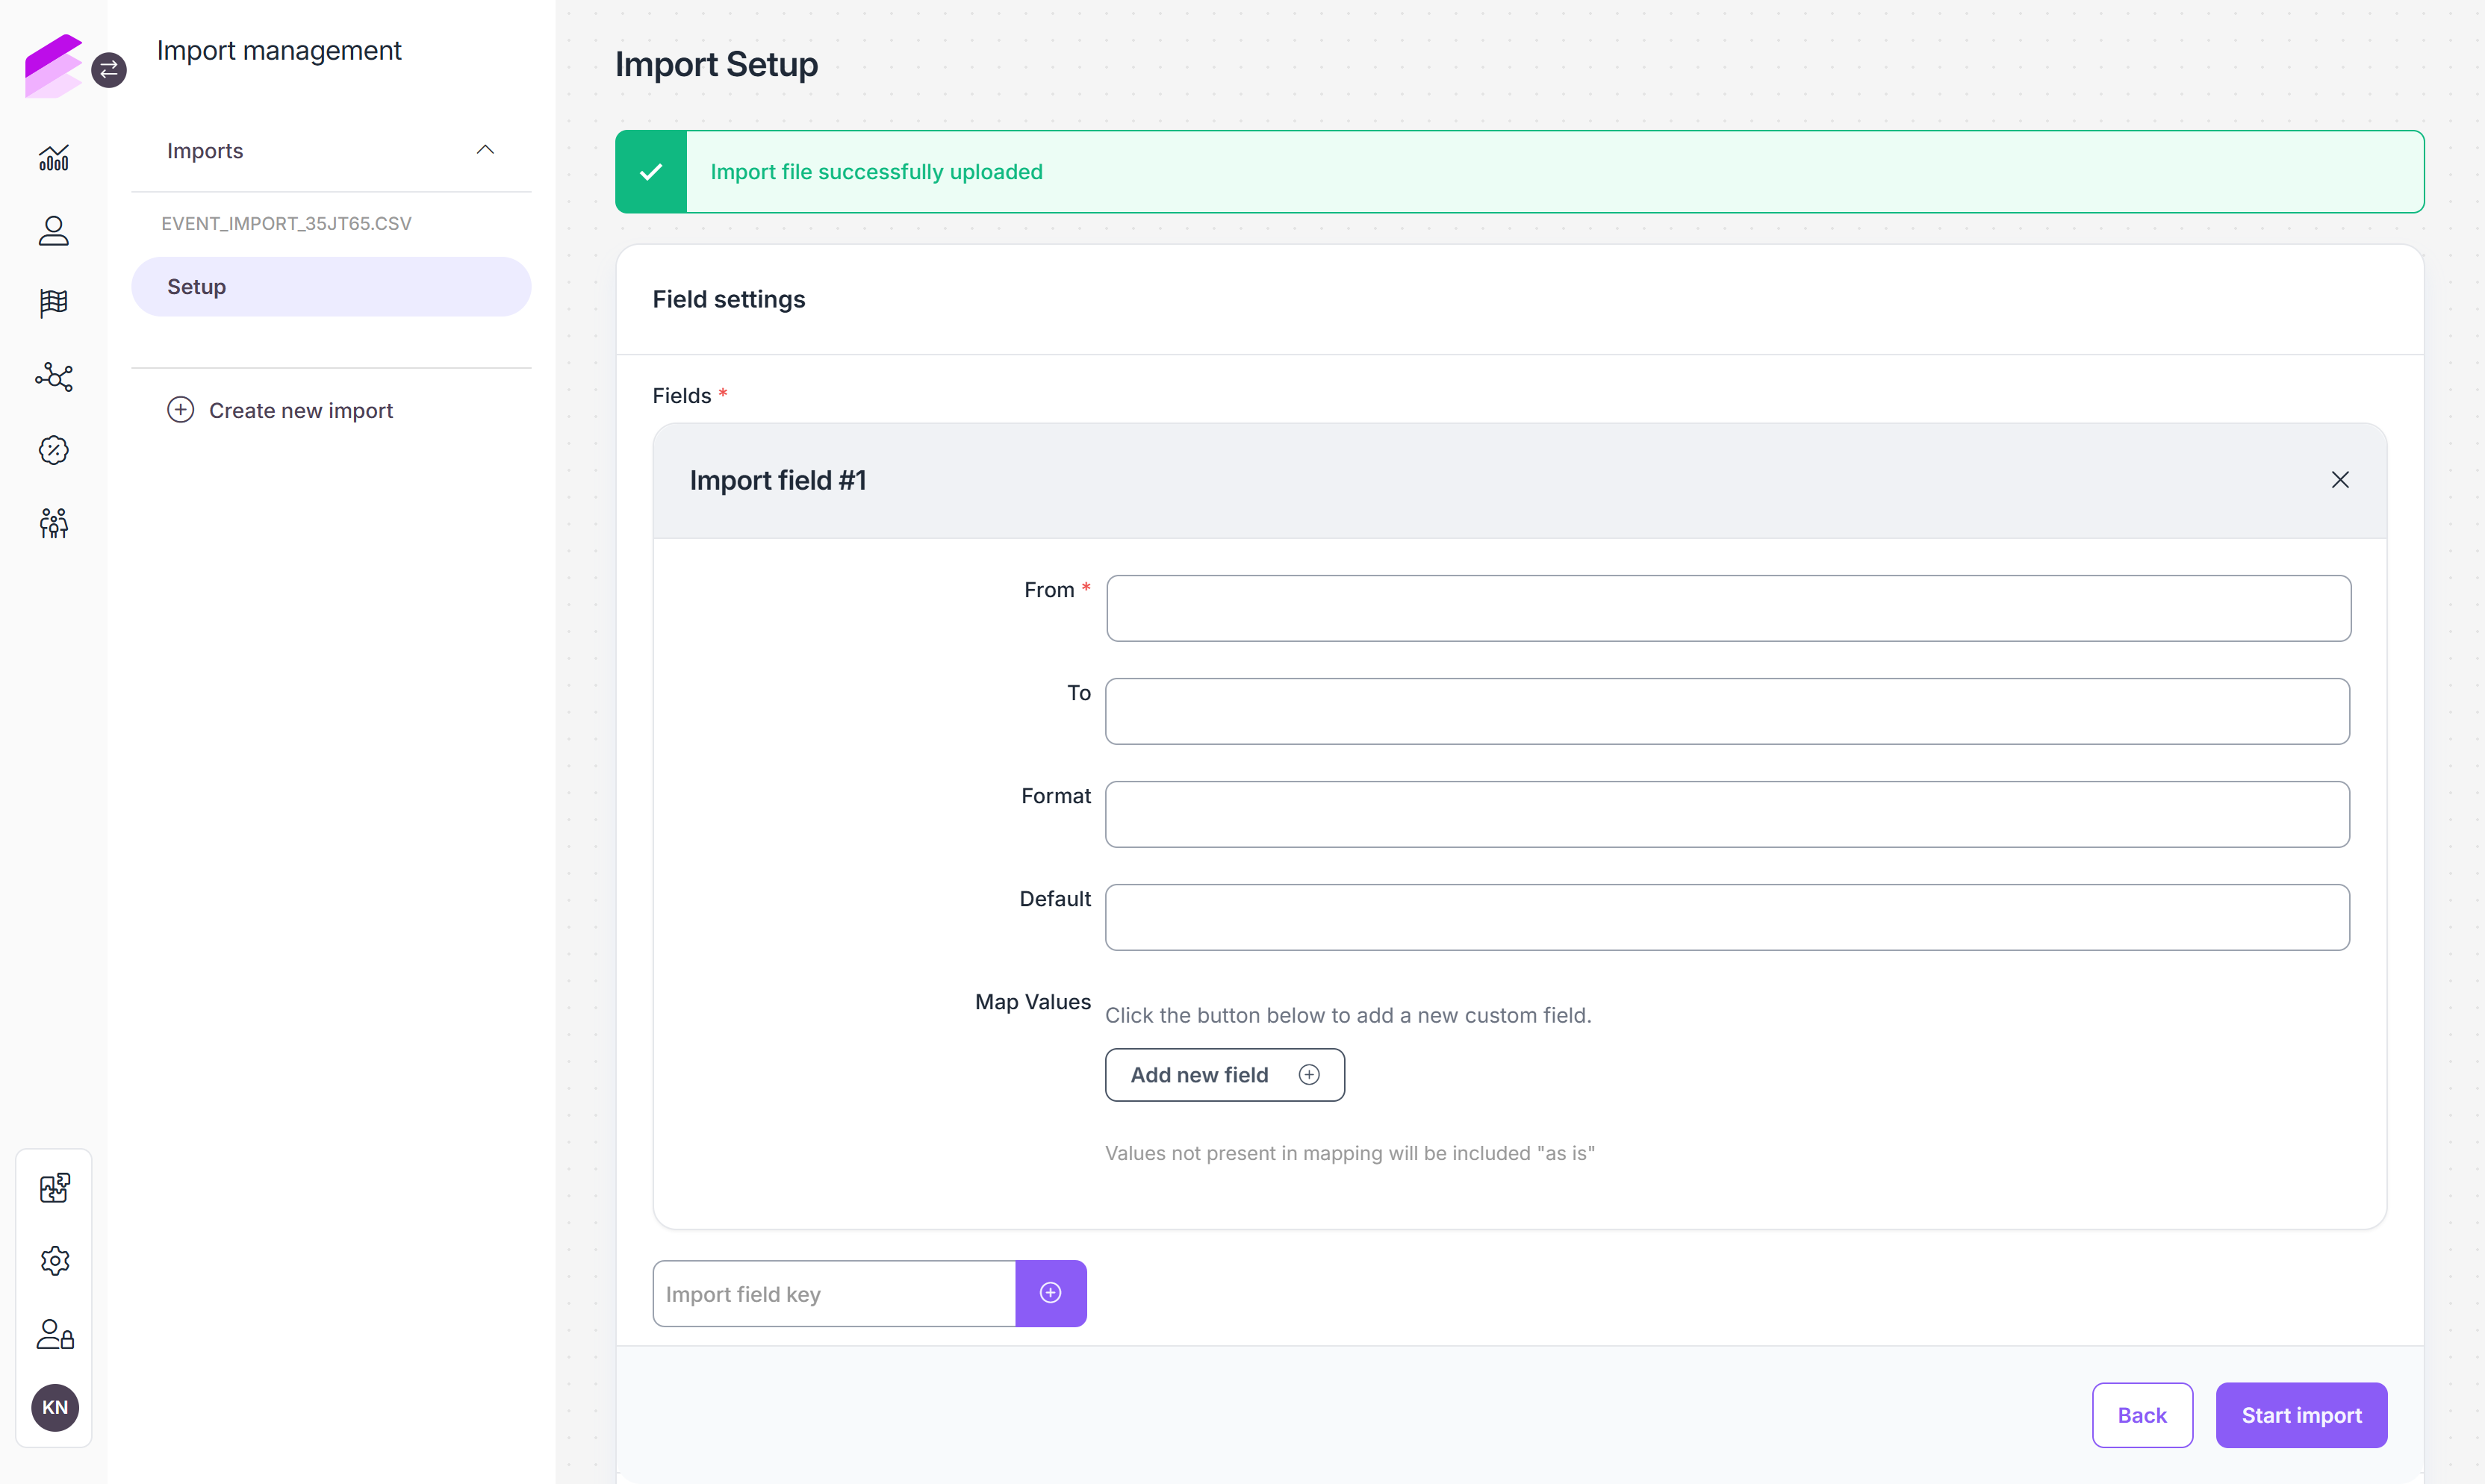
If the upload is successfully processed, you’ll receive a success message at the top of the page, indicating that you can proceed with the data import configuration.
After uploading the import file, it will be added to the list of imports on the Imports page with uploaded status. If you prefer not to complete the import configuration immediately after the upload, you can return to it anytime using the Setup button that appears next to the import in the list.
Field settings
Click the + button next to Fields to adjust the headers of your CSV file or and field names used in the JSON file to match the attribute names within Antavo. This step is optional.
From: The column header in your import file.
To: The name of the target attribute to be populated by the From column values of the import file. Please contact the Antavo Service Desk for assistance in defining the field name.
Format: The format of the date values in the data column. It must adhere to the PHP date format.
Default: Empty values in the file will be filled with the default value
Map values: You can replace the values of the data fields in your import file by mapping the current values with the values to be imported to the corresponding Antavo data fields. Contact the Antavo Service Desk if you need assistance in adding values acceptable to specific Antavo data fields (e.g., mapping woman/man values to female/male for importing into the Antavo gender field).
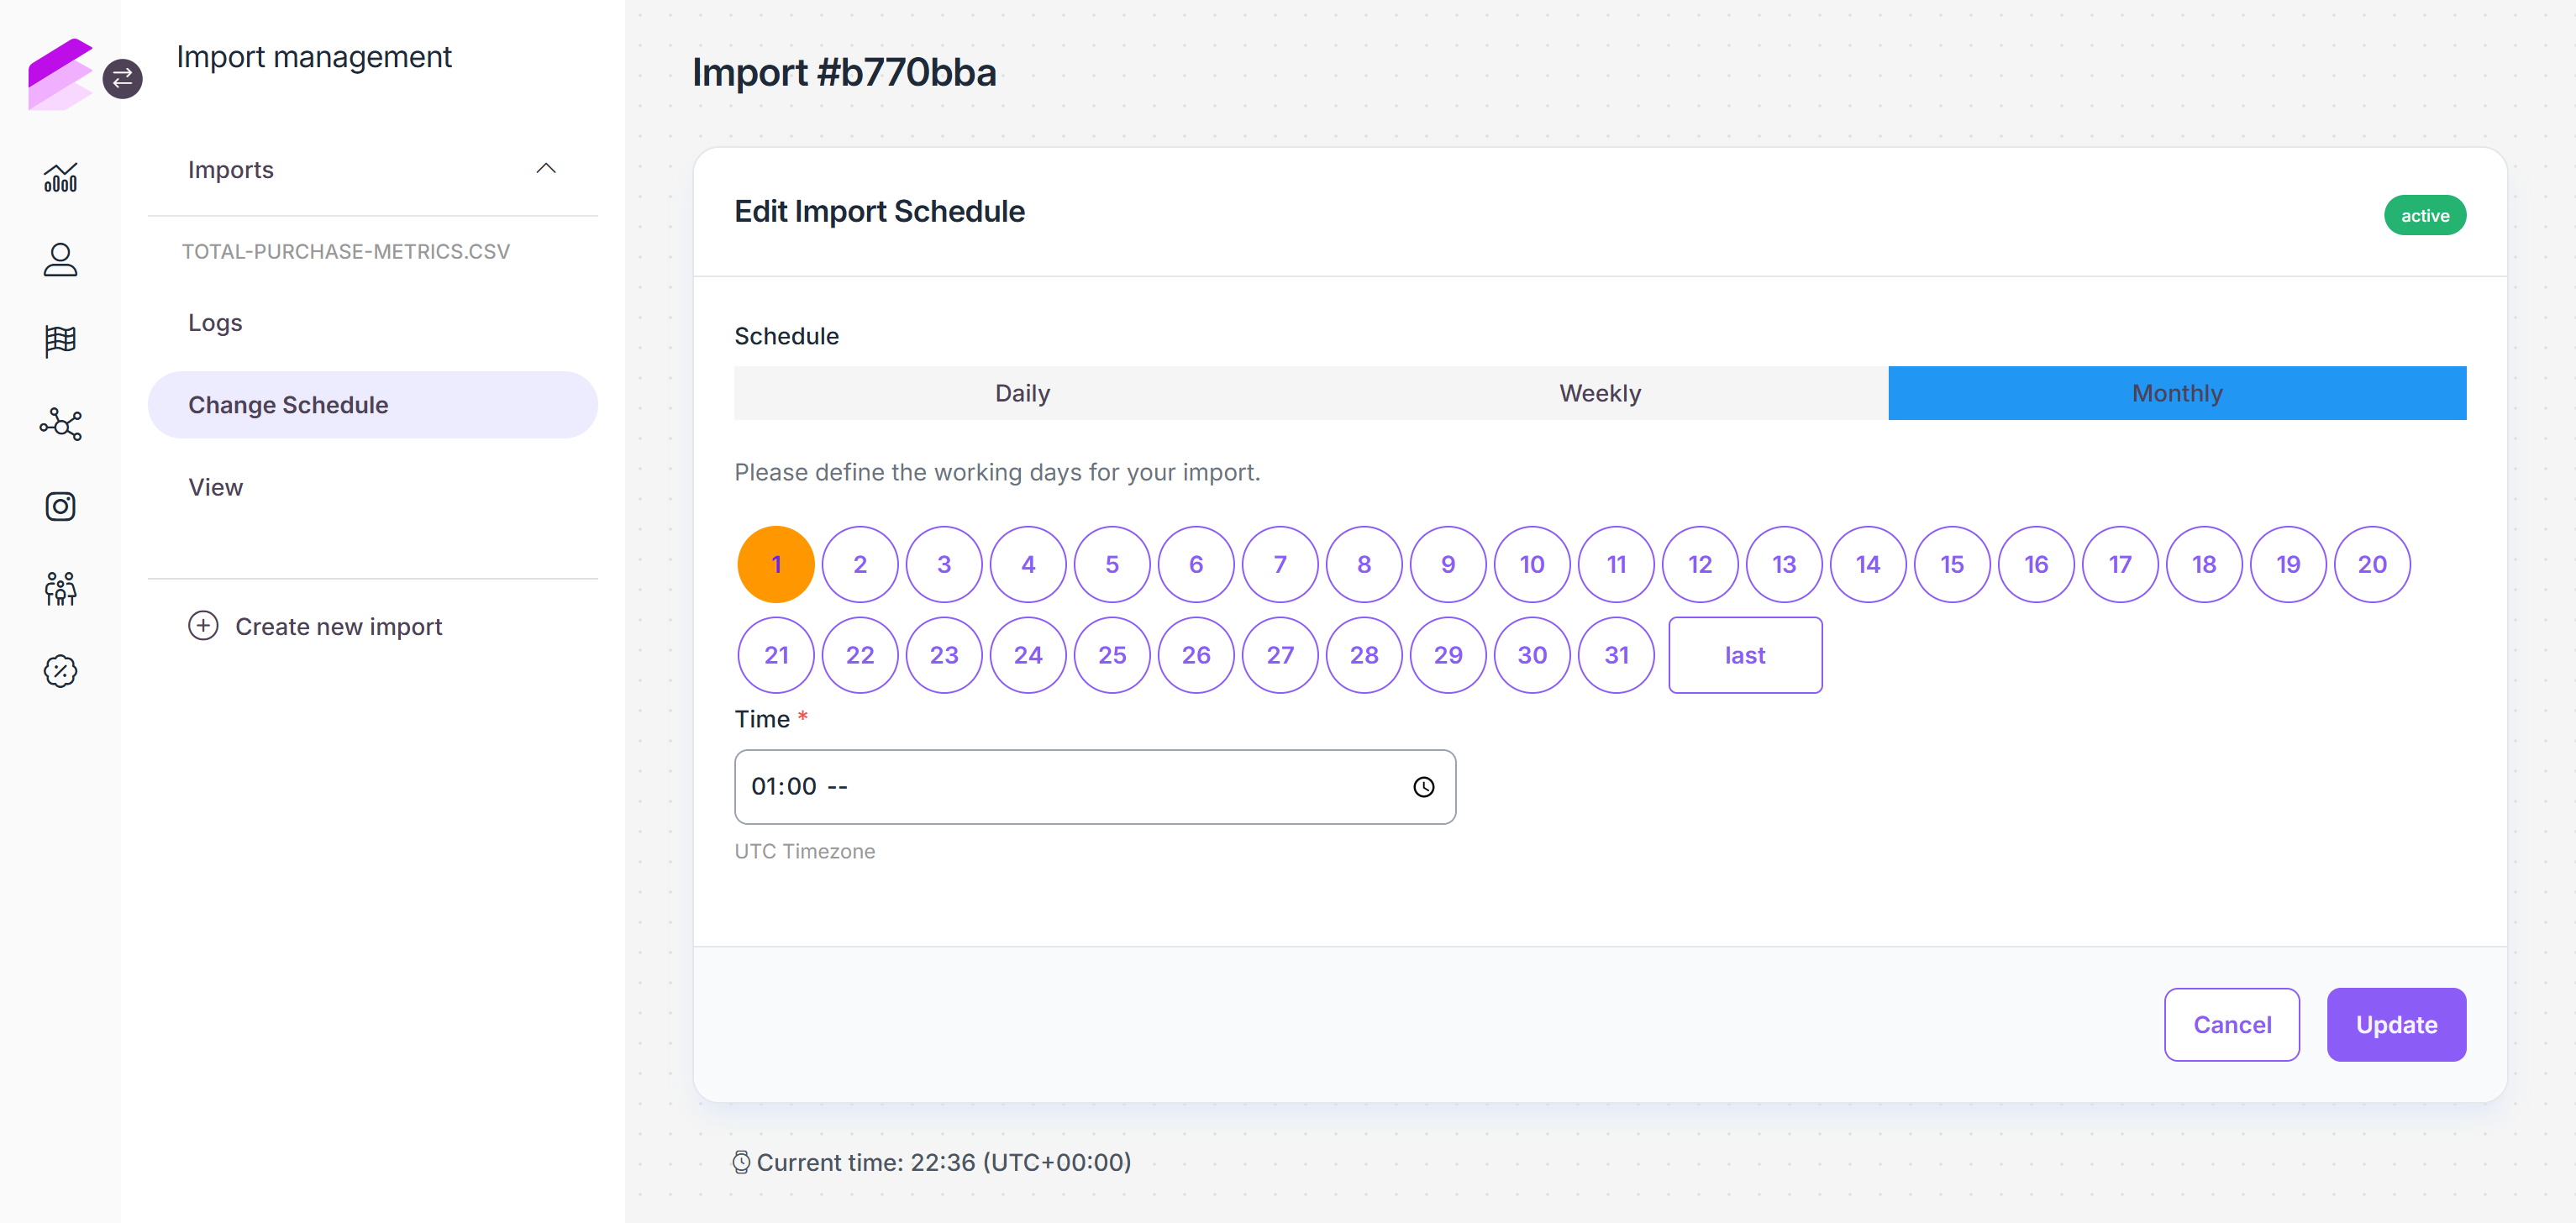
Scheduling
Scheduling allows imports to run at a specified time or be set as recurrent based on the UTC timezone.
By default, CSV or JSON files are imported immediately (None option), but importing can be scheduled by selecting the On-date or Repeated from the dropdown list. Ensure you enter the date in a valid format; otherwise, the import cannot be executed.
On-date: The import starts at a predefined date and time.
Use the date and time selector or enter the details manually in the Date and Time fields.
Repeated: Select this option to set the data import to be triggered periodically.
Daily: Set the time of day when the import should start.

Weekly: Select the day(s) of the week and set the time of day.

Monthly: Select the day(s) of the month and set the time of day. You can use the Last value to ensure the import starts on the last day of the month, regardless of the number of days in a given month.

Scheduling of previously configured imports may be modified after creation.
Queued row processing
Enabling the queued row processing option initiates the pre-processing of imported records before insertion into the database. Preloading accelerates the import procedure and highlights any records that cannot be imported.

File format options
CSV file imports
Delimiter
Use the dropdown list to select the value delimiter that is used in the file. The default option is the comma, but you can also choose a semicolon, pipe, or tab.Enclosure
Currently, the double quote is the only option to indicate that a delimiter character is used within a single field value. For example, if a comma is used as the delimiter, the value "news, entertainment" will be processed as a single value in one data field, while without quotes, it would be processed as two separate values
JSON file imports
Object and value in one row
When this option is enabled, only JSON files with object key-value pairs on the same row can be imported.
Module options
Duplication handling
You can decide how to handle data rows that include entities already stored in the Antavo database.Skip: Data rows of existing entities will be skipped, leaving the entity unchanged.
Update: Data rows of existing entities will be processed, and the entity will be updated according to the CSV file data.
Note that when updating a set of uploaded coupons, only unassigned coupons can be updated.
Coupon pool
Use the dropdown list to select the coupon pool previously configured in the Coupons module to which the coupons should be uploaded.You can either select a coupon pool,
or choose the Based on the chosen file option if the ID of the coupon pool has been added as a data column in your import file.
Reward
This option is only applicable if you upload coupons directly from the reward configuration page instead of using a coupon pool created in the Coupons module. Use the dropdown list to select the coupon type-reward previously configured in the Rewards module to which the coupons should be uploaded.You can either select a reward,
or choose the Based on the chosen file option if the ID of the reward has been added as a data column in your import file.
Please note that if you select a coupon pool or reward but add the ID of another pool or reward to the applicable column of the import file, these data column values are ignored, and all the coupon codes will be uploaded to the selected coupon pool or reward automatically.
Click Start import to begin the import process. Once the import has started, the settings (except for scheduling settings) are non-modifiable.
Import summary
Once the process has been initiated, the View tab will be added to monitor the results of the import process.
If queued processing has been enabled, the Log section on the View page is empty, and all the record-level results are listed under the Preloaded data tab.
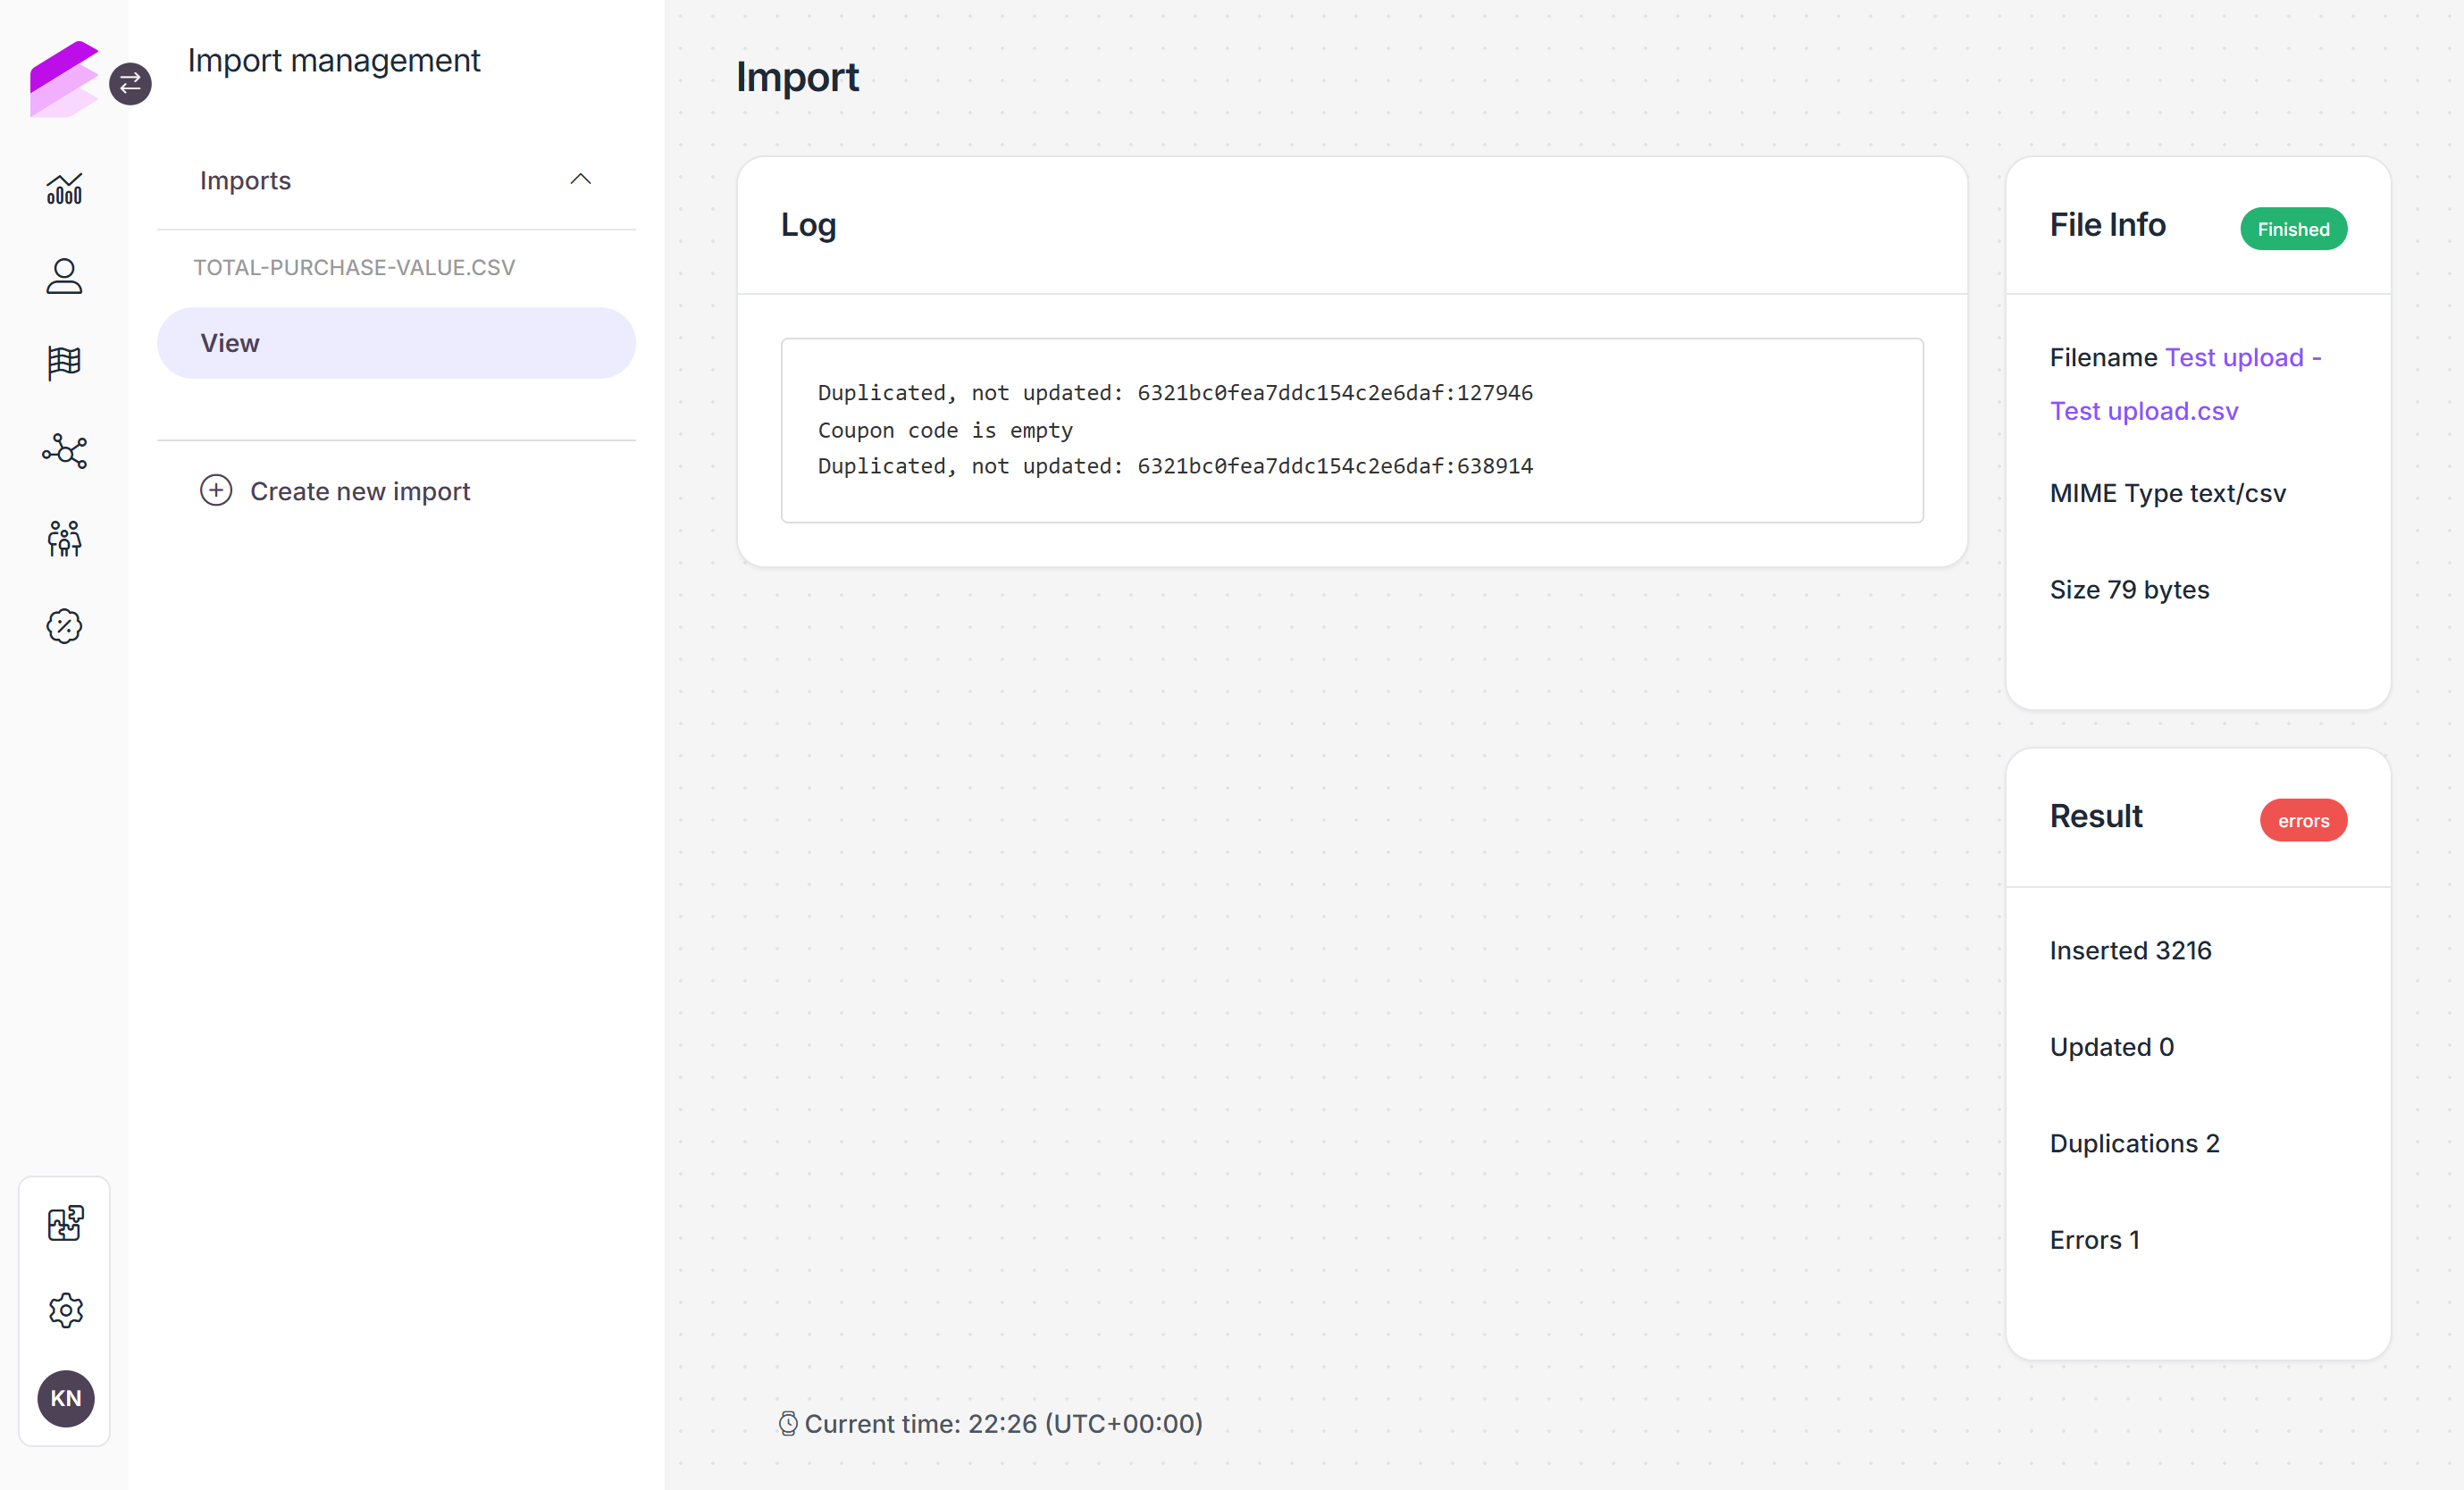
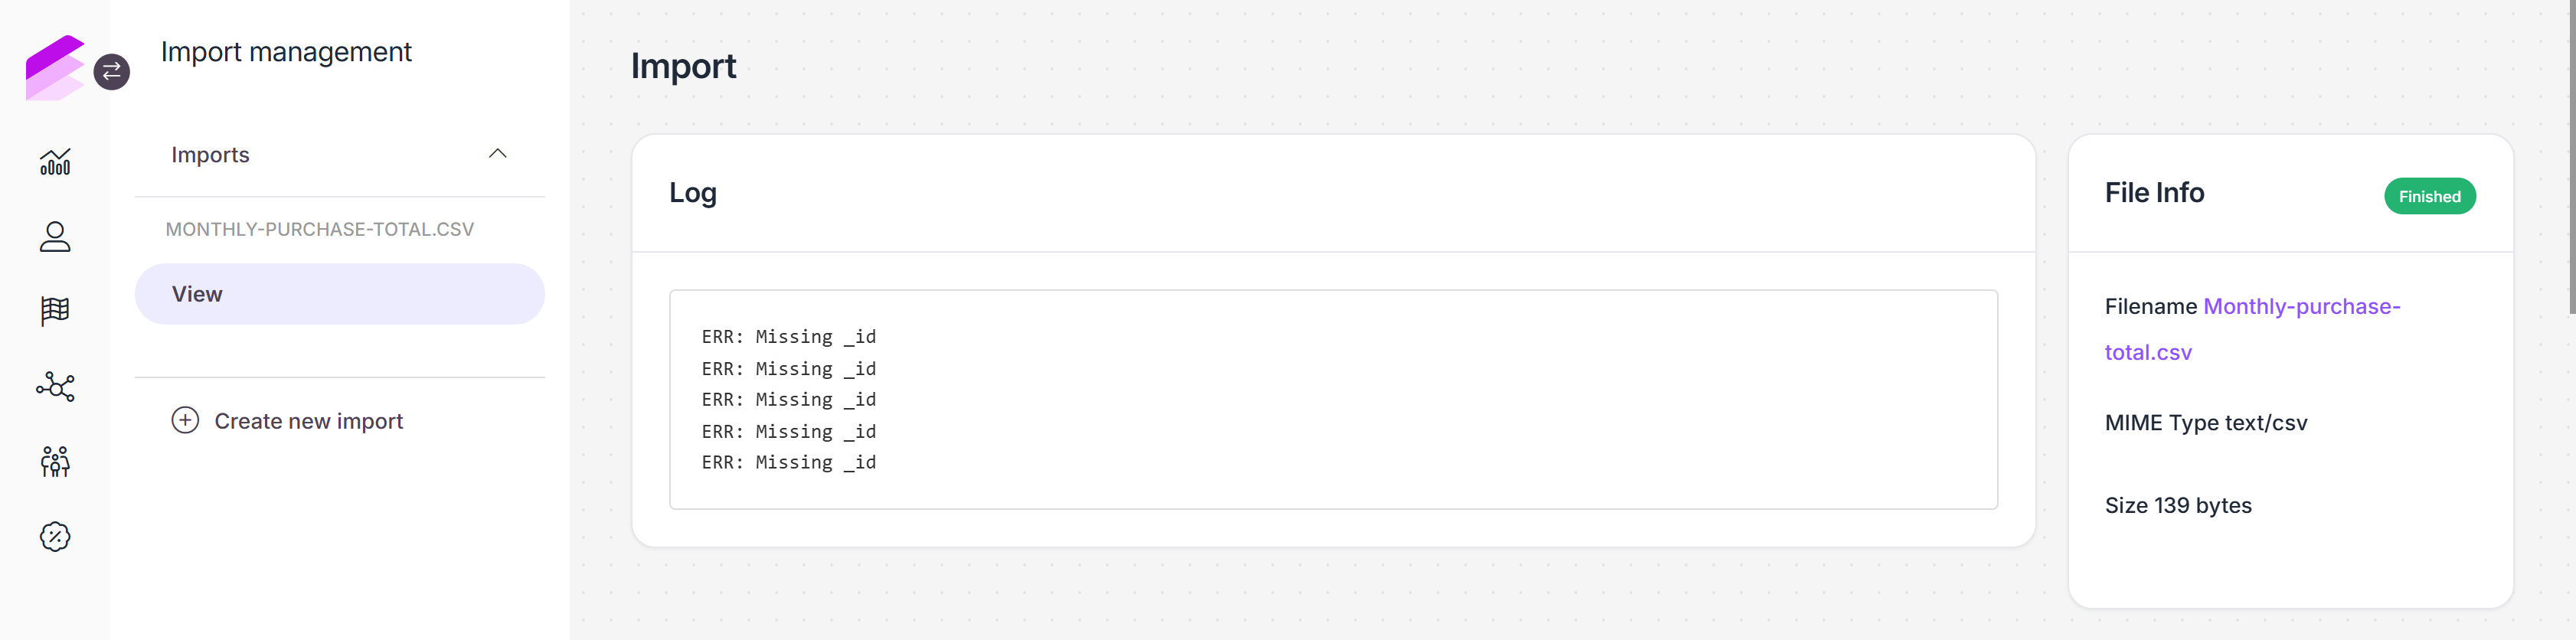
While the Log details the output of the process, the File info summarizes the import file properties.
The Results section shows if the import file was successfully processed and displays the number of:
Entities that were inserted or updated in the database
Duplications handled
Erroneous entries
If the number of errors is a non-zero value, a red errors label is displayed in the Results section, indicating that some of the records were not imported. Please check the Log sections to learn more about why the import failed.
Creating an import file
Before you begin, you can download templates from the data source selection page. Both CSV and JSON templates are available to help you structure your import file correctly. It is essential to follow the format of the templates exactly, otherwise, the import will not be successful.
CSV
Header
In the first row of the CSV file, define the name of the data field as the headers of your data columns. You can use the name of the loyalty target fields, but you can map the fields of the import file with the loyalty fields during the import setup via the Field Settings section.
Here is an example of how the header of a reward import appears in the import file without mapping.
status,type,name,description,start_date,end_date,points |
When importing events, ensure that you include both the customer and action columns otherwise, the import process will fail.
Rows
After preparing the headers, add the data values in subsequent rows, with each row representing one item to register.
Here is an example of the content of the reward import file, including the headers and the rewards to import.
status,type,name,description,start_date,end_date,points |
inactive,downloadable,reward name,reward description,2021-05-31,2021-06-30,1500 |
There’s no limit on the number of items that can be included in an import file.
JSON
JSON files should be formatted to ensure clarity and consistency, making it easier for the system to process the data accurately. The file should contain a single array of JSON objects. Each object represents an individual data entry and must include all required fields, following the schema of the downloadable template. Ensure the file is encoded in UTF-8 format to support a wide range of characters, and that every key matches the target field names, or map them during the import setup via the Field Settings section.
When importing JSON data, the file should follow this structure:
[ { "status": "active", "type": "gift_card", "name": "Example Name translatable", "description": "Example Description translatable", "redeem_instructions": "Example Redeem instructions translatable", "terms": "Example Terms and Conditions translatable", "claim_button_label": "Example Claim button label translatable", "image_url": "Example Image URL", "cost": 100, "price": 100, } ]Import details
After creating the import, you’ll be automatically directed to the View tab of the import page to monitor its status, visible in the upper right corner. In the Log section, you can review any errors encountered during the import process.
The Result section provides the following insights:
Inserted: Number of records that were added during the import process.
Uploaded: Number of data values that were modified during the import process.
Duplication: Number of data values that were already present in the field.
Errors: Number of records that were not processed due to errors, indicated in the Log section of the page.
You can access the Import details page anytime from the Imports list by clicking the Details button next to the import.
Downloading import files
To download previously imported files, follow these steps:
Navigate to the Imports module page
Click the Details button in the corresponding row
Navigate to the View tab, which will display the File info section on the right-hand side
Click on the name of the import file
If there is no name, File not available anymore will appear in place of the file name, indicating that the file is no longer accessible in the database.
The file will be downloaded with the same filename and format as it was previously imported.
To ensure the security of personally identifiable information, Management UI administrators can configure access levels for users regarding downloads under the Roles page.
Inactivate and reactivate repeated imports
You can inactivate repeated scheduled imports anytime by following these steps:
Click the Set inactive button located in the upper right corner
Confirm your choice in the dialog that appears.
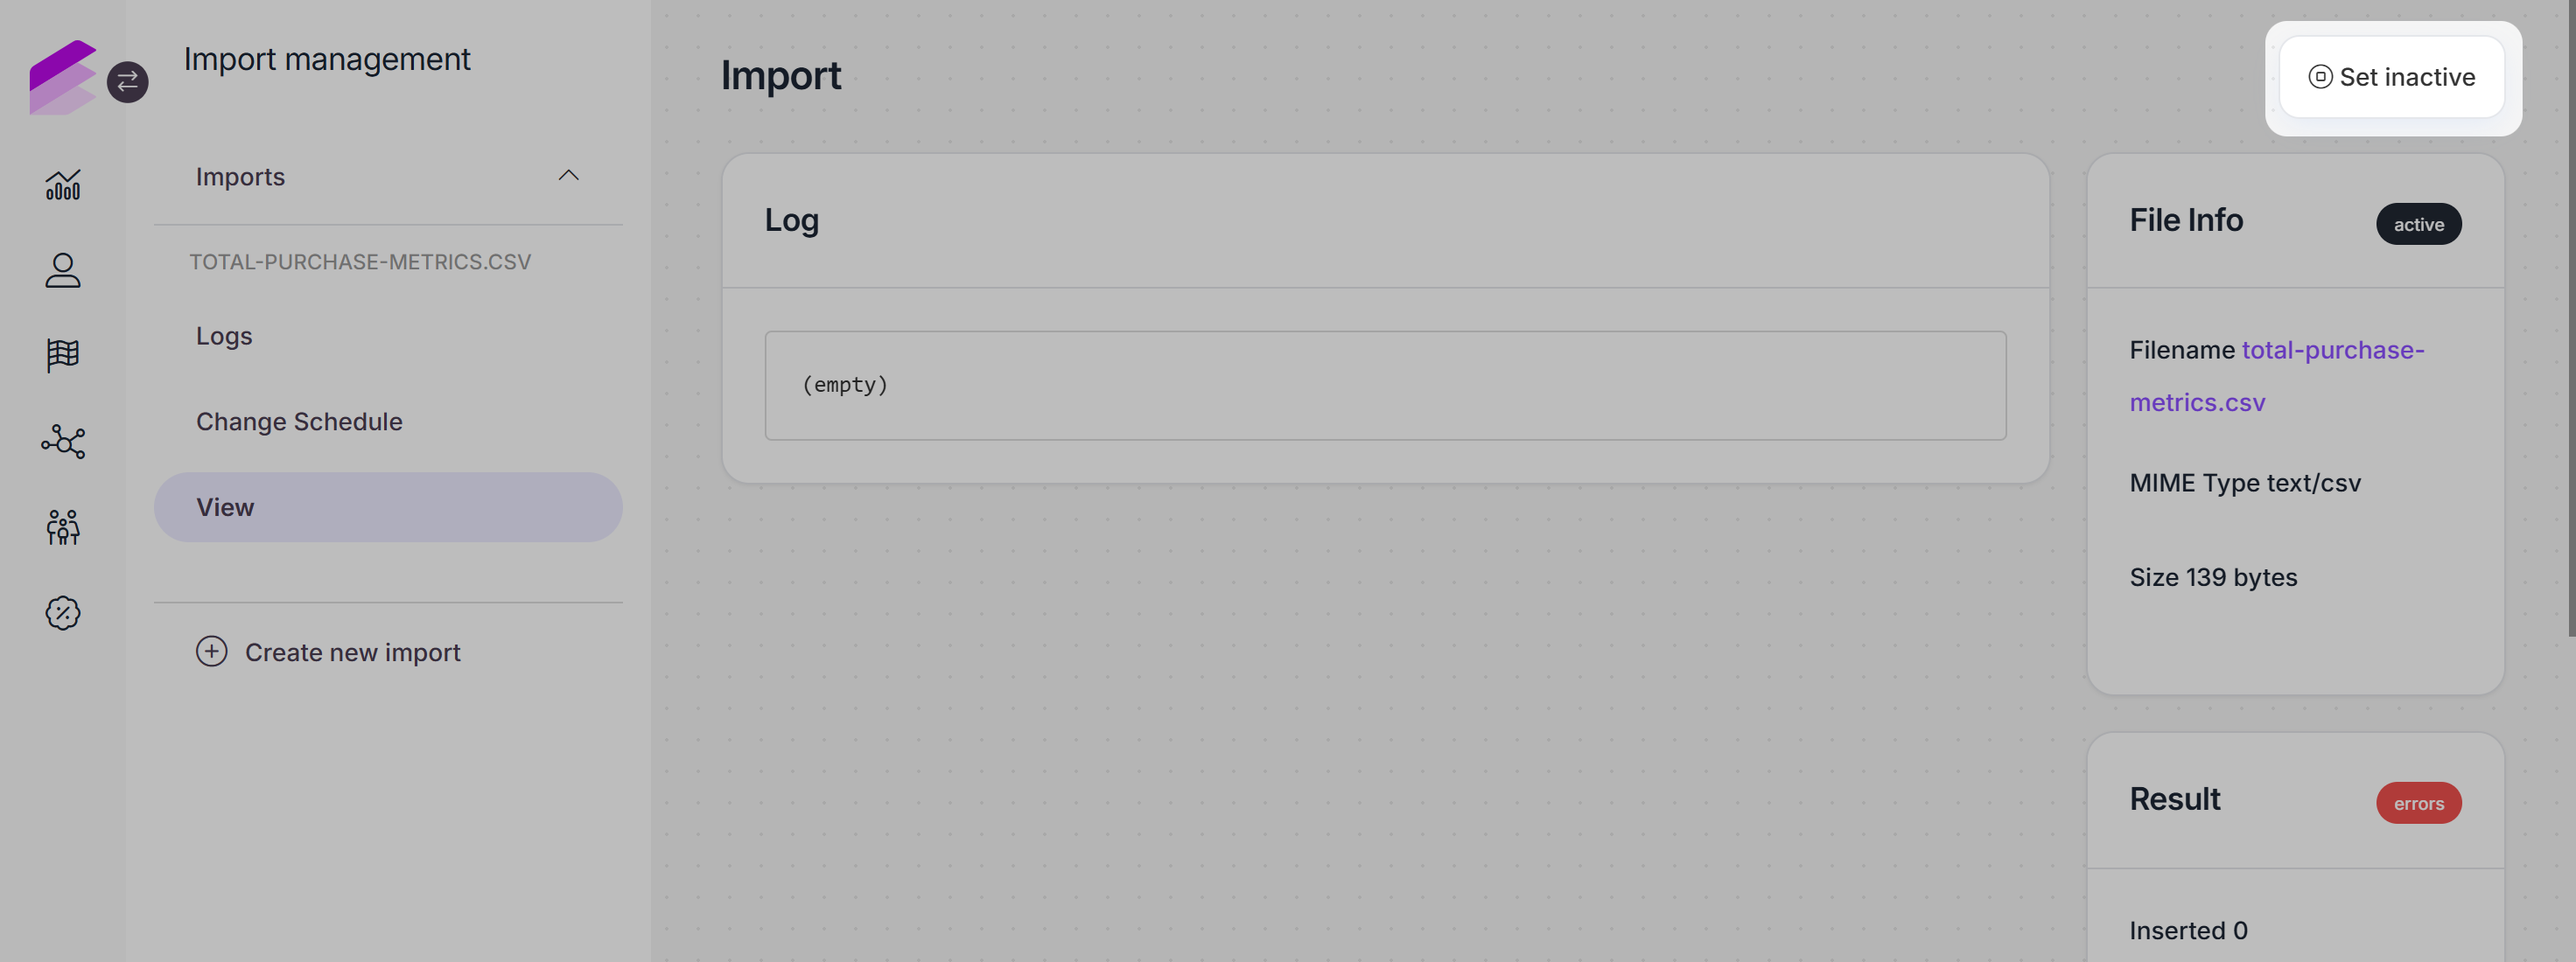
Once the import is inactivated, the button is replaced by a Set active action button, which you can use when you decide to reactivate the import again.
Change import schedule
The scheduling of previously created scheduled imports can be updated through the Import page by following these steps:
Navigate to the Imports module page
Click the Details button in the corresponding row
Navigate to the Change Schedule tab
Modify scheduling settings as needed
Switching between On-date and Repeated schedule types is not possible.Click Update to save your changes
Please note that changing schedule settings does not apply to On-date scheduled imports that have already run their courses.
Preloaded data
If queued row processing is enabled, preloaded records are displayed once the import process is initiated and pre-processing is completed.
The following information is displayed for each record:
Row number: The ordinal number of the row.
Status: Status of the record import (pending, finished, failed).
Error: Error occurred during the import process, if any.
Imported at: Date of the import execution.
By clicking the > icon at the beginning of each row, you can access detailed information about the preloaded record:
Field name
Field value
Field target (the value provided in the To field under Field settings, if any)
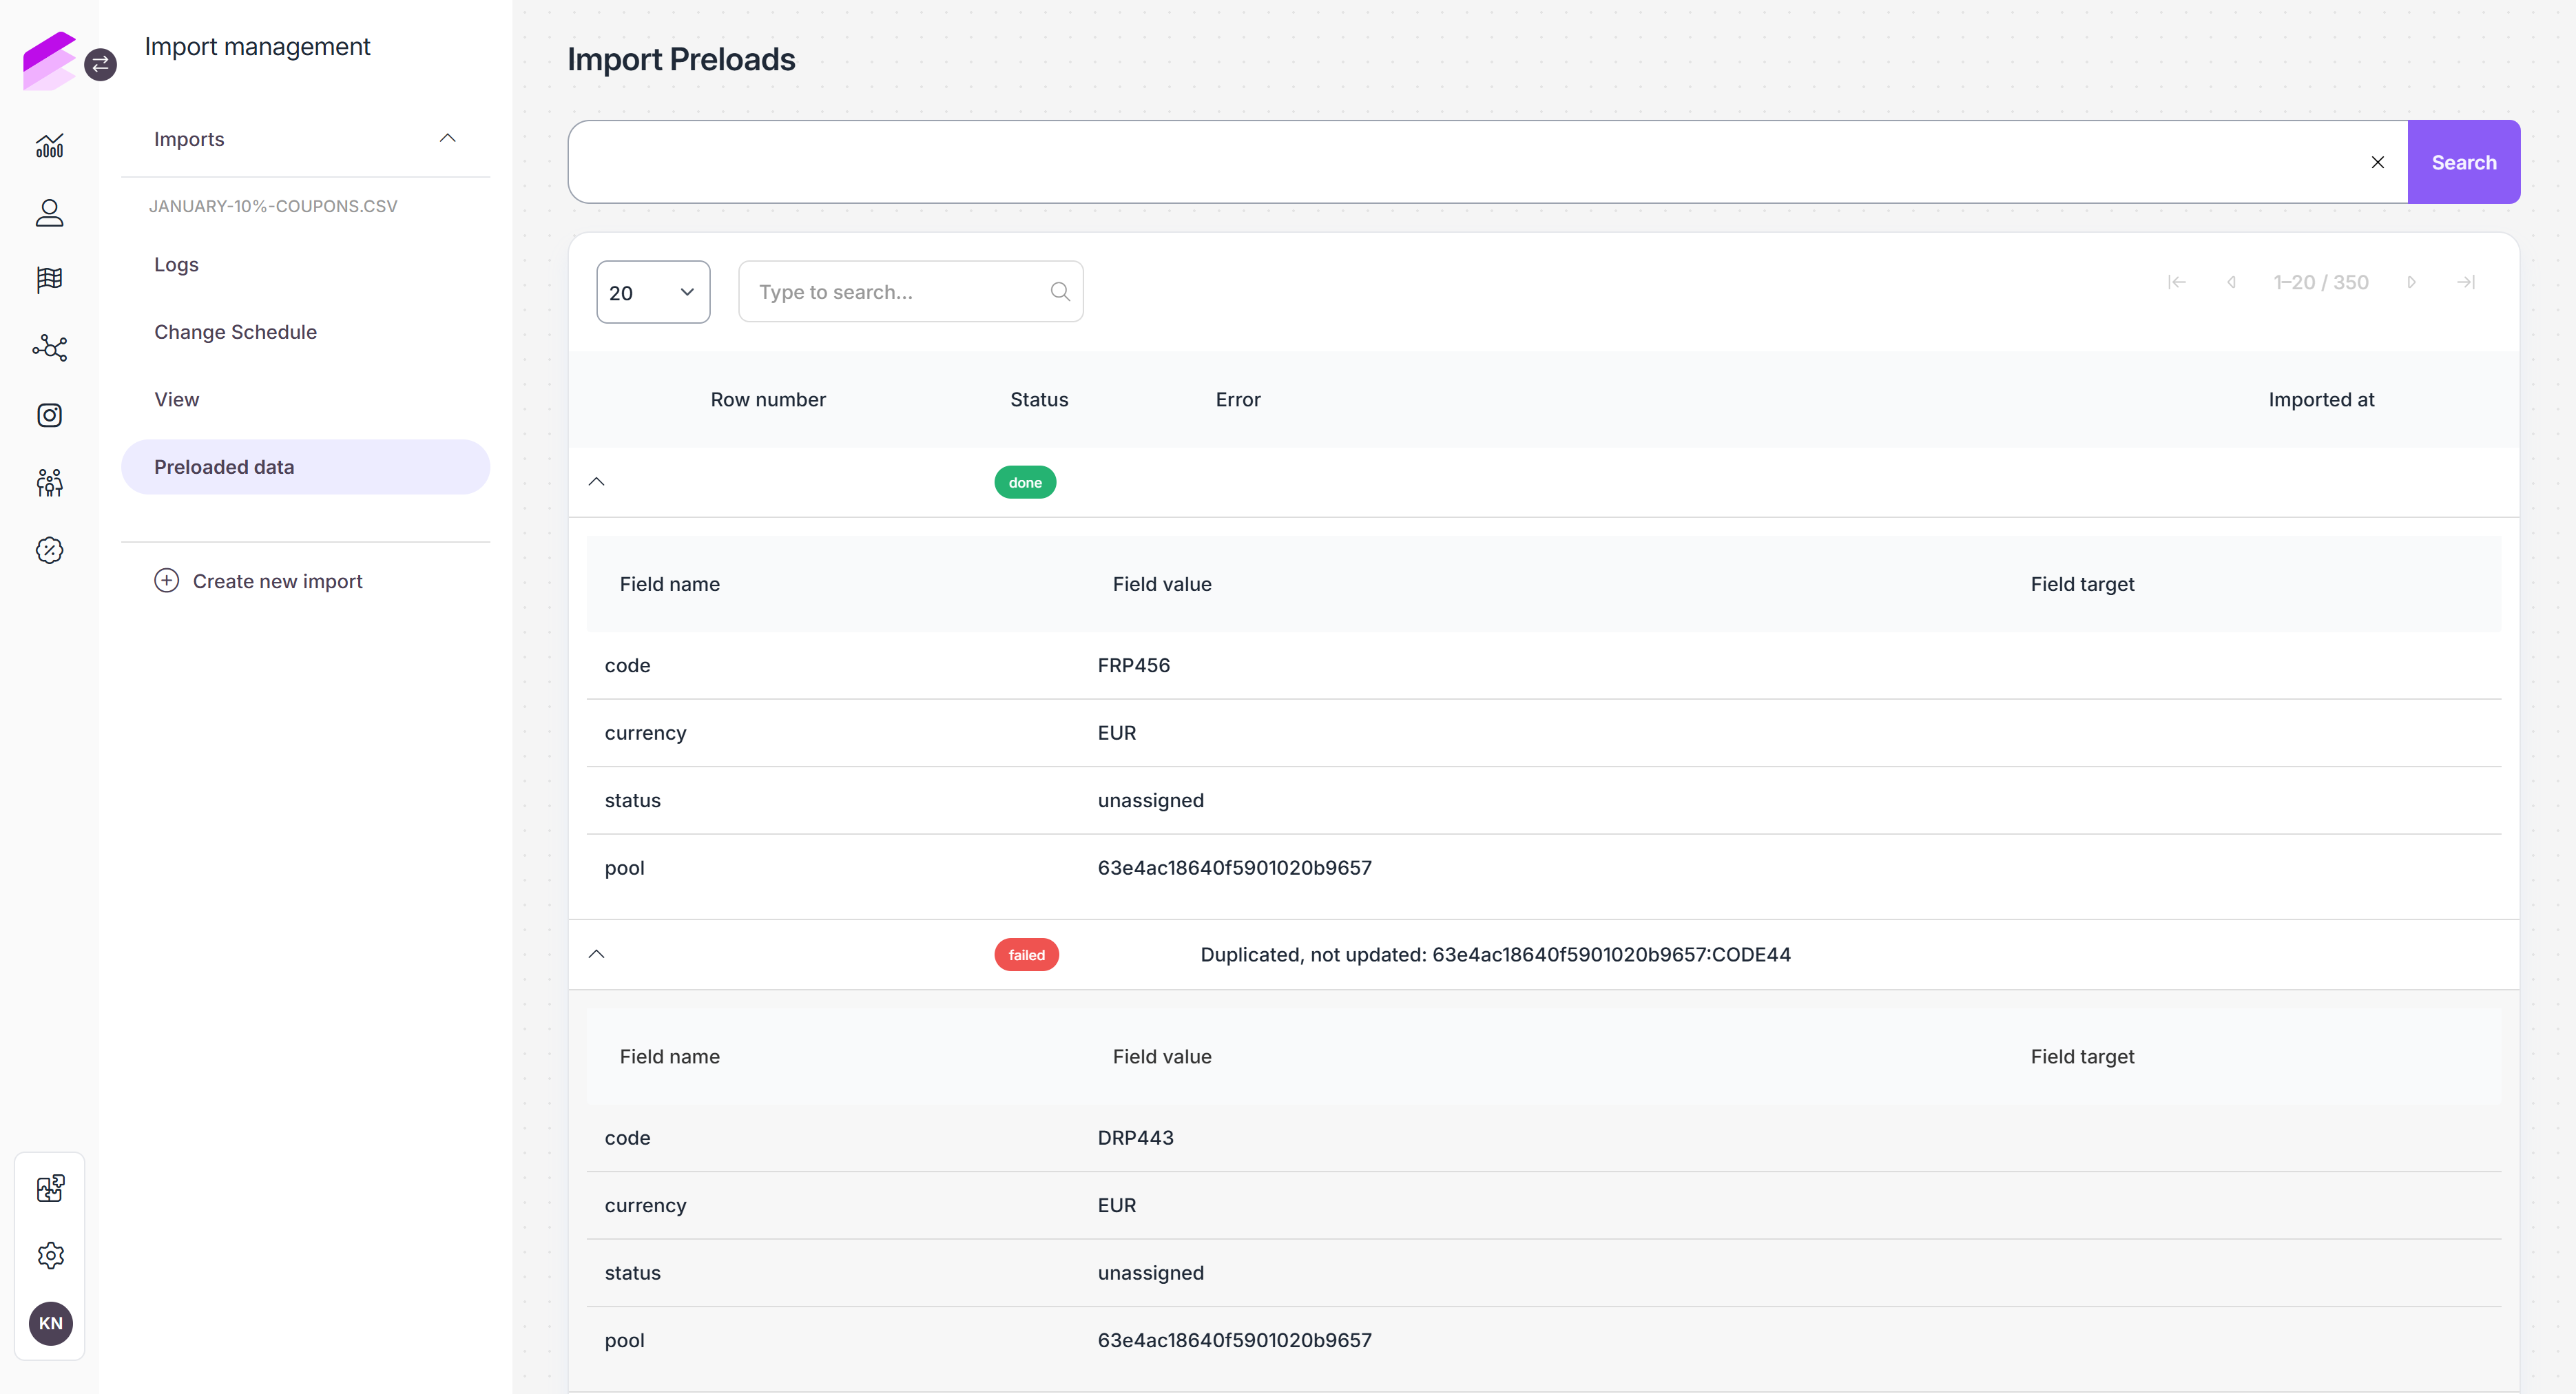
Using the search bar at the top, items can be filtered by status and row number.
Logs
A Logs tab is automatically added if the import was created with repeated scheduling. The page lists all the runs of the configured import with the date of running and the current status, which can be:
Processing: The import process is in progress.
Success: The import process has finished.
Failed: The export process has failed. Please contact the Antavo Service Desk for further information if the issue persists.
At the end of each row, there is a button to download the import file.
If you choose to turn on the queued processing option during import setup, you can view the preloaded data of each import occurrence by clicking the corresponding Preloaded data button.