Customer Import is one of the import models available in the Imports module and is designed for creating and updating customer records in Antavo in a controlled, self-service manner. It is primarily intended for large-scale customer data migrations during go-live preparation.
Unlike the standard Customers model import, this version introduces a structured, multi-step workflow with pre-processing, flexible field mapping, and validation. This allows data issues to be identified and resolved early, reducing operational risk and minimizing the need for technical intervention.
Each imported record represents a customer. During import, Antavo determines whether the customer already exists in the workspace and applies the appropriate action:
If the customer ID does not exist, a new customer is created.
If the customer ID already exists, the existing customer record is updated.
The import uses Opt-In and Profile events to apply customer data changes in a consistent and traceable way, ensuring the correct customer state throughout the process.
Creating a new import
To create a new import:
Navigate to the Imports module
Click Create new import in the left sidebar
Select Customer Import (Beta) as the data model
Click Next
.png)
Customer import follows a fixed, multi-step workflow. Each step must be completed successfully before continuing.
.png)
You can cancel the import process at any time before it is started in the final step. Once the import has begun, it cannot be canceled.
1. File upload
After selecting the Customer Imports model, upload one or more JSON or CSV files by clicking Select Files or by dragging and dropping files from your computer into the upload area.
.png)
A JSON and CSV file template download links are available on this page and must be followed when preparing import files to ensure correct structure and field usage.
The Import Fields collapsible section is also available, which provides the list of customer attributes that can be imported.
2. Pre-processing
Before customer records can be imported, uploaded files must be pre-processed. Click Start upload to begin pre-processing
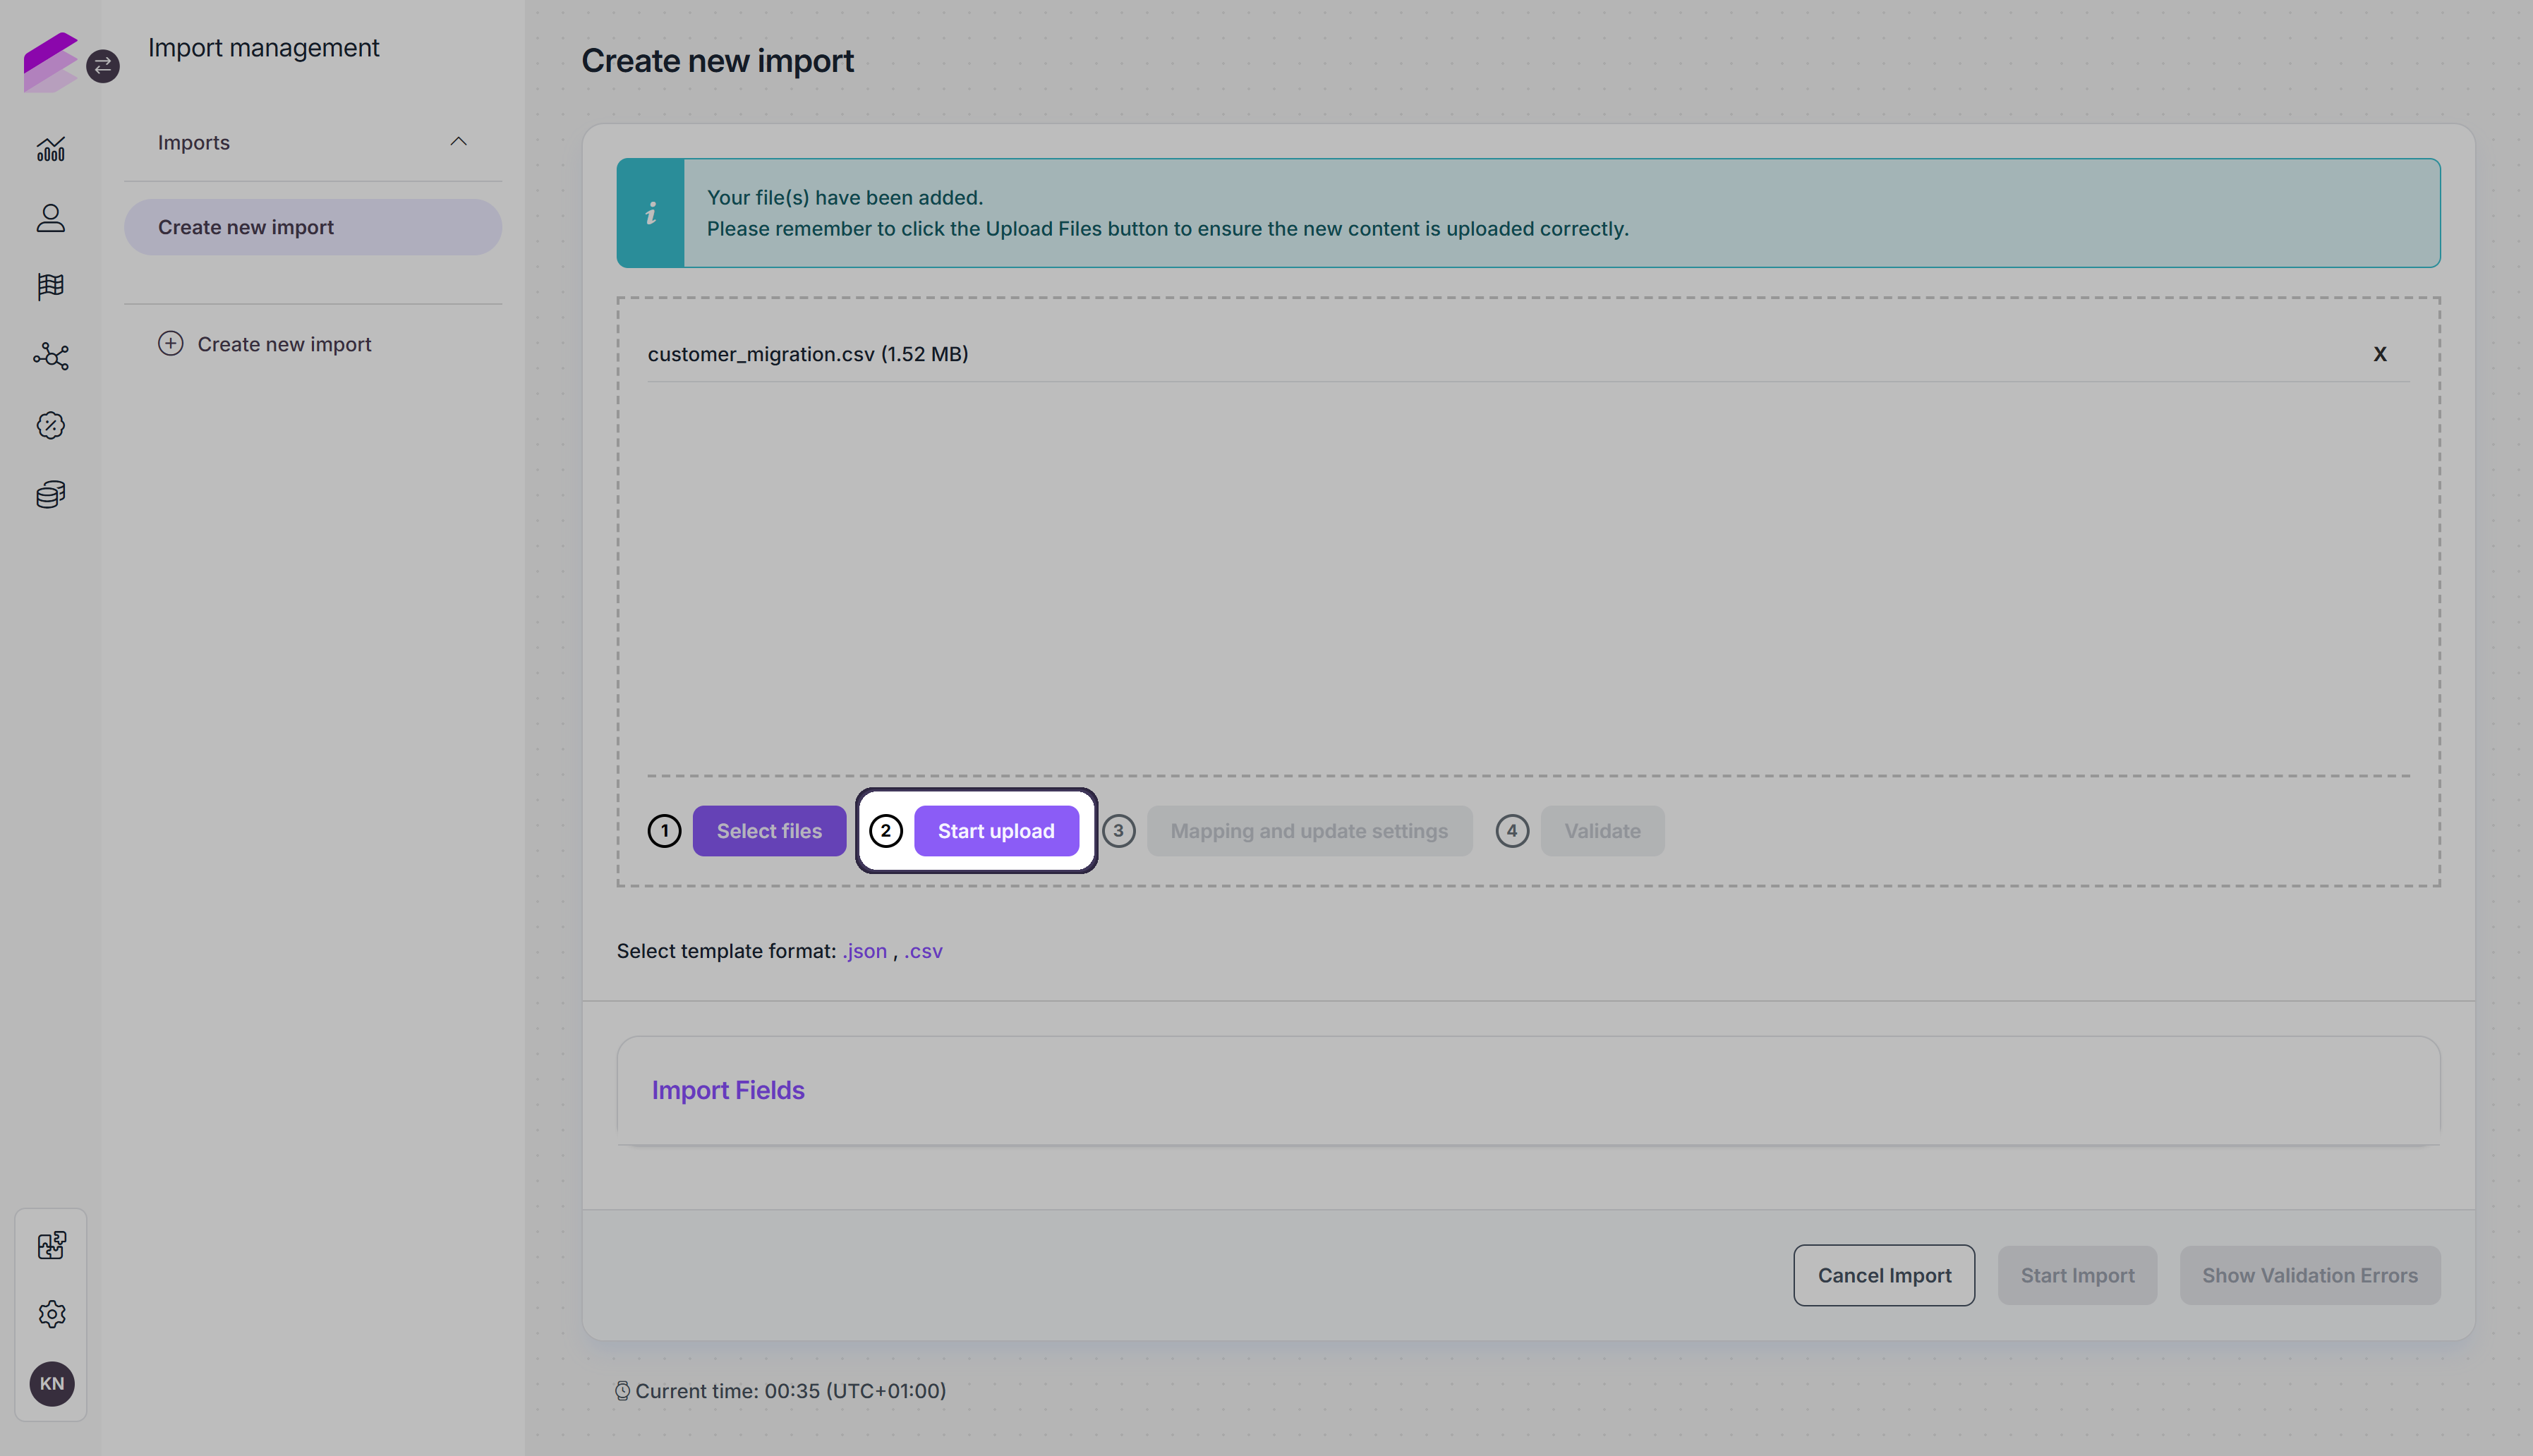
During this step, the system validates the basic structure of the uploaded files and prepares them for mapping. This validation runs automatically and focuses on file-level correctness rather than data content.
Typical checks performed during pre-processing include empty files, unsupported or inconsistent file structure, missing headers (CSV files), and structural format issues in JSON files.
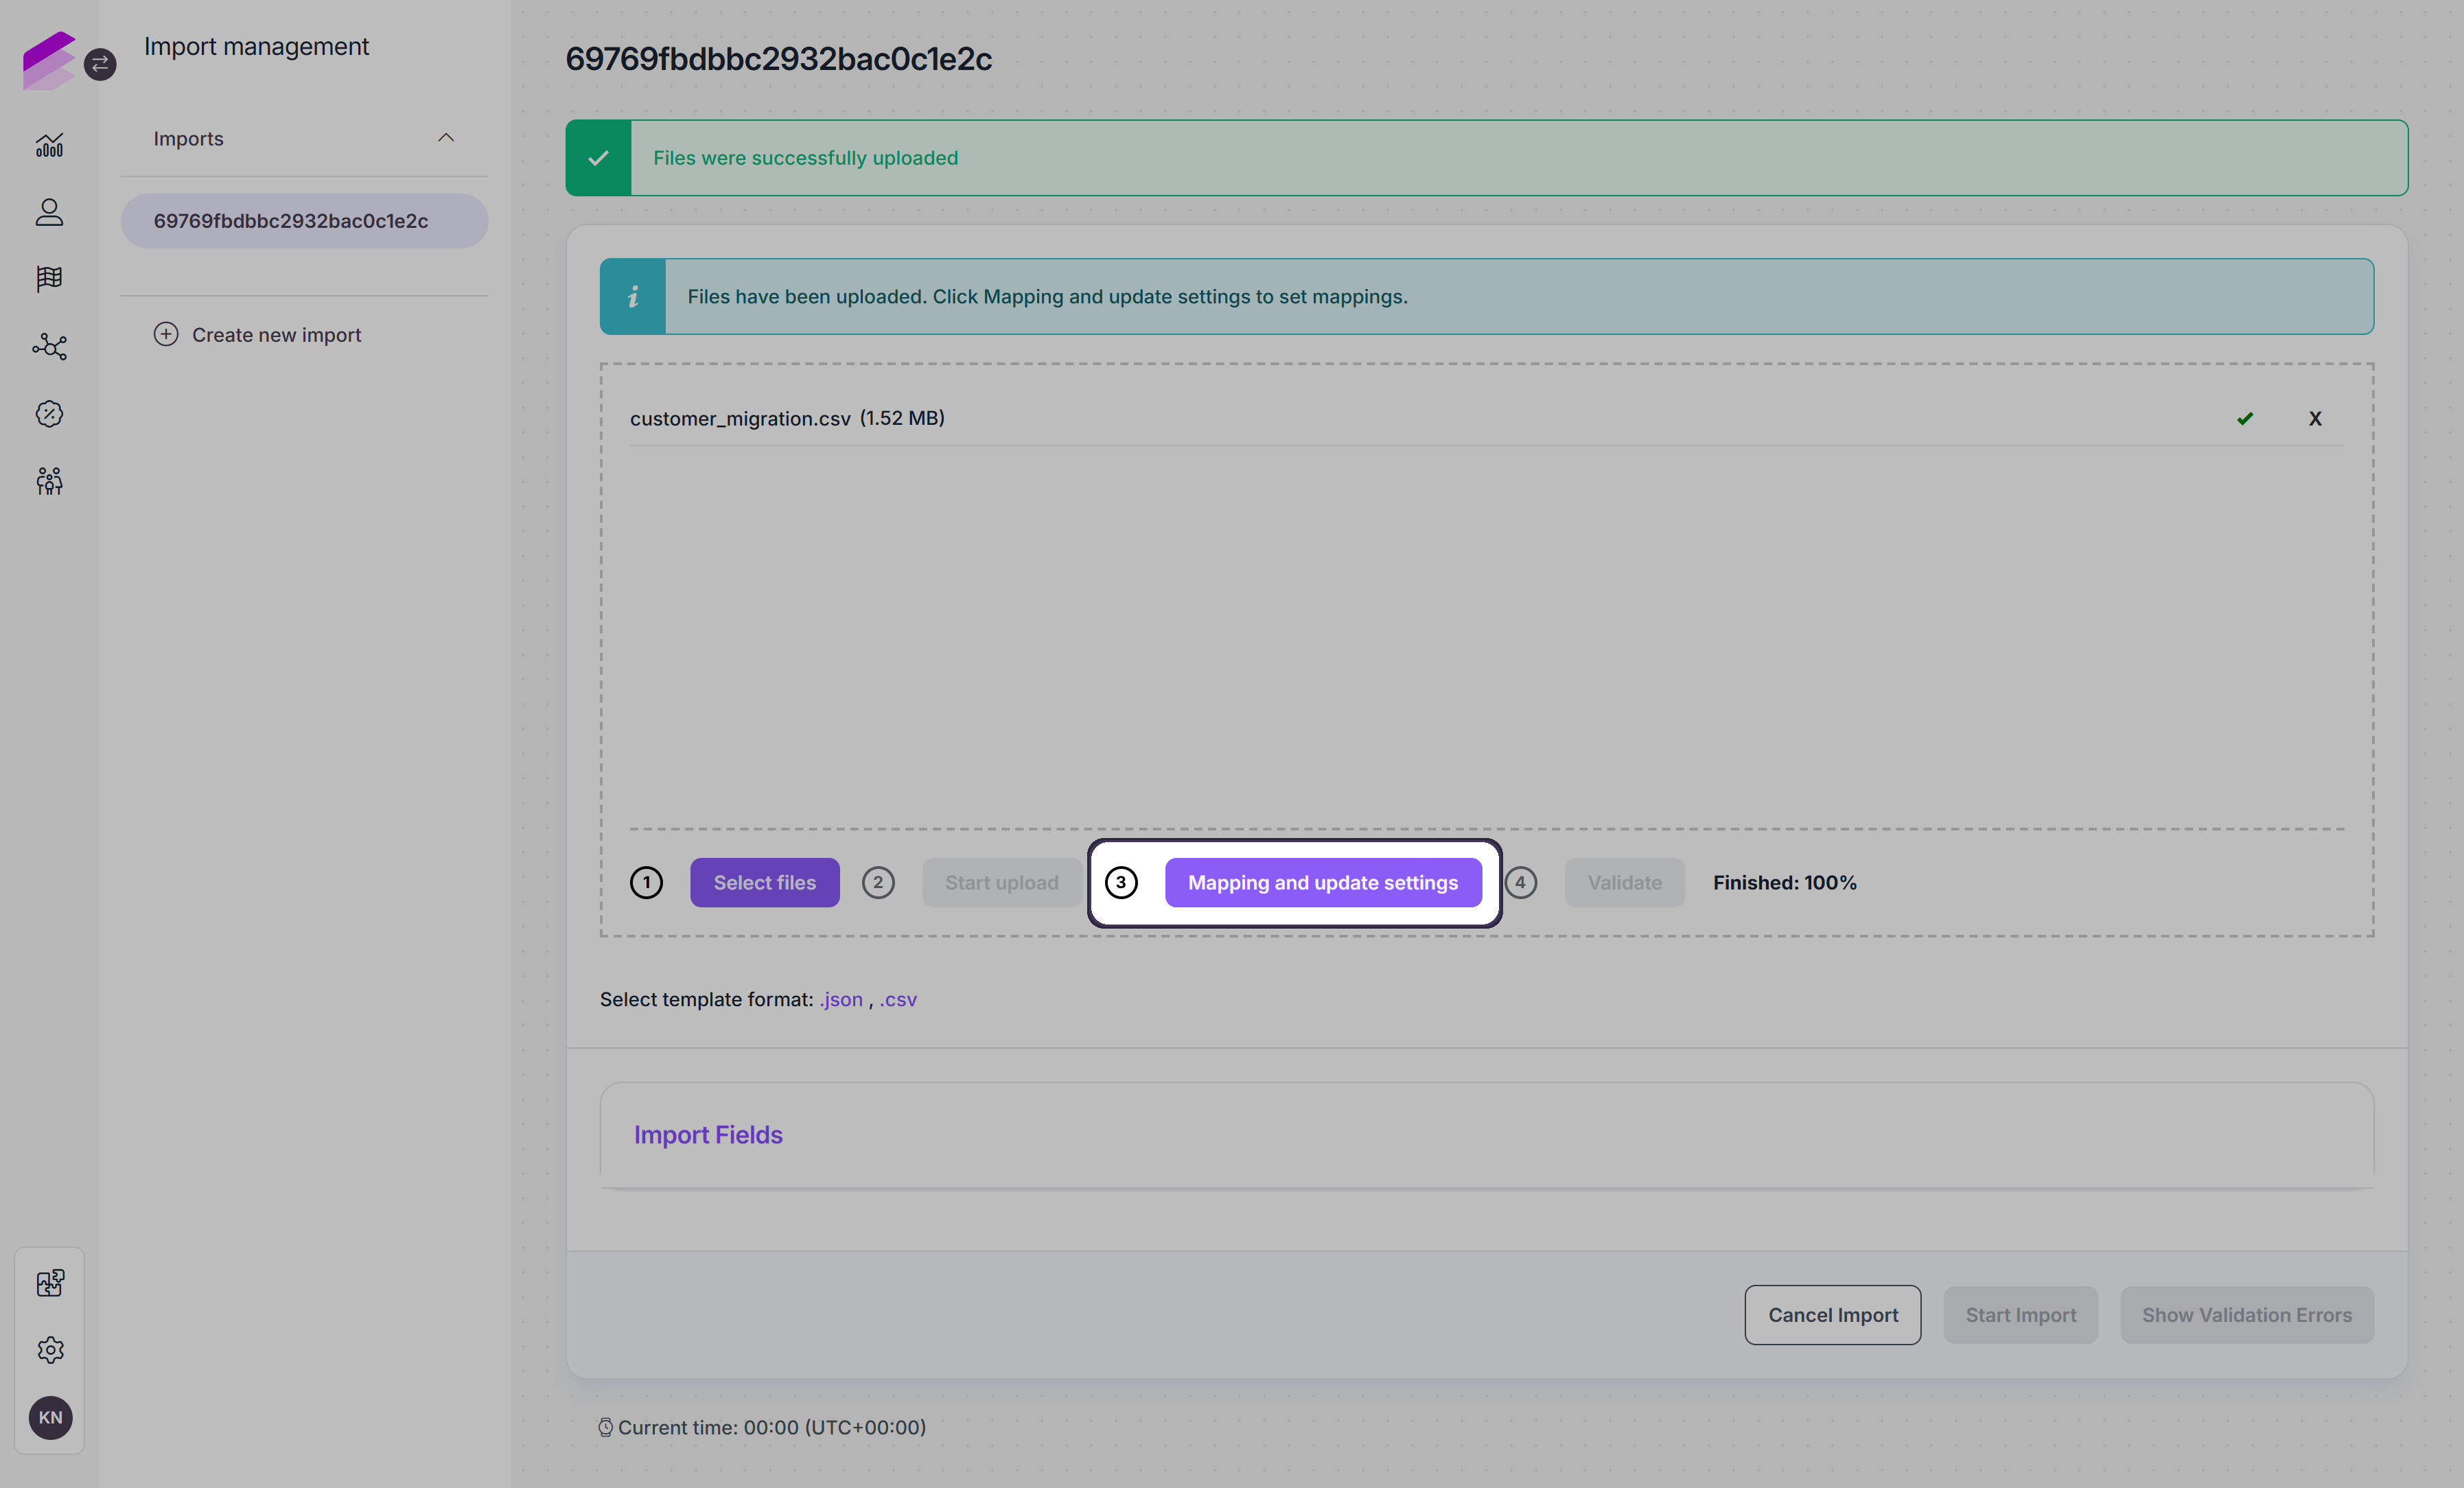
Once the upload has finished, one of the following icons is displayed at the end of the row of each uploaded file:
✅ - Displayed if no errors were found in the file.🚫 - Displayed if the file contains a structural error.
If any error is detected, an error message is displayed at the top of the page explaining the issue. In addition Show validation errors button becomes available, allowing you to review detailed error information.
To continue, remove the invalid files using the delete (×) icon, fix the issues in the source files, and upload the corrected versions again. As long as errors are present, you cannot proceed to the next step.

3. Mapping and update settings
After pre-processing completes successfully and all uploaded files are valid, configure how incoming data should be matched and updated in Antavo by clicking Mapping and update settings.
This step allows you to control how imported customer data is interpreted and stored. It is especially useful when the structure or value formats of the source file do not exactly match Antavo’s customer attributes.
During pre-processing, file headers are automatically read from the uploaded files. In the mapping step, these file headers can be assigned to Antavo customer attributes.
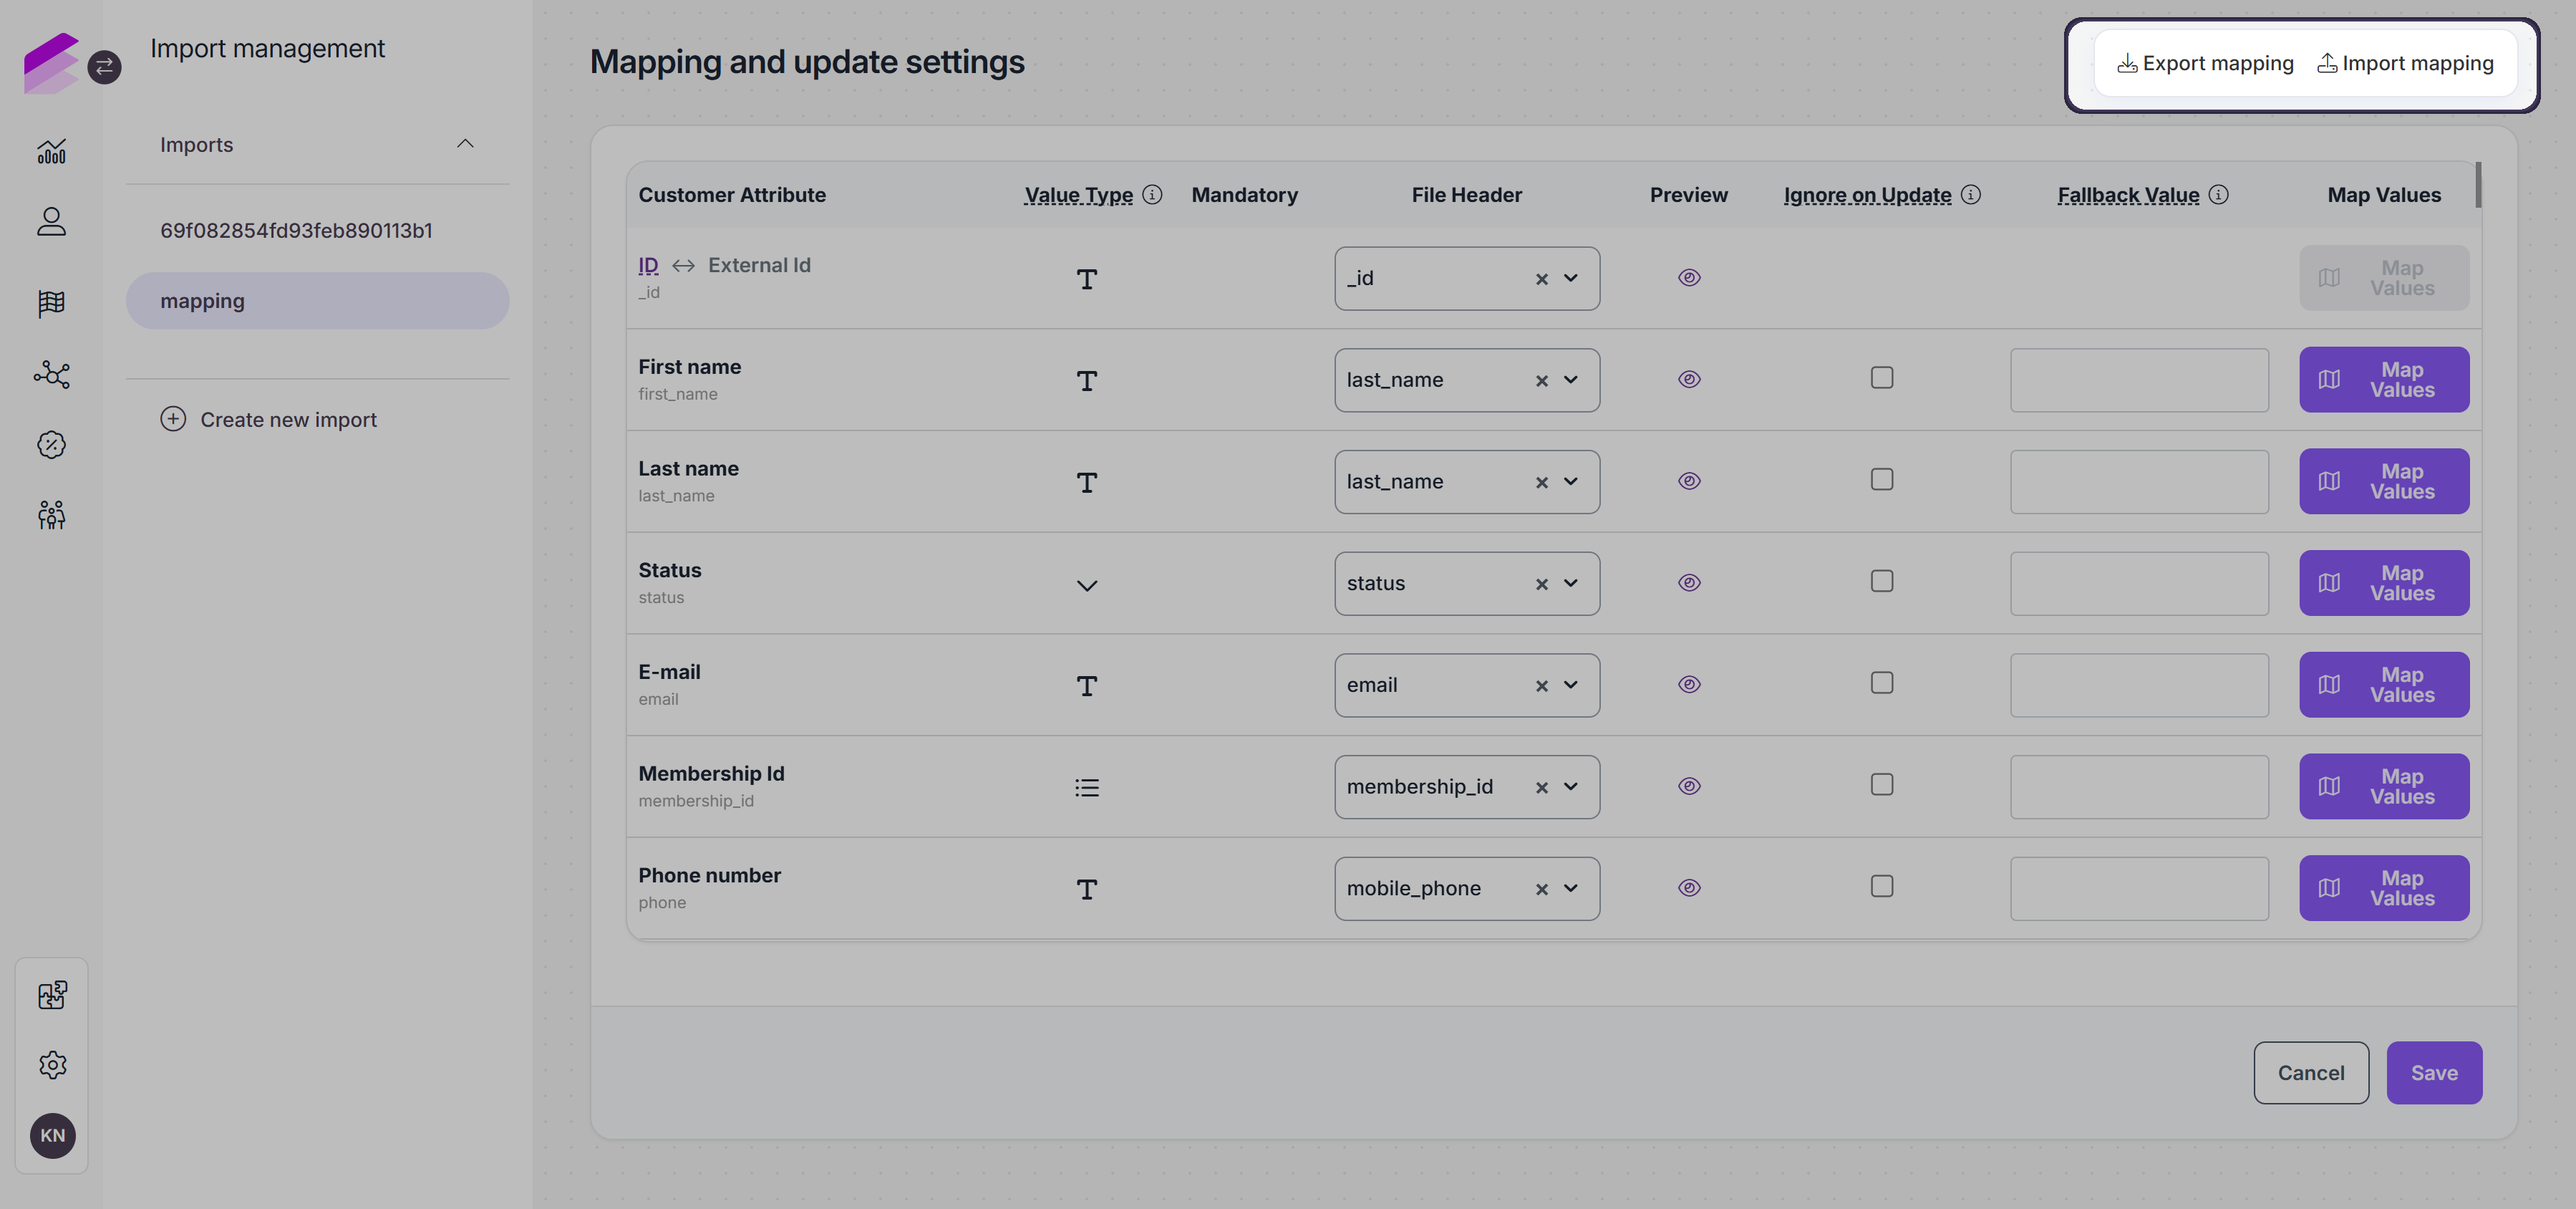
Mapping table overview
The mapping page displays a table listing all available customer attributes. Each row represents a customer attribute that can be populated or updated during the import.
For each attribute, the following information and controls are available:
Customer attribute: The name of the customer attribute.
The ID attribute is always listed first and cannot be modified. You can switch between using loyalty ID or external ID for import.Value type: Indicates the expected data type of the attribute (available attribute types are string, numeric, date, datetime, boolean, multiple choice, select, list, URL).
Mandatory: Indicates whether the attribute is required.
File header: A dropdown where you select which file column should populate the customer attribute. Only headers detected during pre-processing are available, and already-mapped headers are not shown again.
Preview: An eye icon that displays the first three values from the selected file column to help verify correct mapping.
Ignore on update: When enabled, this attribute will not be updated for existing customers, even if a value is present in the file. This option is useful when you want to preserve existing customer data.
Fallback value: An optional default value used when a field is empty during import, and it can be either a fixed (static) value or a dynamic expression evaluated at processing time (see supported formats).
Map values: Opens the value mapping interface, where incoming attribute values within the import file can be replaced with standardized values. Read more below.
Based on these settings, values from the uploaded files are written to the corresponding customer attributes during import.
.png)
Supported formats for date and datetime attributes when defining static or dynamic values
Dynamic
Relative base values
todaytomorrowyesterday
Relative offsets
+1 day-1 day+1 week+1 month+1 year
Combined expressions
+1 day 14:00tomorrow 10:00next monday 09:00
Weekday expressions
mondaynext mondaylast friday
Special expressions
first day of this monthlast day of next month
Static
Fixed formats
2026-04-072026-04-07T14:30:00Z
Alternative formats
Apr 7, 2026
Unix timestamp
@1712491800
Value mapping
Value mapping allows you to automatically replace specific incoming values with standardized values before they are saved.
Click Map Values for the customer attribute where you want to define value replacements
Click + Add value to change
Define the imported value and the replacement value
Add multiple value replacements as needed
Click Save and Close
.png)
Once all required fields are mapped, click Save to continue.
Export and import mapping
The mapping configuration can be exported and imported to make it easier to migrate, duplicate, or restore import settings.
Two actions are available in the top-right corner of the mapping screen:
Export mapping
Download the current mapping configuration as a JSON file. The exported file contains the configured mapping structure.Import mapping
Upload a previously exported JSON configuration file. After a successful import, the relevant mapping fields are automatically updated based on the uploaded configuration.
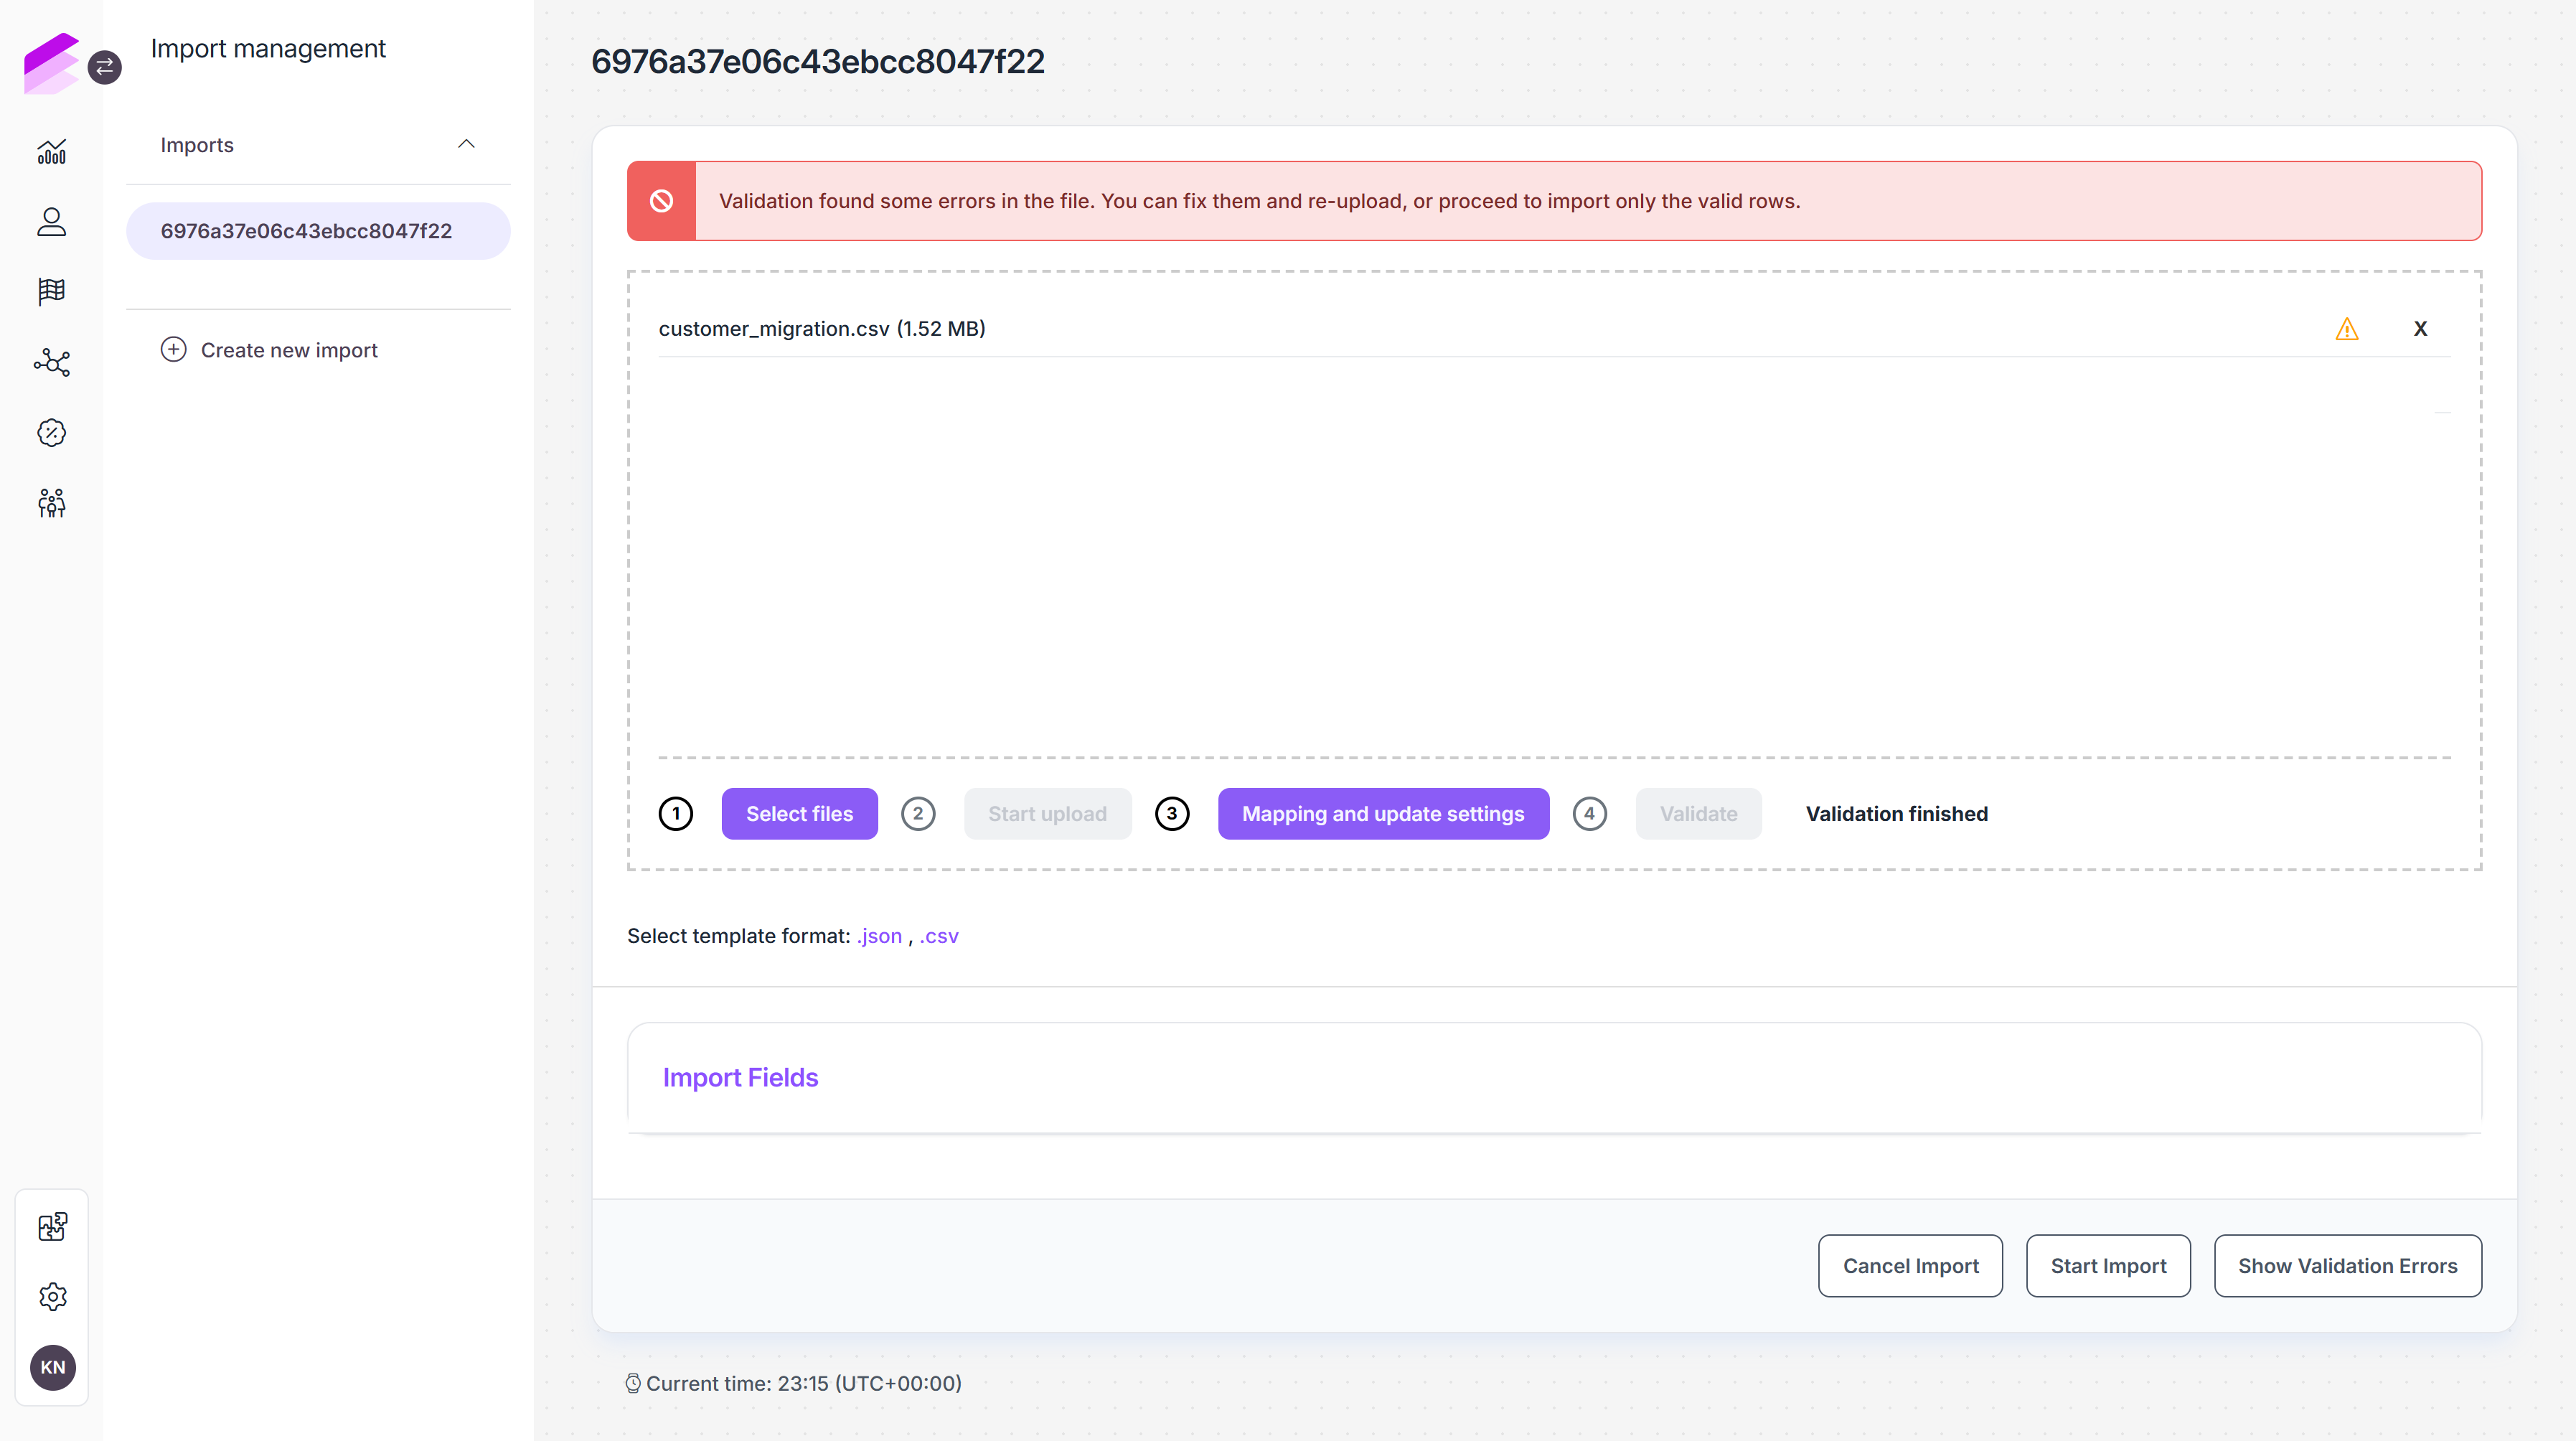
4. Validation
Once mapping is configured, click Validate.
.png)
During validation, the system checks the data for syntax and content-level errors to ensure that only valid, error-free customer data is imported. This process uses the same attribute validators as the Opt-In and Profile events.
Common checks include mandatory fields, unique customer IDs, correct data types and formats (e.g., email, date, numeric, boolean, URL), and allowed values for custom attributes.
If any errors are detected, they will appear on the page, and the Show Validation Errors button becomes available. You can review detailed information about each error and download them as CSV or JSON files.
Workflow impact warning
During validation, a Workflow impacting import popup message may appear. This pop-up is shown when the system detects active workflows linked to opt_in or profile events. These workflows can affect import performance or trigger unintended changes on customer records during the import process.
The pop-up displays a list of the affected workflows. From this list, you can review the workflows and temporarily set non-essential ones to Inactive for the duration of the import, while keeping required workflows active.
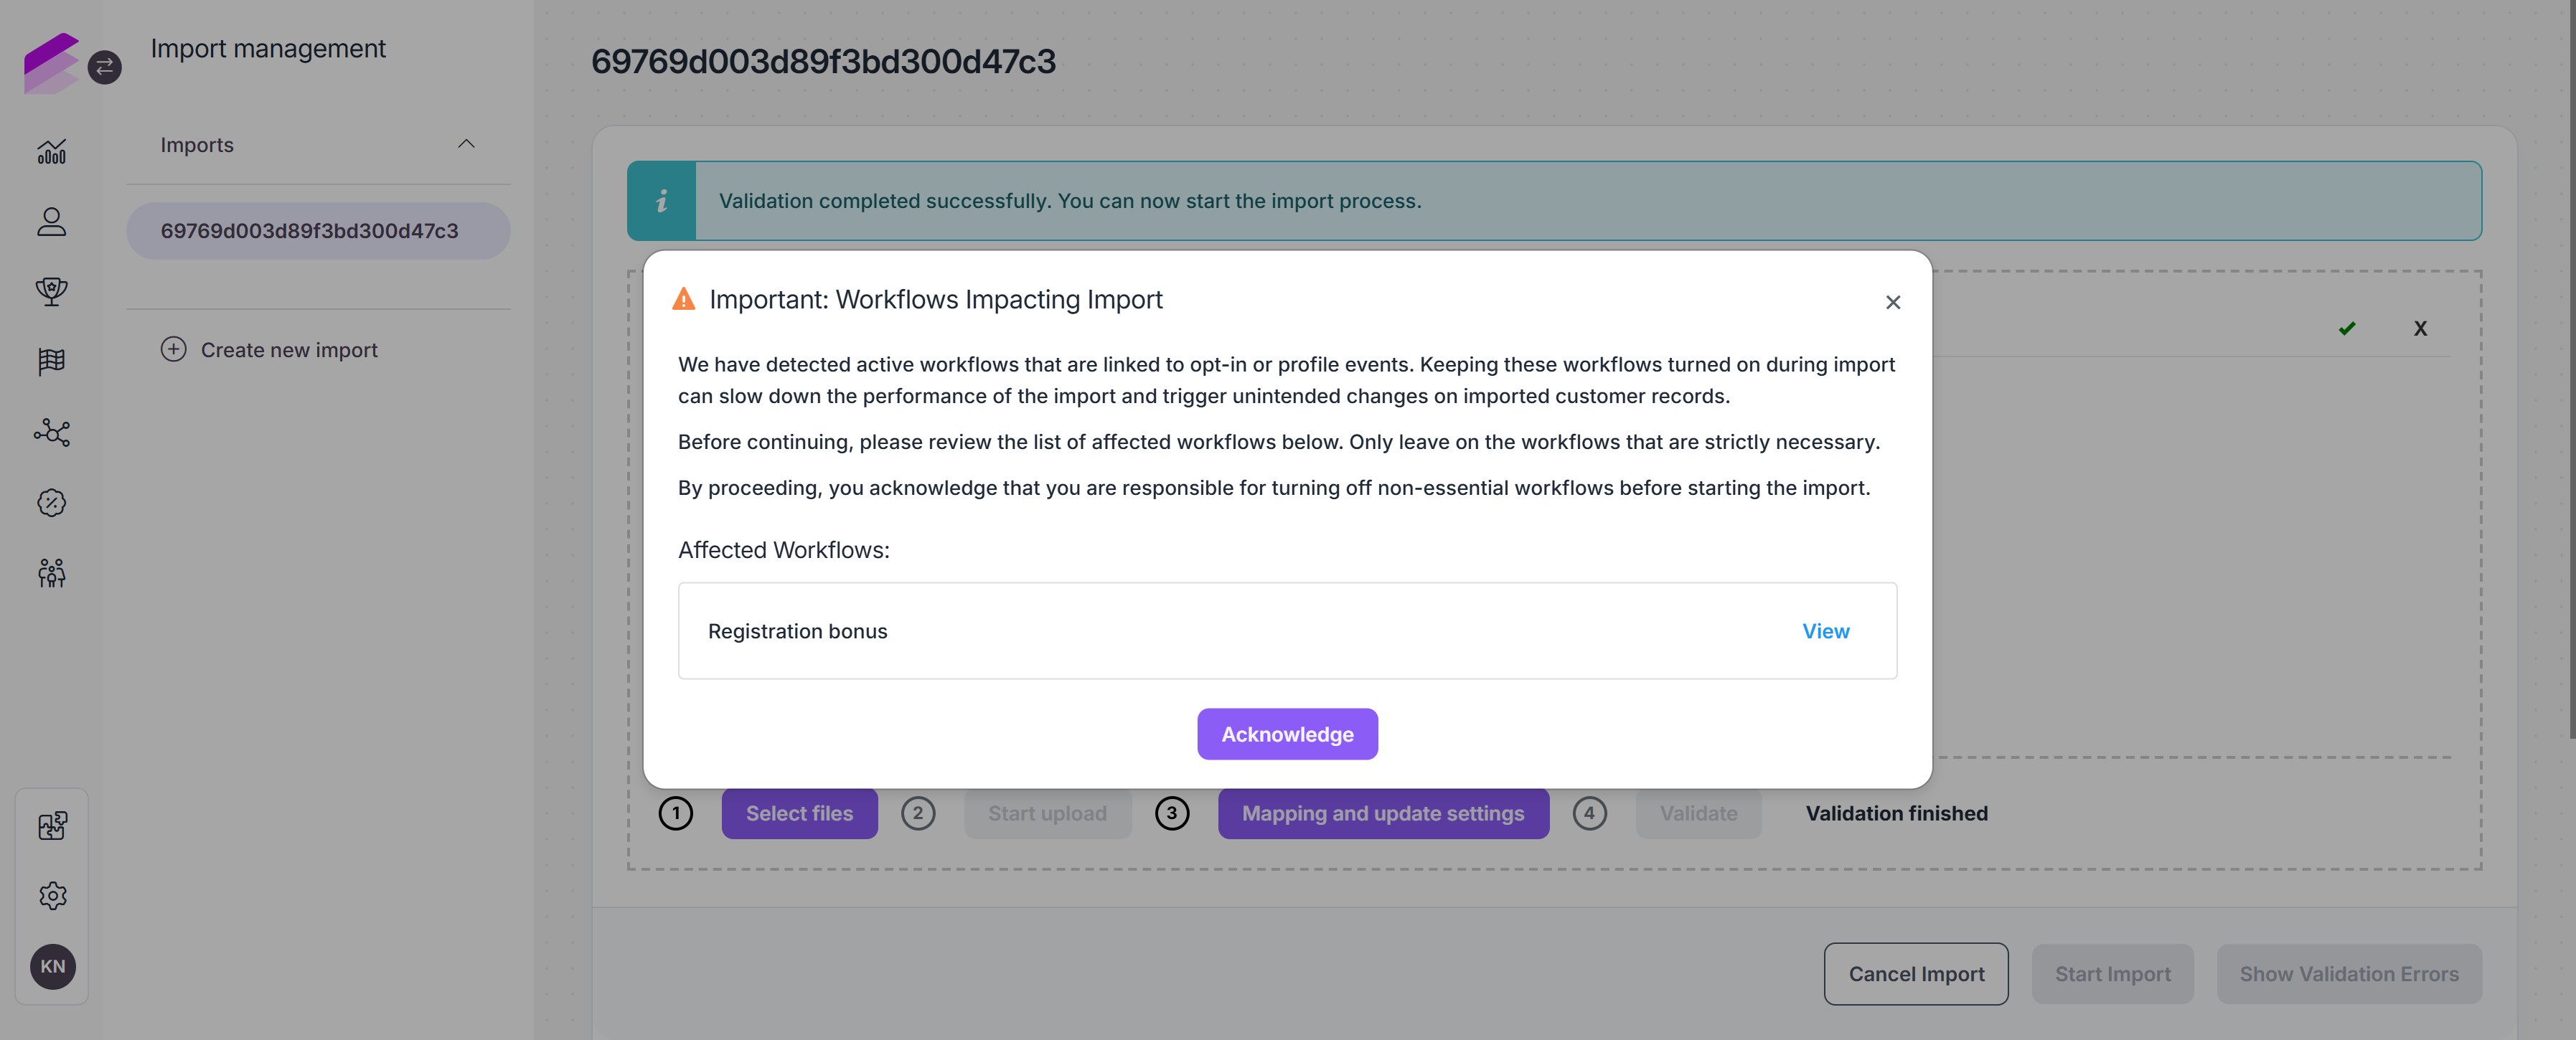
After reviewing the list and making any necessary changes, you click Acknowledge to continue with the import. When validation completes successfully and a Validation finished message is displayed
5. Start import
Click Start import to import all uploaded and validated files
When starting the import with errors present, a confirmation pop-up window appears on the page. You must acknowledge this message to proceed. Only records with valid data will be imported, records with errors will be skipped.
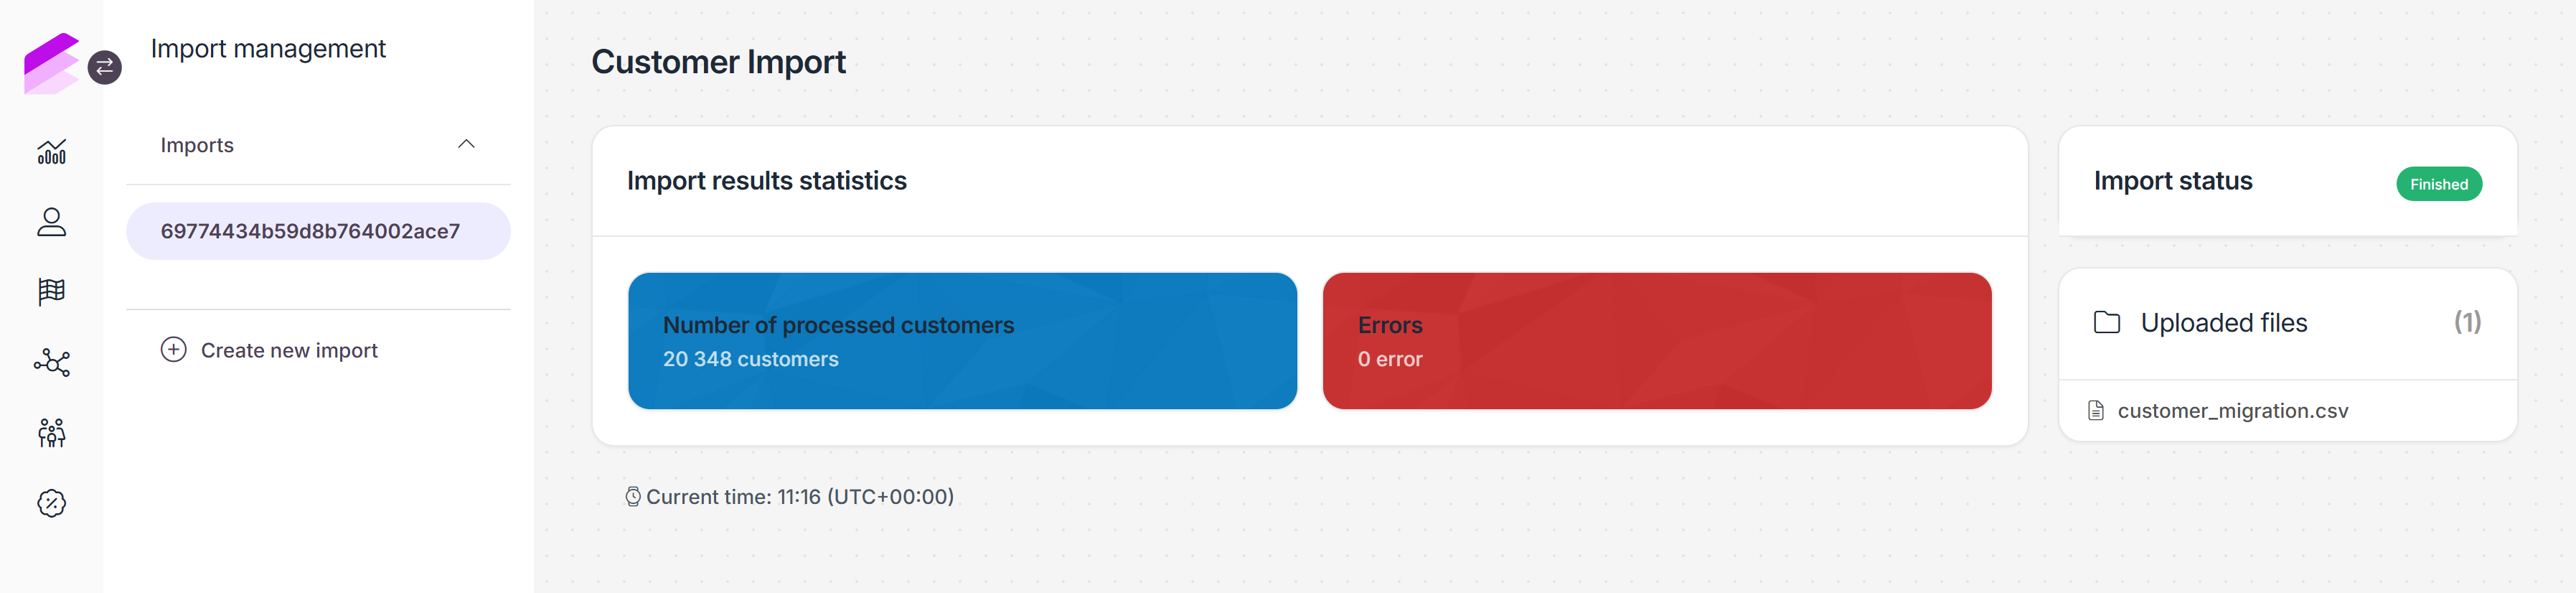
Once the import process has started, you are redirected to the import details page, where you can see:
The status of the import, which updates to Finished when the import completes
A summary of successfully imported records, number of processed customers
Number of errors for records that were skipped during import
Links to download the import source files
You can access the Import details page anytime from the Imports list by clicking the Details button next to the import.
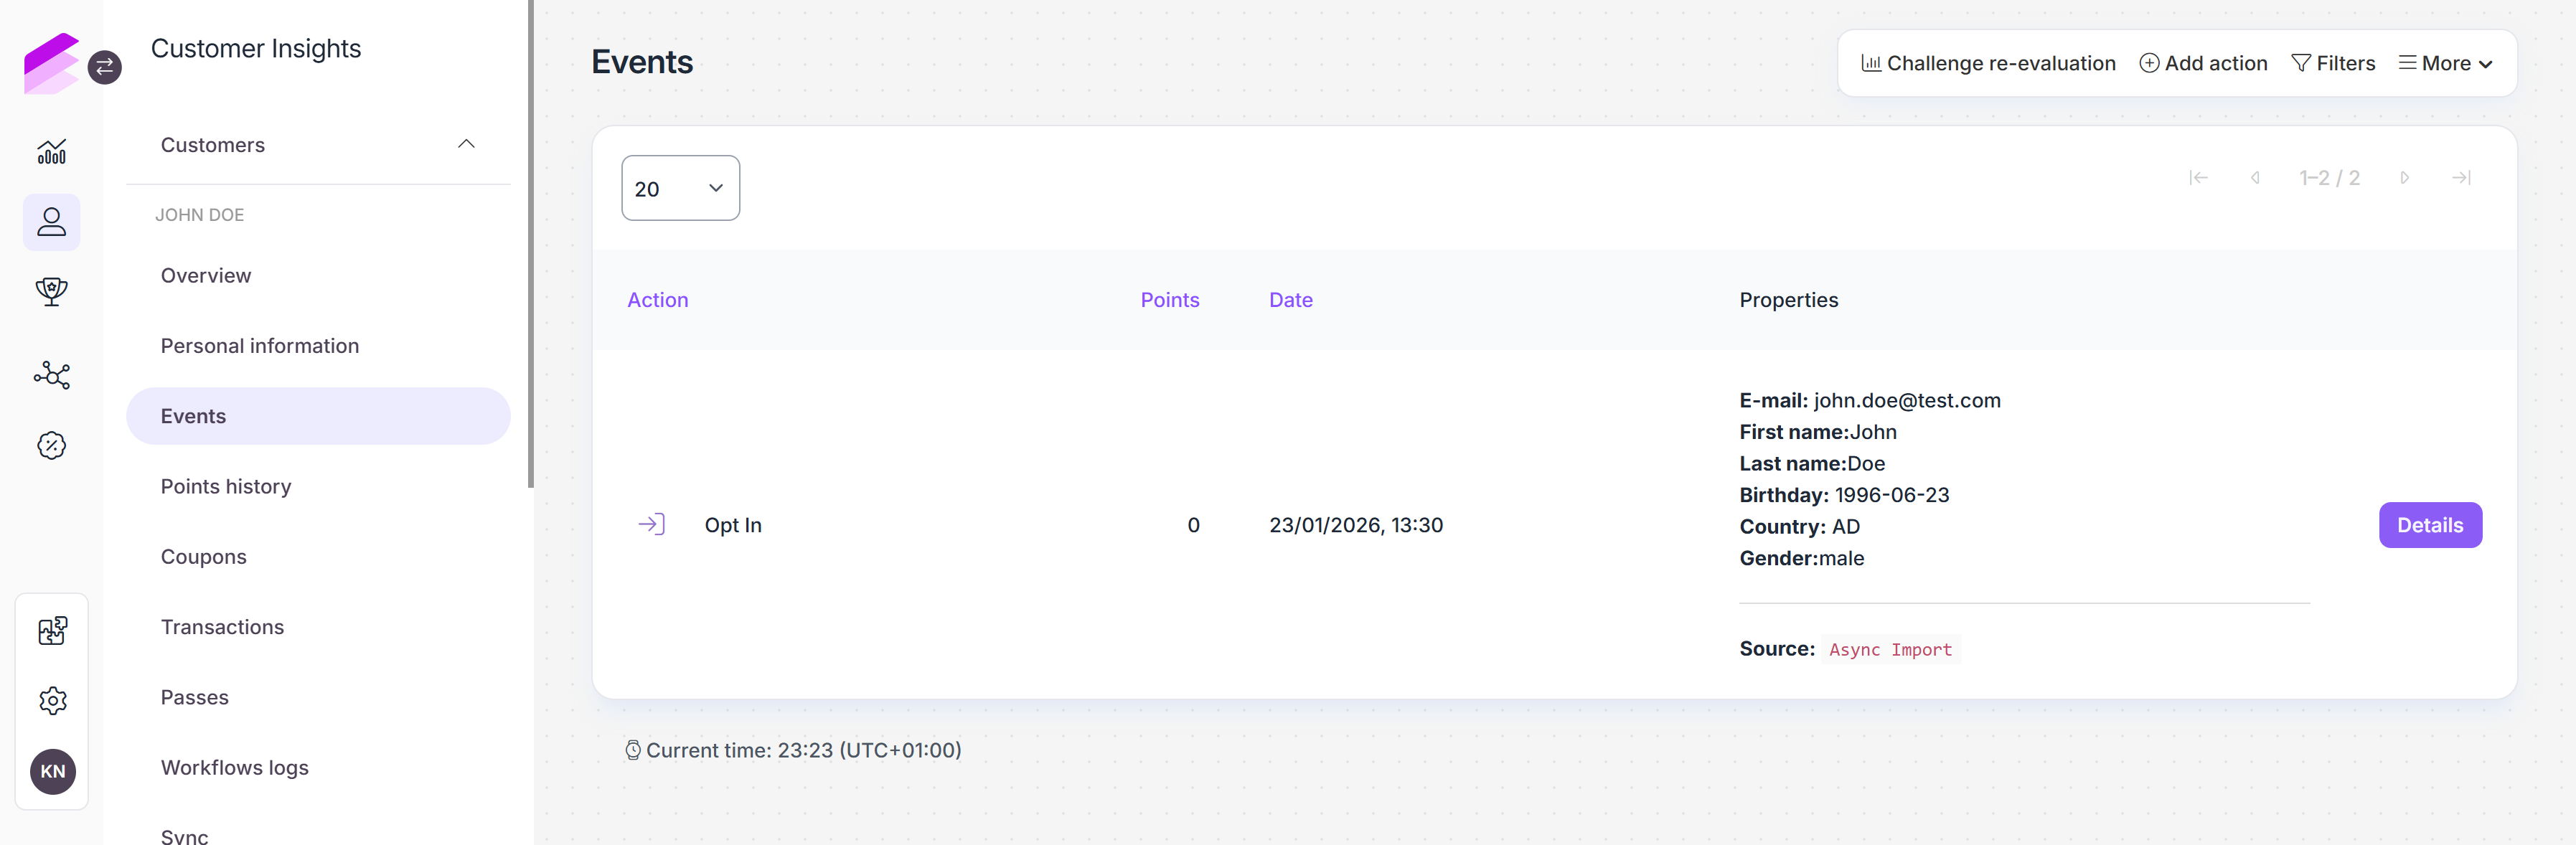
Import results
On the customer's Events page, the opt_in and profile events imported with the Customer import are listed with a Async Import source.
Validation errors
During Pre-processing and Validation, any detected errors can be reviewed by clicking the Show validation errors button at the bottom of the page.
On the error details page, errors are grouped by file, making it easy to see which file and which row caused the issue, along with a clear error description for each affected record.
Validation step error reports can be downloaded in CSV or JSON format. This helps share detailed error information with technical or data teams, and re-upload corrected data without manually reviewing large datasets.
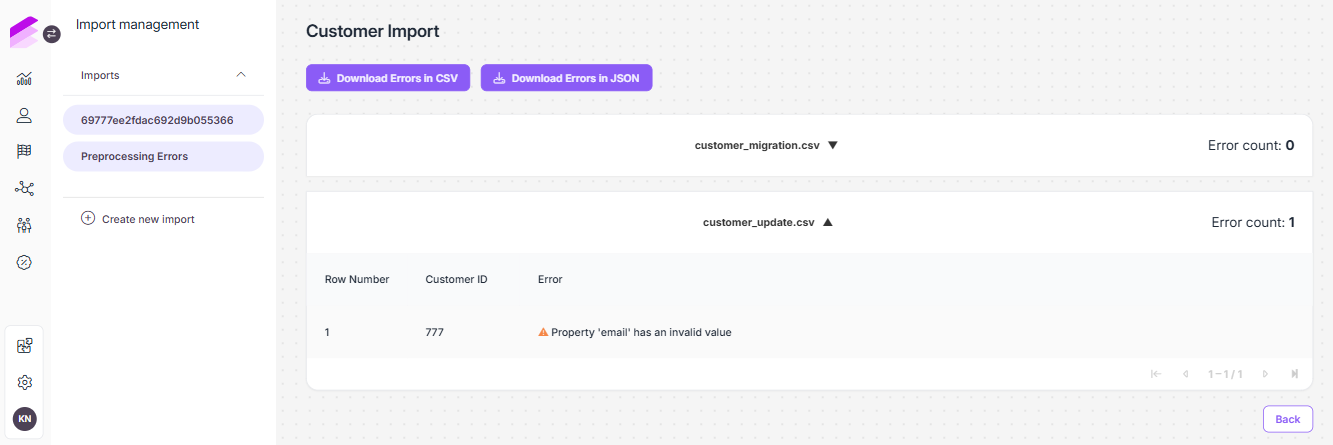
Import errors
Records with errors are skipped during the import process. These error records, however, are logged for review.
Errors can occur if a customer record has a missing mandatory field, an invalid email address, an incorrect date format, or a value that does not match the expected type. To review logged errors, click the Errors button.

The Customer Imports Errors page displays the list of encountered errors with the file name, the row number of the record, the customer ID associated with the record, and the error description
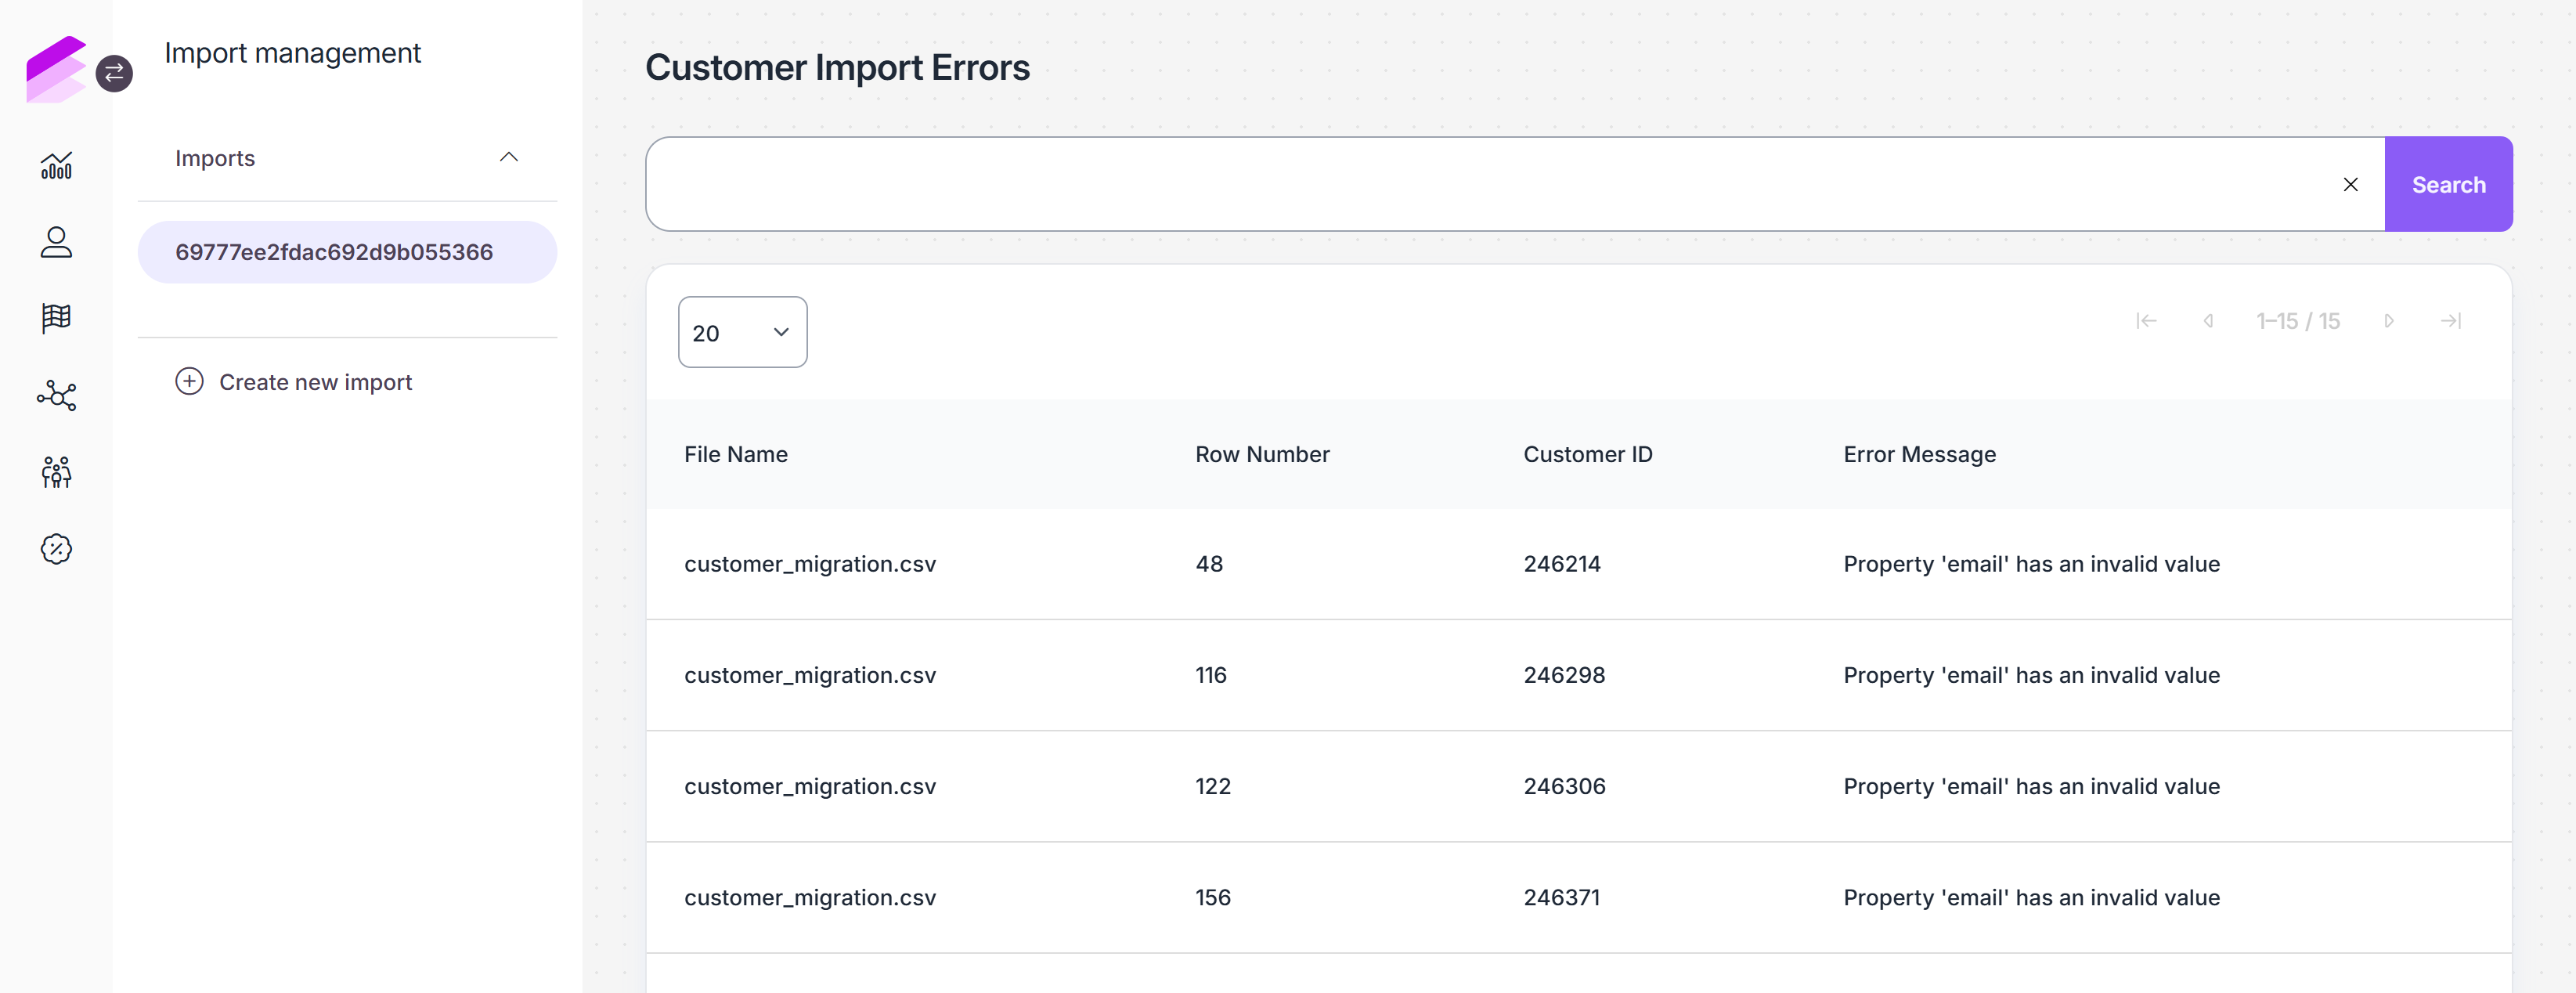
You can use the filter at the top of the page to filter the list by file name, row number and customer ID.