Klaviyo is a cloud-based email marketing and automation platform designed for ecommerce businesses. It features a built-in Customer Data Platform (CDP) that enables businesses to integrate additional marketing data for improved ROI. This platform collects and stores data on customer behavior, including website activity, purchase history, email engagement, and social media interactions.
Antavo’s integration with Klaviyo enables businesses to elevate customer experience and foster customer loyalty. By merging data from both platforms, you can develop a comprehensive understanding of your customers' behaviors and preferences, leading to the creation of targeted and personalized marketing campaigns.
This integration supports one-way synchronization, meaning data can only be sent from Antavo to Klaviyo, and not the other way around.
To access the configuration interface, navigate to the Modules menu and search for Klaviyo integration in the list. The page will open to the Connect Klaviyo subpage, where you’ll be prompted to enter an API key.
Configuring the Antavo - Klaviyo connection
The Klaviyo integration uses OAuth authorization to establish a secure connection between an Antavo workspace and a Klaviyo account.
To connect the integration:
In the Antavo Management UI, navigate to the Modules menu and open the Klaviyo integration module
Click Connect with OAuth
Log in to the Klaviyo account in the authorization window
Select the Klaviyo account you want to connect
Authorize Antavo to access the selected Klaviyo account
After successful authorization, the connection is established for the selected Antavo workspace.
Existing integrations previously configured using a private API key remain fully functional.
Configuring field synchronization
Field synchronization sends Antavo customer data to the corresponding profile properties in Klaviyo.
To configure field synchronization:
Open the Klaviyo integration module in the Antavo Management UI
Click Add new field +
Select an Antavo field from the Loyalty fields dropdown
Select the corresponding Klaviyo profile property under Remote fields
Add additional field mappings as required
Click Save
Communication through the workflow editor
You can synchronize Antavo events with Klaviyo, add customers to Klaviyo lists, and manage Klaviyo marketing channel subscriptions through the Workflows editor. This example demonstrates how to add customers to a Klaviyo list and send a welcome email from Klaviyo when someone joins the loyalty program.
You can access workflow management through the Workflows icon on the left sidebar.
Click Create new campaign or Create new general workflow, depending on the type of flow you would like to run
Fill in the required fields to create the campaign or workflow
Drag and drop the Event trigger node from the right sidebar onto the empty canvas
Specify the type of event on which the workflow should run. This should be configured to be triggered on an Opt-in event so that this workflow activates whenever such an event occurs.
Click Update
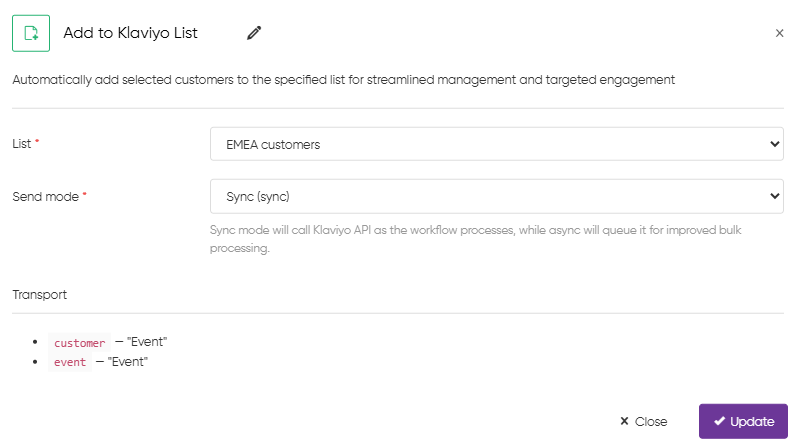
Drag and drop the Add to Klaviyo List action node onto the canvas
Select the Klaviyo list to which the customer should be added
Select the Send mode
Sync: Immediately sends the API request to Klaviyo during workflow processing.
Async: Queues the customer and list data for later processing, recommended for handling larger volumes efficiently.
Click Update
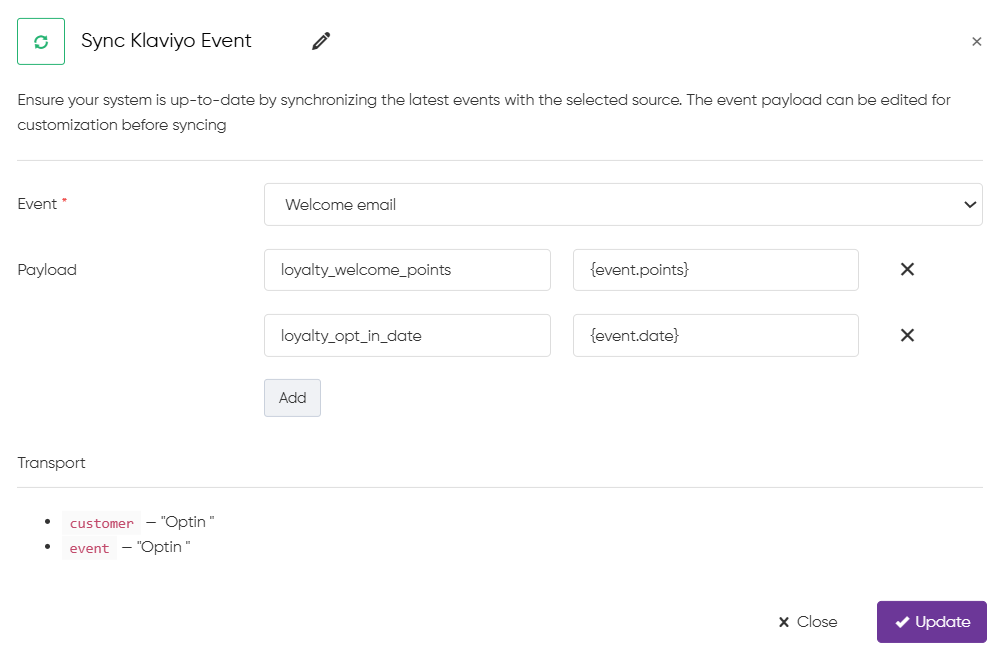
Drag and drop the Sync Klaviyo Event action node onto the canvas
This node allows you to select the Klaviyo event to be called and specify the payload (the information you would like to send to Klaviyo).Select the Klaviyo event to be triggered (mandatory)
Add the key and value of the event data to be sent in the payload (the information about the event that needs to be sent to Klaviyo). You can include multiple data fields by clicking the Add button.
Click Update
Connect the Event trigger node to the Add to Klaviyo List and Sync Klaviyo Event action nodes
Antavo also provides ready-made Klaviyo flow templates that use predefined loyalty metrics. For setup instructions, see [Using Antavo flow templates in Klaviyo].
Antavo also provides ready-made Klaviyo flow templates that use predefined loyalty metrics. For instructions on making the required metrics available, configuring the Antavo workflows, and installing the templates, see Using Antavo flow templates in Klaviyo.
Managing marketing channel subscriptions in Klaviyo through the workflow editor
You can manage customer subscriptions to Klaviyo marketing channels (email and SMS) directly through the Workflows editor in Antavo. This example demonstrates how to subscribe customers to Klaviyo channels when they opt in to communications, for example, during loyalty program signup or when accepting marketing consent during checkout.
You can access workflow management through the Workflows icon on the left sidebar.
Click Create new campaign or Create new general workflow, depending on the type of flow you would like to run
Fill in the required fields to create the campaign or workflow
Drag and drop the Event trigger node from the right sidebar onto the empty canvas
Configure the node to trigger on an event that signals customer consent, such as a marketing opt-in event or any custom event your system sends upon consent.
Click Update
Tip: If the raw event itself doesn’t imply directly that consent has been given, you can use an Event attribute filter or Customer attribute filter node to ensure the event or customer has the required consent attributes before proceeding.
Keep in mind that in order to use an attribute filter, the relevant consent information must be populated at some point, typically by sending it within the triggering event or storing the data via customer field synchronization.
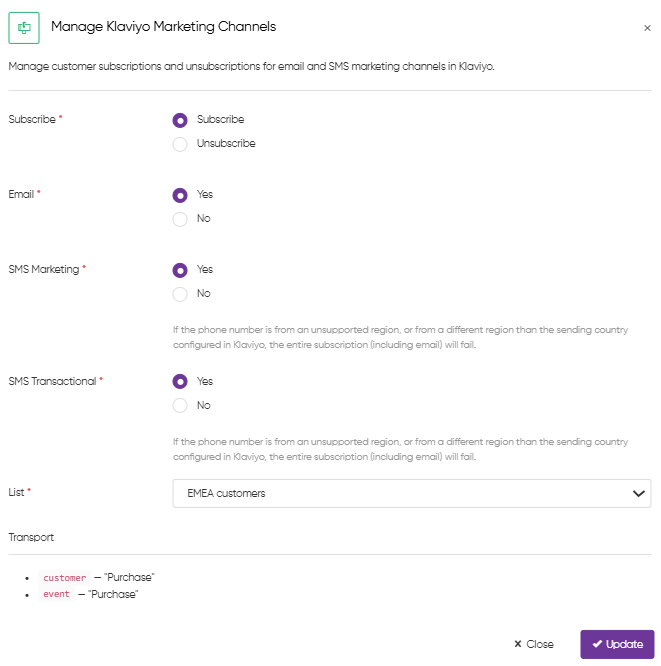
Drag and drop the Manage Klaviyo marketing channels action node onto the canvas
Use this node to configure the desired subscription state:Select the Subscribe option
Select the relevant channel(s): Email, marketing and transactional SMS
Select a Klaviyo list to add the customer to
Click Update
Link the Event trigger node to the Manage Klaviyo marketing channels node.
Optionally, connect further nodes (e.g., to send a welcome email) after the subscription step.
Disconnecting the integration
The Klaviyo integration can be disconnected at any time from the module settings page:
Navigate to the Klaviyo module settings page.
Click Disconnect in the top right corner
Confirm the action in the dialog