Insider's customer data platform (CDP) enables enterprise marketers to connect customer data across channels and systems, predict customer behavior, and individualize customer experiences across channels.
This integration supports two-directional synchronization, allowing data to be exchanged between Antavo and Insider in both directions.
To access the configuration interface, navigate to the Modules menu and search for Insider integration in the list.
Configuring the connection
Generate the Insider API key
The module configuration requires an API key for the specific Insider workspace, which can be found in the Insider account's Integration Settings. To obtain it, follow the steps below:
In your Insider account, click your email address, then select Settings > Inone Settings from the dropdown

Select the Integration Settings tab

Scroll down to the API keys section, then click Generate API Key

Select Unified Customer Database as the type of the API key, then click Next

Copy the generated API key
This key is required to set up the Insider integration in Antavo.

You can only view and copy the API key immediately after it is generated. Once you click Done, you won't be able to reaccess the API key on the Insider platform.
Configure the Antavo settings
In Antavo's Management UI, go to the Insider module's configuration page, then follow the steps below:
Under General Settings, set up the customer ID mapping:
Select the Antavo identifier attribute you want to use to identify the customer. This can be the Antavo customer ID or a customer attribute that has been set as an external ID.
Select the respective Insider identifier attribute - a UUID or an email address, or type a custom identifier attribute.
In the Insider partner name field, enter the name of your Insider account
In the Insider API key field, paste the API key you have copied from the Insider workspace's integration settings
Click Save at the bottom of the page
.png)
Configuring outbound communication from Antavo to Insider
Customer synchronization
To configure the customer data mapping between the two systems:
Navigate to the Outbound settings section
Click Add mapping next to Outbound profile mapping
In the field under Antavo, select a customer attribute from the dropdown list
In the field under Insider, type the corresponding customer attribute as used in Insider
If the added attribute is a custom field in Insider, mark the Custom checkbox

Please refer to Insider's Attributes and Events documentation for more information on Insider customer attributes.
Note that:
Phone numbers are only accepted in E.164 format
Birthdays must follow the RFC 3339 date-time format
To map additional customer attributes, click Add mapping, then provide the Antavo attribute name and its corresponding Insider attribute in the respective fields
Click Save
Event synchronization
To configure the event property mapping between the two systems:
Click Add event next to Outbound event mapping
In the field under Antavo, select the Antavo event you want to synchronize from the dropdown list
In the field under Insider, type the name of the corresponding Insider event
To map the event parameters, click Add mapping
Select the Antavo event parameter from the dropdown list under Antavo
Type the name of the corresponding Insider event parameter under Insider
If the added parameter is a custom parameter in Insider, mark the Custom checkbox

Please refer to Insider's Attributes and Events documentation for more information on Insider event attributes.
To map additional event parameters, click Add mapping, then provide the Antavo event parameter and its corresponding Insider event parameter in the respective fields
Click Save
Configuring inbound communication from Insider to Antavo
To send data from Insider to Antavo, you need to configure the sync in both systems:
In Insider, define what data should be sent.
In Antavo, set up how this data should be mapped.
Configure Insider webhooks
You need to create separate webhooks for:
Event synchronization
Customer attribute synchronization
Create a webhook in Insider
Go to Components → Integrations → External integration
Select Webhook
Enter a name for your webhook integration.
Click Save
.png)
After saving, you’ll find the webhook under the Integrated Platforms tab.
Once the integration has been created, you’ll be redirected to the Rules page of the integration, where you can configure the mapping.
Event synchronization
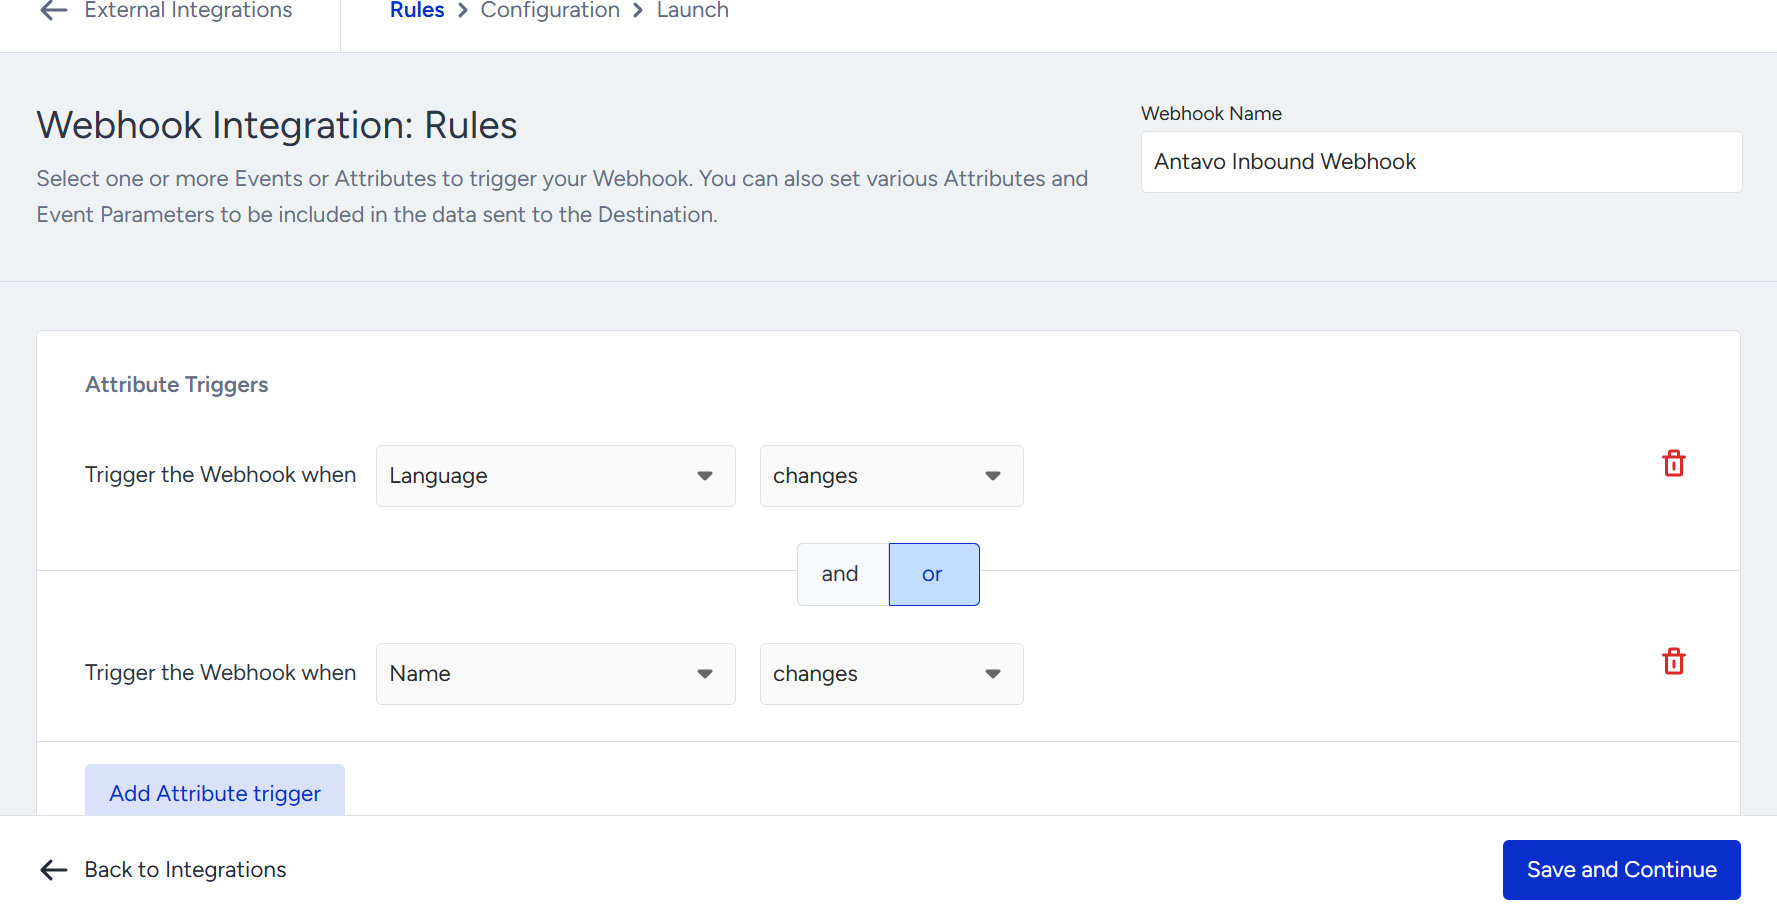
Define Rules
Open the Events tab and select Custom Events
Define the Event trigger by selecting the Insider event to be synced
You can add multiple triggers with the Add Attribute Trigger option.
Add Event parameters to be included in the request
Add additional Insider customer attributes to the payload (optional)
Always include the customer ID, so Antavo can correctly identify which customer the event belongs to.
Click Save and Continue
.png)
Please refer to Insider's Attributes and Events documentation for more information on Insider event attributes.
2. Configuration
Add the POST endpoint to which the sync request should be sent: https://api.{your_environment}.antavo.com/v1/webhook/insider/profile?api_key={your_api_key}
Replace {your_environment} and {your_api_key} with the values from your Antavo workspace. You can find them under Settings → API in the Antavo Management UI.Use the Test Webhook button to send a test request to the configured endpoint.
Click Save and Continue
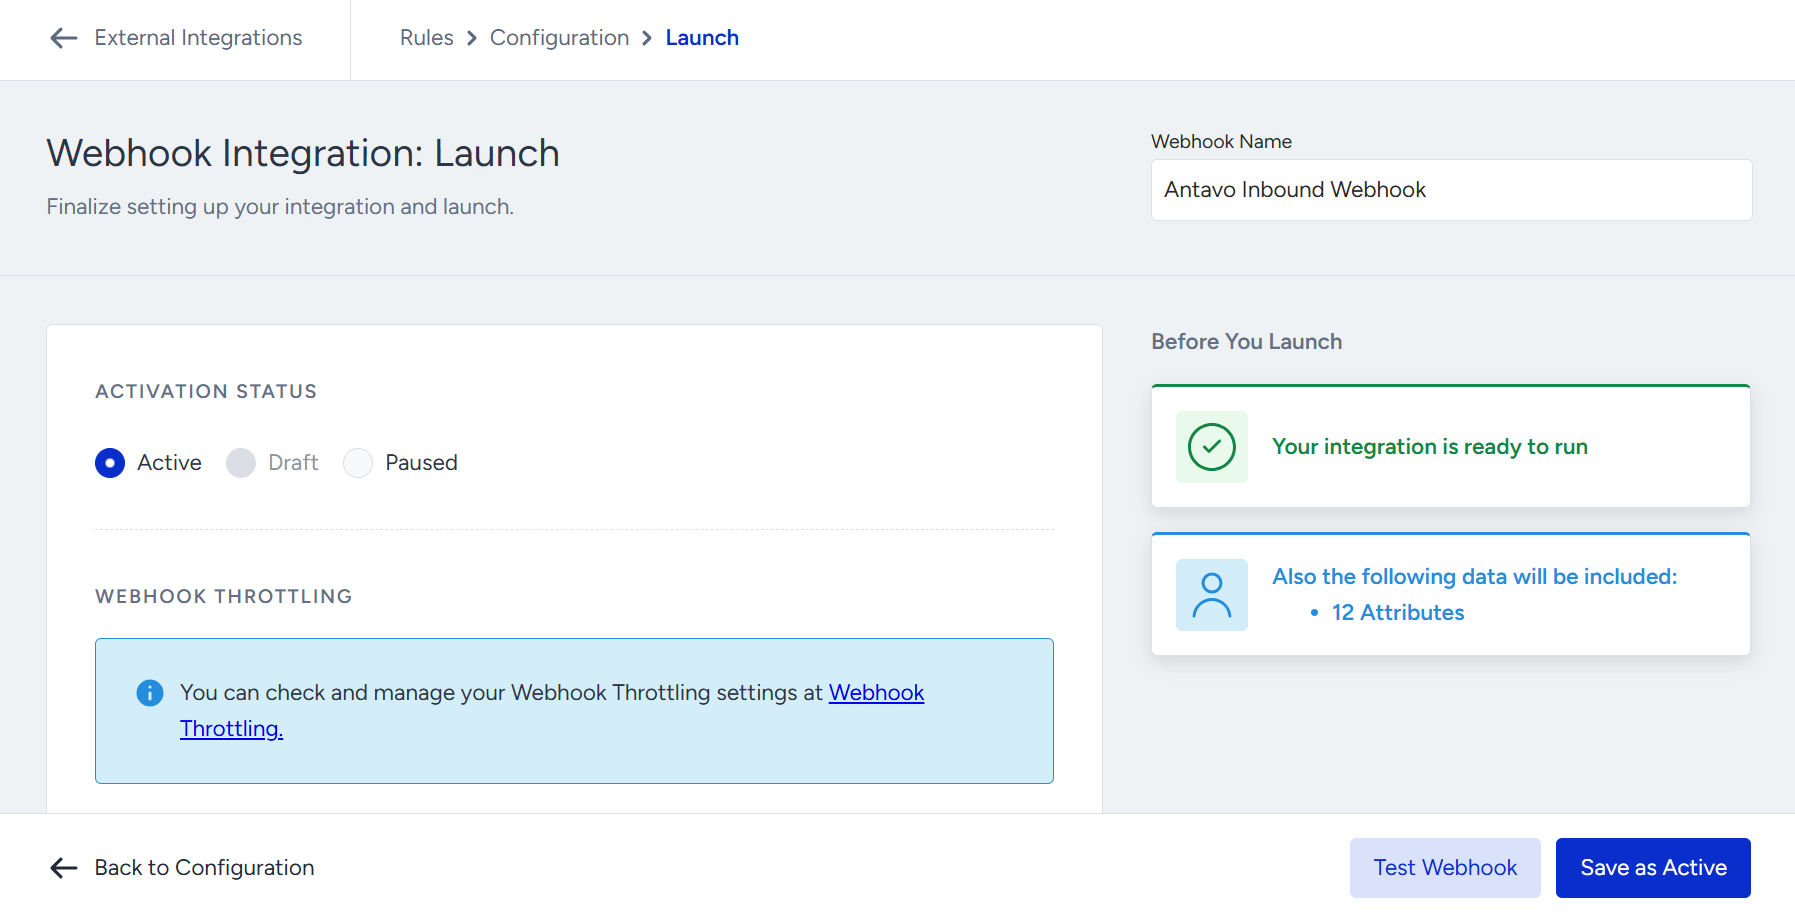
Launch
Set the status to Active
Click Save as Active
Customer attribute synchronization
Define Rules
Open the Attributes tab and select Attributes
Define the Attribute trigger:
Select the Insider attribute to be synced
Choose the action that should trigger the synchronization (e.g., change, change from → to values, change to, generated as)
You can add multiple triggers with the Add Attribute trigger option
Add additional Insider customer attributes to the payload (optional)
Always include the customer ID so Antavo can identify which customer profile should be updated.Click Save and Continue
Please refer to Insider's Attributes and Events documentation for more information on Insider customer attributes.
Configuration
Add the POST endpoint to which the sync request should be sent: https://api.{your_environment}.antavo.com/v1/webhook/insider/profile?api_key={your_api_key}
Replace {your_environment} and {your_api_key} with the values from your Antavo workspace. You can find them under Settings → API in the Antavo Management UI.Use the Test Webhook button to send a test request to the configured endpoint
Click Save and Continue
Launch
Set the status to Active
Click Save as Active
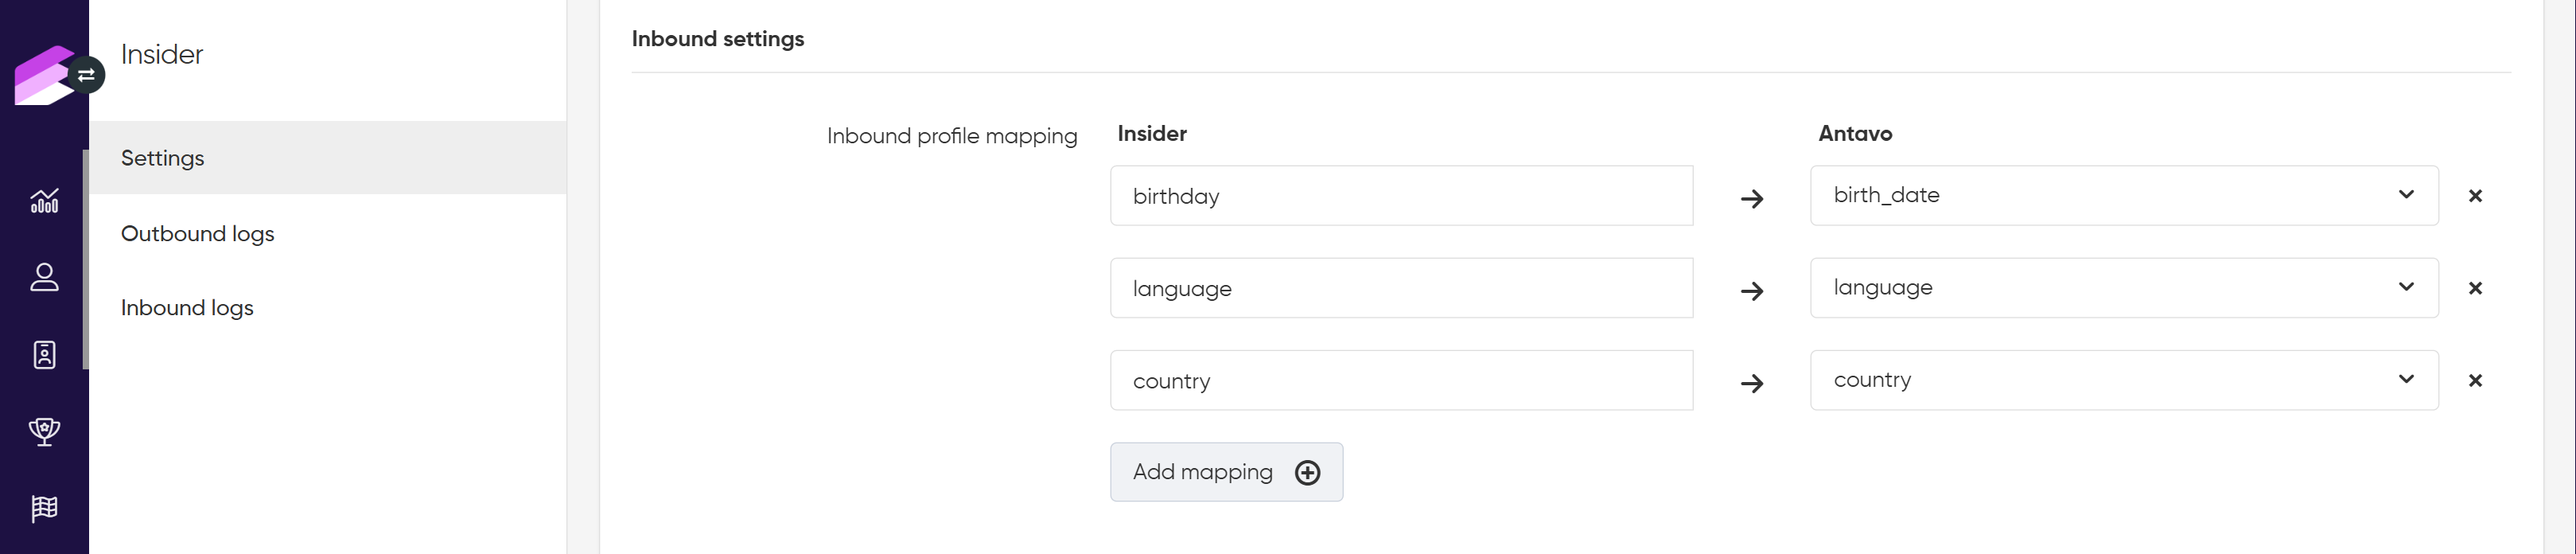
Configure mapping in Antavo
Customer synchronization
To configure the customer data mapping between the two systems:
Click Add mapping next to Inbound profile mapping
In the field under Insider, type the customer attribute as used in Insider
In the field under Antavo, select a corresponding customer attribute from the dropdown list
Please refer to Insider's Attributes and Events documentation for more information on Insider customer attributes.
To map additional customer attributes, click Add mapping +, then provide the Antavo attribute name and its corresponding Insider attribute in the respective fields
Click Save
Event synchronization
To configure the event property mapping between the two systems:
Click Add event next to Inbound event mapping
In the field under Insider, type the name of the corresponding Insider event
In the field under Antavo, select the Antavo event you want to synchronize from the dropdown list
To map the event parameters, click Add mapping +
Type the name of the corresponding Insider event under Insider
Select the corresponding Antavo event parameter from the dropdown list under Antavo
.png)
Please refer to Insider's Attributes and Events documentation for more information on Insider event attributes.
To map additional event parameters, click Add mapping +, then provide the Insider event parameter and its corresponding Antavo event parameter in the respective fields
Click Save
If auto-subscribe is enabled, any inbound request (both event and customer) from Insider for a customer who does not yet exist in Antavo will automatically create the customer with an inactive status.
Logs
Once synchronization is set up and running, you can track traffic activity in both directions.
Outbound logs
Open the Outbound logs tab to browse the logs of requests sent from Antavo to Insider.
For each outbound API request to Insider, the following information is displayed:
Timestamp | Date and time of the outbound request |
Customer ID | The Customer’s name and ID |
Event type | Type of event that triggered the synchronization |
Status code | HTTP status code returned by the request |
Response time (s) | Time elapsed between the request and the response (in seconds) |
Error | Error message returned (if applicable) |
Identifier | Identifier of the request |
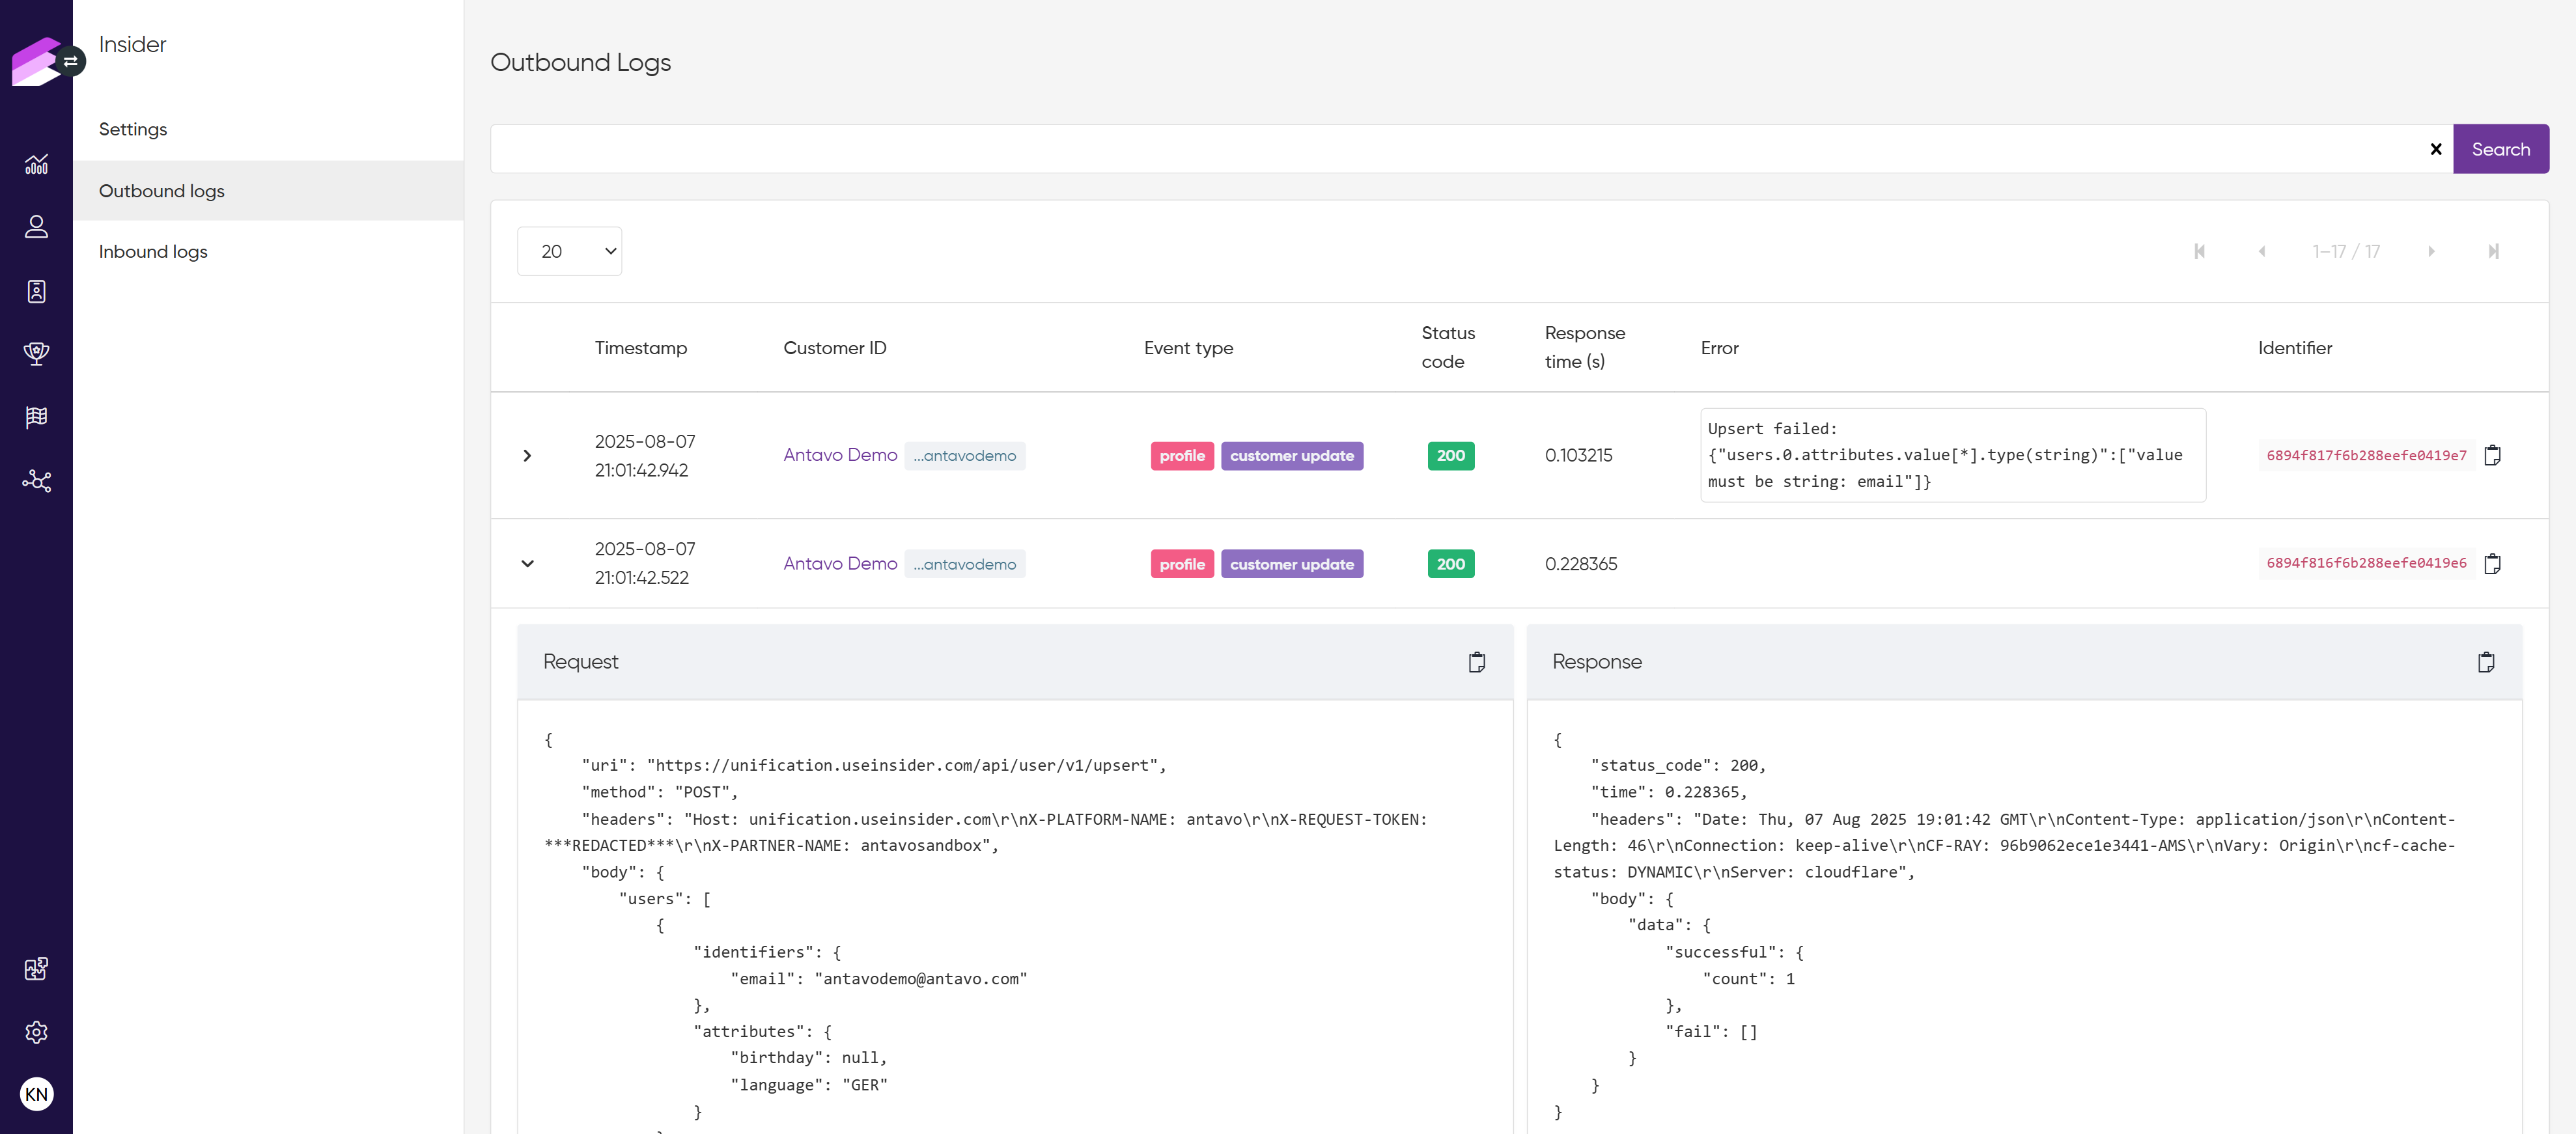
You can expand each log entry to view the full request and response body.
Filter the outbound logs
On the Outbound logs page, use the Search field at the top to enter one or more filter criteria.
You can filter the results by:
Identifier
Customer ID
Event type
Error
Status code
Response body
Click Search to display the filtered results. To reset the filter, click the X button at the end of the search field.
Inbound logs
Open the Inbound logs tab to browse the logs of requests sent from Insider to Antavo.
For each inbound API request, the following information is displayed:
Timestamp | Date and time of the inbound request |
Customer ID | Customer’s name and ID |
Type | Type of the request (profile or event) |
Action | Action triggered in Antavo |
Status | Status of the incoming request (error or done) |
Event | ID of the registered Antavo event |
Error | Error message returned (if applicable) |
Identifier | Identifier of the request |
You can expand each log entry to view the full request body.
.png)
Filter the inbound logs
On the Inbound logs page, use the Search field at the top to enter one or more filter criteria.
You can filter the results by:
Identifier
Customer ID
Request type
Action
Status
Event
Error
Response body
Click Search to display the filtered results. To reset the filter, click the X button at the end of the search field.