The Tiered campaigns module is designed to encourage customers to repeat specific actions by rewarding points based on the level of the milestone they have achieved during a predefined time period.
For example, if you have a campaign planned for the fall season but prefer to grant points in the last days of September, October, and November, this module enables you to configure this campaign for a month’s duration, repeated three times. This allows for the same setup to be reused, rather than configuring each campaign individually.
When it comes to sales commission management, this feature can be beneficial as sales personnel can earn more rewards or unlock higher commission rates by reaching specific milestones.
To access the configuration page, open the Modules menu and search for the Tiered campaigns module. The page will open to a list of campaigns already set up using this module.
The following information is displayed on the listing page:
Name | The name of the campaign along with its status, which can be active, inactive, draft, or scheduled. |
Event type | The type of event that will trigger the campaign. |
Attribute to aggregate | The attribute of the event that will be summarized for eligibility. |
Limit hit type | Three types: percentage, hit limit, and amount. |
Next evaluation date | This date of the next evaluation; indicates when pending points will be moved to awarded status. |
Recurring | Shows green checkmark if the campaign is recurring, with the remaining number of occurrences displayed when hovered over. |
Adding a new campaign
Click Create new campaign on the left sidebar to configure
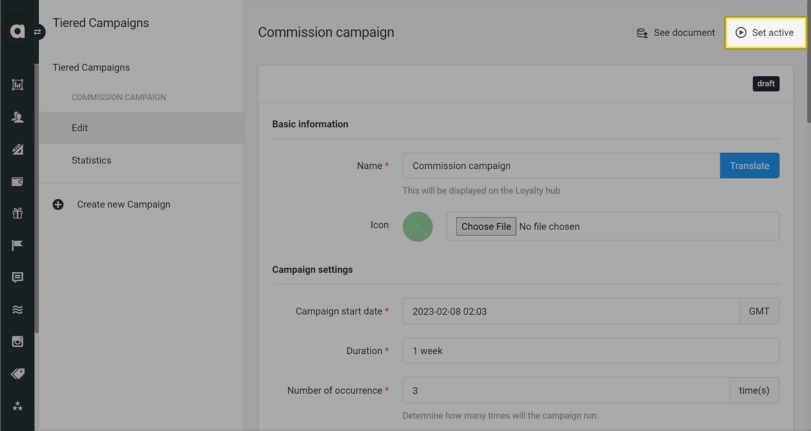
Basic information
Name
If you handle multiple languages in your loyalty program, click the Translate button to add translations.Icon (optional)
Follow the upload instructions to add an image that will represent this campaign.
Campaign settings
Campaign start date
Select the start date using the date pickerDuration
Specify how long the campaign should run. Use the format: ({number}minute(s)|hour(s)|day(s).Number of occurrences
Set the total number of times the campaign should run within the duration.Preview generated on
Indicates how often the bonus points are recalculated. Previews are visible under the Statistics page of each campaign.Grace period
Define the time interval after the end of the campaign duration before the awarded points are calculated. This allows time for any modifications after the campaign ends. Use the format: ({number}minute(s)|hour(s)|day(s).Segments of a campaign (optional)
Optionally, you can select specific customer segments and/or lists to make the campaign available to. You can add multiple segments using the dropdown list. This configuration field operates with a logicaloroperator, meaning that the reward is accessible to the members of any selected segment(s) and list(s).

Campaign rules
Select the entity type
Use the dropdown field to select the type of entity that will trigger your campaign:Transaction: The campaign will be applied to all events that have a transaction ID.
![]()
If you use the Checkout accept module in the loyalty program, pending points (coming from pending checkouts) are also registered for Tiered campaign participants. This ensures that checkout_update and checkout_reject events also modify the pending points within the tiered campaign.
Tiered campaign bonus points will remain pending until campaign evaluation. These points will not be awarded to the customer if checkout confirmation does not occur before the campaign period ends.
Event: If you set the Event option, any event can be selected as a campaign trigger (except for those with a transaction ID). The Entity type dropdown list will automatically appear allowing you to select the specific event.

Select the attribute to aggregate (numeric fields)
Select the attribute of the event that will be summarized for campaign evaluation. If you've chosen Transaction from the Entity type dropdown, you can add a product combination campaign. Simply select the Product Combination option at the bottom of the list to proceed.

Attribute for date (optional)
Select the date attribute to check. This determines whether the event/transaction occurred within the occurrence period. The selectable options vary based on campaign type:Transaction date attribute:
Timestamp of purchase date
Auto acceptance date
Checkout date
Event date attribute:
Date
Expiration date
Timestamp

Limit hit type
Select from three different point calculation methods.Amount: Customers receive points for each amount they reach within the tier.
Hit limit: Once the customer reaches the tier, they receive the points one time.
Percentage: Within the tier limit, the customer receives a given percentage of the amount This option is not available for product combination campaigns.

You can find examples for each of these logic types.
Tiers
In the first two columns, you can configure the from and to values of the aggregated attribute. Define the reward value that you would like to grant after upgrading in the tier system in the third column:Points/increment: Appears when Amount is selected as the limit hit type. Enter the number of points to award within the tier after each evaluation.
Points/level: Appears when Hit limit is selected as the limit hit type. Enter the number of points to award. This only gets awarded one time.
Percentage: Appears when Percentage is selected as the limit hit type. Enter the percentage to award after the customer enters the tier.

Bracketed
If you turn this option on, the from and to limits will be individually awarded to the tiers, instead of applying the aggregation once.Unlimited
If you turn this option on, there is no upper limit on how many points the campaign can allocate (tier max is locked). If this box is not checked and customers collect a higher amount than the highest level tier, they will be rewarded with the maximum number.
Criteria
Product
Use the dropdown list to trigger the campaign on specific products purchased, added under the Product catalog module. This setting is applicable only for Transaction-type campaigns. If you are creating a product combination campaign, you can set the number of items to be purchased in the Quantity field. Click x to remove a product.Filter
Use filters to restrict the campaign to specific event attribute values.

Points Economy
If you use Multi-accounts, select the account to which the points should be rewarded.

Activating a tiered campaign
After saving for the first time, the status of the tiered campaign is inactive. You can activate them right away using the Set active button on the upper right-hand side of the setup page and confirm the activation in the dialog that subsequently appears.
Tiered campaign statistics
The Statistic tab displays Previews that serve two main purposes:
Reflecting customer impact: Previews indicate the number of customers affected in a campaign, divided into occurrences.
Each preview corresponds to a single campaign occurrence.
Updating pending points: Generating a preview triggers an update of pending points for occurrences with an Active and Grace period status.
To initiate the preview creation, click the Generate preview button in the upper right corner. Once the process is complete, the preview status will change to Finished.

The summary table shows the following information:
Start date | The starting date of the occurrence. |
Occurrence status |
|
Pending points | The status of points if the occurrence status is Active or Grace period |
Awarded points | Pending points transition to the Awarded points column if the status is Completed |
Number of customers | The number of customers who have received pending or awarded points |
Evaluation date | The date when the points are awarded, calculated as the end date plus the grace period |
Managing tiered campaigns
Edit a campaign
Go to the Tiered Campaigns module page
Select the campaign you wish to edit
Make the necessary adjustments to your campaign
Save your changes by clicking Update
When editing the campaign, you can manage these additional settings:
Next campaign end date: This date indicates the end date of the currently running occurrence, calculated as the start date plus the duration you’ve specified in the Duration field.
Campaign end date: This date represents the end of the campaign after all occurrences.
Deactivate a campaign
If you decide to pause the campaign, follow these steps:
Go to the Tiered Campaigns module page
Select the campaign you wish to deactivate
Click the Set inactive button on the upper right-hand side of the page
Confirm your choice in the dialog that appears
You also have the option to archive the inactive campaigns from the Management UI.
Go to the Tiered Campaigns module page
Select the campaign you wish to archive
Click on the Archive button on the upper right-hand side of the page
Confirm your choice in the dialog that appears
Archiving is irreversible. Once a tiered campaign structure is archived, it cannot be restored.
This document provides examples of all three options that can be chosen to calculate awarded points when using the Tiered campaign module.
Point calculation logic examples
Amount-based
The customer receives the points for each amount they reach within the tier.
The first table illustrates how the multiplication rules change when the customer progresses within the tier system. The second table demonstrates how the points are awarded based on these rules.
Example | Given property | Increment |
|---|---|---|
Tier 1 | 0-50 | 10 |
Tier 2 | 51-100 | 20 |
Tier 3 | 101-200 | 30 |
<Property> before grace period | Pending point preview before grace period | Bracketed | <Property> at the end of the campaign | Awarded points | Bracketed | |
|---|---|---|---|---|---|---|
A user | 49 | 490 | 490 | 79 | 1,580 | 500+580 |
B user | 70 | 1,400 | 550+400=900 | 90 | 1,800 | 500+800 |
C user | 154 | 4,620 | 500+1,000+1,620+3,120 | 300 | 6,000 | 500+1,000+3,000 |
Hit limit-based
Once the customer reaches the tier, they receive the points one time.
The first table displays the number of points to be awarded when entering a new tier. The second table demonstrates how the points are awarded based on these rules.
Example | Given property | Points for hit limit |
Tier 1 | 0-50 | 10 |
Tier 2 | 51-100 | 20 |
Tier 3 | 101-200 | 30 |
<Property> before grace period | Pending point preview before grace period | Bracketed | <Property> at the end of the campaign | Awarded points | Bracketed | |
Advisor A | 49 | 0 | 0 | 79 | 10 | 10 |
Advisor B | 70 | 10 | 10 | 90 | 10 | 10 |
Advisor C | 154 | 20 | 30 | 300 | 30 | 50 |
Percentage-based
Within the tier limit, the customer receives the given percentage of the amount.
Example | Given property | Percentage of the property |
Tier 1 | 0-50 | 100 |
Tier 2 | 51-100 | 200 |
Tier 3 | 101-200 | 300 |
<Property> before grace period | Pending point preview before grace period | Bracketed | <Property> at the end of the campaign | Awarded points | Bracketed | |
Advisor A | 49 | 49*100% | 49*100% | 79 | 158 | 50*100%+29*200% |
Advisor B | 70 | 70*200% | 50*100%+20*200% | 90 | 180 | 50*100%+40*200% |
Advisor C | 154 | 150*300% | 50*100%+50* 200%+54*300% | 300 | 900 | 50*100%+50*200%+100*300% |