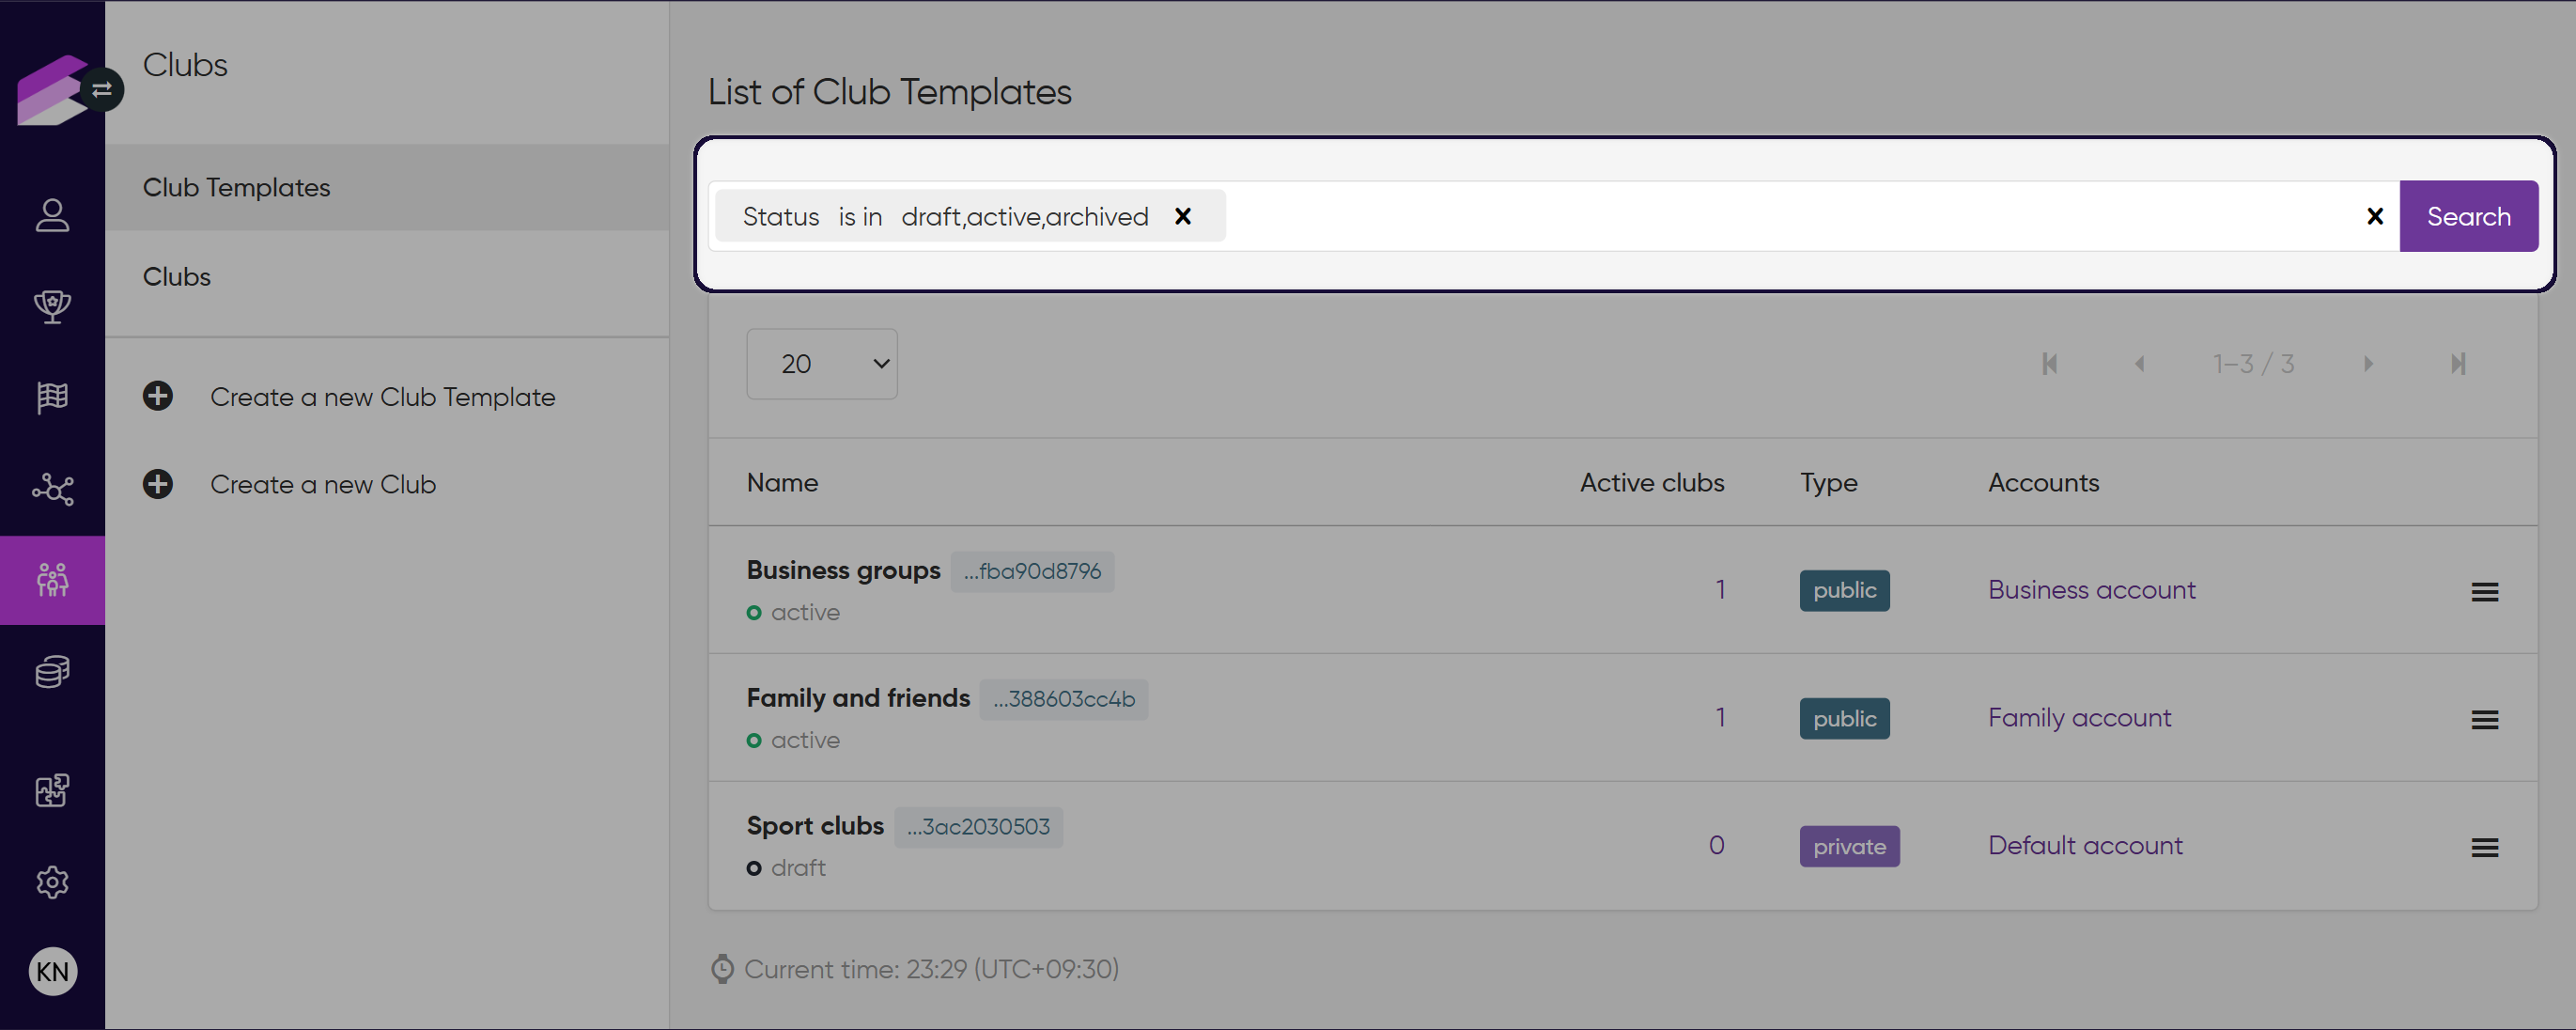
To access the configuration page, open the Modules menu and search for the Clubs module. The page will open to a list of club templates (if already created), displaying the following information:
Name | The name of the club template, followed by its ID and status, which can be You can click the template ID to copy it. |
Active clubs | The number of active clubs created using the template. You can click the number to open the list of clubs created with the template. |
Type | The type of the club template, which can be either |
Accounts | This column displays the accounts associated with the club template. Only the point-earning events from these accounts are considered when calculating the point contributions for clubs created with this template. You can click an account’s name to open its settings page. Note that this column is visible only if the Multi-accounts module is enabled in the loyalty program. |
Creating a new club template
Click Create a new Club Template in the sidebar of the Clubs module to open the template’s Edit page.
Basic settings
Enter the name of the club template.
This name is for internal use only, and it is used to identify the template in the list of templates.Select the type of club template:
Public: Loyalty members can join the club via a link (no invitation or approval is needed).
Private: Loyalty members must receive an invitation to join the club.
Enter the invitation settings. - Only applicable if the Club Template Type is set to Private
Next to Invitation Auto Accept, select whether invited loyalty members should automatically become a member with an active status or if they should first receive an applicant status.
Applicant members need the club owner’s permission to become full members of the club and to receive the active status.In the Invitation Pattern field, enter the URL that will be used for the invitation link to join a private club. If left empty, the default URL is
https://shop.antavo.com/.
When an invitation ID to join a club is generated (via the Create an invitation to a club endpoint), it is added to the end of the URL provided in this field, creating the invitation link.In the front-end implementation of the loyalty program, you must ensure that the generated invitation link redirects to the Add a customer to a private club endpoint.
In the Invitation ID Validity field, enter the number of days for which the invitation will be valid.
Set the club member limit.
Specify the maximum number of members for each club. Note that the applicant members of a club are not included in the club’s total member count.
.png)
The club template type cannot be changed once the template is activated.
Contribution settings
This section allows you to define how reward points earned by club members at checkout are shared between the customer's personal account(s) and the club. Contribution settings are configured at the Club Template level and can be customized for each account (if multi-account functionality is enabled).
Select the Contribution type
Choose how contribution points should be calculated:
Set percentage: A specified contribution percentage of the earned points is deducted from the club member's total points and added to the club’s point balance. The remaining points are credited to the club member’s account.
Additional percentage: The full amount of points earned is credited to the club member’s account. Additionally, a specified contribution percentage of that amount is added to the club’s points.
No automatic contribution: No points are automatically allocated to the club. Points may be contributed manually through customer donations only.
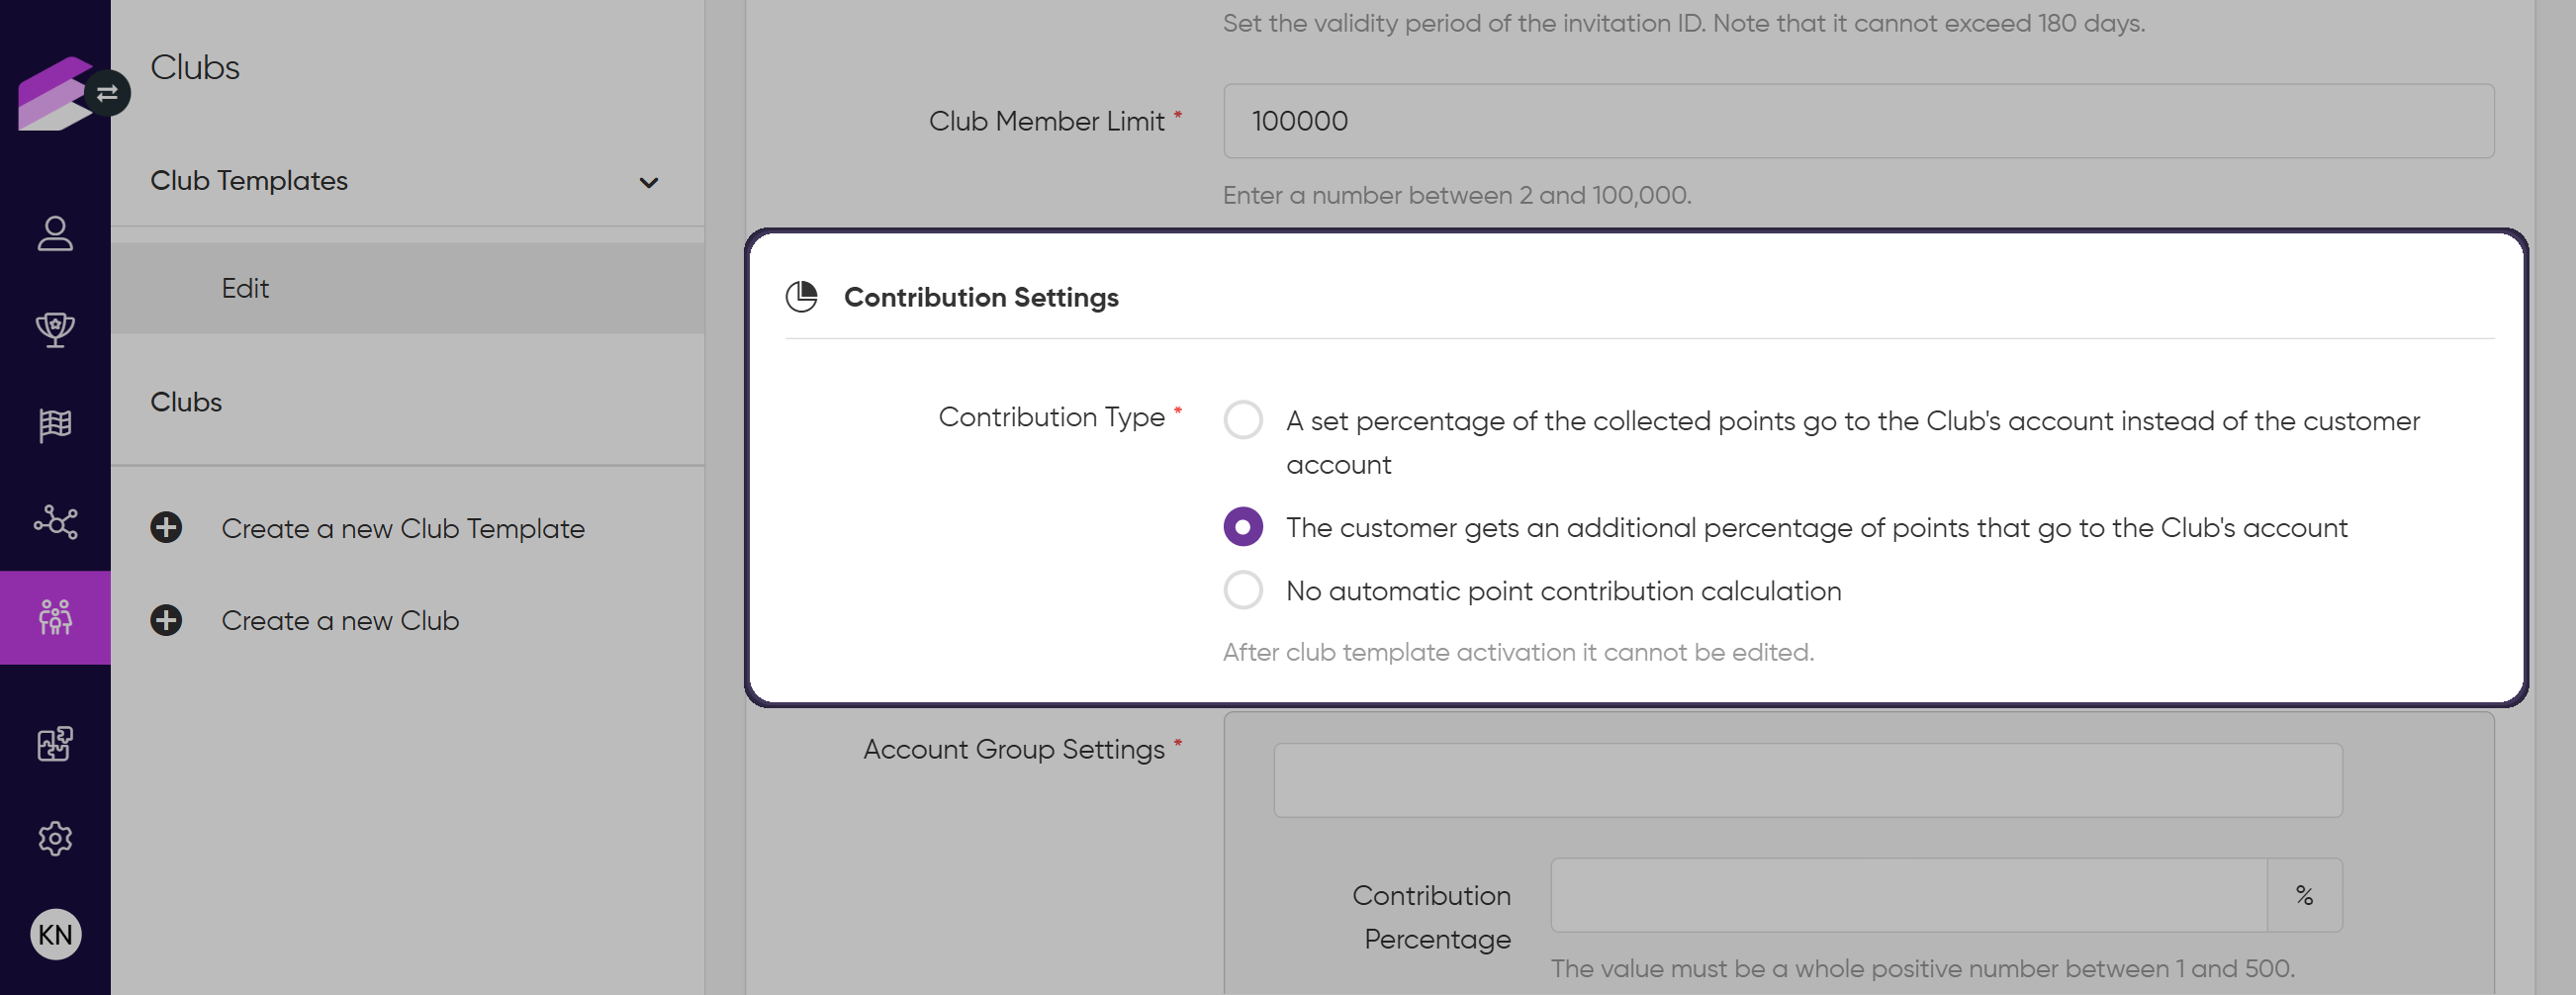
The contribution type cannot be changed once the template is activated.
Account-level contribution settings
If the Multi-accounts module is enabled, you can configure contribution settings per account. Otherwise, the configuration applies globally, and no account selection dropdown will be displayed.
Select one or more accounts for which the contribution settings should apply.
If the Multi-accounts module is turned off, this field is not displayed.
Set the percentage of points to be automatically contributed to the shared Club Points account.
This field is only shown if the Contribution type is not set to No automatic contribution.
Set the point conversion rate
This setting defines how Account Points are converted into Club Points when contributions are calculated. Fraction values are not supported.Enter the source (Account Point) value – This is the number of points earned by the customer in their account.
Enter the target (Club Point) value – This is the number of Club Points the account points will be converted into.
The effective conversion rate is calculated as Club Point / Account Point and displayed in the help text under the configuration field for reference.
Example: If 10 Account Points are worth 5 Club Points, enter: Account Point: 10 Club Point: 5, the conversion rate will be 0.50.
Changes to the conversion rate after the template has been activated will not retroactively modify previously earned or contributed points.
Configure a minimum points threshold for Club Point contributions
This setting defines whether there is a threshold for activating Club Point contributions based on the member’s earned points.No minimum points required: Club Point contributions are activated regardless of how many points the member earns at checkout.
Minimum points required: Contributions are activated only if the total earned points by the club member at checkout equal or exceed the specified minimum point value.
The system recommends a minimum point value based on the contribution percentage and point conversion rate to ensure valid contributions.
Point donation
Check the Enable Point Donation option to allow customers to donate points to clubs.
To enable point donations, your developer team must implement the donation endpoint of the Clubs API., which helps to submit donations programmatically. Each donation is logged as a club_point_donation event in both the customer’s and the club’s event history. Learn more about event history.
If the Contribution Type is set to No automatic contribution, this checkbox is automatically enabled and cannot be changed. This is because, in the absence of automatic contributions, manual point donations are the only way for club members to contribute points to the club. Therefore, point donation must always remain enabled in this configuration.
Once point donation is enabled, the Enable Limitation of Point Donation option becomes available.
Set Club Point Donation Limit
Enter the amount of Club Points that can be donated within the selected reset cycle.
The equivalent amount in Account Points is automatically displayed next to the configuration field based on the current Point Conversion Rate.
Example: If the conversion rate is 0.50, entering 1 Club Point shows Equals to 2 Account Points.
Select Limit Reset Type
Choose how and when the donation limit reset cycle is defined:
The limit will not be reset: Donation limits apply cumulatively, without any reset cycle.
Fixed date: The donation limit resets annually on specified dates. This creates a recurring yearly reset cycle.
You can add multiple reset dates (month and day) via the Add Reset Interval Date button.
Based on the customer's first donation: The donation limit resets after a defined interval starting from the customer's first donation event. This defines a rolling reset cycle based on individual donation activity.
Format: ({number} minute(s) | hour(s) | day(s) | month(s) | year(s)) (e.g., 1 year, 30 days).
Members with the role Applicant are not eligible to donate account points to the club.
.png)
To configure different contribution settings for other accounts, click the Add Account Group Setting button. An account can only be added to one account group setting.
Additional Account Group settings can be deleted by clicking the × button in the top right corner of each group. The first Account Group setting is mandatory and cannot be removed.
Club point expiration
Select the club point expiration type:
No expiration: If this option is selected, the club points will never expire.
Rolling: Select this option to set a time period after which the club points will expire. The expiration date is calculated by adding the specified number of days to the date when the club points are earned. Points earned from different actions have distinct expiration dates.
Calendar: Select this option to specify one or more recurring dates on which the club points will expire.
If club point expiration has been enabled in the previous step, donated points will also expire.
In the Expire After field, enter the number of days after which the club points will expire (e.g., 1 day, 1 week, 2 months, etc.). - Only applicable if the Expiration Type is set to Rolling
The expiration date is calculated by adding the specified number of days to the date when the club points are earned. Points earned from different actions have distinct expiration dates.Next to Expiration Dates, click Add interval date to specify one or more recurring expiration dates by entering the month and day of each date. - Only applicable if the Expiration Type is set to Calendar
Club points will expire annually on the selected dates.Please ensure that the club-point-expiration job is configured, as it is required for the expiration process to function.
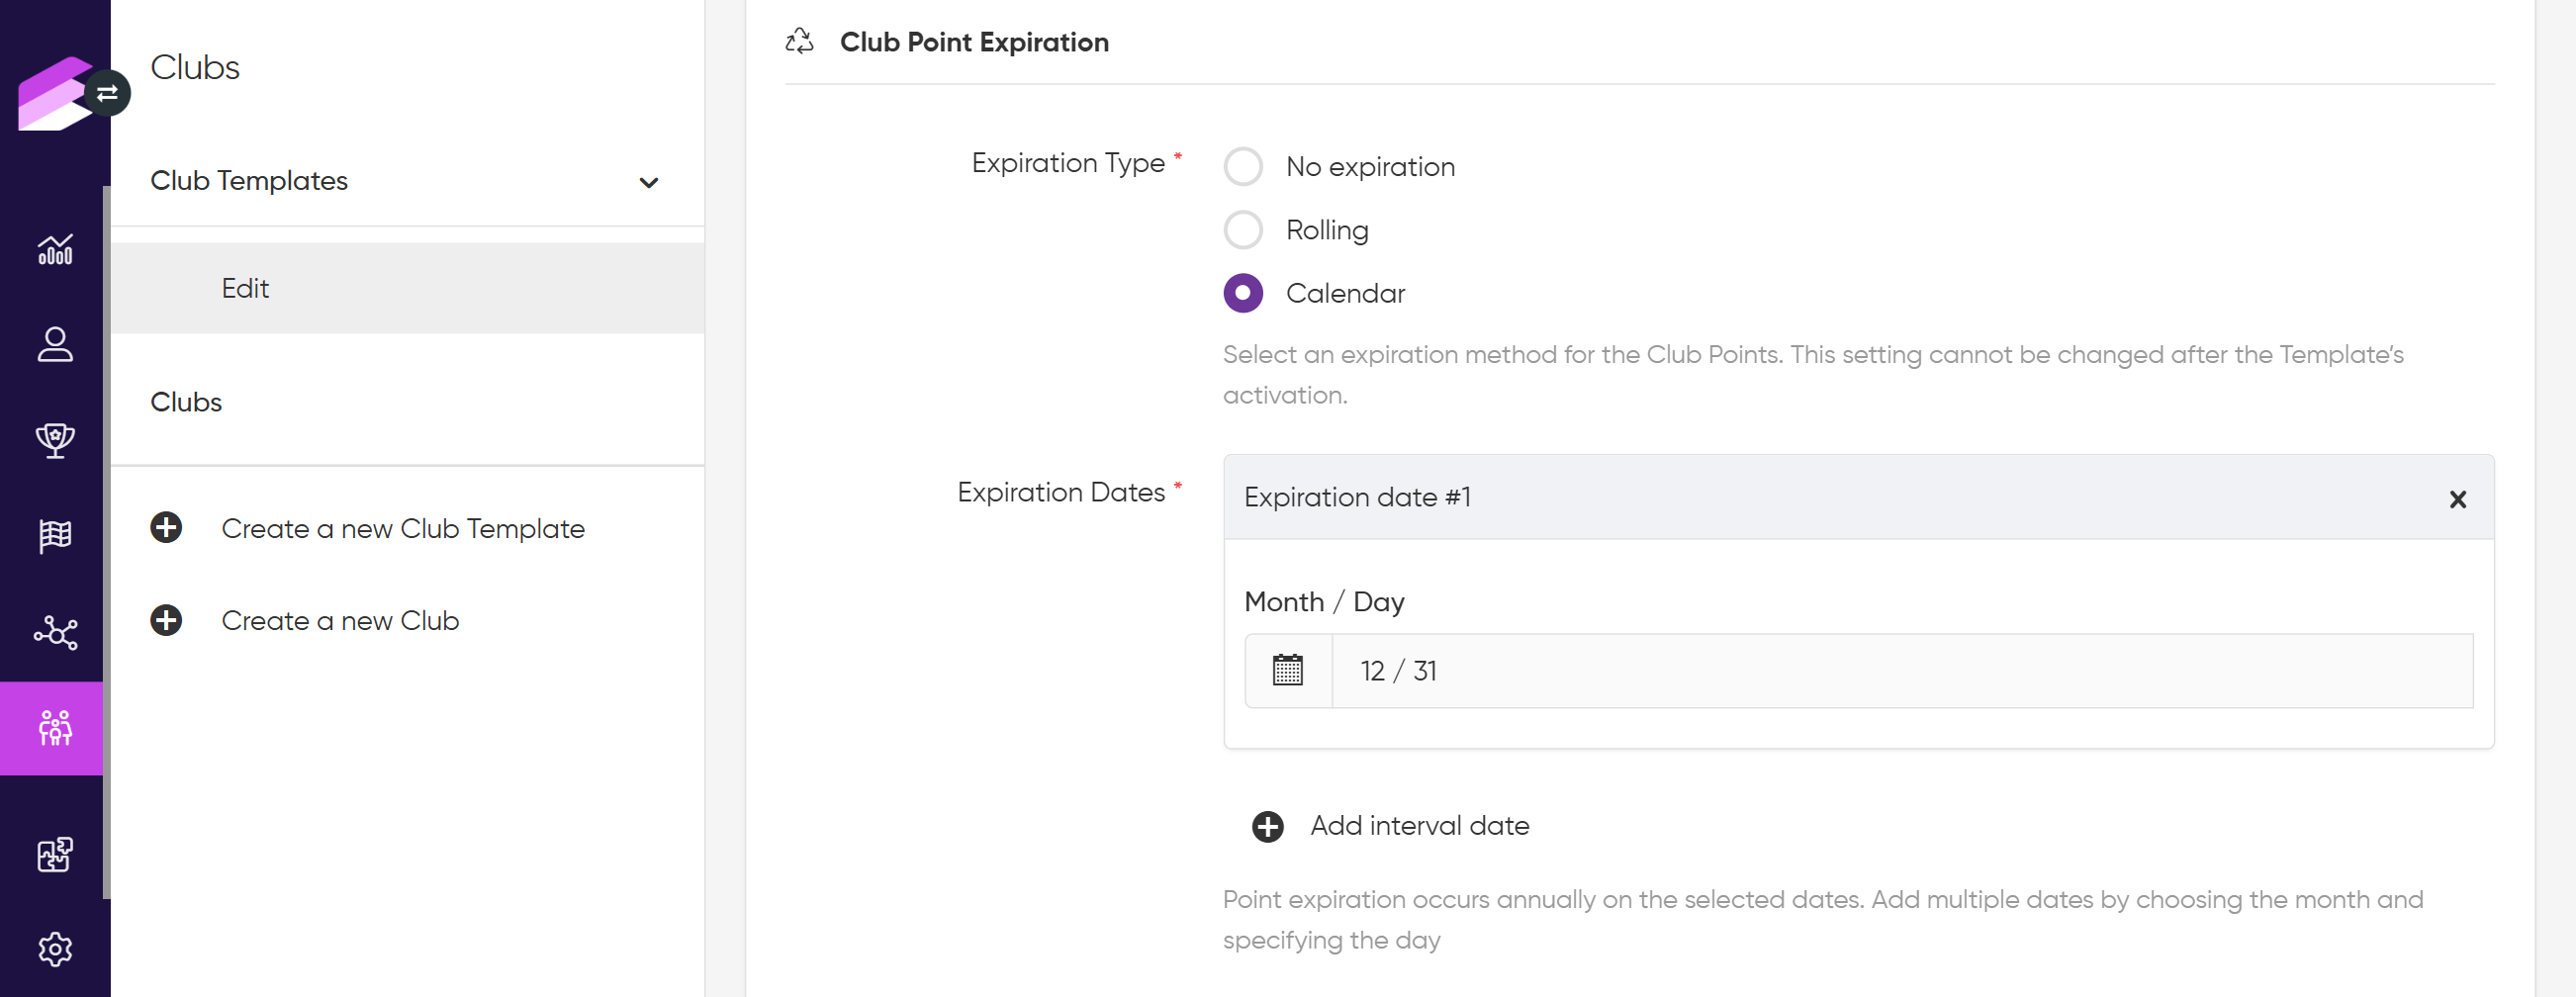
The club point expiration type cannot be changed once the template is activated.
Burn settings
Next to Burn Eligibility, select who can spend club points:
All active members: Select this option to allow all club members to spend club points.
Owner only: Select this option to restrict the spending of club points to the club owner only.
In the Membership Duration Requirement field, specify the minimum number of days that a member must be a part of a club before they can spend club points. - Only applicable if the Burn Eligibility is set to All active members
Note that the value must be between 0 and 365 days.Mark the Enable the Limitation of Spending checkbox to limit the amount of club points that a club member can spend.
Note that this limitation also applies to the club owner.Next to Limit Reset Type, select the spending limitation logic:
The limit will not be reset: Select this option if the point spending limit can only be reached once, after which it will not be reset.
Fix date: Select this option to set one or more recurring dates on which the amount of spendable club points is reset.
Based on the customer’s first spending event: Select this option to reset the amount of spendable club points at a specified time interval.
Next to Limit Reset Dates, click Add reset interval date to specify one or more recurring reset dates by entering the month and day of each date. - Only applicable if the Limit Reset Type is set to Fix date
The amount of spendable club points will be reset annually on the selected dates.In the Limit Reset Interval field, enter the time interval after which the amount of spendable club points will be reset (e.g., 1 week, 2 months, etc.). - Only applicable if the Limit Reset Type is set to Based on the customer’s first spending event
Each reset date is calculated by adding the set time interval to the date of the club member’s first point spending action or to the date of the first such action following a limit reset.In the Spending Limit field, enter the number of club points that each club member can spend according to the specified spending limitation logic.

The burn settings cannot be changed once the template is activated.
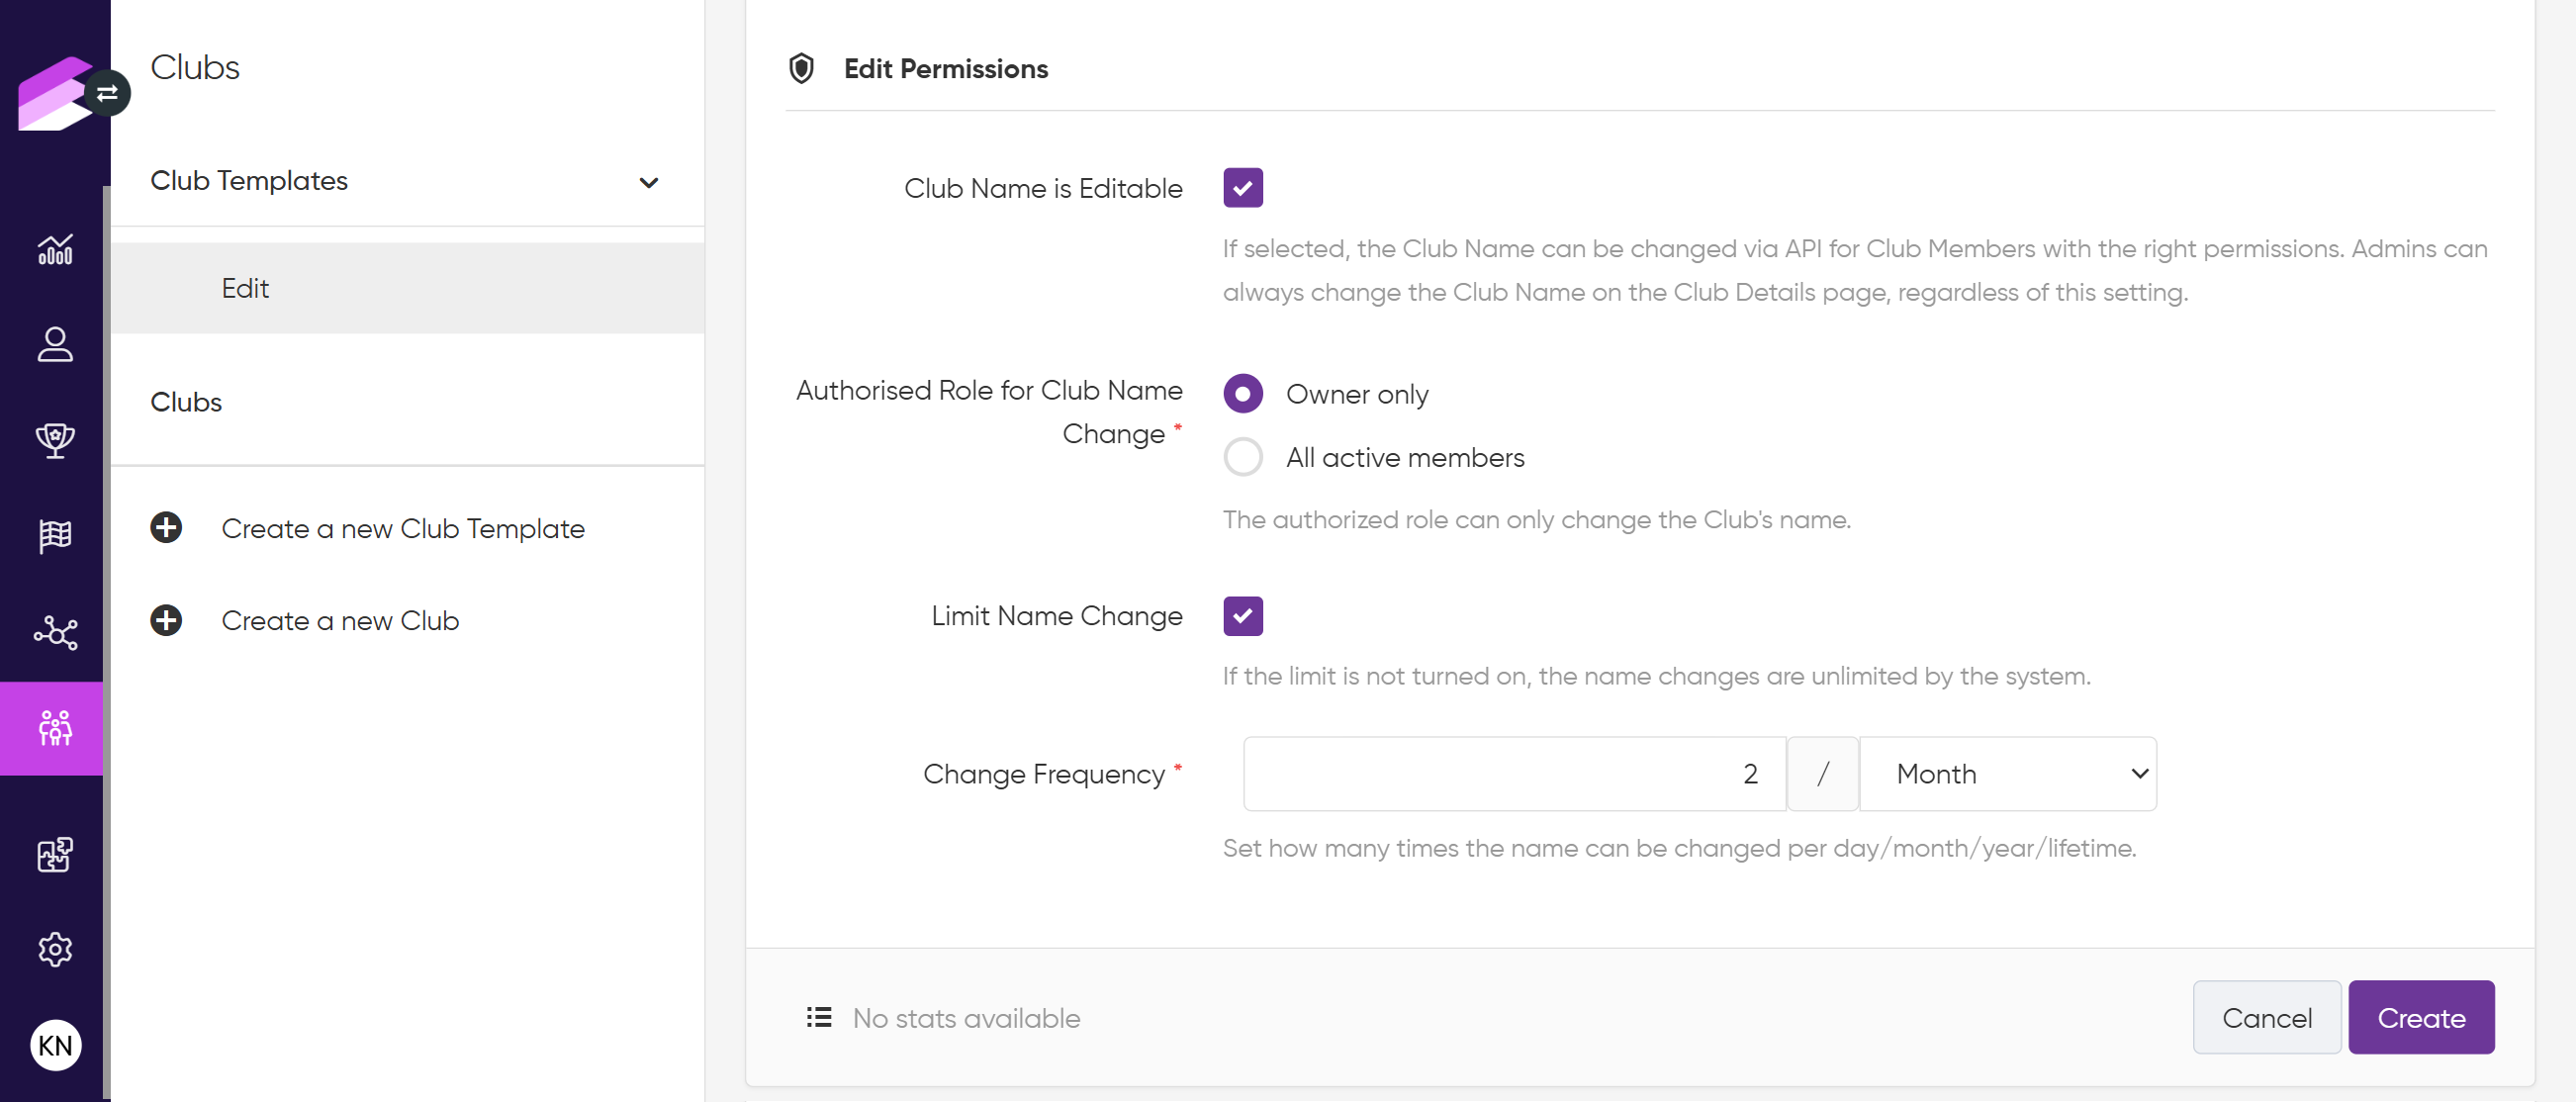
Edit permissions
Mark the Club Name is Editable checkbox to allow club members with the appropriate permissions to change the club’s name via the Clubs API.
Note that Management UI admins can always change the club’s name on the club’s Details page, regardless of this setting.
The following settings are only available if the Club Name is Editable checkbox is marked:
Next to Authorised Role for Club Name Change, select who can change the club’s name:
Owner only: Select this option to allow only the club owner to change the club’s name.
All active members: Select this option to allow all club members to change the club’s name.
Mark the Limit Name Change checkbox if you want to set a limit for how many times the club’s name can be changed. Leave it unmarked to allow an unlimited number of name modifications.
In the Change Frequency field, enter the number of times that the club’s name can be changed within the defined period (e.g., 1/Day, 3/Year, etc.). - Only applicable if the Limit Name Change checkbox is marked
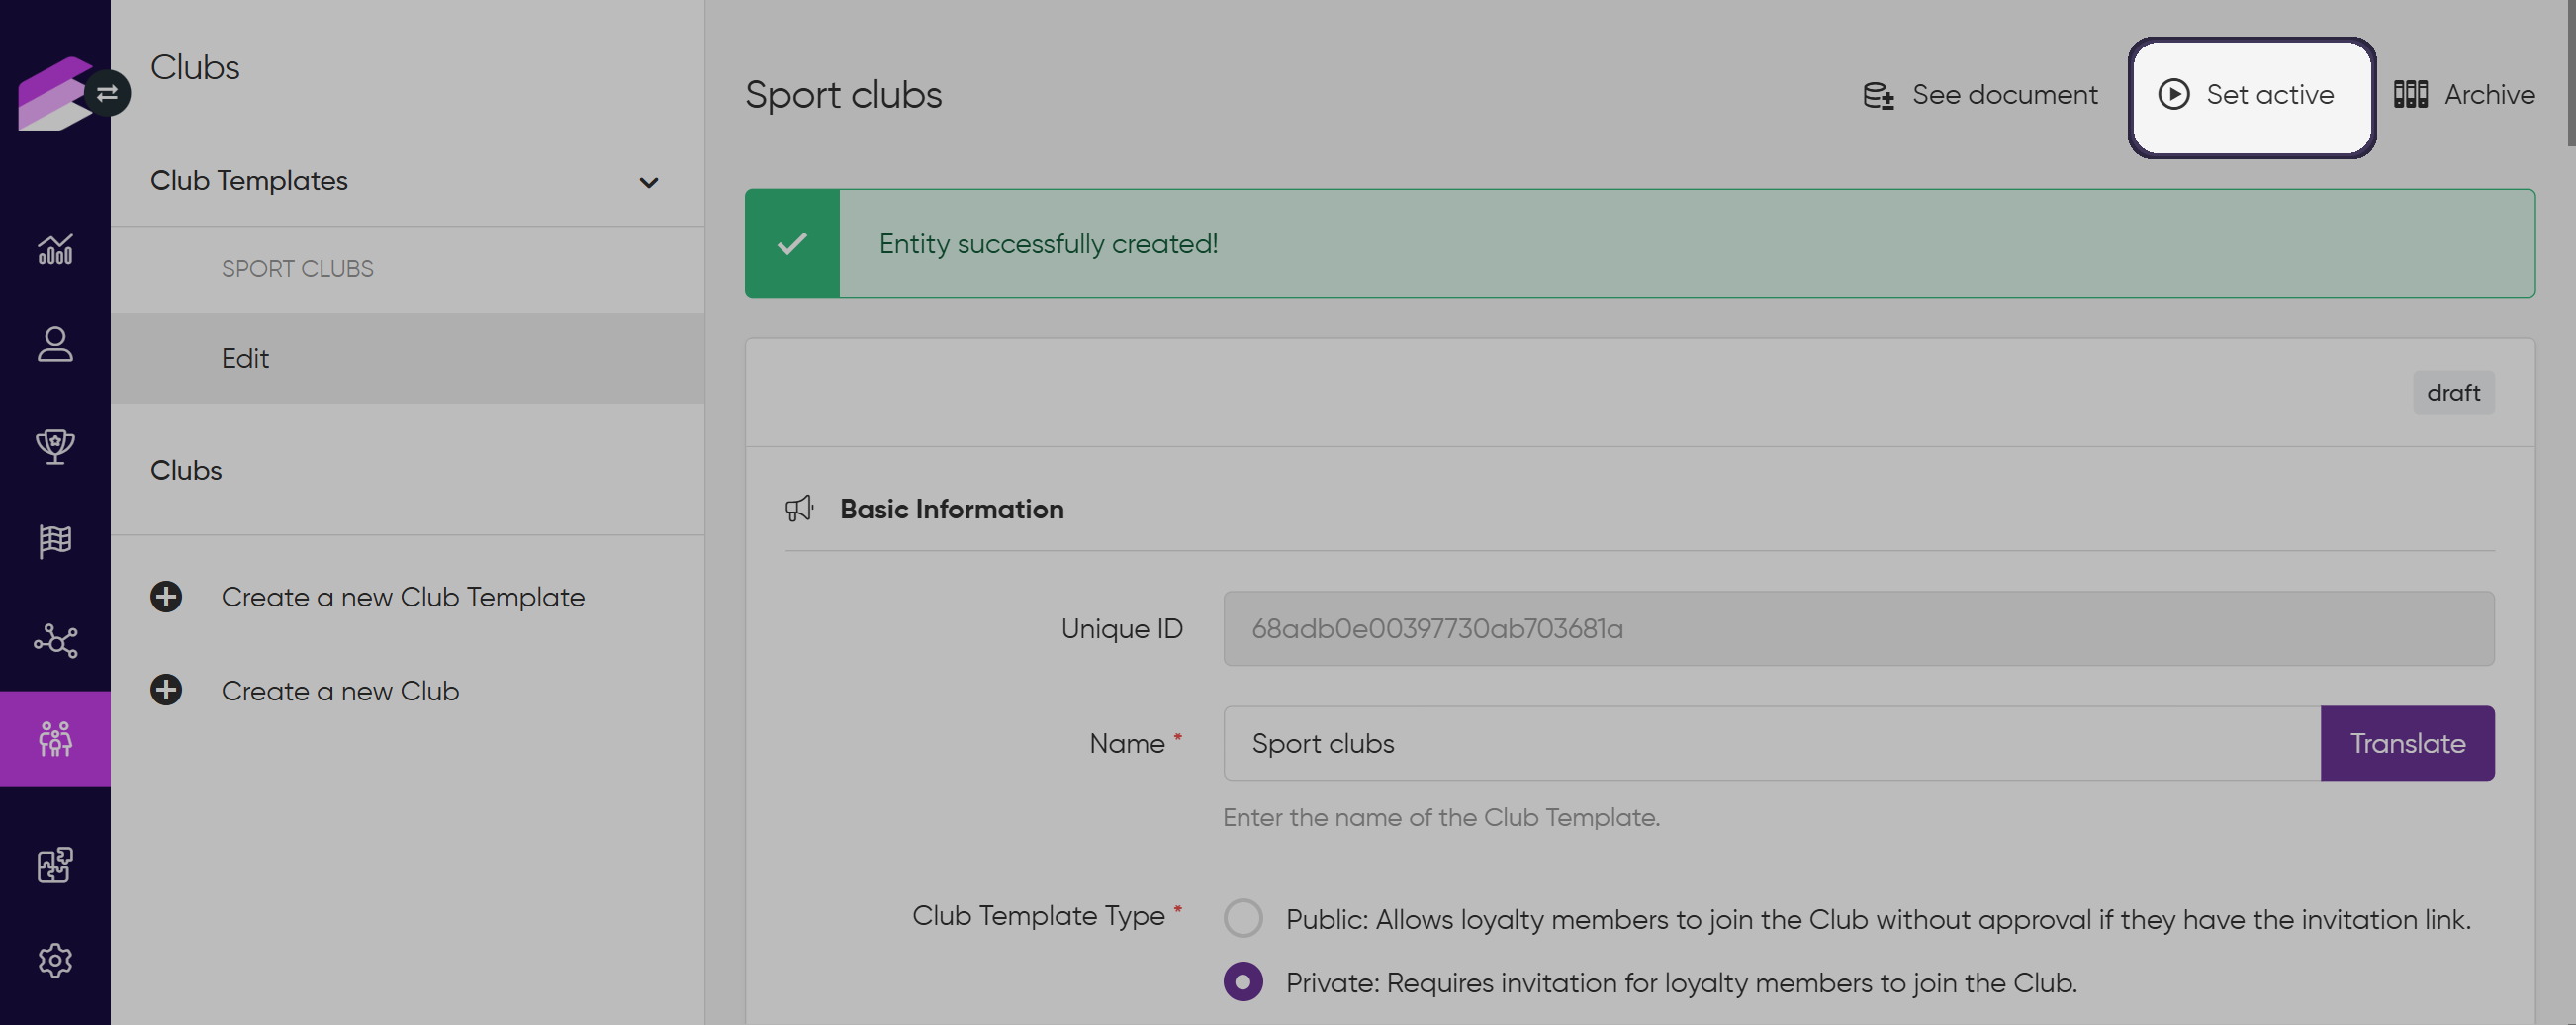
Activate a club template
After you create a club template, its status is set to draft by default. Draft templates appear in the list of club templates on the Clubs module configuration page, but they cannot be used to create new clubs until they are activated.
To activate the club template immediately after creation, click the Set active button on the upper right-hand side of the template’s Details page, then confirm the activation in the dialog that appears. The template’s status is changed to active.
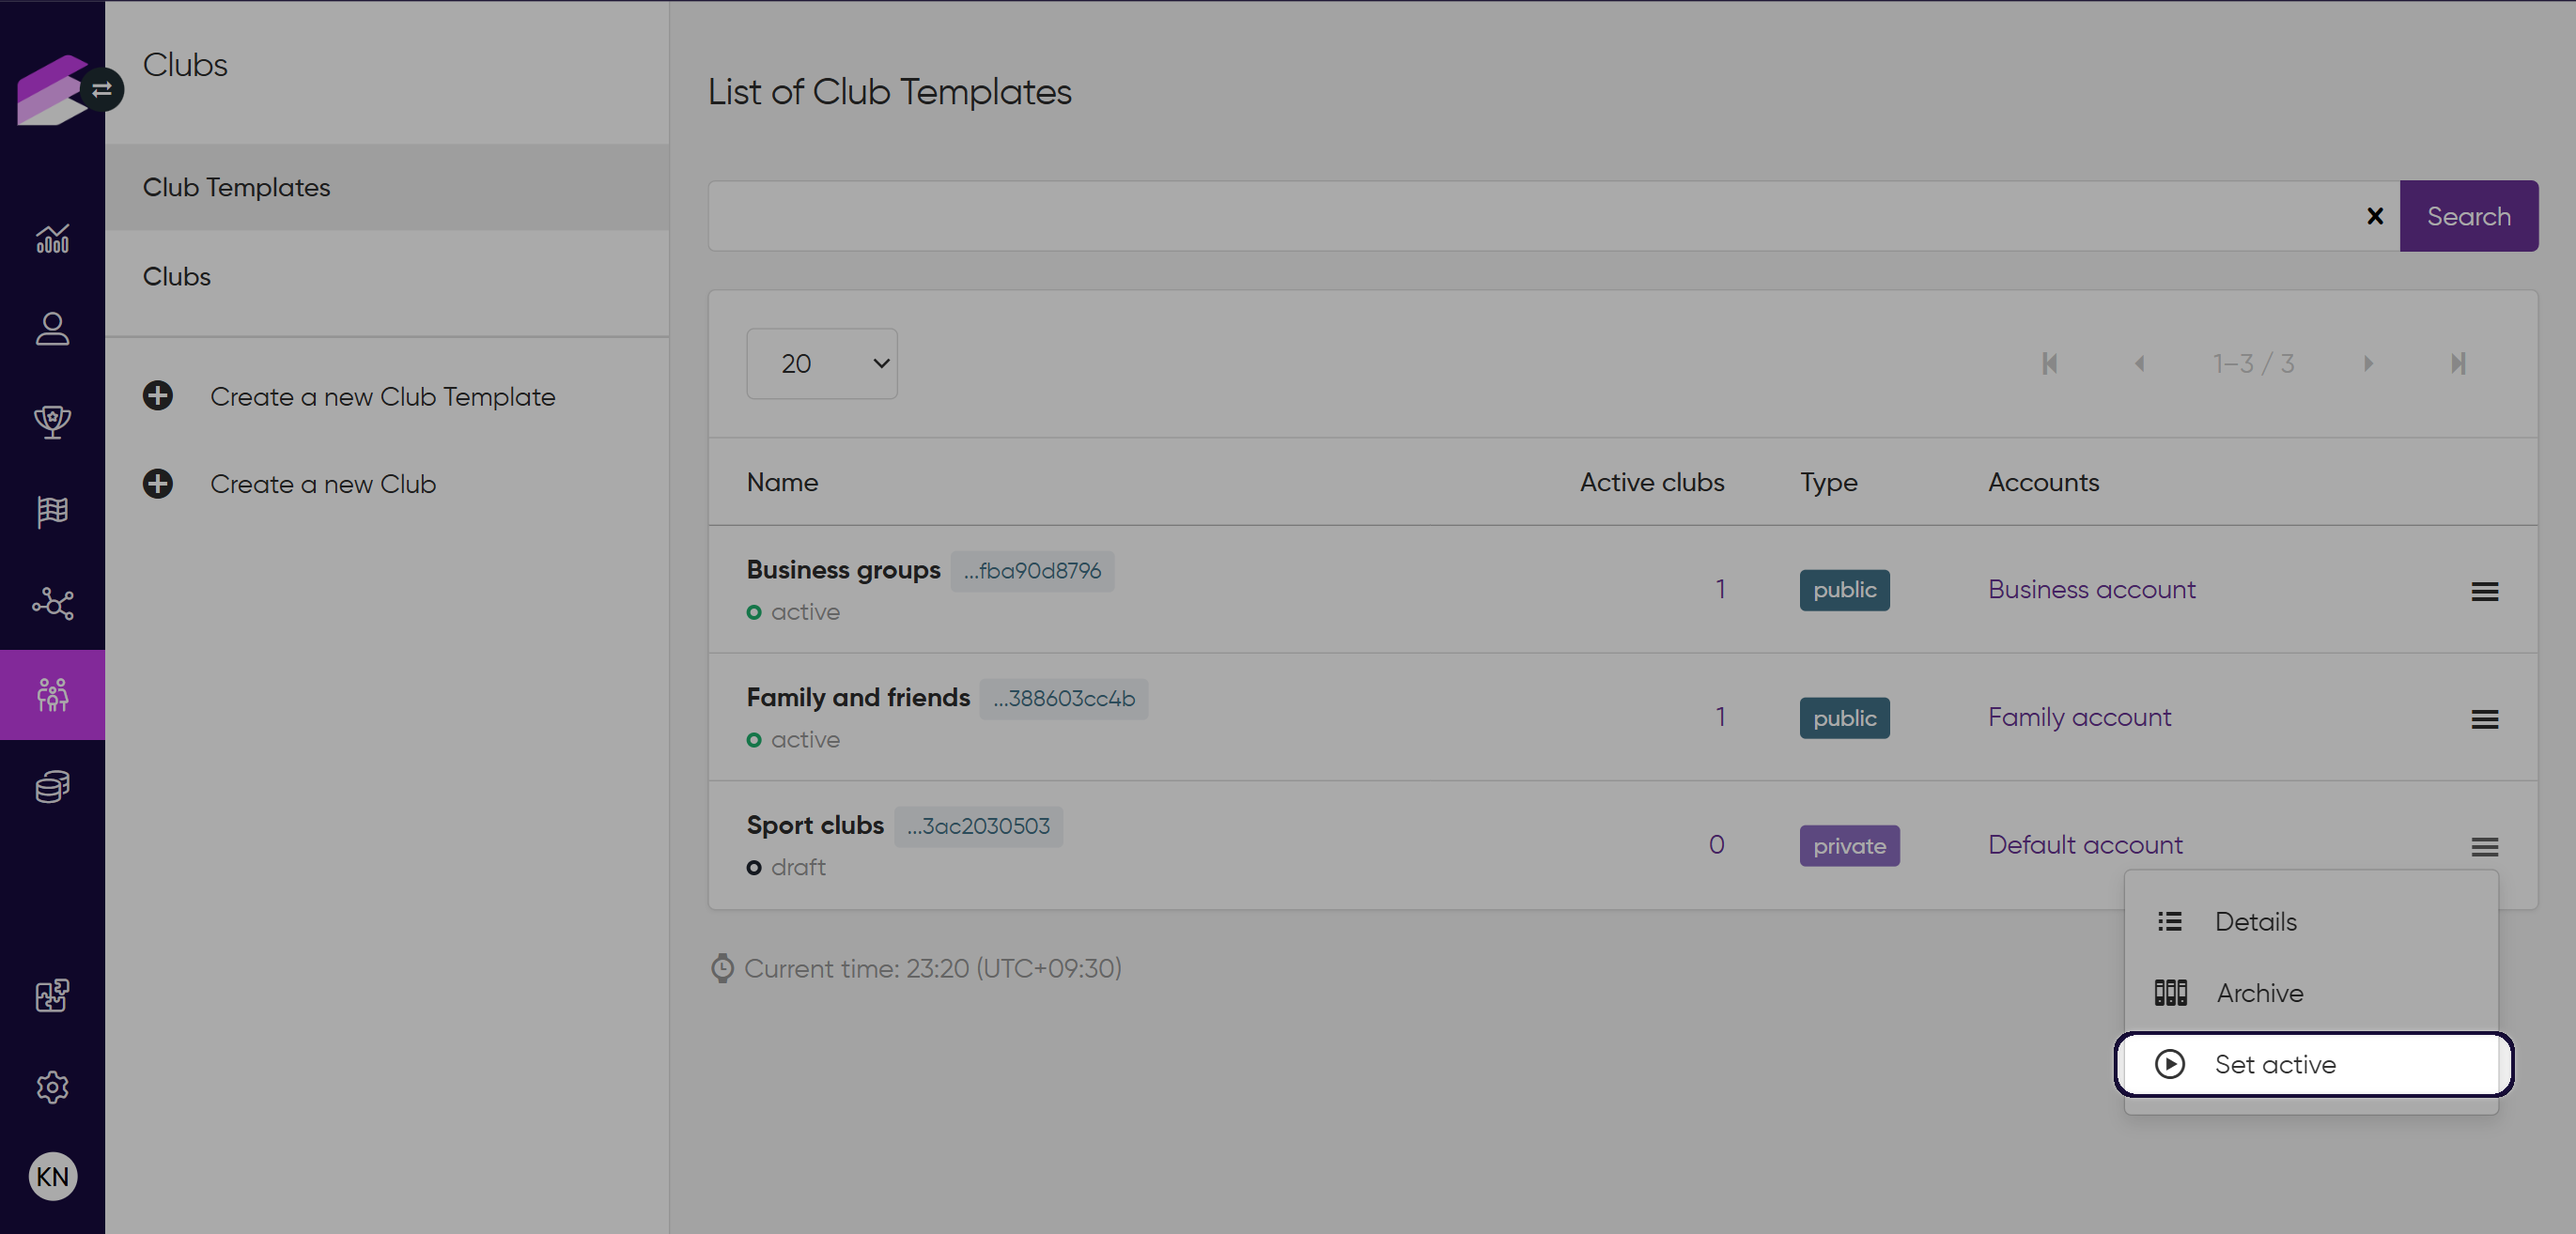
You can also activate a club template from the Club Templates menu in the module’s sidebar navigation. Open the hamburger menu at the end of the template’s row, click Set active, and then confirm the activation in the dialog that appears. The template’s status is changed to active.
Once a club template is activated, the following settings can no longer be edited:
Club template type
If the type is set to Private, you also cannot edit the Invitation Auto Accept settings.
Contribution type
Point expiration type
Burn settings
Managing club templates
Edit a club template
Go to the Club Templates page in the sidebar of the Clubs module.
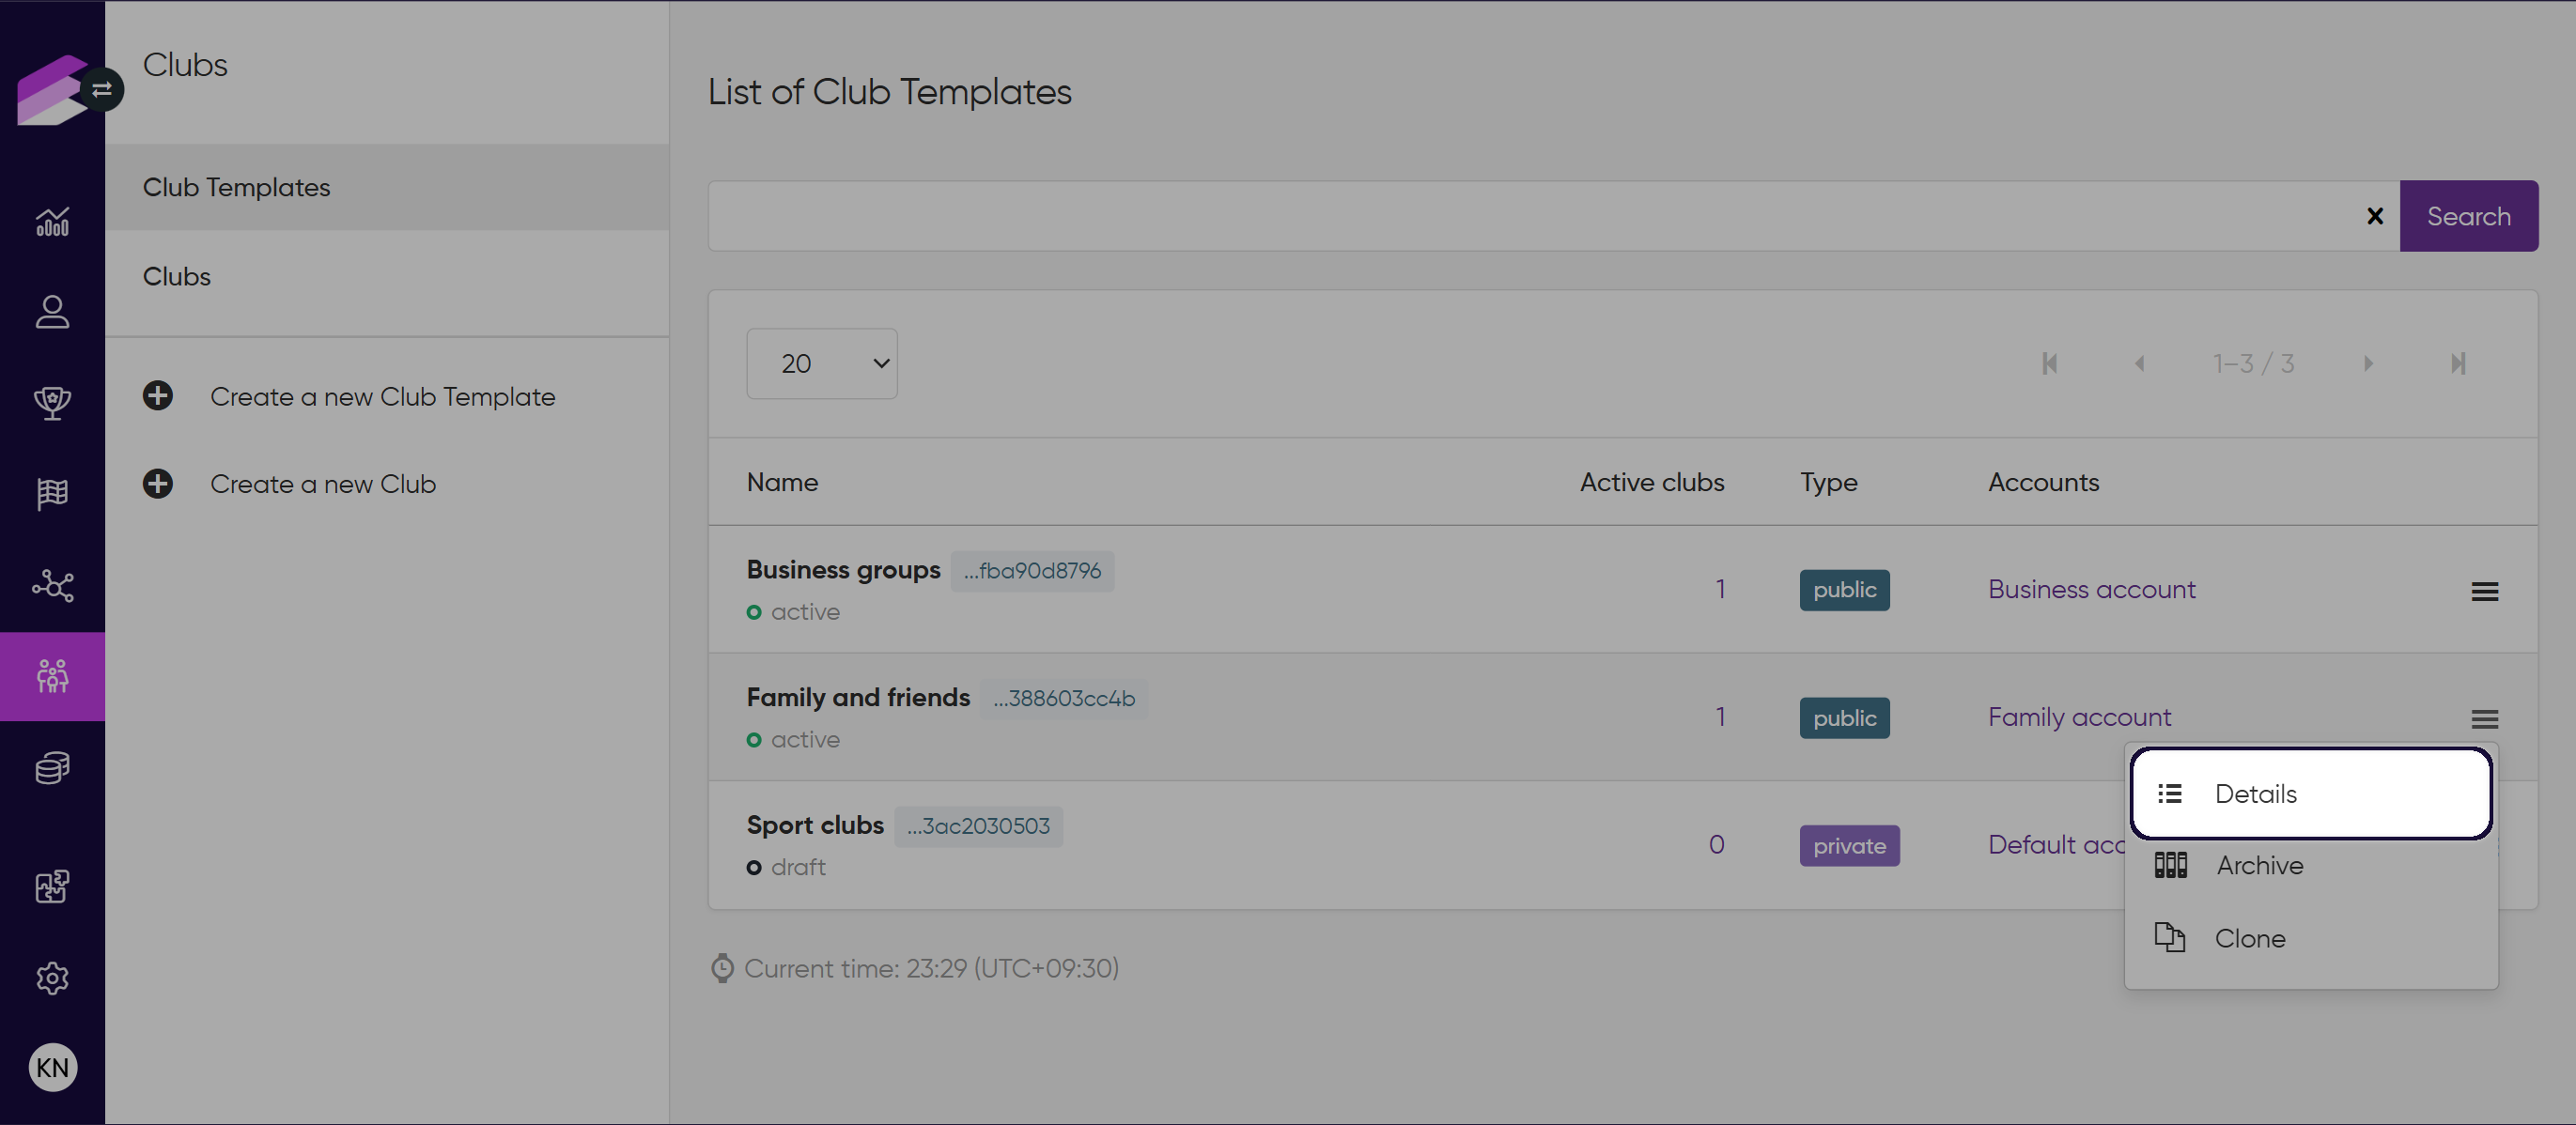
Click the hamburger button of the club template you want to edit.
Click Details to open the Edit page.
Modify the settings of the club template as needed.
Click Update to save your changes.
A confirmation message of the successful action is displayed at the top of the page.
If you modify the Contribution settings the change will affect only future point earning events as this information cannot be modified on past events.
Clone a club template
You can clone an existing club template to create a new template with the same or similar settings:
Go to the Club Templates page in the sidebar of the Clubs module.
Click the hamburger button of the club template you want to clone.
Click Clone.
The Edit page of the new template opens, but the template is not yet created.Modify the template’s settings as needed.
Note that the name of the clone template is modified by default to reflect the cloning action. You can change the name before creating the clone template, or you can edit it later.
Click Create.
A confirmation message of the successful action is displayed at the top of the page, and the new template is created with adraftstatus.
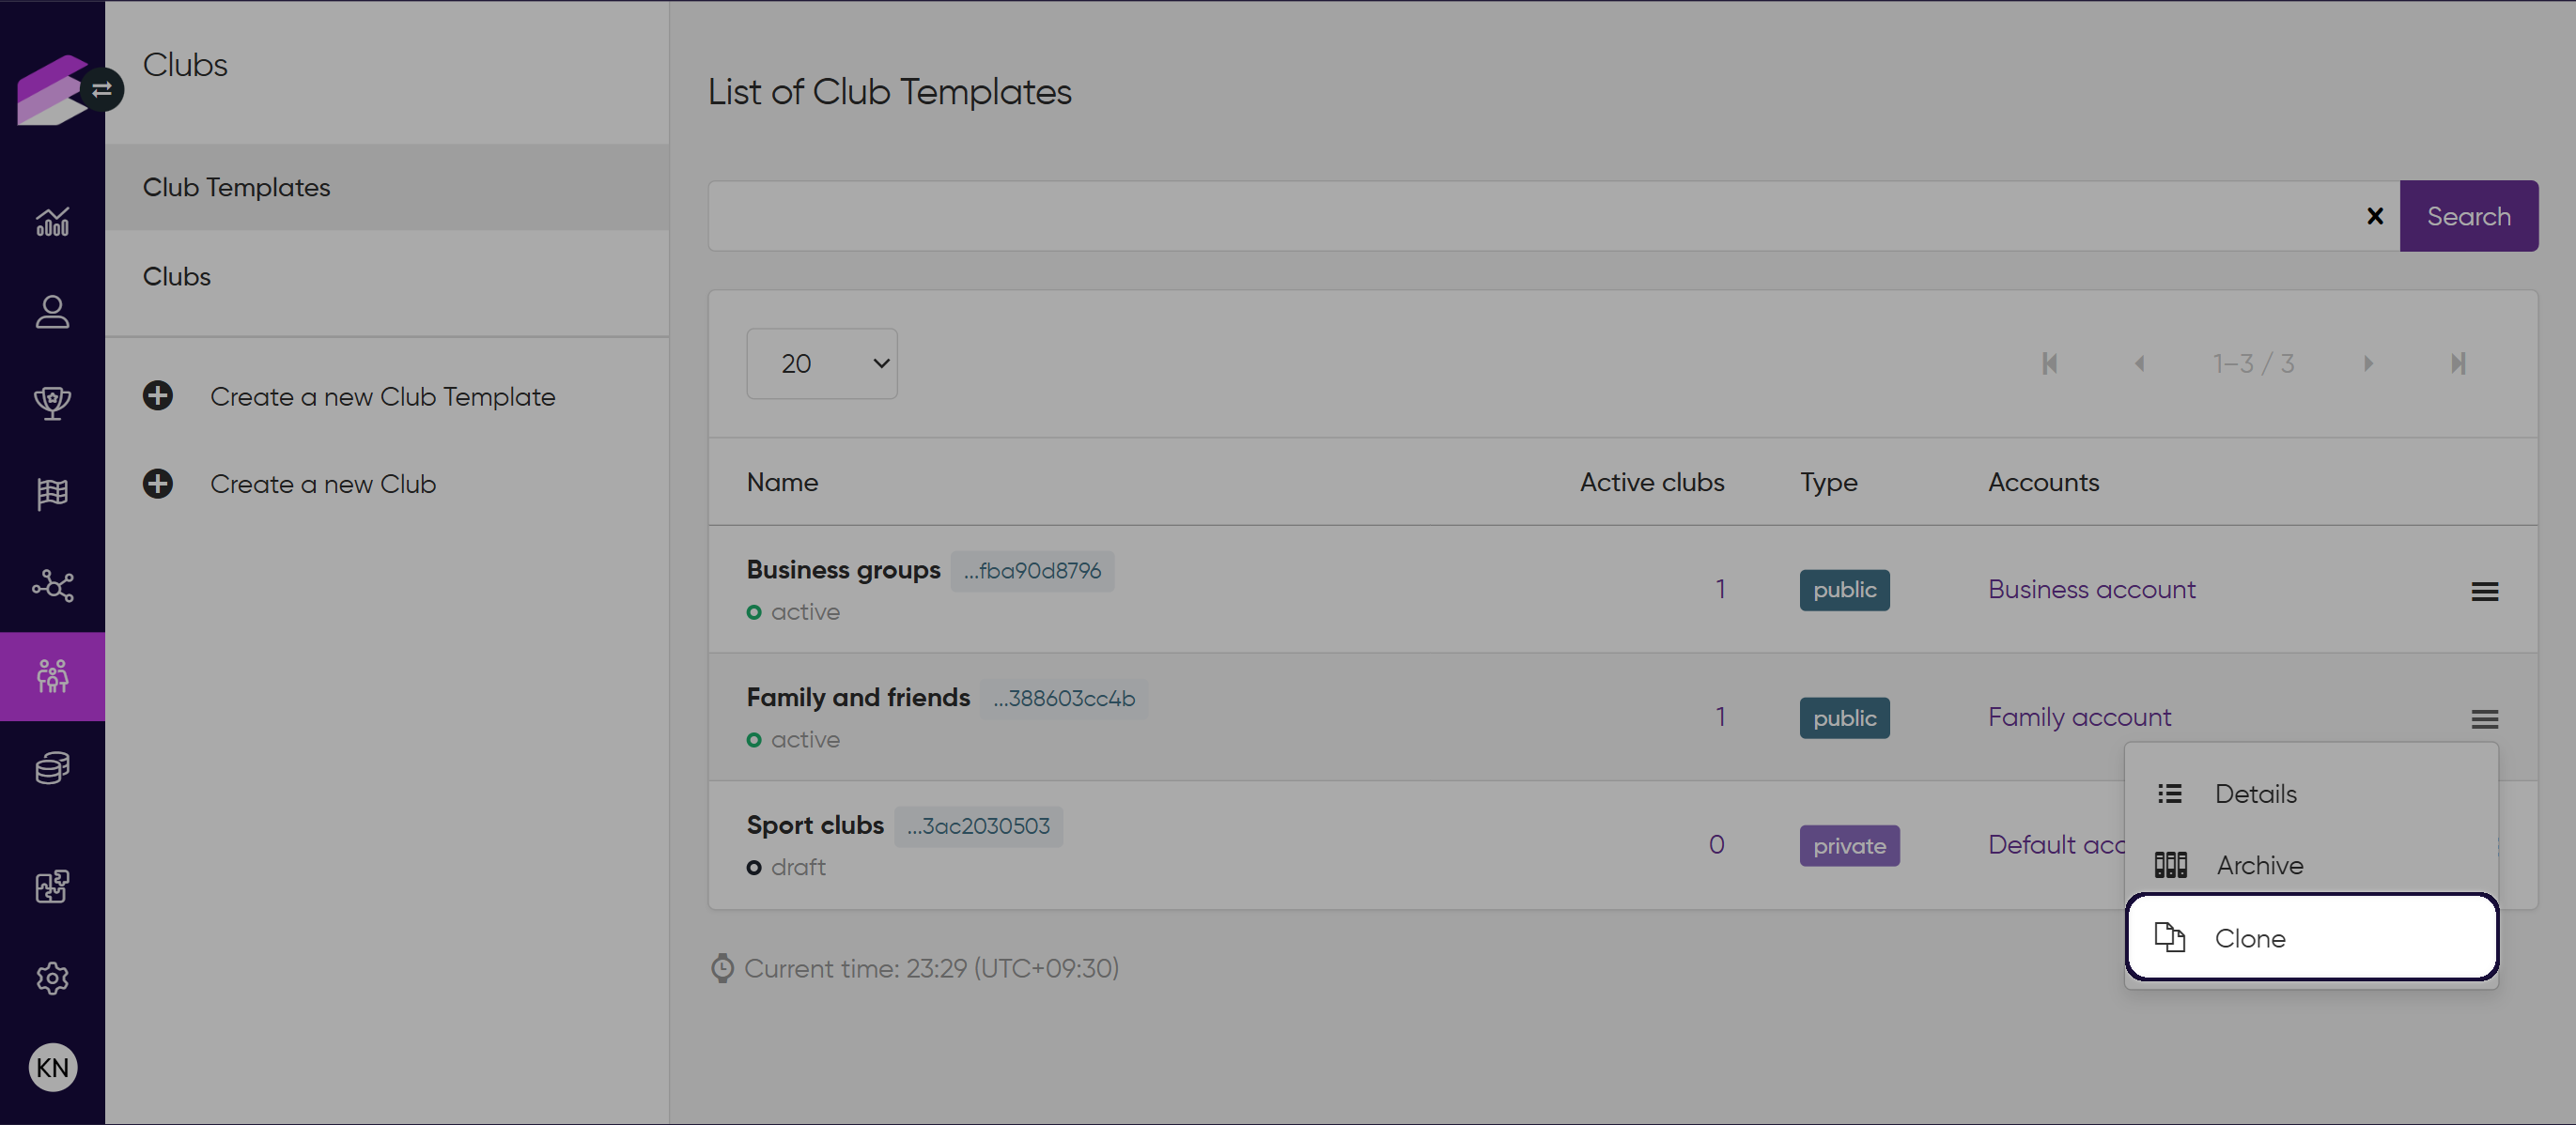
Only active or archived templates can be cloned.
Archive a club template
To archive a club template in the Management UI:
Go to the Club Templates page in the sidebar of the Clubs module.
Click the hamburger button of the club template you want to archive.
Click Archive.
Confirm the action in the dialog that appears.
A confirmation message of the successful action is displayed at the top of the page, and the template’s status is changed toarchived.
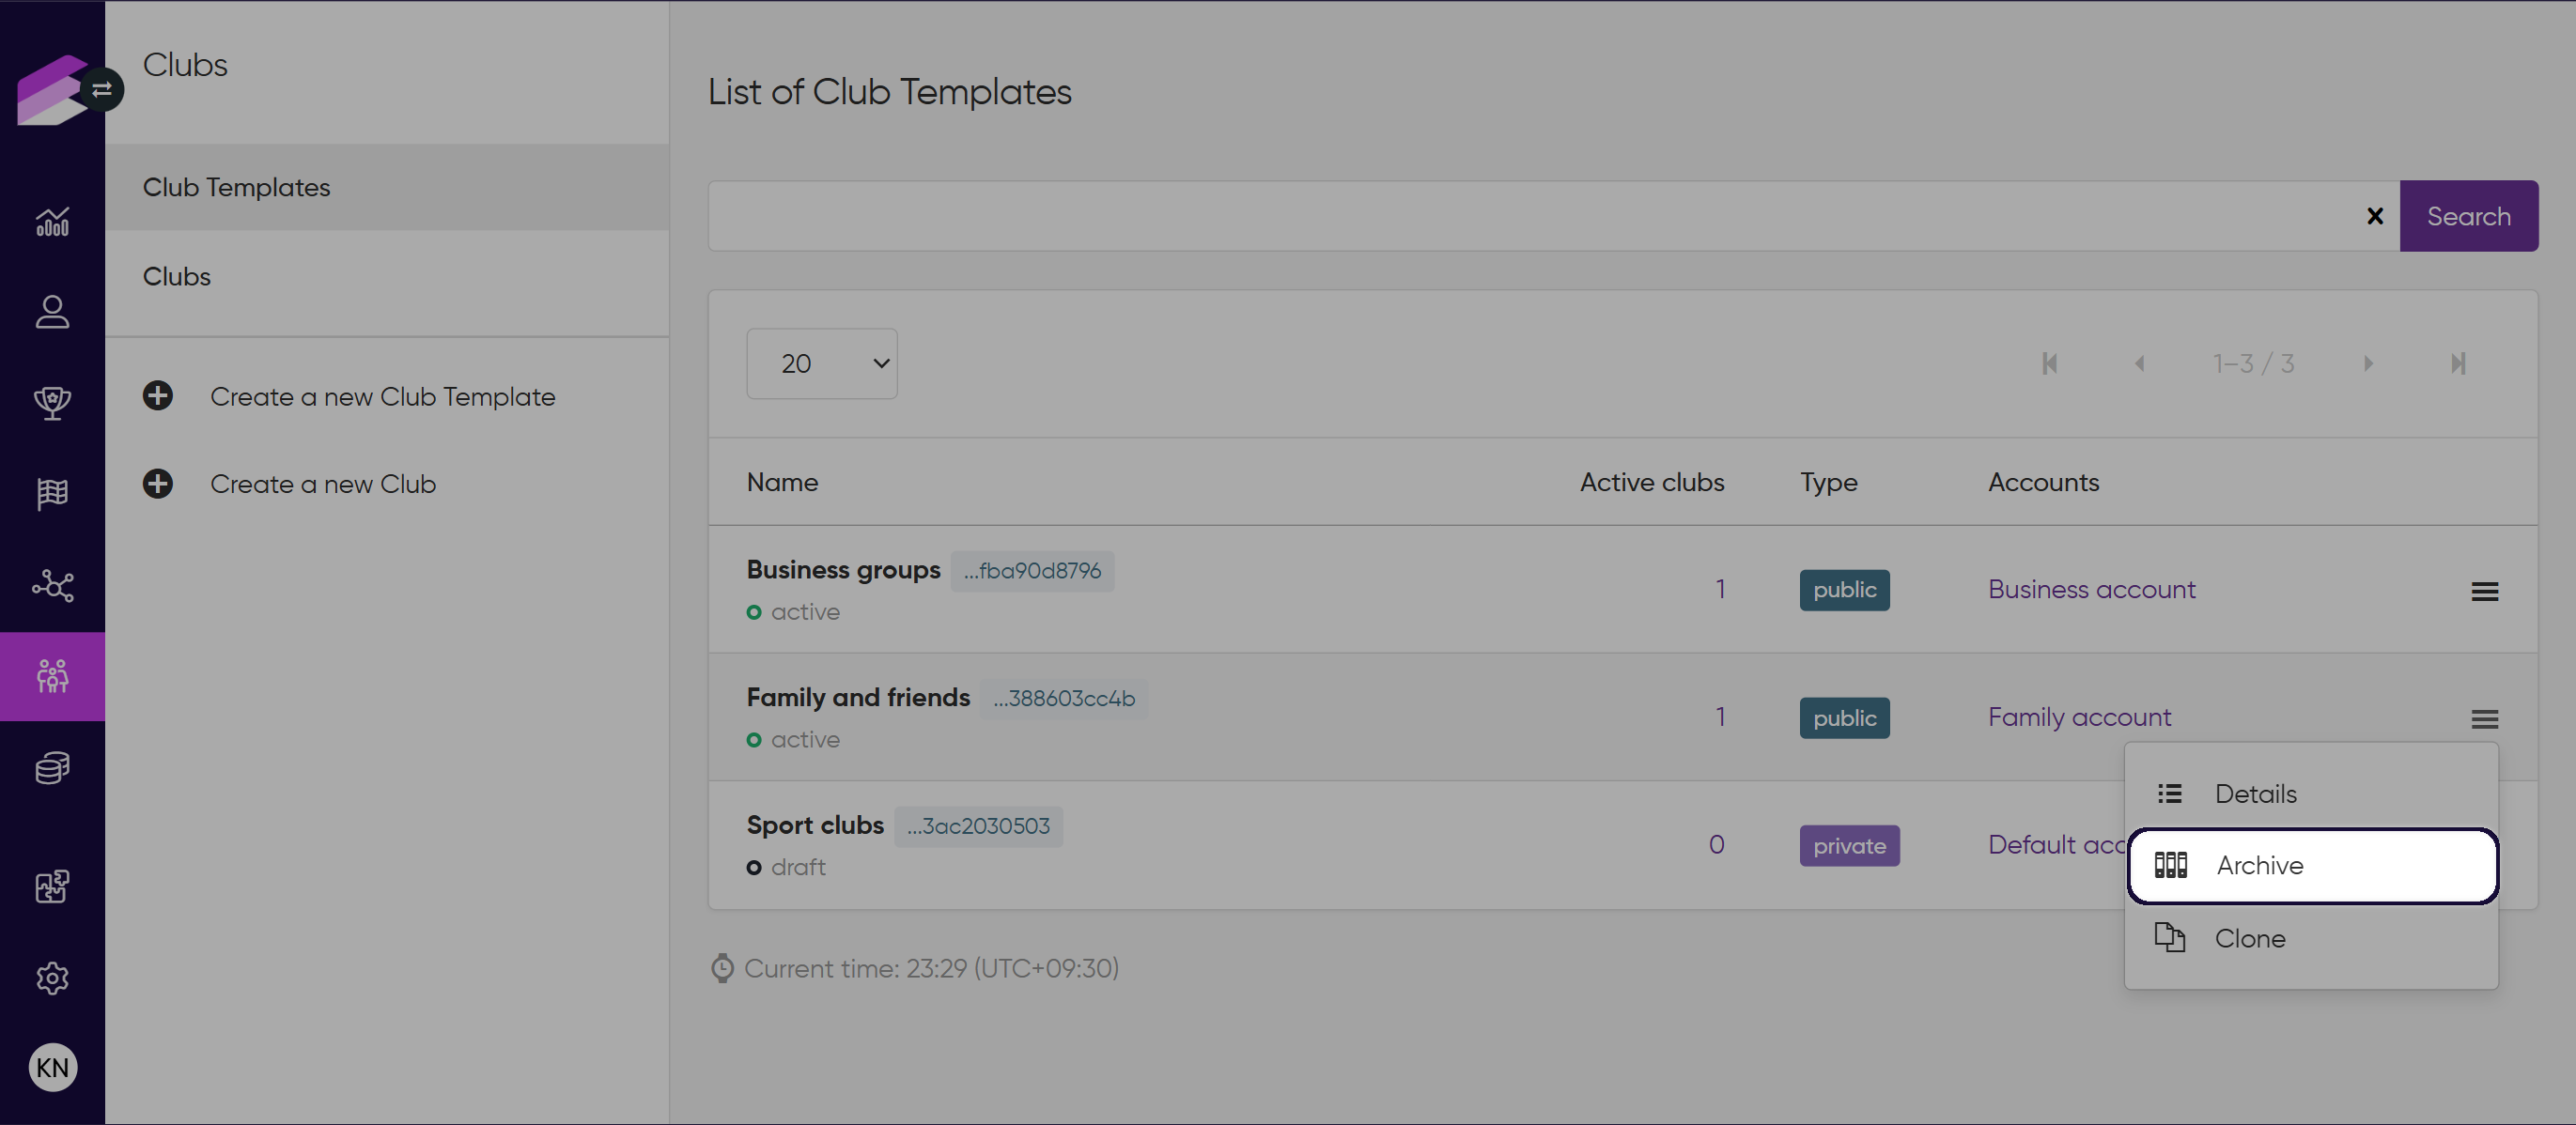
Archiving is irreversible. Once you archive a club template, you cannot use it to create new clubs or restore it to a
draftoractivestatus, but you can clone it.
Note that archived templates are hidden by default. To display the archived templates in the list of club templates, use the filter at the top of the page.
Filter the list of club templates
To filter the club templates on the Club Templates page of the Clubs module:
In the Search field at the top of the Club Templates page, enter one or more filter criteria.
You can filter the results by the club template’s ID, name, type, status, or by the associated account.Click Search to display the filtered list.
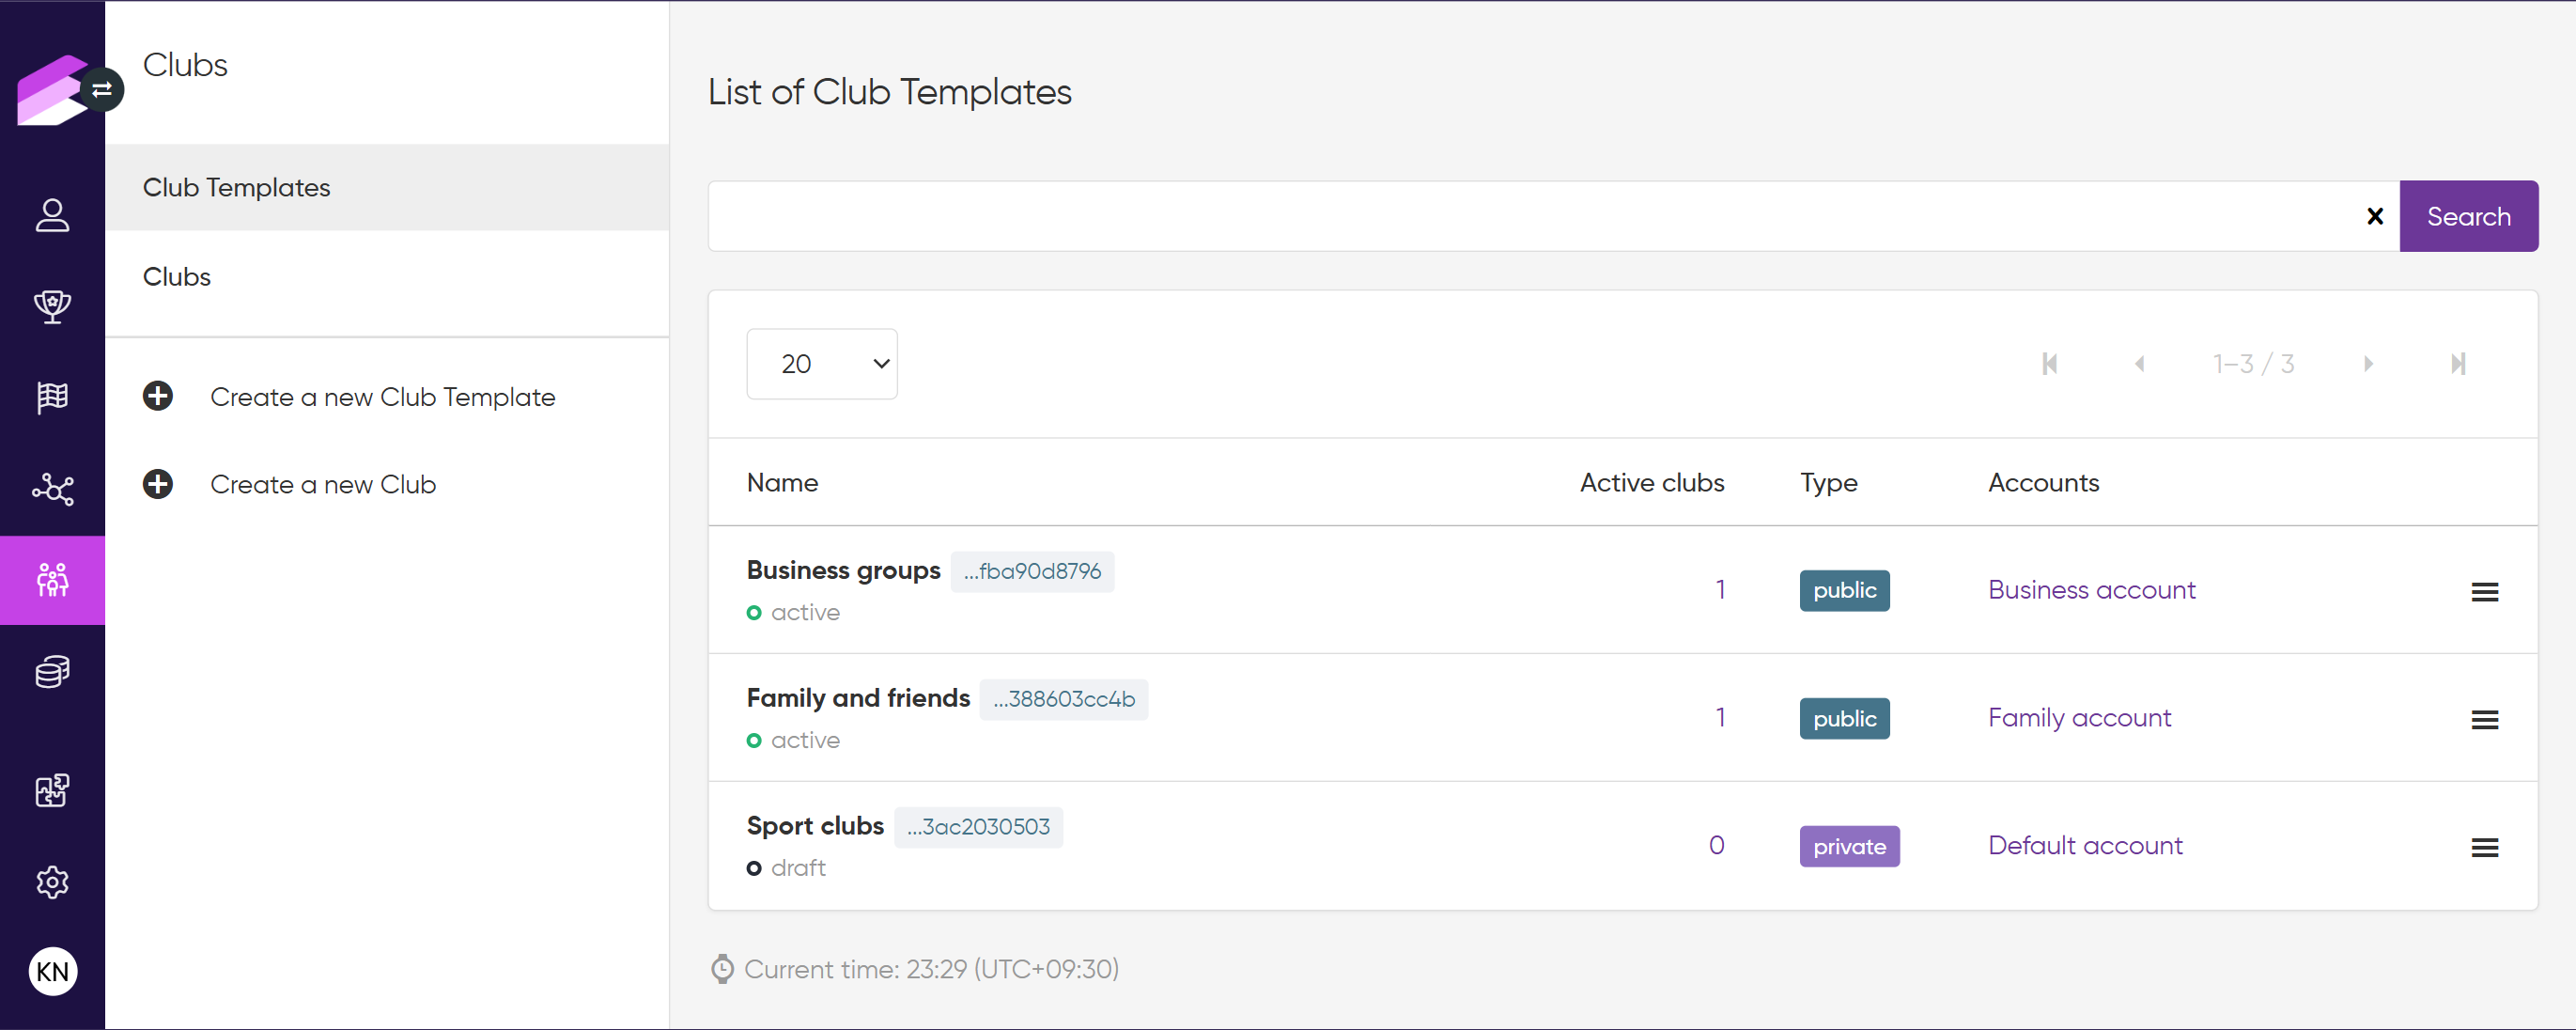
To reset the filter, click the X button at the end of the field.