Recognizing customers on their birthdays is an excellent way to show appreciation and foster positive emotional connection.
Please ensure to provide Antavo with your customers’ birthdate data in the birth_date customer attribute for accurate and timely delivery of birthday rewards.
The cases we will explore in this article
Case 1: Customers receive a 10% off coupon on their birthdays
Case 2: Customers in each tier get a different amount of points as a gift on their birthdays
Case 3: Customers get a 10% coupon on the first day of the month of their birthday
Case 4: Evaluate the effectiveness of various types of birthday rewards
Case 1: Customers receive a 10% off coupon on their birthdays
In our first use case, we’ll demonstrate how to award a 10% coupon code to customers on their birthday.

1. Open Workflows management and click Create new workflow
2. Name the workflow and click Create
3. Drag and drop an On a date trigger to the canvas
Set the recurrence of the trigger to Daily, so that it runs daily
Choose the time of day when the coupon will be issued
Click the Update button
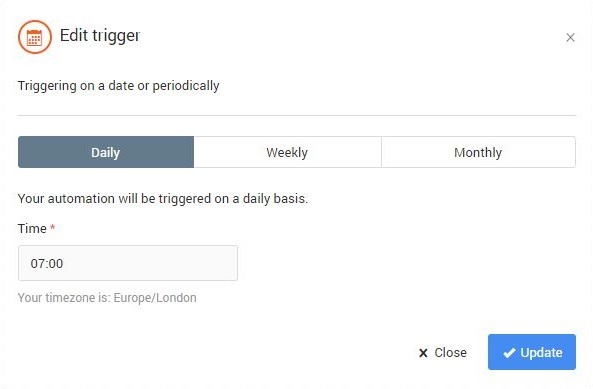
In this example, the workflow will send a coupon at 7 am to every customer having a birthday on the current day.
4. Add a Customer attribute filter to the canvas and connect it to the On a date trigger
In this filter, define which customers the workflow should be applied to.
Select Birth date as the customer attribute name
Add the in date operator
Set the value to this day
Click the Update button

This filters customers who have their birthdays on the current day.
5. Add an Assign coupon action to the canvas and connect it to the success (green) branch of the Customer attribute filter
In this step, we will set up all the information needed to define the 10% off coupon codes to be assigned to customers
Choose the coupon source
Generate: If you want Antavo to generate codes, define the coupon pattern in the Pattern field, using:
# for digits (0-9),
@ for alphabetic characters (A-Z),
* for alphanumeric characters
all other characters can be added as literals
For example, BIRTHDAY### generates codes like BIRTHDAY596.
Remote: If you prefer more control, set a callback URL endpoint in the URL field to provide coupon codes.
Set the coupon type to percentage
Set the value of the coupon to 10
Set the expiration time (optional)
Click the Update button

In this example, we’ve set up a 10% percent coupon generated by Antavo with an expiration time of 4 months.
6. Add a Webhook message action to the canvas and connect it to the success (green) branch of the Assign coupon action
As coupons are not sent to customers automatically by Antavo, customers will only learn that they have received a coupon if you notify them. Antavo can provide you with the necessary information in the form of a webhook message. This way, you can send a notification to your customers through your newsletter provider and handle coupon redemption restrictions in your webstore environment. In this step, we will set up a webhook message, but make sure you consult with your developer team and refer to Actions articles beforehand.
Add the URL of the webhook endpoint that your developers have set up
Set a timeout value for the webhook request in seconds
This is optional, but if you leave it blank, the default value of 1 second will be applied.Set the content type
The data can be sent in either URL-encoded or in JSON format, whichever is more comfortable for your developer.In the Fields section, add the list of the information you need Antavo to provide
Click the Update button
Please, make sure to consult with your developer when setting up webhook messages.
.png "webhook_coupon-6 (1).png")
In this example, we have added all the coupon redemption information to the webhook message, including the customer ID, coupon code, coupon value, coupon type, and expiration date. We used the JSON content type and the appropriate key format.
If you have a Trigger Marketing Communication action node in the left sidebar, you don’t need to process a webhook message. Antavo can trigger an event in your newsletter provider, which will send coupon codes to your customers. To use the out-of-box solution, add a Trigger Marketing Communication action instead of the Webhook message action this way:
6. Add a Trigger Marketing Communication action to the canvas and connect it to the success (green) branch of the Assign coupon action
Select the event you would like to trigger from the dropdown list that appears in the Event field
Fill the Payload with the content you want to include in the event
Click the Update button

Congrats, your workflow is all set! Don’t forget to save your workflow by clicking the Save button before closing the page. When you want to activate your workflow, set the status to Active at the top of the canvas.
Case 2: Customers in each tier get a different amount of points as a gift on their birthdays
In addition to coupon codes, you can reward your customer with bonus points on their birthdays, providing the freedom to choose how they want to use their gift. The Workflows module offers the possibility to add a different number of bonus points based on any customer attribute. In this example, customers in a higher tier will receive more bonus points than those in a lower customer tier.
Basic tier customers should receive 50 points, while Premium tier customers should receive 100 points.

1. Open Workflows management and click Create new workflow
2. Name the workflow and click Create
3. Drag and drop an On a date trigger to the canvas
Set the recurrence of the trigger to Daily, so that it runs daily
Choose the time of day when the coupon will be issued
Click the Update button

In this example, the workflow will assign bonus points to every customer who has their birthday on the current day, at 7 am.
4. Add two Customer attribute filters to the canvas and connect them to the On a date trigger on separate branches
The first filter will define Basic tier customers who have their birthdays on the current day:
Select Birth date as the first attribute name
Add the in date operator
Select this day
Click the AND button
Select tiers.{unique_id}._id as the second attribute name where {unique_id} is the ID of the tier structure
Add the equals with operator
Set the value to Basic
Use the name of the tier set up in the Tiers module.Click the Update button

This is how Basic tier customers, who have their birthdays on the current day, are filtered.
The second filter will define Advanced tier customers who have their birthdays on the current day:
Select Birth date as the first attribute name
Add the in date operator
Set the value to this day
Click on the AND button
Select tiers.{unique_id}._id as the second attribute name where {unique_id} is the ID of the tier structure
Add the equals with operator
Set the value to Advanced
Use the name of the tier set up in the Tiers module.Click the Update button
If you have more than two tiers in your loyalty program, add more Customer attribute filters to define each tier.
5. Add two Campaigns bonus actions to the canvas and connect them to the success (green) branches of the corresponding filters
The first action will define the number of bonus points that Basic tier customers will receive:
Set Points to 50
Fill in the Description field
This message will appear on the Points history page, indicating why 50 points were added to the customer’s balance.Click the Update button

In this example, we have set up a 50-point bonus.
The second action will define the number of bonus points that Advanced tier customers will receive:
Set Points to 100
Fill in the Description field
This message will appear on the Points history page, indicating why 100 points were added to the customer’s balance.Click the Update button
If you have defined more customer filters, connect a Campaign bonus action to each.
Congrats, your workflow is all set! Don’t forget to save your workflow by clicking the Save button before closing the page. When you want to activate your workflow, set the status to Active at the top of the canvas.
Case 3: Customers get a 10% coupon on the first day of the month of their birthday
This case will be structured very similarly to the first one. The only difference is the day when customers receive their coupon code reward.

1. Open Workflows management and click Create new workflow
2. Name the workflow and click Create
3. Drag and drop an On a date trigger to the canvas
Set the recurrence of the trigger to Monthly, so that the workflow runs every month
Choose the first day of the month when the coupon will be issued
Choose the time of the first day of the month when the coupon should be issued
Click the Update button

In this example, the workflow will send a coupon on the first day of every month at 7 am to every customer whose birthday is in the current month.
4. Add a Customer attribute filter to the canvas and connect it to the On a date trigger
In this filter, we will define which customers the workflow should be applied to:
Select Birth date as the customer attribute name
Add the in date operator
Set the value to this month
Click the Update button

This is how customers who have their birthdays in the current month are filtered.
5. Add an Assign coupon action to the canvas and connect it to the success (green) branch of the Customer attribute filter
In this step, we will set up all the information needed to define the 10% off coupon codes to be assigned to customers.
Choose the coupon source
Generate: If you want Antavo to generate codes, define the coupon pattern in the Pattern field, using:
# for digits (0-9),
@ for alphabetic characters (A-Z),
* for alphanumeric characters
all other characters can be added as literals
For example, BIRTHDAY### generates codes like BIRTHDAY596.
Remote: If you prefer more control, set a callback URL endpoint in the URL field to provide coupon codes.
Set the coupon type to percentage
Set the value of the coupon to 10
Set the expiration time (optional)
Click the Update button

In this example, we set up a 10% percent coupon generated by Antavo with an expiration time of 4 months.
6. Add a Webhook message action to the canvas and assign it to the success (green) branch of the Assign coupon action
As coupons are not sent to customers automatically by Antavo, customers will only learn that they have received a coupon if you notify them. Antavo can provide you with the necessary information in the form of a webhook message. This way, you can send a notification to your customers through your newsletter provider and handle coupon redemption restrictions in your webstore environment. In this step, we will set up a webhook message, but make sure you consult with your developer team and refer to Actions articles beforehand.
Add the URL of the webhook endpoint that your developers have set up
Set a timeout value for the webhook request in seconds
This is optional, but if you leave it blank, the default value of 1 second will be applied.Set the content type
The data can be sent in either URL-encoded or in JSON format, whichever is more comfortable for your developer.In the Fields section, add the list of the information you need Antavo to provide
Click the Update button
Please, make sure to consult with your developer when setting up webhook messages.

In this example, we have added all the coupon redemption information to the webhook message, including the customer ID, coupon code, coupon value, coupon type, and expiration date. We used the JSON content type and the appropriate key format.
If you have a Trigger Marketing Communication action node in the left sidebar, you don’t need to process a webhook message. Antavo can trigger an event in your newsletter provider, which will send coupon codes to your customers. To use the out-of-box solution, add a Trigger Marketing Communication action instead of the Webhook message action this way:
6. Add a Trigger Marketing Communication action to the canvas and connect it to the success (green) branch of the Assign coupon action
Select the event you would like to trigger from the dropdown list that appears in the Event field
Fill the Payload with the content you want to include in the event
Click the Update button

Congrats, your workflow is all set! Don’t forget to save your workflow by clicking the Save button before closing the page. When you want to activate your workflow, set the status to Active at the top of the canvas.
Case 4: Evaluate the efficiency of various types of birthday rewards
In this case, we are testing 3 types of rewards by splitting the Advanced tier segment into 4 equal groups. The first 25% group will receive a 10 EUR coupon, the second 25% group will receive a 10% off coupon, and the third 25% will receive 100 bonus points. The final group of 25% will be the control group, which will not receive any reward, so you can identify external factors when analyzing the effectiveness of different incentives at the end of your campaign.
To further sophisticate the workflow, we have added two customer filters as well: we will target English-speaking customers and those who are signed up for email communication.

1. Open Workflows management and click Create new workflow
2. Name the workflow and click Create
3. Drag and drop an On a date trigger to the canvas
Choose the repeat option to set the workflow to begin every day
Define the testing period by setting a Start date and an End date
Set the trigger recurrence to Daily so the workflow will run daily
Choose the time of day when the customer should receive the rewards
Click the Update button

In this example, the workflow will send a reward at 7 am to every customer who has a birthday on the current day, during the month of November.
4. Add a Customer attribute filter to the canvas and connect it to the On a date trigger
In this example, we will restrict our A/B test to customers who meet 3 requirements:
Birthday criteria
Select Birth date as the first attribute name
Add the in date operator
Set the value to this day
Tier criteria
Click on the AND button
Select tiers.{unique_id}._id as the second attribute name where {unique_id} is the ID of the tier structure
Add the equals with operator
Set the value to Advanced
Segment criteria
Before you add the filter, make sure you have the segment created under the Customer insights menu or synced from your email service provider.Click on the AND button
Select Relations as the attribute name
Add the in segment operator
Set the value to signed up to email
.PNG "cust_att(3).PNG")
This is how Advanced tier customers are filtered whose birthdays fall on the current day and who are email subscribers.
5. Add 3 A/B test actions to the canvas and connect them to the success (green) branch of the Customer attribute filter
In this step, we will split the selected customers into four test groups and attach the customer list to which they will be added automatically. Make sure you create four lists for the four test groups under the Customer insights menu before you start setting up the A/B test.
25% will be added to the 10% coupon list
25% will be added to the 10 EUR coupon list
25% will be added to the 100 bonus points list
25% will be added to the control group list

6. Add an Assign coupon action to the canvas and connect it to the A endpoint of the A/B test action
Choose the coupon source
Generate: If you want Antavo to generate codes, define the coupon pattern in the Pattern field, using:
# for digits (0-9),
@ for alphabetic characters (A-Z),
* for alphanumeric characters
all other characters can be added as literals
For example, BIRTHDAY### generates codes like BIRTHDAY596.
Remote: If you prefer more control, set a callback URL endpoint in the URL field to provide coupon codes.
Set the coupon type to amount
Set the value of the coupon to 10
Set the expiration time (optional)
Click the Update button

In this example, we have set up a 10 EUR coupon generated by Antavo with an expiration time of 1 month.
7. Add an Assign coupon action to the canvas and connect it to the B endpoint of the A/B test action
Choose the coupon source
Generate: If you want Antavo to generate codes, define the coupon pattern in the Pattern field, using:
# for digits (0-9),
@ for alphabetic characters (A-Z),
* for alphanumeric characters
all other characters can be added as literals
For example, BIRTHDAY### generates codes like BIRTHDAY596.
Remote: If you prefer more control, set a callback URL endpoint in the URL field to provide coupon codes.
Set the coupon type to percentage
Set the value of the coupon to 10
Set the expiration time
Click the Update button

In this example, we have set up a 10% off coupon generated by Antavo with an expiration time of 1 month.
8. Add a Campaign bonus action to the canvas and connect it to the C endpoint of the A/B test action
Set the Points to 100
Fill in the Description field
This message will appear on the Points history page, indicating why 100 points were added to the customer’s balance.Click the Update button

In this example, we have set up a 100-point bonus.
Congrats, your campaign is all set! Don’t forget to save your workflow by clicking Save before closing the page. When you are ready to activate your workflow, set the status to Active on the top of the canvas.