To enhance your ability to increase average order value, frequency of purchases, and total spend, we designed workflows to empower you to fine-tune purchase incentivization in your webstore. You can set up periodic campaigns to offer your customers the opportunity to earn bonus points with qualified purchases. Our filters help you target specific customer segments, allowing you to personalize your campaigns.
The cases we will explore in this article:
Case 1: Encourage customers to purchase from a specific product category
Introducing a new product category is an exciting opportunity to engage customers and attract new ones. To achieve these goals, we will implement a month-long campaign consisting two distinct workflows:
Double points for purchasing from a product category: Customers will earn double points when they purchase an item from the newly introduced beauty category.
Refer-a-friend bonus campaign: Customers will receive 100 bonus points when they refer someone who later makes a purchase in the beauty category.
These workflows aim to incentivize both existing customers to explore the new category and encourage them to refer friends, thereby expanding your customer base and driving sales in the 'beauty' category.
First workflow: Double points for purchasing a product from the beauty category
1. Open Workflows management and click Create new campaign and configure campaign settings
2. Name the workflow and click Create
3. Drag and drop an Event trigger to the canvas
The initial step of the workflow involves defining the Checkout item event that will trigger the workflow to begin.
Set the Checkout item event as the Event type
Click the Update button

This is how we have defined the event that will be rewarded with bonus points.
4. Add an Event attribute filter to the canvas and connect it to the action (lower) branch of the Event trigger
Select product category as the event attribute name
Add the equals with operator
Add beauty as the value
Be sure to define the category exactly as it’s sent in the Checkout item event.Click the Update button
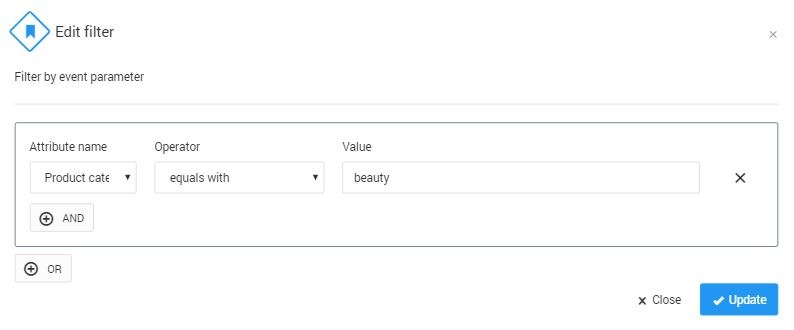
In this step, we have applied the campaign to items in the beauty product category.
5. Add a Campaign bonus action to the canvas and connect it to the success (green) branch of the Event attribute filter
Set Points to {event.points}
You don’t need to add a double multiplier here because the customer has been rewarded once already according to the settings in the Incentivized purchase module. However, if you want to triple the points the customer gets for the checkout, use a double multiplier ({event.points}*2).Fill in the Description field
This message will appear on the Points history page, indicating why bonus points were added to the customer’s balance.Click the Update button

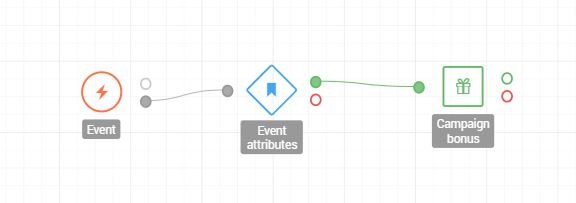
Here’s how we double the points that customers will receive for purchasing beauty category items.
Don’t forget to save the workflow before leaving the page.
Second workflow: Refer-a-friend bonus campaign
1. Navigate to the Campaigns tab and click the + button next to the campaign that we have just set up at the start of the setup process
2. Name the workflow and click Create
3. Drag and drop an Event trigger to the canvas
The initial step of the workflow involves defining the Checkout item event that will trigger the workflow to begin.
Set the Checkout item event as the Event type
Click the Update button
.PNG)
This is how we have defined the event that will be rewarded with bonus points.
4. Add an Event attribute filter to the canvas and connect it to the action (lower) branch of the Event trigger
Select product category as the event attribute name
Add the equals with operator
Add beauty as the value
Be sure to define the category exactly as it’s sent in the Checkout item event.Click the Update button
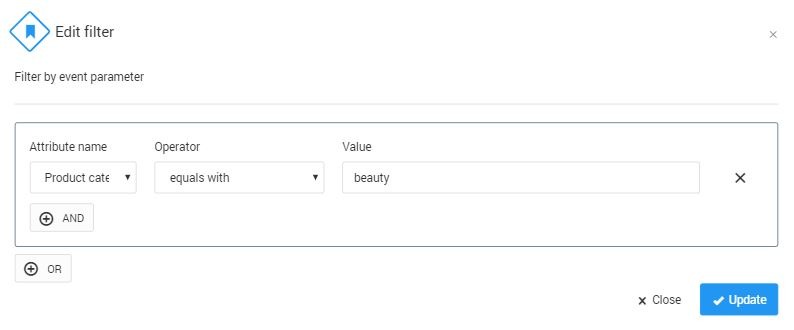
In this step, we have applied the campaign to items in the beauty product category.
5. Add a Referral bonus action to the canvas and connect it to the success (green) branch of the Event attribute filter
Set the Points to 100
Fill in the Description field
This message will appear on the Points history page, indicating why 100 points were added to the customer’s balance.Click the Update button

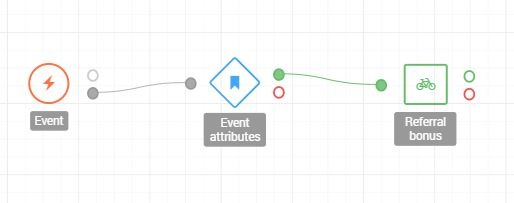
Here’s how we add 100 bonus points to customer accounts after they refer someone who subsequently buys an item from the beauty category.
Congrats, your campaign is all set! Don’t forget to save your workflow by clicking Save before closing the page. When you are ready to activate your workflow, set the status to Active on the top of the canvas.
Case 2: Give new registrants double points for purchases made
With this workflow, you can incentivize newly registered customers to place their first order within a short period of time. Offer double points on purchases made within 2 weeks from the day they register.
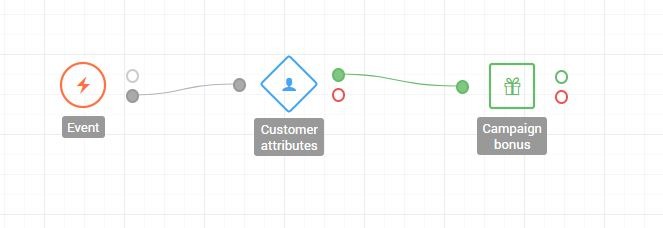
1. Open Workflows management and click Create new workflow
2. Name the workflow and click Create
3. Drag and drop an Event trigger to the canvas
The initial step of the workflow involves defining the Checkout event that will trigger the workflow to begin.
Set the Checkout event as the Event type
Click the Update button
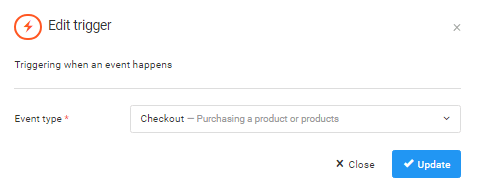
As the first step, we have defined the Checkout event to trigger the workflow.
4. Add a Customer attribute filter to the canvas and connect it to the action (lower) branch of the Event trigger
In this filter, we define which customers should receive a different number of points than what is defined in the Incentivized purchase module.
Select Opt-in at as the customer attribute name
Add the is greater than or equal to operator
Add Date: -2 weeks as the value
Click the Update button
5. Add a Campaign bonus action to the canvas and connect it to the success (green) branch of the Customer attribute filter
Set Points to {event.points}
You don’t need to add a double multiplier here because the customer has been rewarded once already according to the settings in the Incentivized purchase module. However, if you want to triple the points the customer gets for the checkout, use a double multiplier ({event.points}*2).Fill in the Description field
This message will appear on the Points history page, indicating why bonus points were added to the customer’s balance.Click the Update button

Here’s how we double the points that customers will receive for completing a Checkout event.
Congrats, your campaign is all set! Don’t forget to save your workflow by clicking Save before closing the page. When you are ready to activate your workflow, set the status to Active on the top of the canvas.
Case 3: Give a bonus tier upgrade for making a purchase with a minimum basket value
Encourage your customers to act promptly and place their order now by allowing them enter the top tier with just a single purchase. To prevent masses of people from entering your highest tier instantly, make sure you define a relatively high minimum basket value. In this example, we will use 500 EUR.
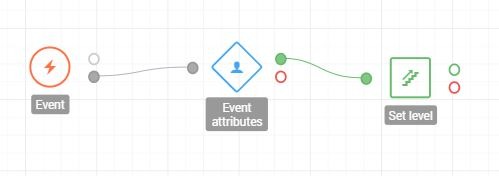
1. Open Workflows management and click Create new campaign and configure campaign settings
2. Name the workflow and click Create
3. Drag and drop an Event trigger to the canvas
The initial step of the workflow involves defining the Checkout event that will trigger the workflow to begin.
Set the Checkout event as the Event type
Click the Update button

This is how we have defined the event that will trigger the instant tier upgrade action
4. Add an Event attribute filter to the canvas and connect it to the action (lower) branch of the Event trigger
Select Total as the event attribute name
Add the is greater than or equal to operator
Add 500 as the value
Click the Update button

In this step, we have applied the campaign to purchases with a minimum basket value of 500 EUR.
5. Add a Set tier action to the canvas and connect it to the success (green) branch of the Event attribute filter
Set Premium tier, as this is the tier you will allow customers to instantly join
Click on the Update button

In this step, we have set the Premium tier to which customers will be upgraded.
Congrats, your campaign is all set! Don’t forget to save your workflow by clicking Save before closing the page. When you are ready to activate your workflow, set the status to Active on the top of the canvas.