Bloomreach is a customer data platform (CDP) that provides various features including content management, personalization, and marketing automation. Integrating Antavo with Bloomreach enables businesses to create personalized marketing campaigns and enhance the overall customer experience.
Antavo facilitates customer and event data synchronization between the two systems. This document demonstrates how to configure a connection and data synchronization between the two platforms. Additionally, it briefly discusses typical use cases.
This integration supports one-way synchronization, meaning data can only be sent from Antavo to Bloomreach, and not the other way around.
Find the configuration page of the Bloomreach module by searching for it from the Modules menu.
Configuring the Antavo – Bloomreach connection
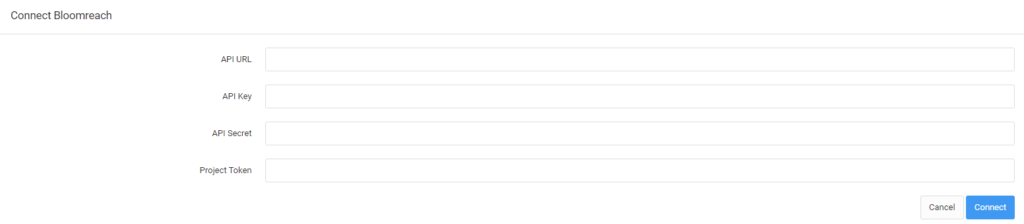
The module configuration requires the following details for establishing and maintaining the connection: API URL, the API Key, API Secret and a Project token.
Obtaining the connection data from the Bloomreach platform
You can find the necessary connection details in the Project settings of Bloomreach’s platform.
Click on the wheel icon located in the upper right corner
Select the Project settings option from the dropdown menu
In the left-hand menu bar, navigate to Access management, then to the API submenu

Find the Project Token and the API Base URL at the top of the page

Having an API Secret and API key requires the creation of a new API group
Locate the API groups section on the page
Click the dropdown and choose the + New group option
Select Private access as the access type
Give the group a name and click Create group
.png "new api group (1).png")
The API secret will appear in the subsequent popup

Finally, the API Key becomes visible under the Group keys section of the page

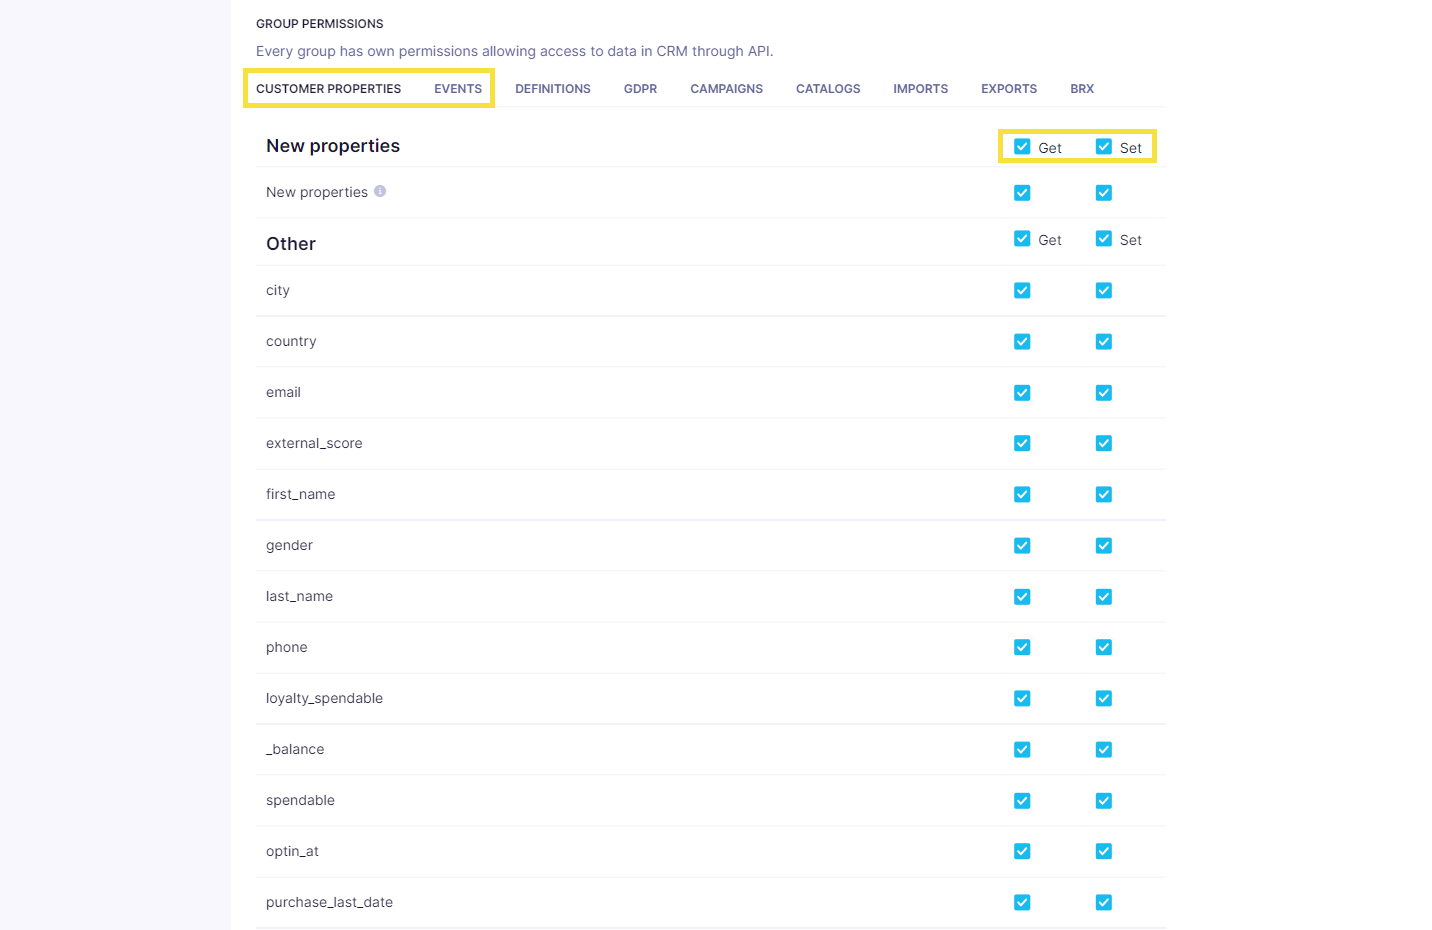
Make sure to add the Get and Set permissions after creating the new API group for Customer Properties and Events. These are required for synchronization.
Connecting Bloomreach in the Management UI
Return to the Bloomreach module page in Antavo Management UI and enter all four pieces of previously obtained information into the respective fields. Then, click Connect.
Synchronizing the fields
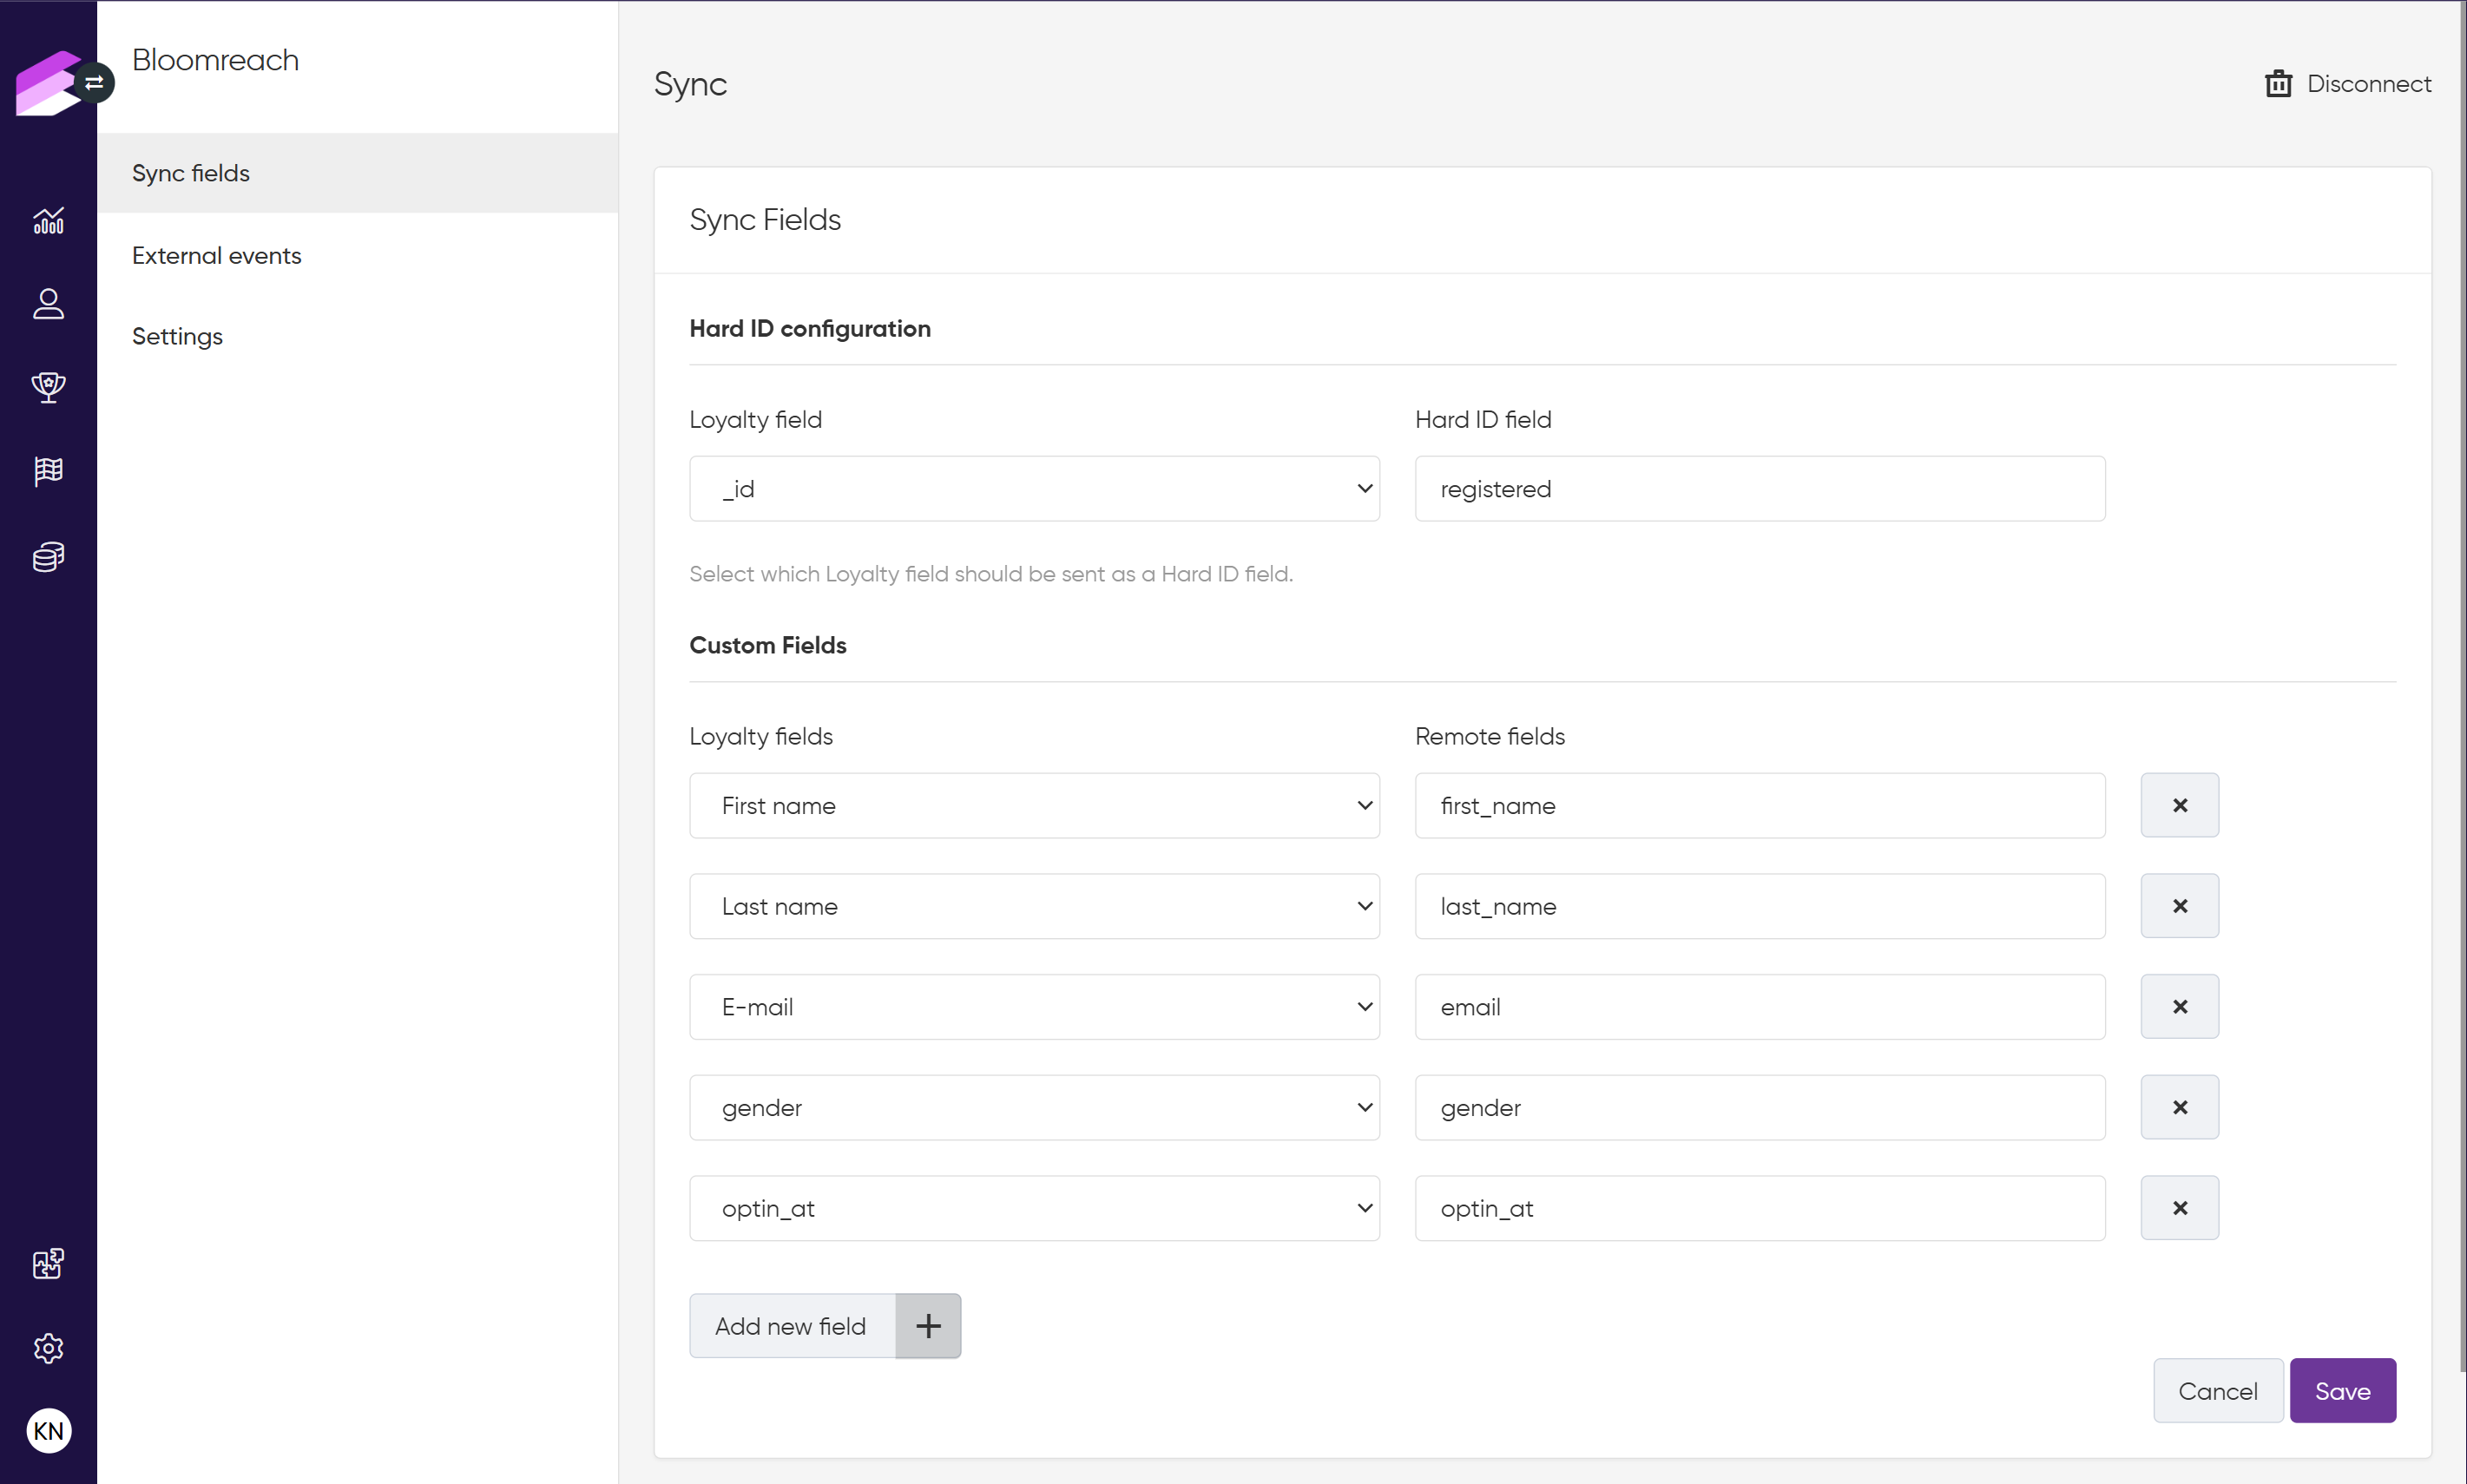
The Sync Fields tab on the left-hand menu bar allows you to configure the field synchronization between the two systems.
Hard ID configuration
The Hard ID must be set by choosing which Antavo field should be sent as a Hard ID. By default, the identifier for this field is registered, with the value being the email address. This ID is case-sensitive and cannot be deleted or edited after being set.
Custom fields
In the Custom fields section, you’ll find the data that needs to be sent to Bloomreach. The Loyalty fields dropdown allows you to select Antavo data, while the Remote fields section enables you to set any desired field name convention, ensuring these fields are automatically created in Bloomreach.
Settings
Event synchronization
This field allows you to add Antavo events using picklists to be synced with Bloomreach: Antavo sends the event to Bloomreach with the same ID, which is the event action’s name.
For example:
The Checkout item event gets synced in Bloomreach as
checkout_itemThe Checkout event gets synced in Bloomreach as
checkoutThe Point Add event gets synced in Bloomreach as
point_add
.png)
Basic information
The Deferred sync checkbox provides a solution to send customer field update calls asynchronously.
When this checkbox is ticked, the Bloomreach request is executed later instead of immediately triggered when an action/event is generated in Antavo.
Deferred sync enables shorter API response times. If an event occurs within Antavo, there’s no need to wait for the response from Bloomreach, resulting in a faster API response.
The Sync data and Sync multiple fields workflow nodes automatically consider the deferred sync option from the newsletter provider extension.
.png)
Use cases
Fields and events can be synchronized using Antavo’s workflow solution. Below are some common scenarios that demonstrate what can be achieved with Antavo’s Bloomreach integration.
Welcome to the loyalty program!
This use case involves sending a welcome newsletter from Bloomreach when someone joins the loyalty program.
Navigate to the workflow management through the Workflows icon on the left sidebar, or by typing it in the search field of Modules.
Click Create new general workflow
To understand workflow types, read more about the concept of campaigns and workflows.Fill in the required fields to create the workflow
Drag and drop the Event trigger node from the right sidebar onto the empty canvas
Double-click on the node to define the type of event on which the workflow should run. Select the Opt-in event from the dropdown menu
This ensures that the workflow will be activated every time someone enrolls in the loyalty programClick Update
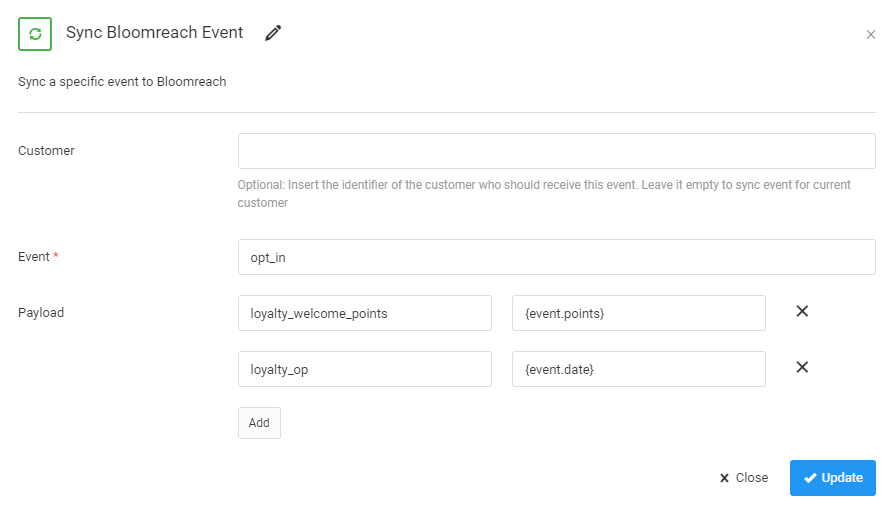
Connect the Event trigger node to a Sync Bloomreach Event node
This allows you to select the Bloomreach event to be called and specify the payload (the information you would like to send to Bloomreach).
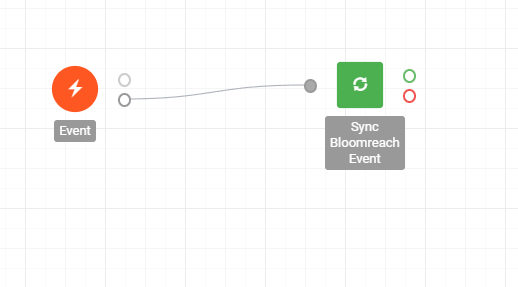
In this example, you can send the date of the opt-in and the points that have been added for enrolling.
After creating a workflow, remember that all workflows are inactive by default. To activate the rule, click the Set active button in the top right corner. This button will only appear after saving the rule.
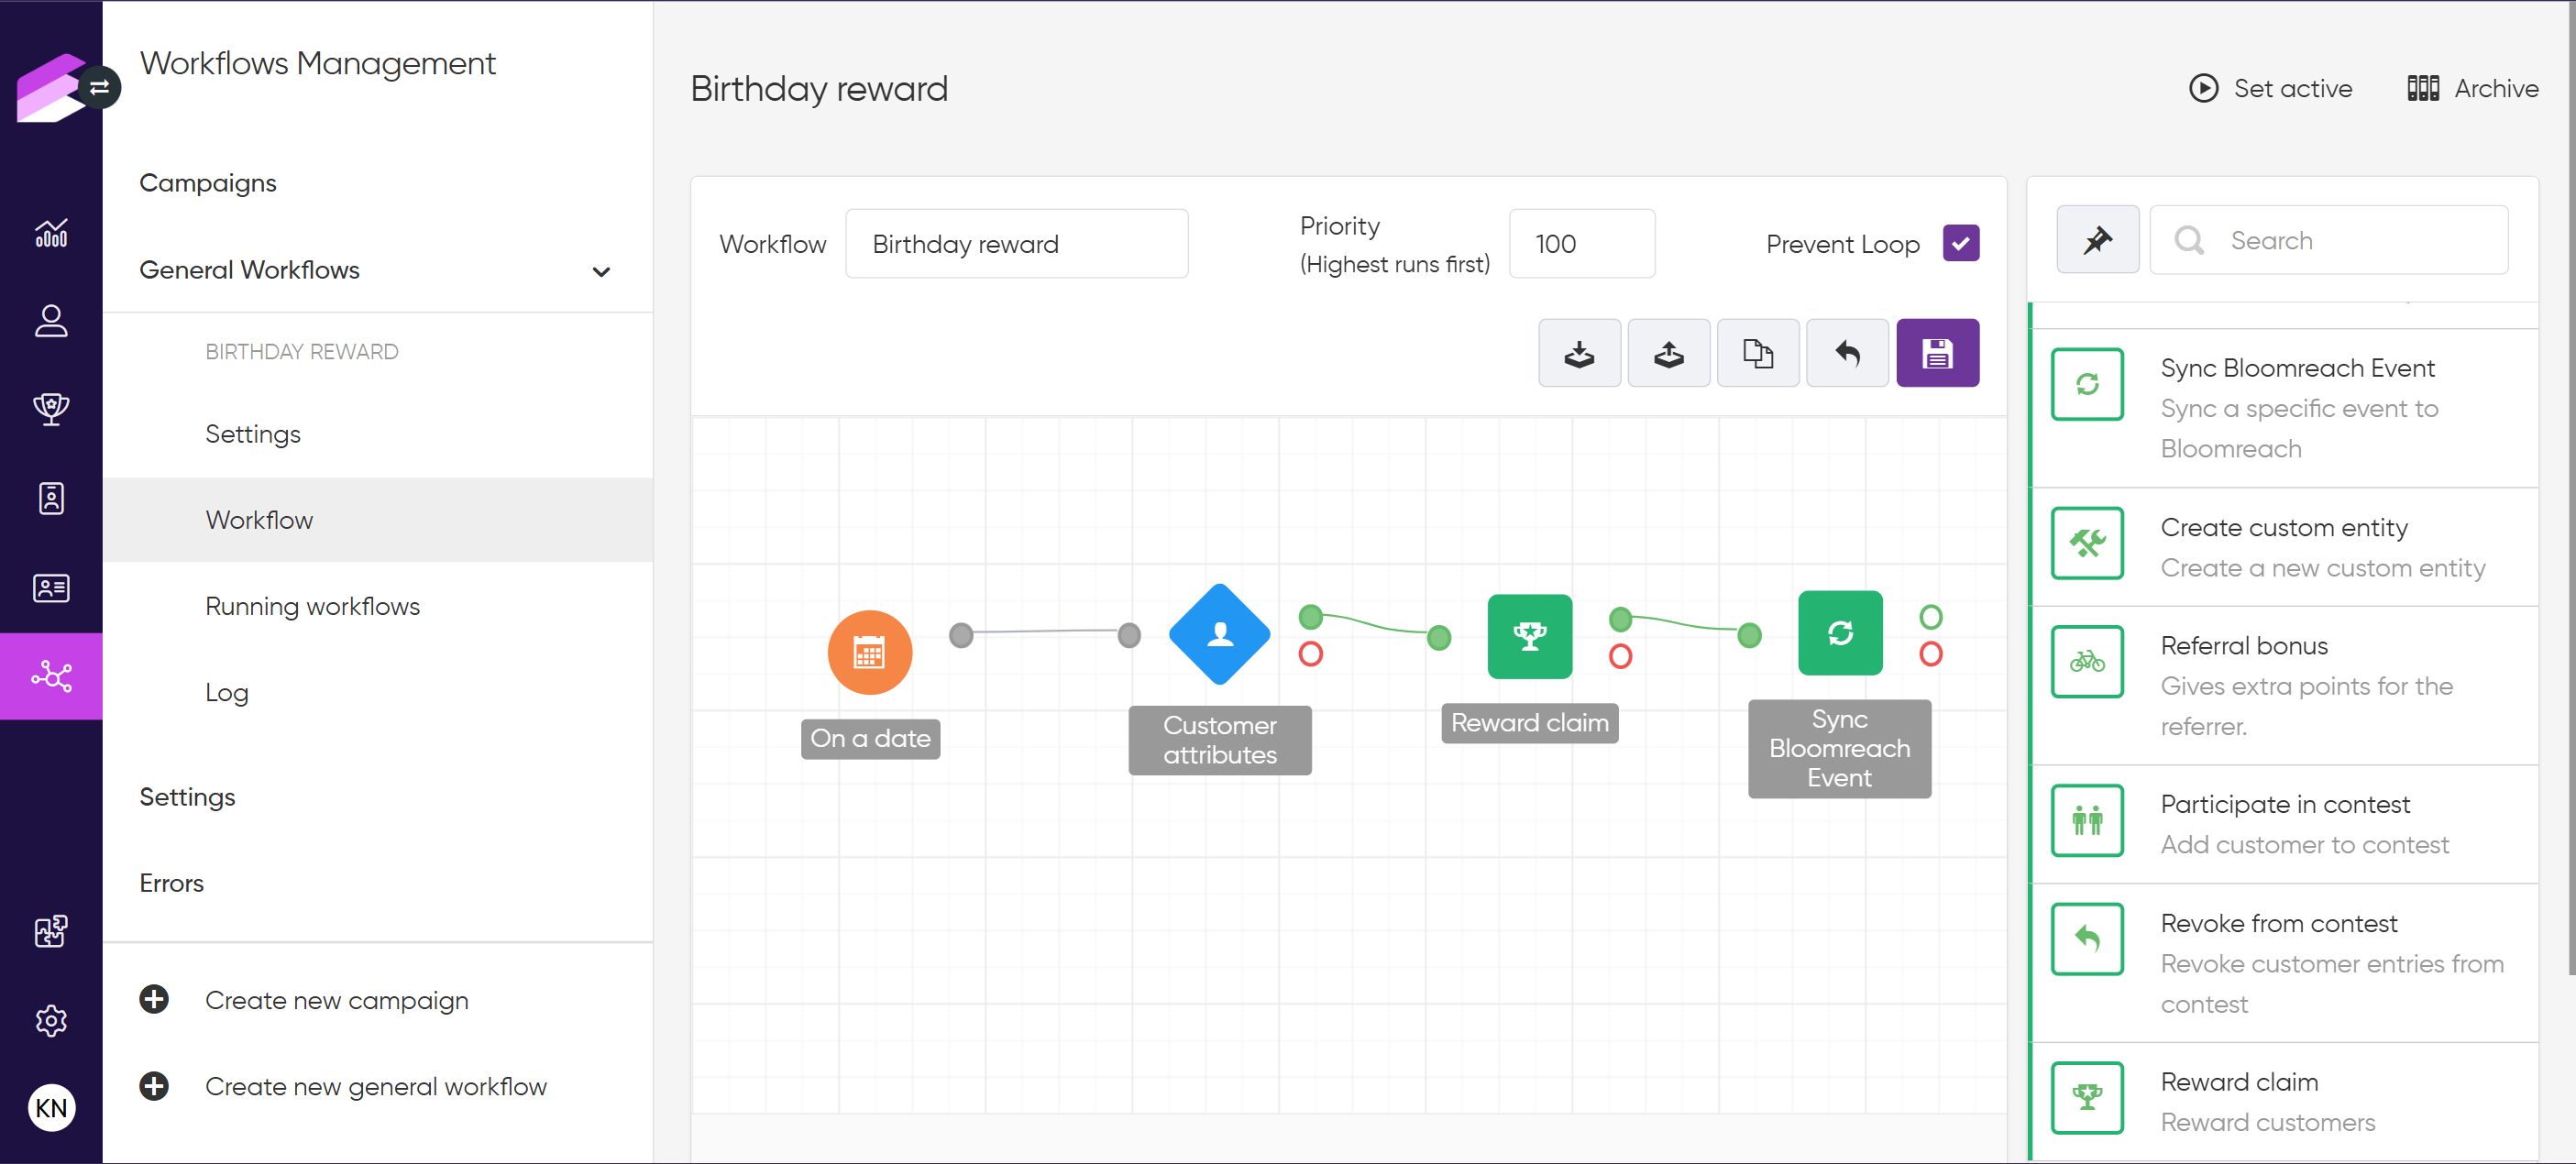
Birthday reward
To gift a reward to your loyalty members on their birthday, you’ll need to create a suitable coupon-based reward.
Navigate to the workflow management through the Workflows icon on the left sidebar, or by typing it in the search field of Modules.
Click Create new general workflow
To understand workflow types, read more about the concept of campaigns and workflows.Fill in the required fields to create the workflow
Drag and drop the On a date trigger to the canvas
The trigger will execute a workflow once every day at a specific time. You can set it by selecting the Daily option in the On a date trigger and specifying the desired time.
Click Update
Drag and drop the Customer attribute filter to the canvas. This filter checks which customers have a birthday on that day.
The attribute for filtering is: birth_date,
the operator is: in date,
and the value should be: this day.
Next, use the Reward claim action node to select the previously created Birthday reward
Since this is a gift, set the Give this reward for free option to Yes
You can also use the Sync Bloomreach Event node to create an event name and sync this information.
Additionally, consider adding the coupon code to the payload to be used in further communications.
Reward claim
Data can also be sent to Bloomreach when a reward is claimed. This use case will use a Campaign for demonstration purposes, but the same principles apply to a General Workflow. To understand workflow types, read more about the concept of campaigns and workflows.
Navigate to the workflow management through the Workflows icon on the left sidebar, or by typing it in the search field of Modules.
Click Create new campaign
Fill in the required fields to create the campaign.
Drag and drop the Event trigger node from the right sidebar onto the empty canvas.
Define the Reward – Claiming a reward as the event type
Click Update
Connect the Event trigger node to a Sync Bloomreach Event node
This allows you to select the Bloomreach event, e.g., loyalty_reward_claim, and the payload can contain additional reward information:reward name
reward description
received coupon code
received coupon value
received coupon expiration date
The customer, event, and reward objects - along with their respective attributes - can be accessed using braces. For example: {customer.first_name} {event.points} {reward._id}.
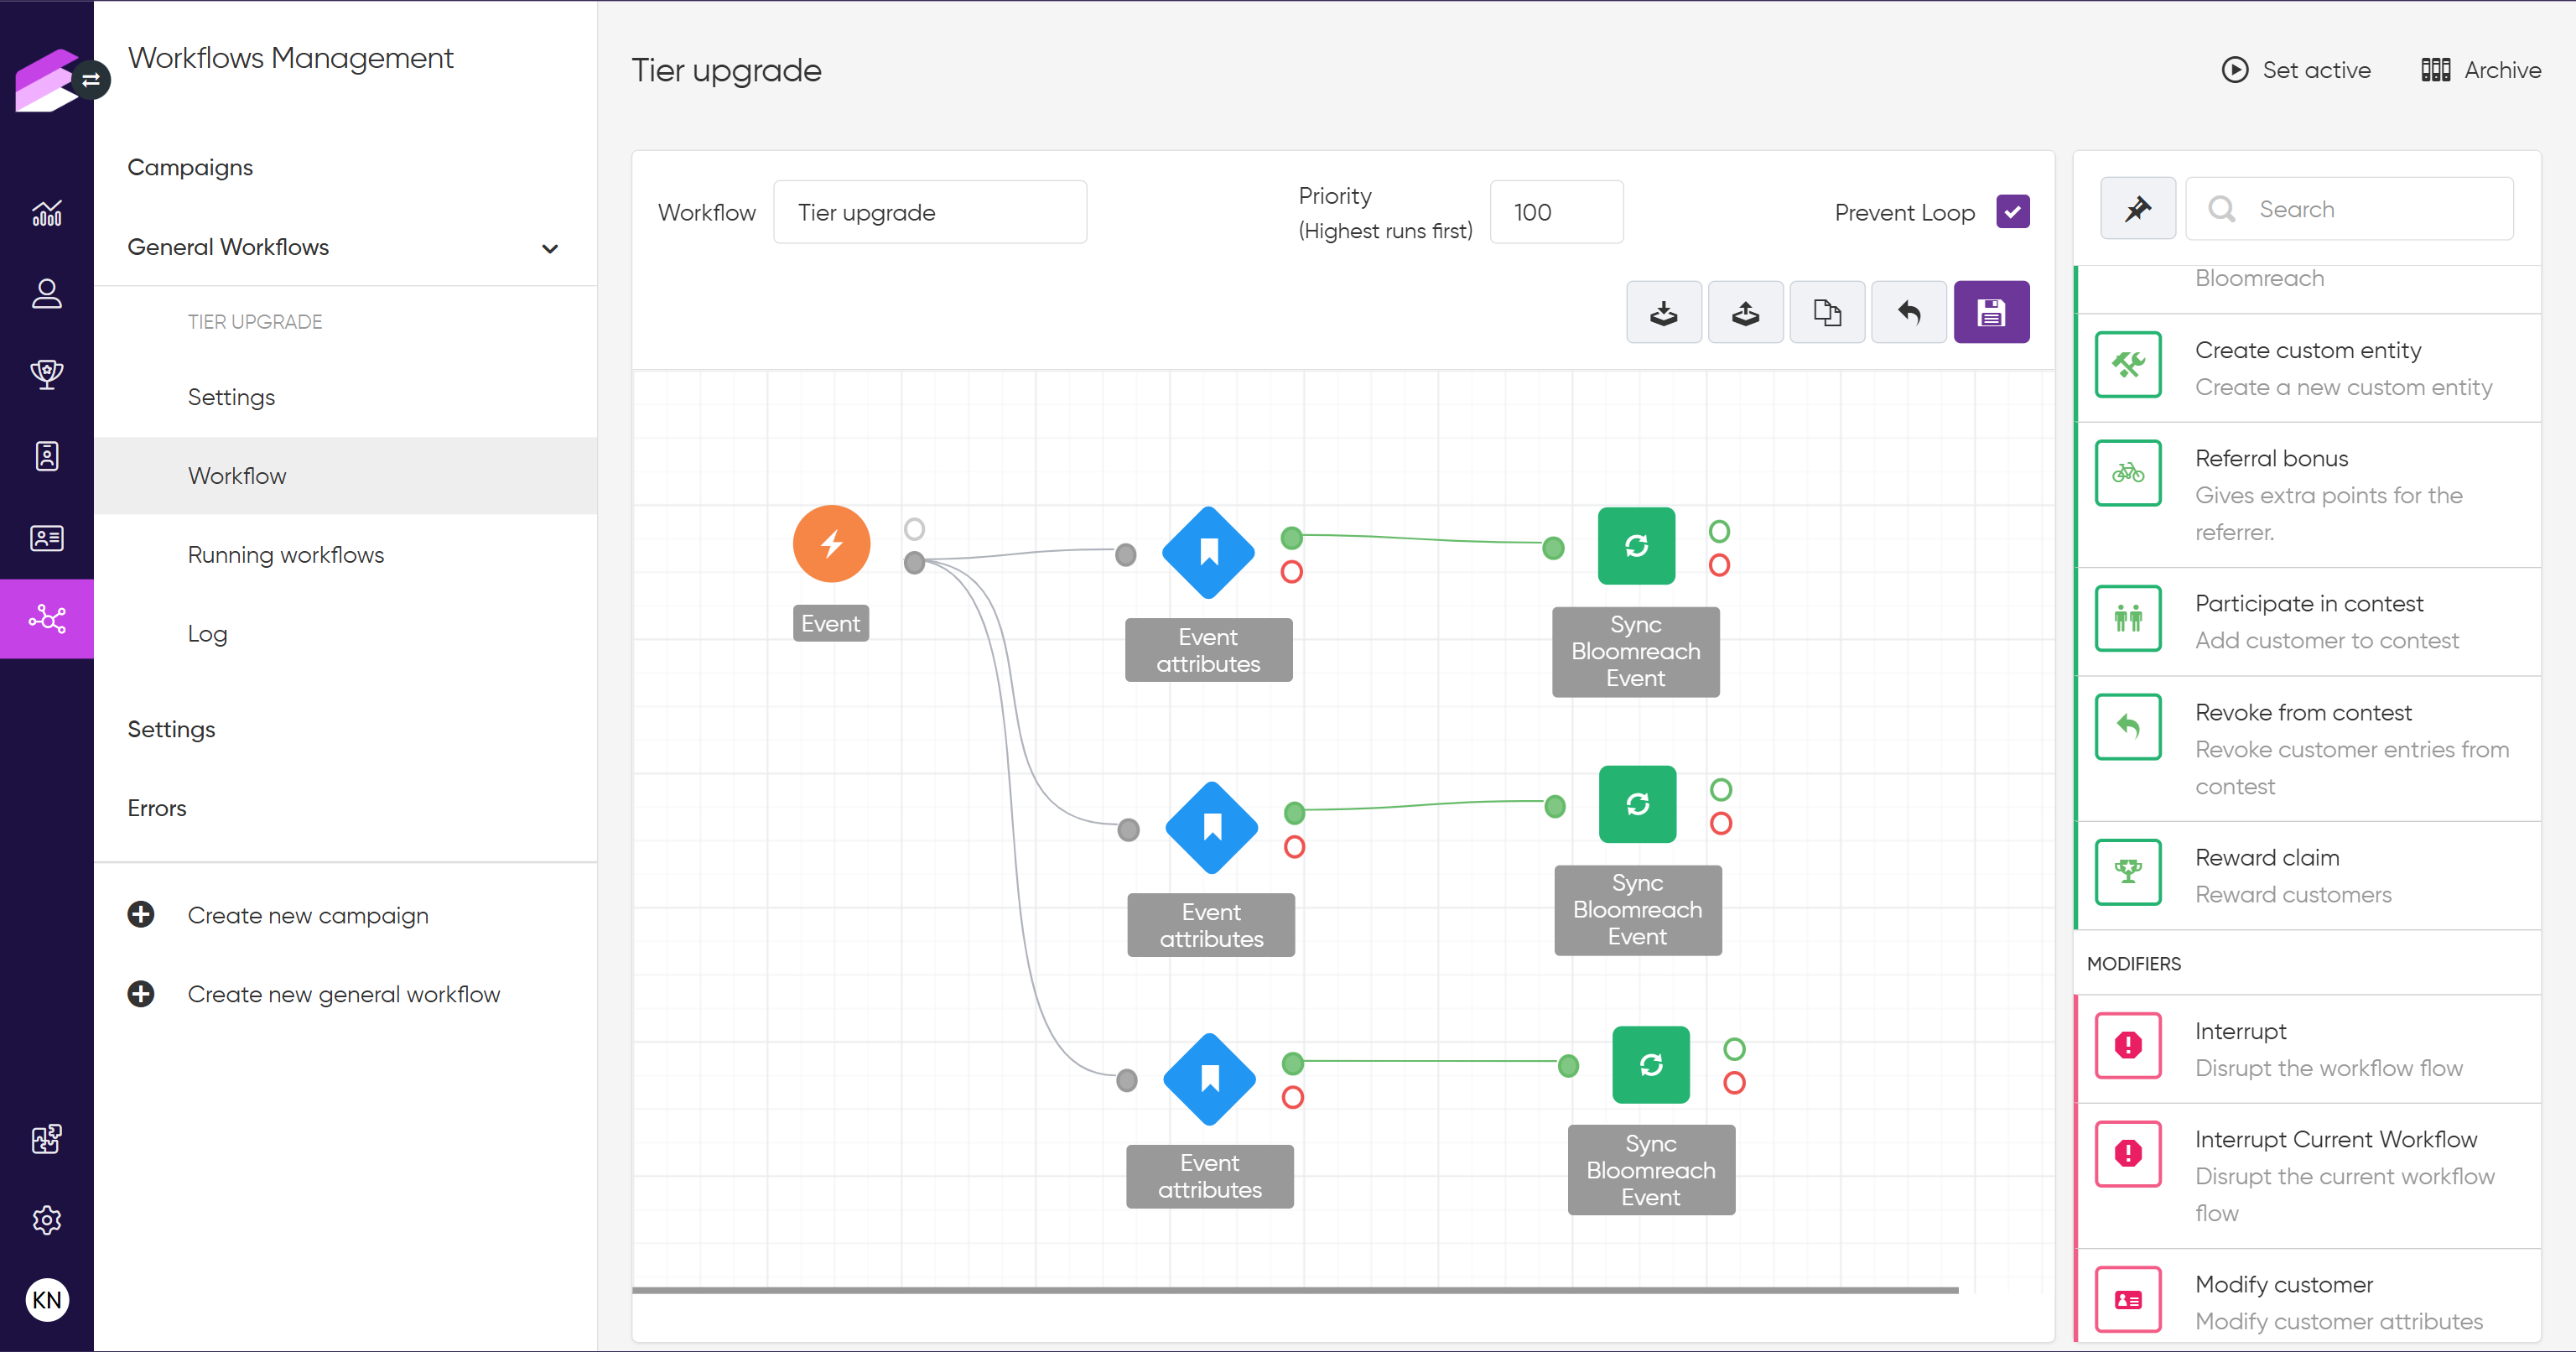
Tier upgrade
In Antavo, you can create one or more tier structures and assign them to loyalty members based on their loyalty performance. It’s quite common to synchronize the tier-up event with an NLP event, as this presents a great marketing opportunity to reach out to customers. In this use case, there are four point-based tiers:
Bronze – Everyone who enrolls
Silver – 10-50 points
Gold – 50-100 points
Platinum – 100+ points
All users are automatically assigned to Bronze after opt-in, so filtering and sending tier-up events are only needed for Silver, Gold and Platinum upgrades.
Navigate to the workflow management through the Workflows icon on the left sidebar, or by typing it in the search field of Modules.
Click Create new general workflow
To understand workflow types, read more about the concept of campaigns and workflows.Fill in the required fields to create the workflow
Drag and drop the Event trigger node from the right sidebar onto the empty canvas
Double-click on the node to define the type of event on which the workflow should run. Select the Tier-up event from the dropdown menu.
Click Update
The tier upgrade event trigger occurs for every upgrade event, so filtering is necessary to connect the correct NLP event to the upgrade. This filter can be performed by the Event attribute filter with the Tier attribute. The operator should be equal with, and the correct value should be selected from the dropdown menu.
Connect the Event trigger node to a Sync Bloomreach Event node
The payload can include a new tier name (according to the filter in the Event attribute).
Sync data related to the customer’s last purchase
This example demonstrates how to configure the synchronization of information related to the customer’s last purchase (number of loyalty points rewarded for the purchase and the number of loyalty points spent to reduce the basket value of the purchase) to predefined Bloomreach customer fields.
Navigate to the workflow management through the Workflows icon on the left sidebar, or by typing it in the search field of Modules.
Click Create new general workflow
To understand workflow types, read more about the concept of campaigns and workflows.Fill in the required fields to create the workflow
Drag and drop the Event trigger node from the right sidebar onto the empty canvas
Select Checkout or Checkout accept (if you use the Checkout accept module) from the dropdown menu
Click Update
Drag and drop the Sync multiple fields node and connect it to the Event trigger
Click the Add button
Enter the name of the Bloomreach field (e.g.,
last_purchase_earned_points)Enter the
{event.points}value
This variable will provide the number of points rewarded for the checkout that triggered the current workflow in Antavo.
Click the Add button
Enter the name of the Bloomreach field (e.g.,
number_of_purchases)Enter the
{customer.purchase_count}value
This variable will provide the customer’s total number of purchases registered in Antavo.
.PNG "sync_braze_fields (1).PNG")
Click Update
Save your workflow by clicking the blue disk button
Click Set active in the upper right-hand corner of the page