Braze is a customer engagement platform that empowers businesses to build meaningful customer relationships through segmentation and cross-channel marketing campaigns. Integrating Antavo with Braze allows you to use loyalty program-related data to run personalized campaigns enhancing the customer experience.
Antavo supports customer and event data synchronization between the two platforms. This document explains how to set up the connection and configure synchronization between the two platforms using Antavo’s Braze module. Additionally, you can find brief descriptions of configuration use cases.
This integration supports one-way synchronization, meaning data can only be sent from Antavo to Braze, and not the other way around.
To access the configuration interface, navigate to the Modules menu and search for Braze integration in the list.
Connecting Braze in Antavo
When first navigating to the Braze integration configuration page in Antavo, you’ll be prompted to connect the two systems.
.png)
To establish the connection, provide the following credentials.
Instance URL
Insert the Braze REST endpoint of your provisioned instance. Refer to Braze’s documentation for the list of endpoint URLs.API Token (Identifier)
Enter the identifier of the API key that Antavo will use for sending requests to Braze. Find the identifier in Braze by navigating to Settings > API Keys and copying the identifier of the API key generated for Antavo in the Rest API Keys section.
.png)
Make sure the
users.trackandevents.listpermissions are set for the API key, allowing Antavo access to Braze’susers/trackandevents/listendpoints.

App Identifier (optional)
Enter your Braze app identifier. Find this identifier in Braze by navigating to Settings > App Settings in Braze and locating the API key field.
Once you’ve entered the credentials, click Connect.
Field mapping configuration
After establishing the connection, you’ll be automatically redirected to the Sync Fields page, where you can configure the field synchronization between the two systems. Whenever any connected field are updated in a member’s profile, Antavo sends a request to Braze, including the updated value in the request payload.
Click the Add new field + button
Use the dropdown field to select the Loyalty field that you want to synchronize to Braze
Enter the Remote field representing the equivalent field in Braze where the data will be populated. You can add new fields in Braze under Data Settings > Custom Attributes. If the field hasn’t been defined in Braze, the new field will be automatically generated.
Add more field parings by adding new rows at the bottom
Click Save
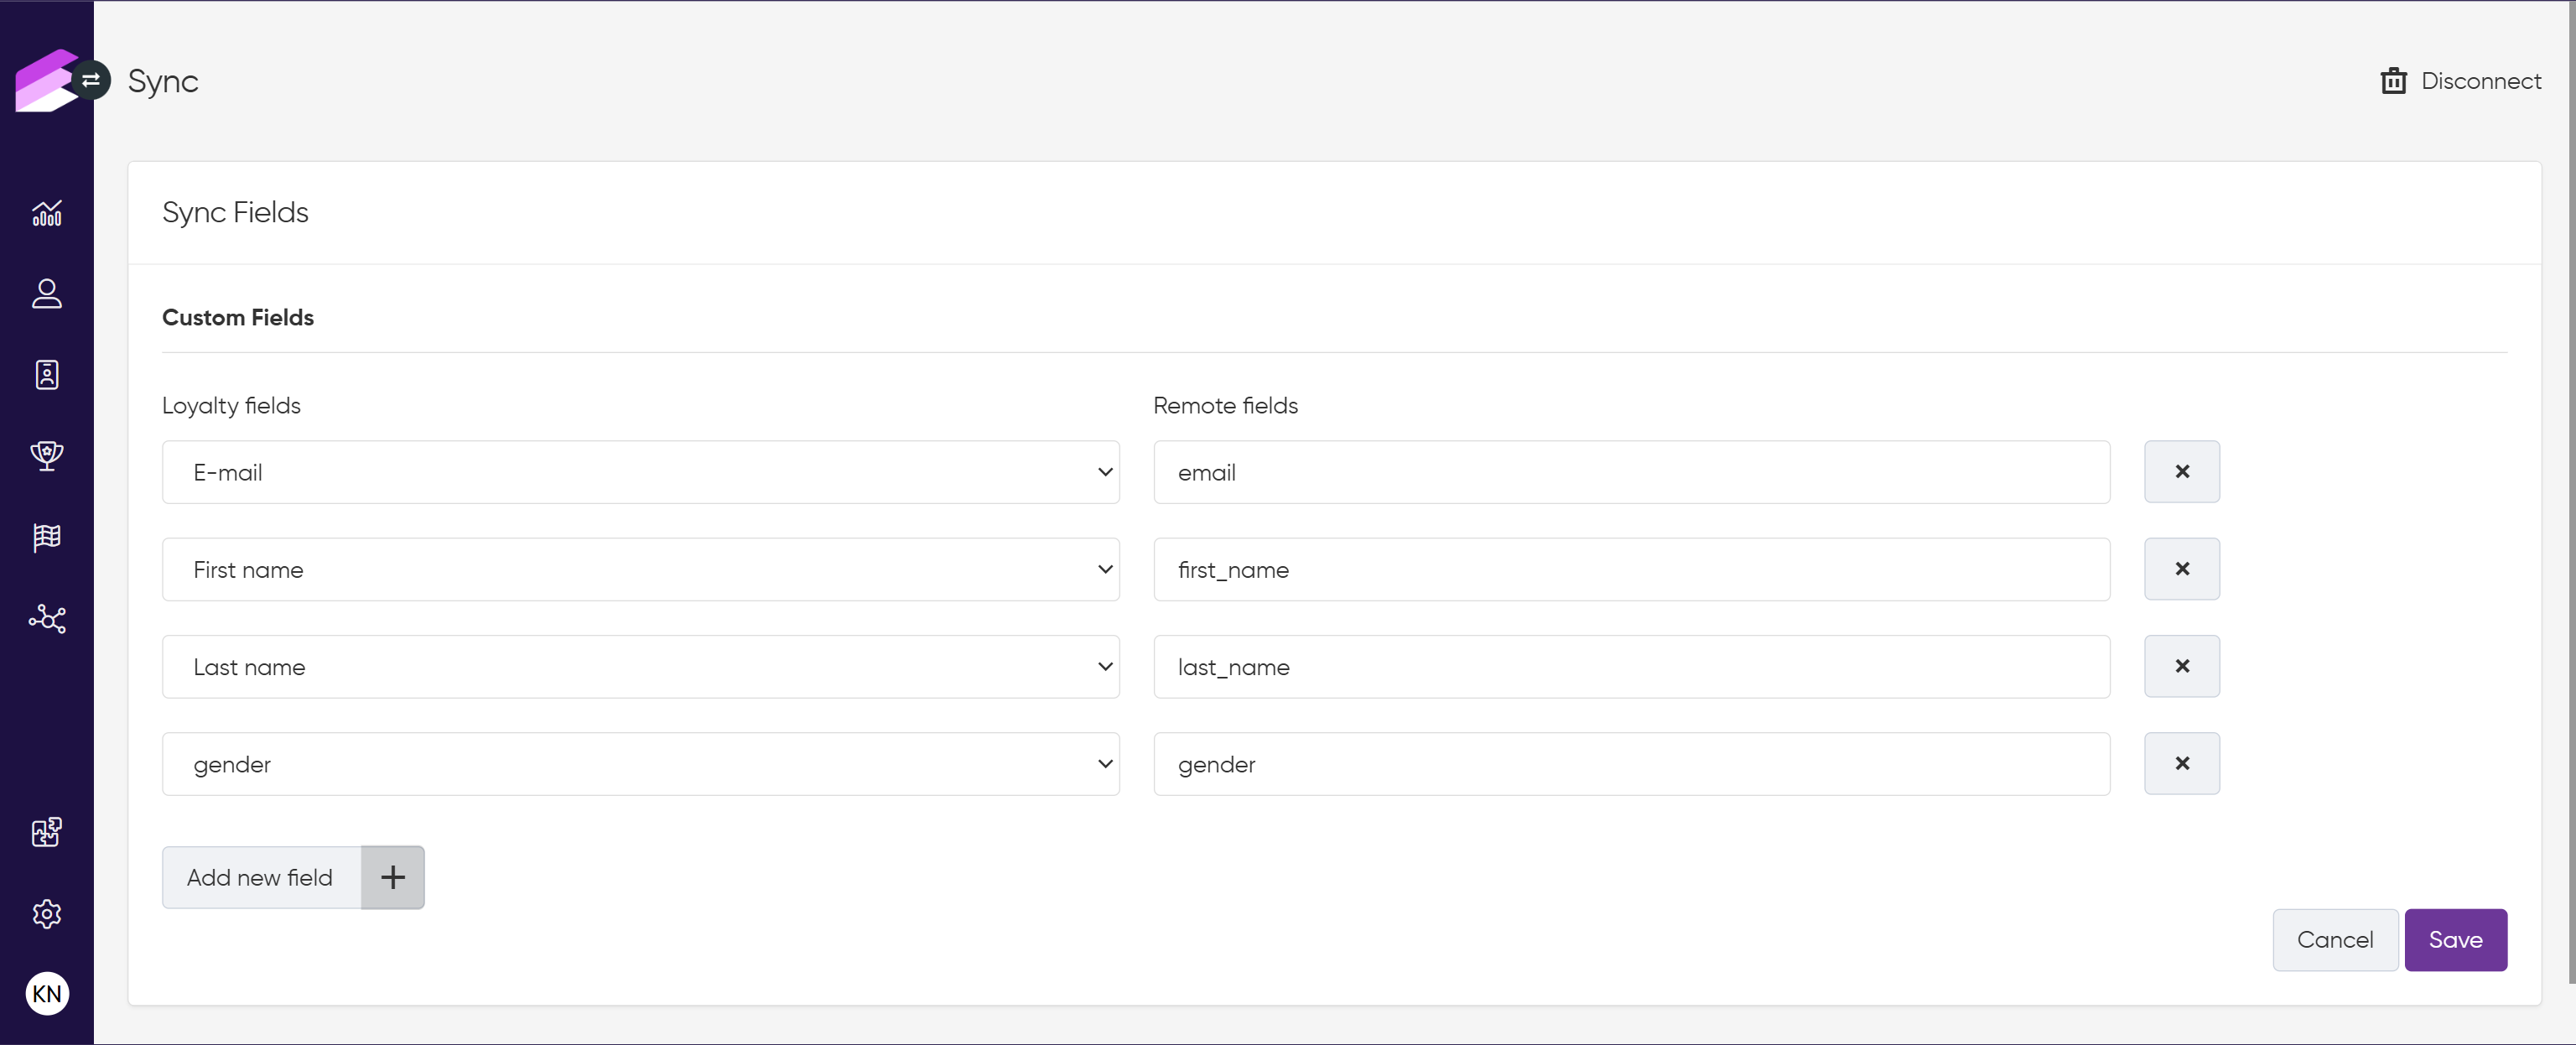
To remove a field from the list of synchronized data, click the X button at the end of the row.

Synchronizing loyalty data through workflows
In addition to the field mappings configured under the Sync Fields page of the Braze integration module, you can also synchronize loyalty-driven data occasionally to Braze through Antavo’s Workflows. This is useful if the data is not stored in customer fields in Antavo or is not added to the list of mapped fields.
You can use the Sync multiple fields action node at any point of your workflow to synchronize entity attributes in a specific workflow.
You can add new fields in Braze under Data Settings > Custom Attributes. If the field hasn’t been defined, it will be generated automatically during synchronization.
Use case - Sync data related to the customer’s last purchase
This example demonstrates how to configure the synchronization of information related to the customer’s last purchase, including the number of loyalty points rewarded for the purchase and the number of loyalty points spent to reduce the basket value of the purchase, to predefined Braze customer fields.
Click Create new general workflow
To understand workflow types, read more about the concepts of campaigns and workflows.Fill in the required fields to create the workflow
Drag and drop the Event trigger node from the right sidebar onto the empty canvas
Select Checkout or Checkout accept (if you use the Checkout accept module) from the dropdown menu
Click Update
Drag and drop the Sync multiple fields node and connect it to the Event trigger
Click the Add button
Enter the name of the Braze field (eg. last_purchase_earned_points)
Enter the {event.points} value
This variable will provide the number of points rewarded for the checkout that triggered the current workflow in Antavo.
Click the Add button
Enter the name of the Braze field (eg. number_of_purchases)
Enter the {customer.purchase_count} value
This variable will provide the customer’s total number of purchases registered in Antavo.
Click Update
Save your workflow by clicking the blue disk button
Click Set active in the upper right-hand corner of the page
.png "field_sync (1).png")
This image shows how the synced last_purchase_earned_points and number_of_purchases Braze fields are populated with data.
Synchronizing customer events
You can synchronize Antavo events with Braze through the Sync Braze events action node in Workflows. Feel free to use variables to define the values to be synced.
If you want to sync a new event with properties to Braze, you can do so under Data Settings > Custom Attributes. If the field and/or its properties haven’t been defined in Braze, all missing items will be generated automatically during synchronization.
Use case - Welcome to the loyalty program!
This use case involves sending a welcome email from Braze when someone joins the loyalty program.
Navigate to Workflows through the icon on the left sidebar
Click Create new general workflow
To understand workflow types, read more about the concept of campaigns and workflows.Fill in the required fields to create the workflow
Drag and drop the Event trigger node from the right sidebar onto the empty canvas
Double-click on the node to define the type of event on which the workflow should run. Select the Opt-in event from the dropdown menu
This ensures that the workflow will be activated every time someone enrolls in the loyalty programClick Update
Drag and drop the Sync Braze events node and connect it to the Event trigger
This enables the selection of the Braze event, e.g., registration, and the payload can contain additional information provided in the Opt in event:
points for enrollment
date of enrollment

Click Update
Save your workflow by clicking the blue disk button
Click Set active in the upper right-hand corner of the page

Use case - Reward claim notification
Data can also be sent to Braze when a loyalty reward is claimed to notify customers about the details of reward redemption.
Navigate to Workflows through the icon on the left sidebar
Click Create new general workflow
To understand workflow types, read more about the concept of campaigns and workflows.Fill in the required fields to create the workflow
Drag and drop the Event trigger node to the empty canvas from the right sidebar
Select the Reward event, which is registered when a reward is claimed in the loyalty program.
Click Update
Drag and drop the Sync Braze events node and connect it to the Event trigger
This enables the selection of the Braze event, e.g., loyalty_reward_claim, and the payload can contain additional reward information:
reward name
reward description
received coupon code
received coupon value
received coupon expiration date

Click Update
Save your workflow by clicking the blue disk button
Click Set active in the upper right-hand corner of the page

This image shows how the synced loyalty_reward_claim event can be used as a trigger in Braze.
Sync log
You can review the synchronization history of each customer by accessing the Sync tab within the customer profile under the Customer Insights menu.
Disconnecting Braze from Antavo
If you decide to disconnect Braze from Antavo, navigate to the module configuration page, click Disconnect in the upper right-hand corner, and confirm your action. This will immediately discontinue the integration between Braze and Antavo, causing all configured mechanisms to cease functioning.
Please note that this action is irreversible. If you wish to resume using the integration in the future, you will need to reconnect the platforms and configure all mechanisms from scratch.