Twilio Segment is a customer data platform (CDP) that allows businesses to collect, manage, and analyze customer interactions across various channels, enabling them to unify customer data and deliver better engagement through data-driven marketing.
Antavo's Twilio Segment integration allows you to synchronize customer and event data between the two platforms, facilitating the creation of personalized experiences using loyalty-related data and enhancing customer engagement with your brand. As part of the integration, the Antavo source app and Antavo (Actions) destination app are now available in Twilio Segment's catalog.
This integration supports two-directional synchronization, allowing data to be exchanged between Antavo and Twilio Segment in both directions.
Data synchronization to and from multiple Antavo workspaces is not supported. Currently, you can add only one instance of the Antavo source app and one instance of the Antavo (Actions) destination app to your Twilio Segment workspace.
To access the configuration interface, navigate to the Modules menu and search for Twilio Segment integration in the list.
Configuring the outbound connection from Antavo to Twilio Segment
Antavo's Twilio Segment integration allows you to send both event and customer-related data from Antavo to Twilio Segment. The configuration of the outbound connection involves three steps:
Adding and configuring the Antavo source app in the Twilio Segment workspace
Configuring the Twilio Segment integration in Antavo
Connecting a destination app to the Antavo source app in the Twilio Segment workspace
The Antavo source app is an Event Cloud source which can be used to export and synchronize data into a Segment warehouse or into other enabled Twilio Segment integrations.
Add and configure the Antavo source app in Twilio Segment
Add the source app
In your Twilio Segment workspace, go to Connections > Catalog.
Search for the Antavo source app, and select it.

Click Add Source on the app's catalog page.

Set up the source app
On the Source setup page, provide a custom name for the app in the Name field (e.g., Antavo Source).
Note that you can change the name later without disrupting the connection.Click Add Source.
You will be redirected to the Overview page of the source app.

Enable the source app
Go to the Settings page of the source app.
Toggle Enable source to turn on data synchronization between Antavo and a Twilio Segment destination app.
Click Save Changes.

Retrieve the Write key
Navigate to the API Keys page in the sidebar.
Copy the Write Key.
This API key is required to set up the connection on the Antavo-side. The Write key allows Antavo to push data to the Twilio Segment workspace where the source app is enabled.
.png "club_template.png")
Configure the Twilio Segment integration in Antavo
Integration settings
Set up customer ID mapping
In the Management UI, navigate to the Modules menu.
Search for Twilio Segment in the list.
Click Configure to open the Settings page of the module.
Under General Settings, locate the Customer ID mapping dropdown.
Select the field that will be used as the Customer ID:
either the customer ID of the customer in Antavo,
or an external customer ID.
This identifier field is included in all events sent to and from Antavo and is used to reference the customers in external tools connected to Twilio Segment.

Configure the outbound settings
In the Segment write key field under Outbound settings, paste the write key copied from the Antavo source app’s API keys page in Twilio Segment.
.png)
In the Regional Segment dropdown, select the data processing region configured for your Twilio Segment workspace
Refer to Twilio Segment's Regional Segment documentation for more details.
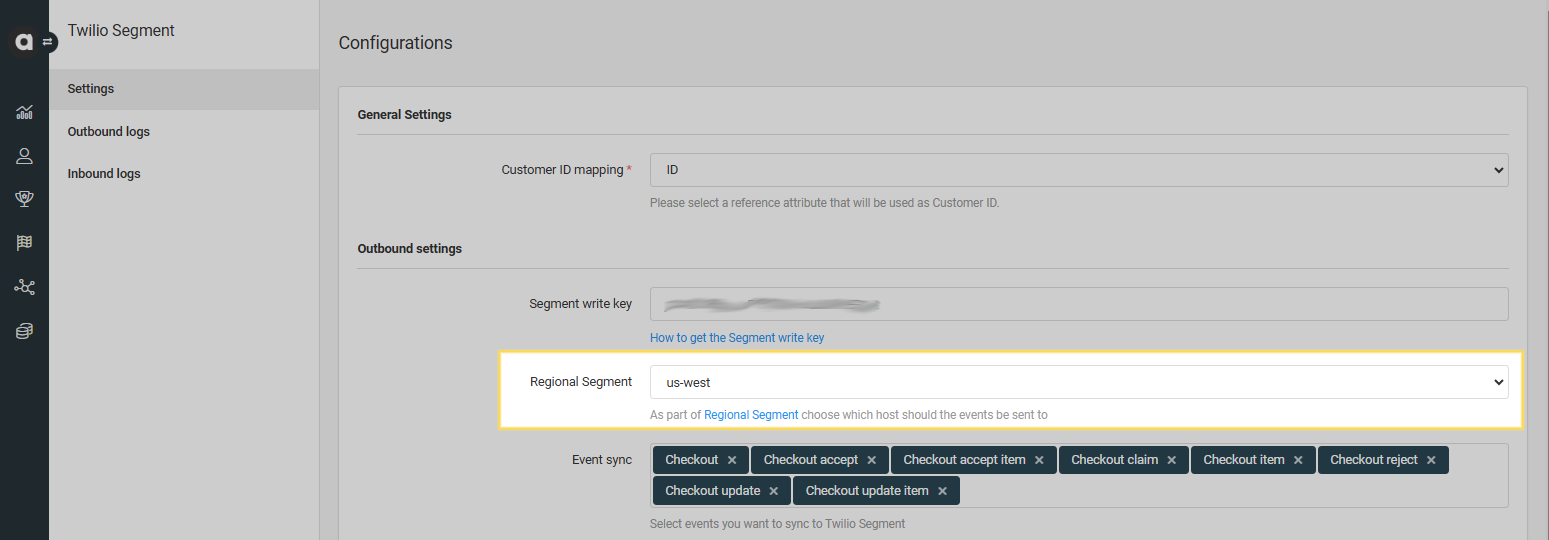
Outbound data synchronization will only succeed if the Regional Segment setting matches the data processing region of your Twilio Segment workspace.
Save the configuration
Click Save to apply your settings.
Event synchronization
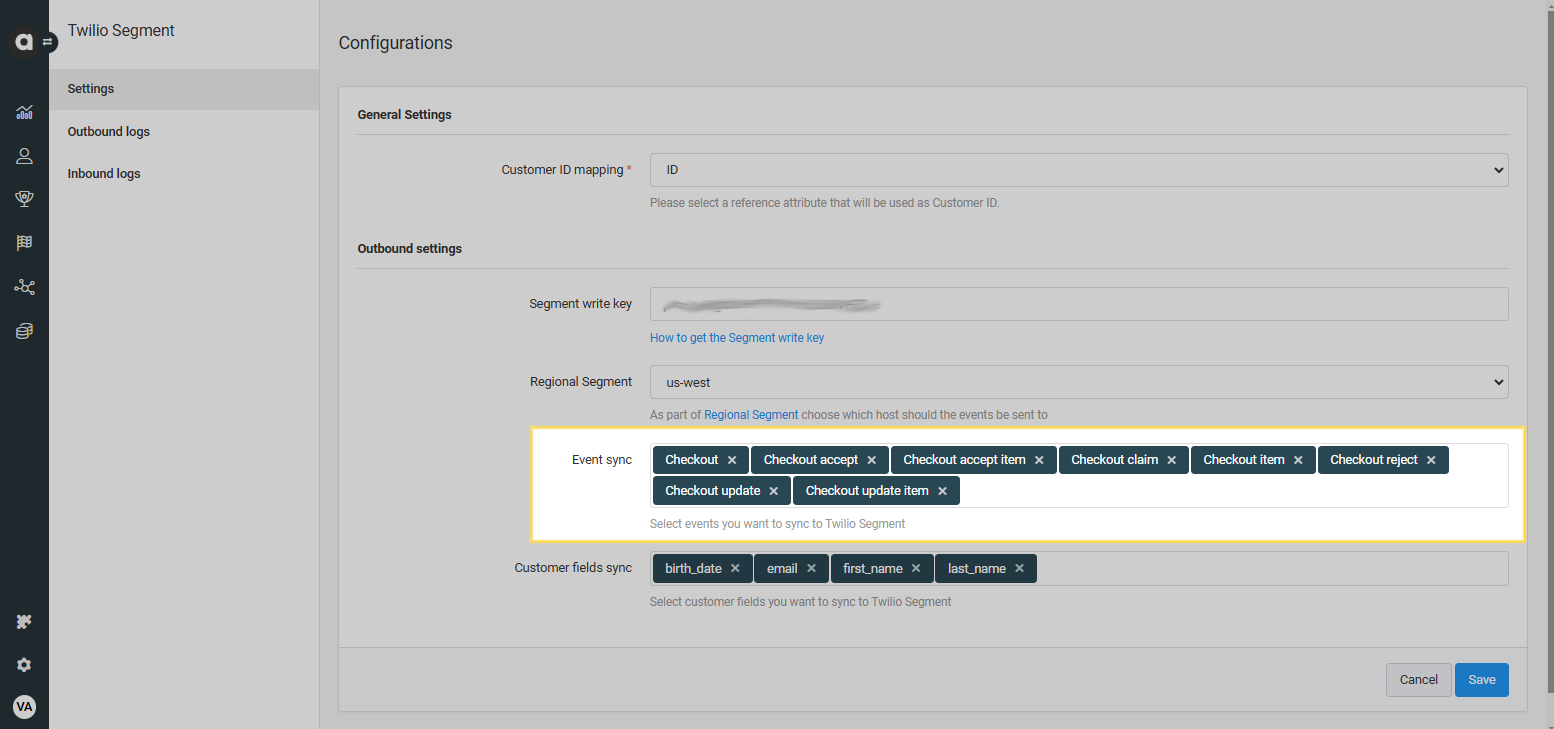
In the Event sync field, select the events to be synchronized with Twilio Segment.
You can add as many events as needed.Click Save to apply your settings.
Customer synchronization
In the Customer fields sync field, select the customer attributes to be synchronized with Twilio Segment when a customer profile update event is registered in Antavo.
You can add as many fields as needed.Click Save to apply your settings.
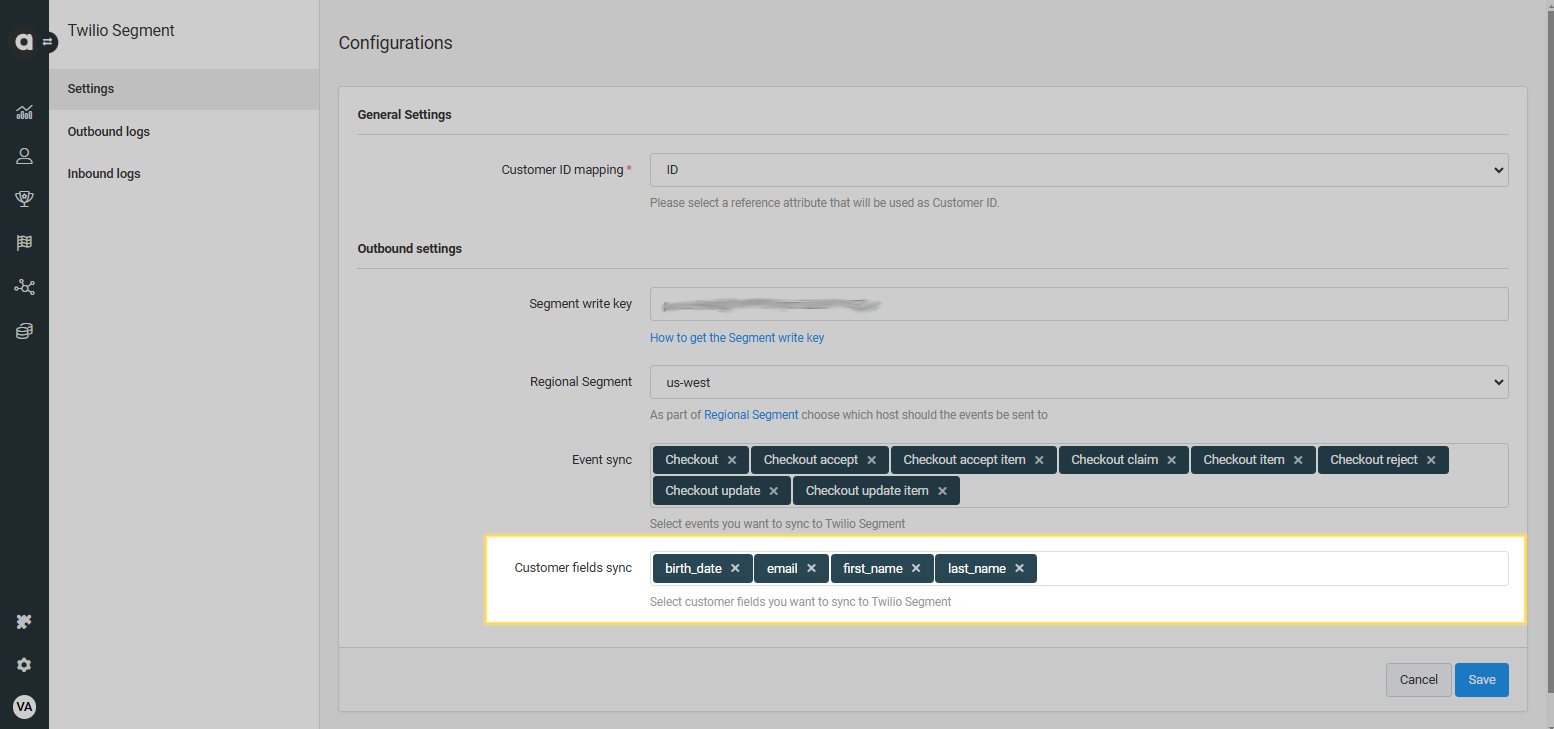
Only the customer attributes listed in this field will be synchronized with Twilio Segment.
Connect a destination app to the Antavo source app in Twilio Segment
In your Twilio Segment workspace, go to Connections > Sources.
Search for the Antavo source app in the list and click its name.
You will be redirected to the Overview page of the source app.
.png)
Add a destination
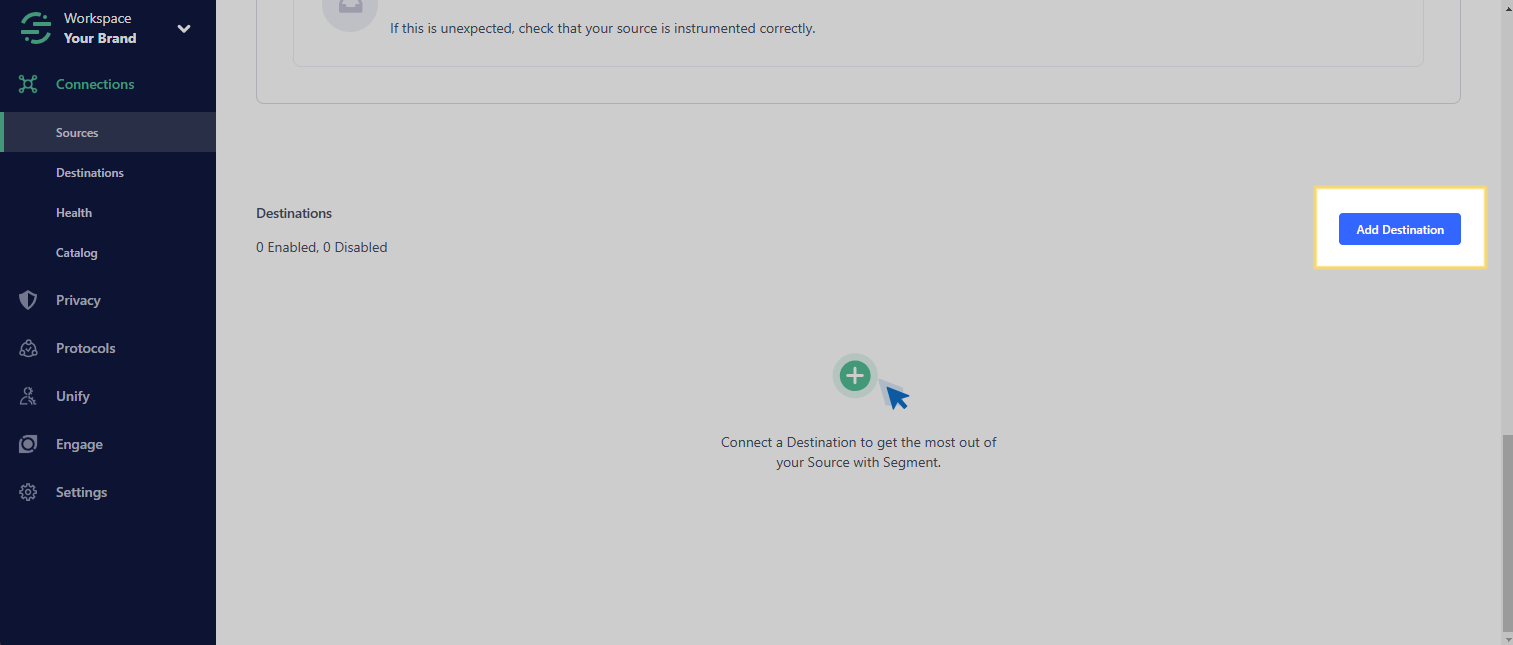
On the app’s Overview page, scroll down to the Destination section.
Click Add Destination.
Select a destination app from the catalog.
Follow the destination app’s documentation to configure and enable it.
The Antavo source app is only compatible with Event streams destinations.
Please note that it cannot be linked directly to the Antavo (Actions) destination app.
Outbound logs
Once synchronization is set up and running, you can track the outbound traffic activity on the Outbound logs page of the Twilio Segment integration in the Management UI.
For each outbound API request to Twilio Segment, the following information is displayed:
Timestamp | The date and time of the outbound request |
Customer ID | The customer ID used to identify the customer |
Event type | The type of event registered in Twilio Segment:
|
Status code | The HTTP status code returned by the request |
Response time (s) | The time elapsed between the request and the response, measured in seconds |
Error | The error message returned (if applicable) |
Identifier | The identifier of the request |
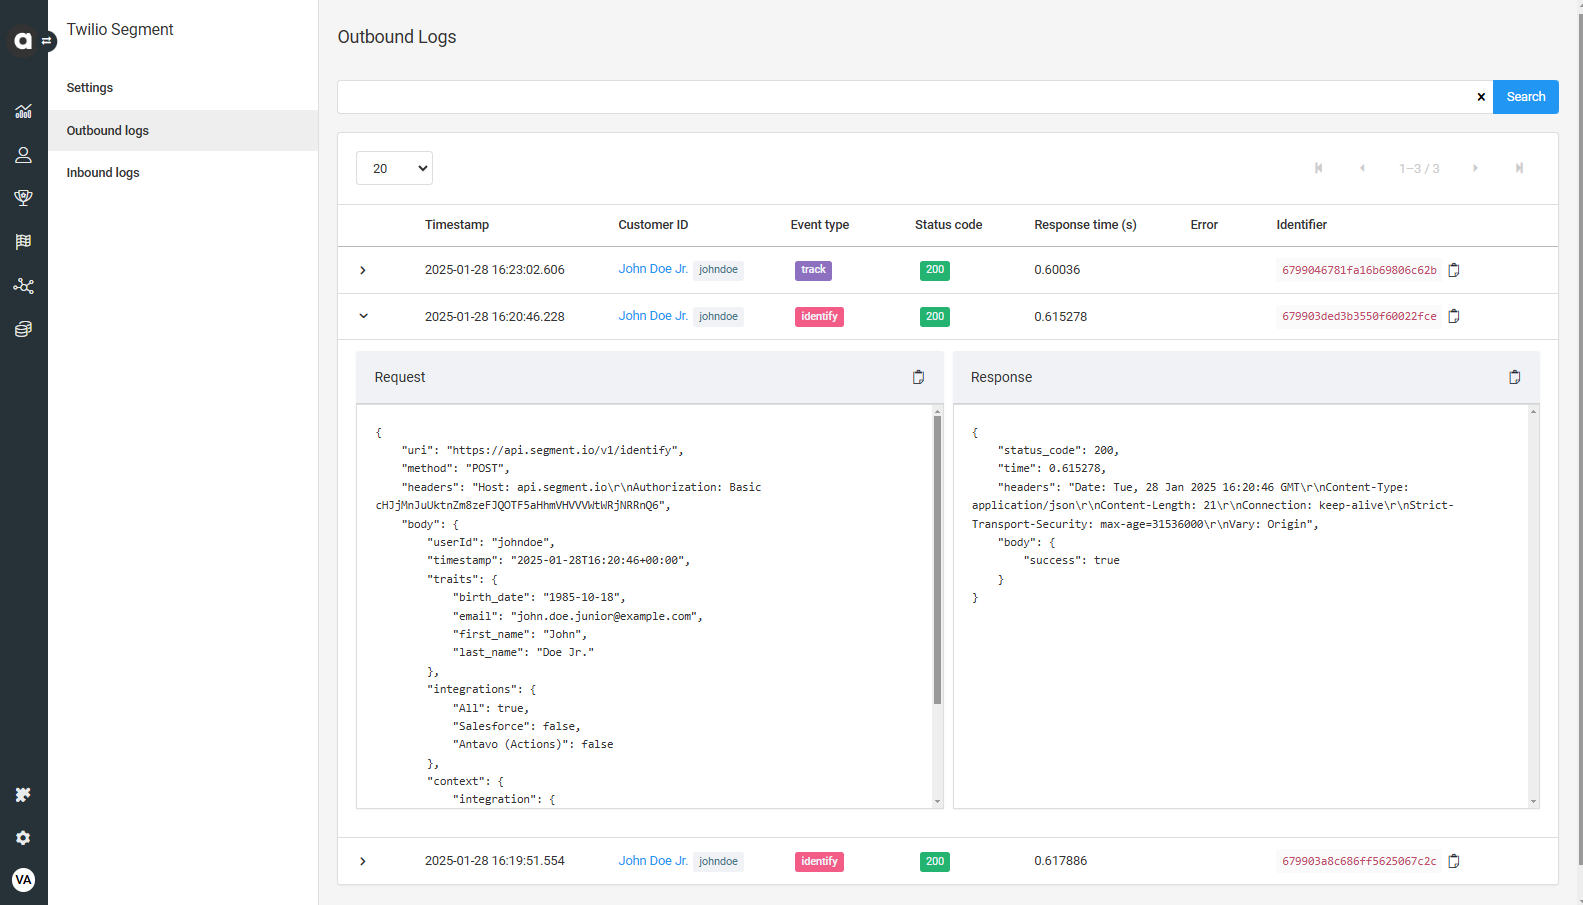
You can expand each log entry to see the request and response body for the specific outbound request.
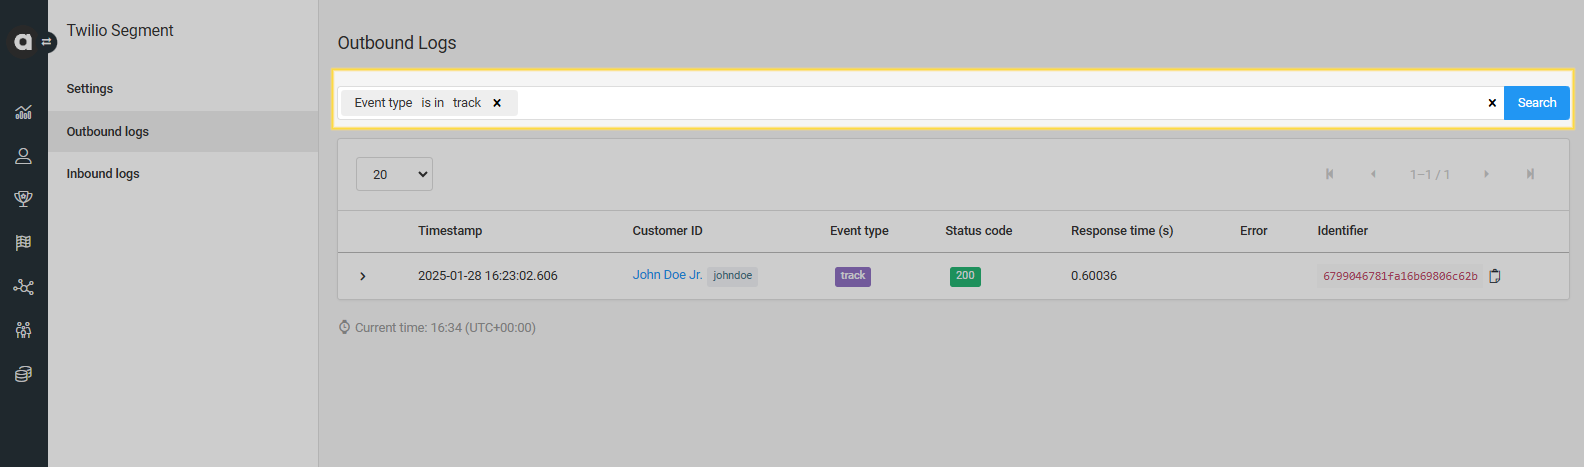
Filter the outbound logs
On the Outbound logs page, use the Search field at the top to enter one or more filter criteria (e.g., set to
Event type is in trackto display only API requests that synchronize event-related data).
You can filter the results by:Identifier
Customer ID
Event type
Error
Status code
Click Search to display the filtered results.
To reset the filter, click the X button at the end of the search field.
Configuring the inbound connection from Twilio Segment To Antavo
With Antavo's Twilio Segment integration, you can synchronize event and customer-related data from Twilio Segment to Antavo. Setting the inbound connection involves two steps:
Configuring the Twilio Segment integration in Antavo
Adding and configuring the Antavo (Actions) destination app in the Twilio Segment workspace
The Antavo (Actions) destination app is an Event streams destination that supports the Destination Actions framework.
Configure the Twilio Segment integration in Antavo
Skip this step if you have already configured an outbound connection.
In the Management UI, navigate to the Modules menu.
Search for Twilio Segment in the list.
Click Configure to open the Settings page of the module.
Set up customer ID mapping
Under General settings, locate the Customer ID mapping dropdown.
Select the field to be used as the Customer ID:
either the customer ID of the customer in Antavo,
or an external customer ID.
This identifier field is included in all events sent to and from Antavo and is used to reference customers in external tools connected to Twilio Segment.
.png)
If you do not plan to synchronize data from Antavo to Twilio Segment, leave the fields in the Outbound settings section blank.
Add and configure the Antavo destination app in Twilio Segment
Add the destination app
In your Twilio Segment workspace, go to Connections > Catalog.
Search for the Antavo (Actions) destination app.
Click Add destination on the app's catalog page.

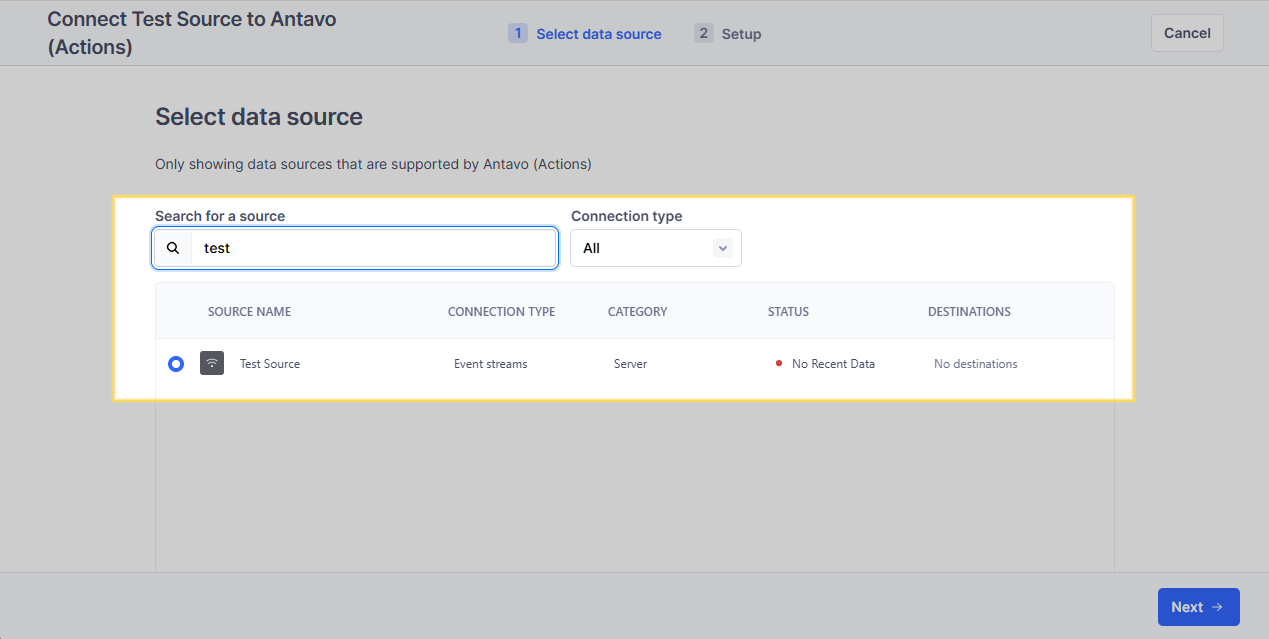
Select the data source
On the Select data source page, select the source app you want to connect to the Antavo (Actions) destination app.
The Antavo destination app is only compatible with the following Event streams sources:
Click Next.
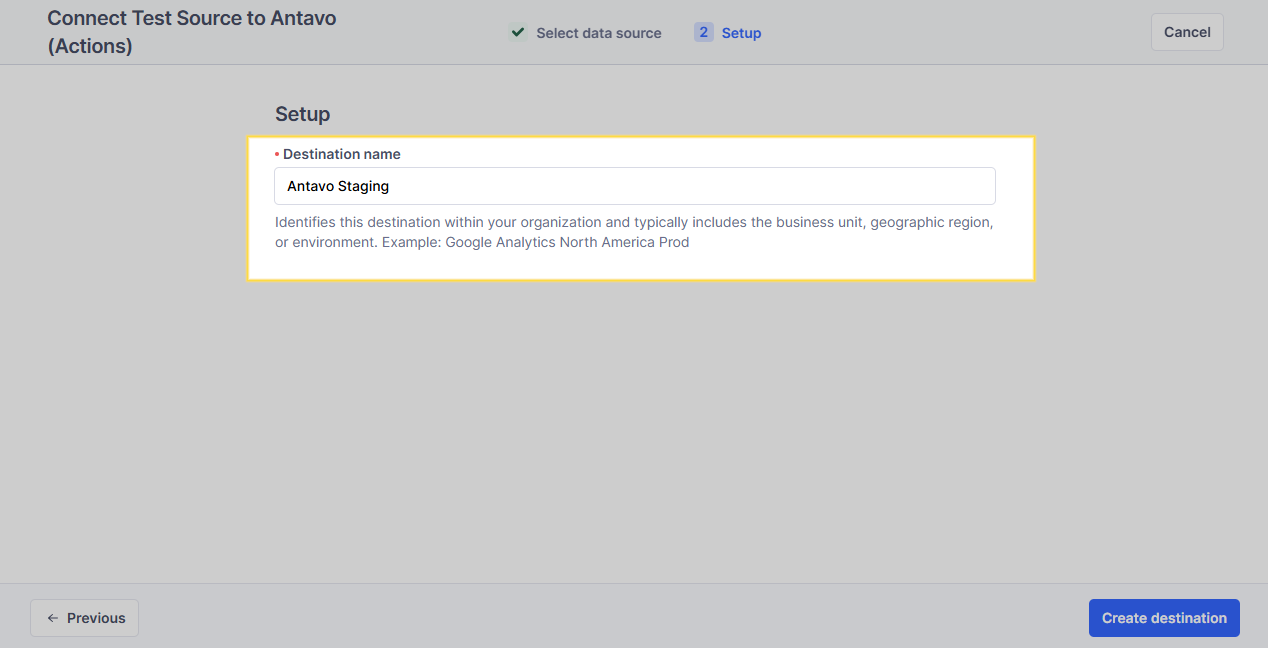
Configure the destination
On the Setup page, provide a custom name for the destination app (e.g., Antavo Staging).
You can change the name later without disrupting the connection.Click Create destination.
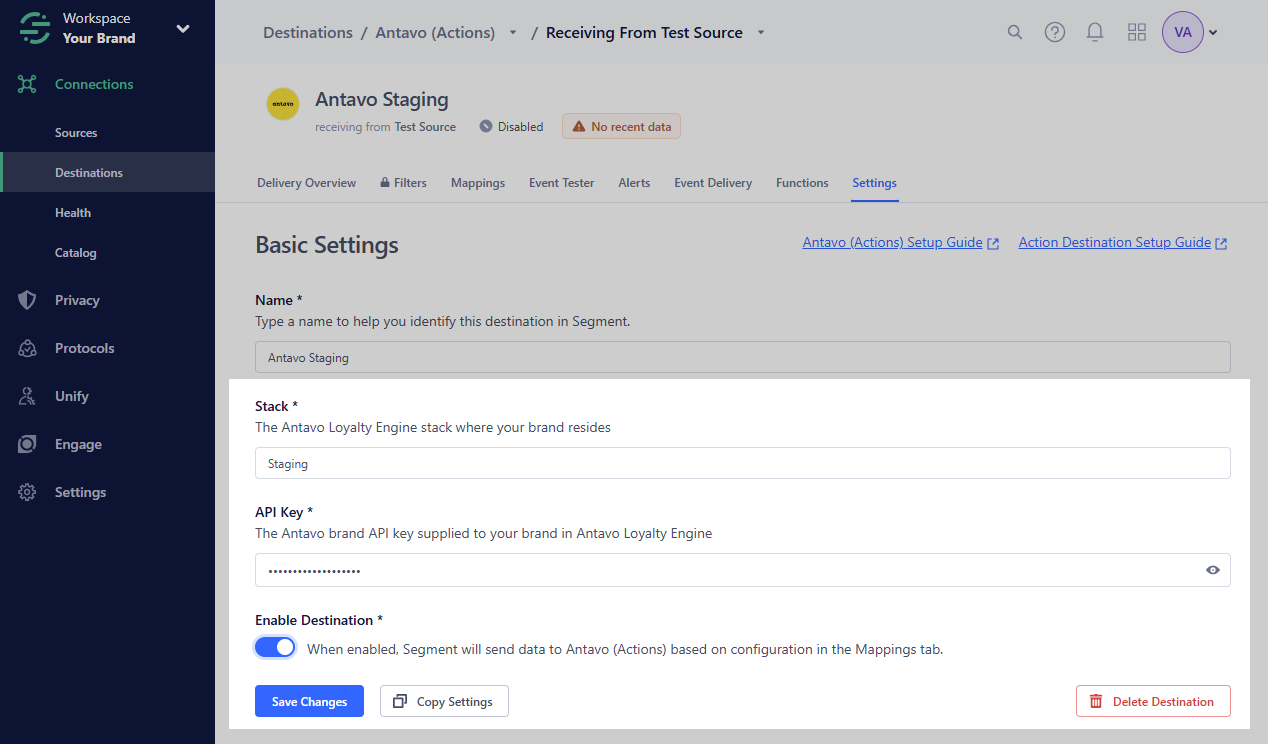
You will be redirected to the Basic Settings page of the destination app.
Configure basic settings
In the Stack field, enter your Antavo workspace’s environment (e.g., Staging).
You can find this on the API settings page of the Management UI next toYour API Region.In the API key field, provide the API key for your Antavo workspace.
You can find this on the API settings page of the Antavo Management UI.Toggle Enable Destination to allow data to be sent from the linked source app to Antavo.
Click Save changes.
At this point, customer or event-related data cannot be sent to Antavo yet. You must first configure data mapping from the source app to the Antavo destination app on the Mappings page. To learn how to configure the mapping, see the Event synchronization and Customer synchronization sections.
Event synchronization
To synchronize external events from a source app in Twilio Segment to Antavo, follow these steps:
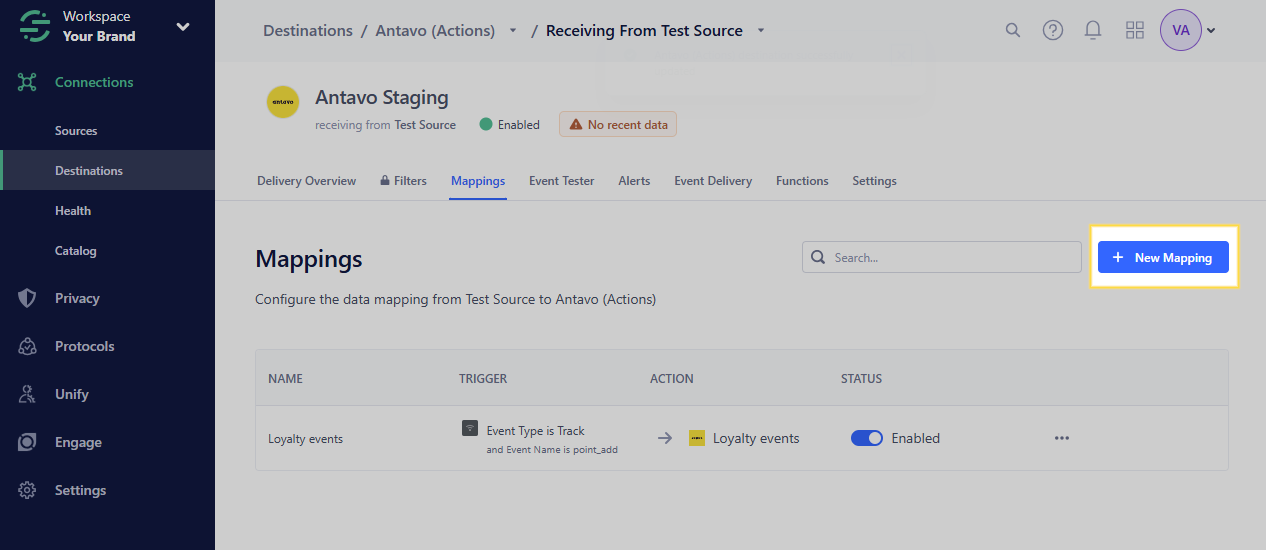
In the Antavo destination app, navigate to the Mappings page.
Click New Mapping.
You are redirected to the mapping setup page.
.png)
If you have already set up a mapping, the page may look different. In this case, the New Mapping button will be located on the right side of the page.
Define streaming behavior
Under Define streaming behavior, select the Loyalty events action to map and synchronize external events to Antavo loyalty events.
.png)
Define event trigger
Under Define event trigger, define the conditions to be met to send event-related data from the source app to Antavo:
Select a condition and an operator from the dropdown as needed.
Note that the Loyalty events action already includes anEvent Type is Trackcondition by default.To define additional conditions, click Add condition.
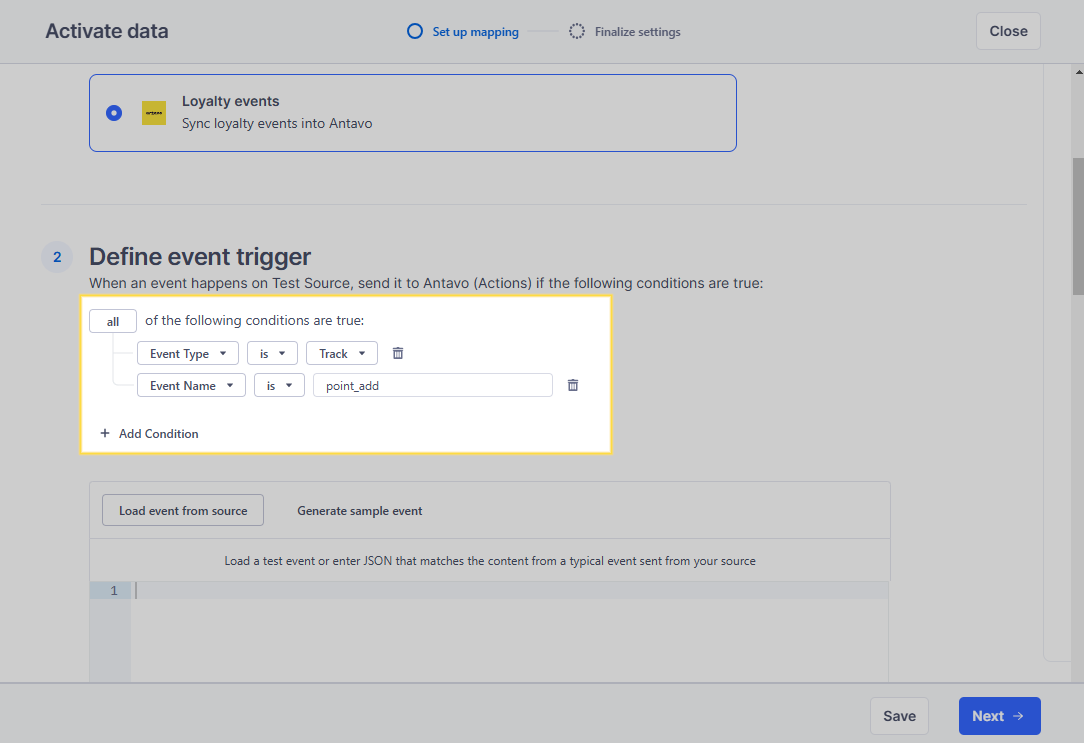
If you have already set up and enabled the source app, you can click Load event from source to display an existing event from the source app that matches the specified conditions.
Map fields
Under Map fields, on the left side, specify which event properties from the source app should be mapped to the Antavo properties on the right.
Click Edit Object to specify the event data attributes that should be mapped to the Antavo event.
Enter the source event’s attributes in the fields on the left.
Specify their counterpart attributes in the Antavo event on the right.
To map additional event properties, click Add Mapping Field.
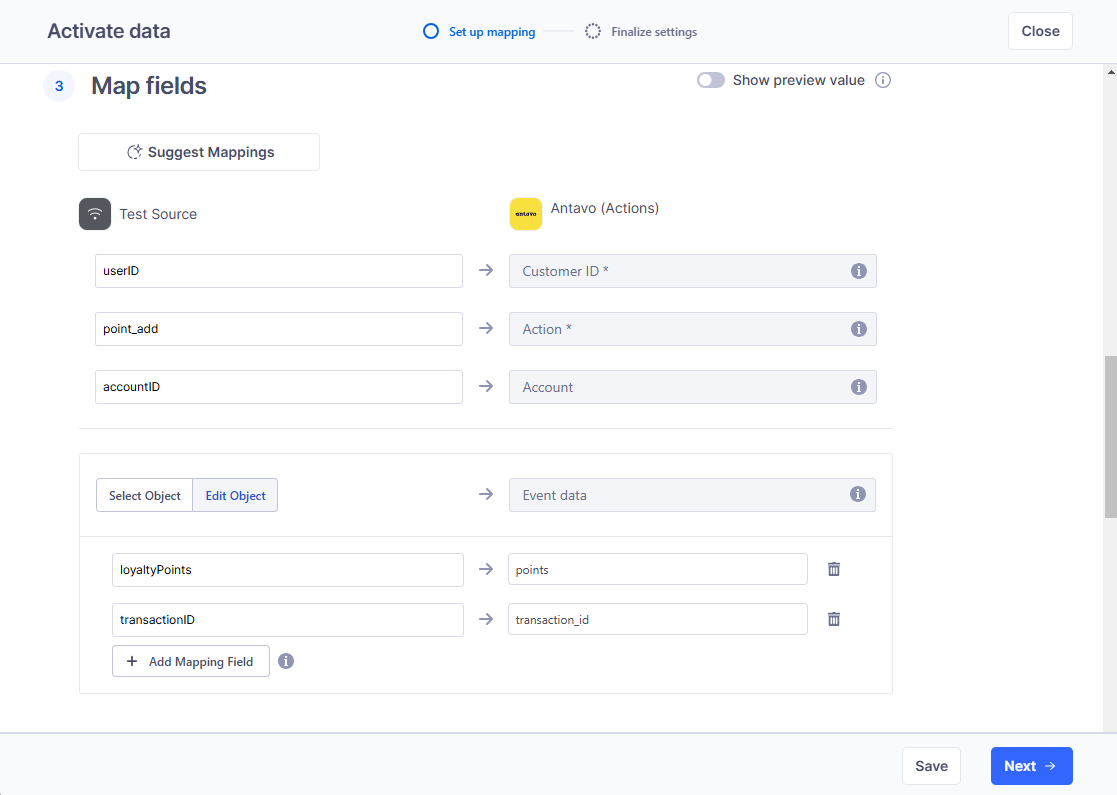
Antavo fields marked with an sterisk (*) must be mapped for this mapping to work.
Also note that if the Multi-accounts module is enabled in your Antavo workspace, you must also map an attribute to the Account field.
Save the mapping
Click Save at the bottom of the page.
You will be redirected to the Mappings page, and a confirmation message will appear if the action is successful.Use the toggle in the Status column to enable the mapping.
Events that match the trigger condition in this mapping will be sent to the destination app.
.png)
Customer synchronization
To synchronize customer profile updates from a source app in Twilio Segment to Antavo, follow these steps:
In the Antavo destination app, navigate to the Mappings page.
Click New Mapping.
You will be redirected to the mapping setup page.
Define streaming behavior
Under Define streaming behavior, select the Profile updates action to map and synchronize external customer profile updates to Antavo customer data.
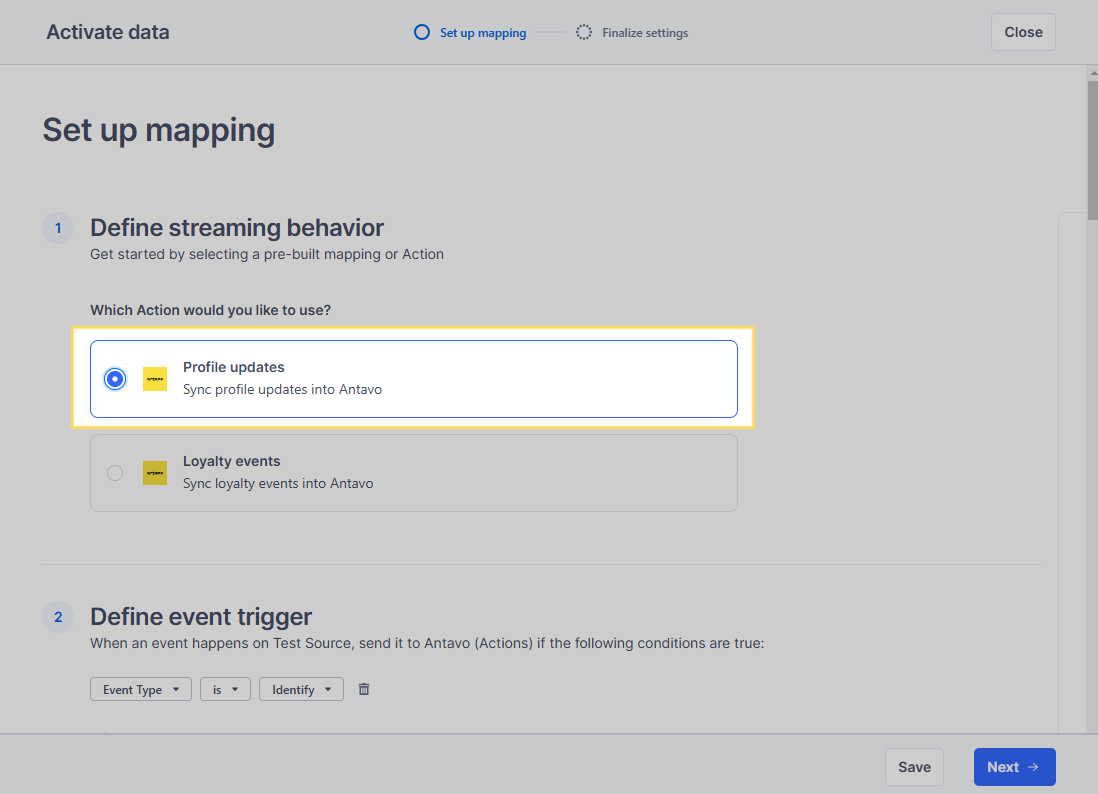
Define event trigger
Under Define event trigger, define the conditions that need to be met to send event-related data from the source app to Antavo:
Select a condition and an operator from the dropdown as needed.
Note that the Profile updates action already includes anEvent Type is Identifycondition by default.To define additional conditions, click Add condition.
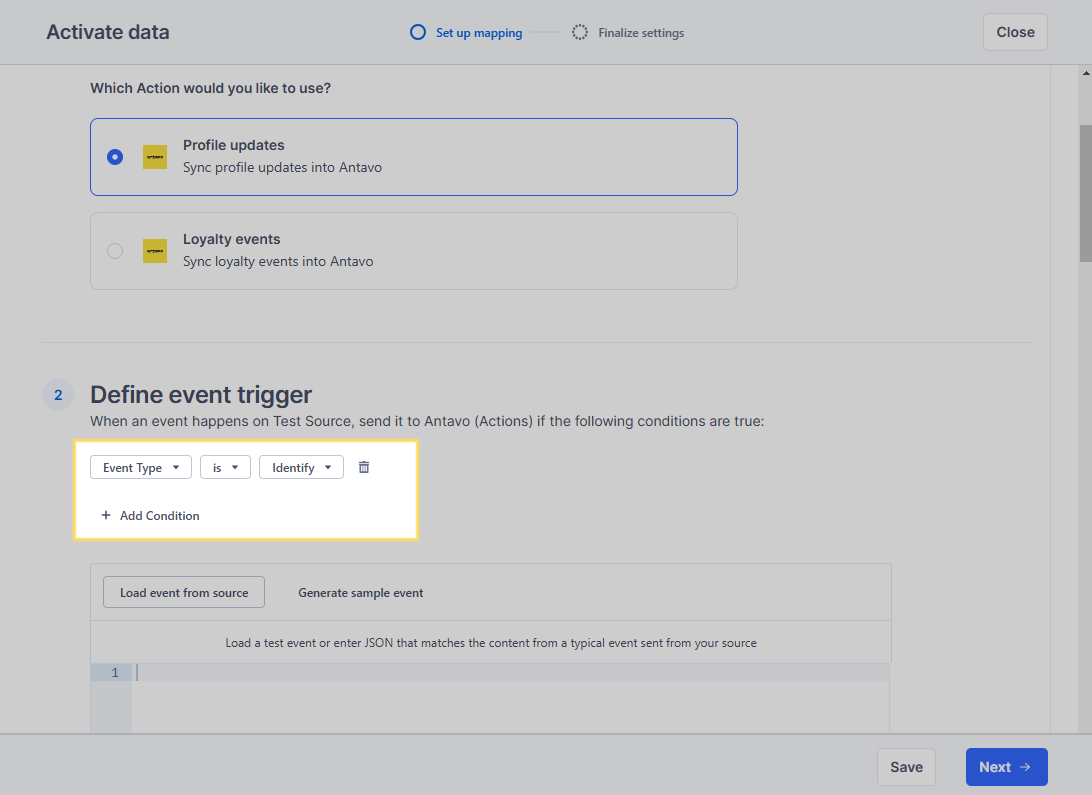
If you have already set up and enabled the source app, you can click Load event from source to display an existing event from the source app that matches the specified conditions.
Map fields
Under Map fields, on the left side, specify which customer properties from the source app should be mapped to the Antavo properties on the right.
Under Edit Object, specify the customer attributes that should be mapped to the customer data in Antavo:
Enter the source event’s attributes in the fields on the left.
Specify their counterpart attributes in the Antavo event on the right.
To map additional customer attributes (e.g., custom fields), click Add Mapping Field.
.png)
Antavo fields marked with an asterisk (*) must be mapped for this mapping to work.
Also note that if the Multi-accounts module is enabled in your Antavo workspace, you must also map an attribute to the Account field.
Save the mapping
Click Save at the bottom of the page.
You will be redirected to the Mappings page, and a confirmation message will appear if the action is successful.Use the toggle in the Status column to enable the mapping.
Events that match the trigger condition in this mapping will be sent to the destination app.
.png)
Inbound logs
Once the synchronization is set up and running, you can track the outbound traffic activity on the Inbound logs page of the Twilio Segment integration in the Management UI.
The following information is displayed for each outbound API request to Twilio Segment:
Timestamp | The date and time of the outbound request |
Customer ID | The customer ID used to identify the customer |
Action | The type of event that is registered in Antavo |
Status | The status of the event synchronization |
Event | The ID of the registered event |
Error | The error message returned (if applicable) |
Identifier | The identifier of the request |
You can expand each log entry to see the request and response body for the specific inbound request.
Filter the inbound logs
In the Search field at the top of the Inbound logs page, enter one or more filter criteria.
You can filter the results by:Action
Identifier
Customer ID
Event type
Error
Status code
Click Search to display the filtered list.
To reset the filter, click the X button at the end of the field.