The Incoming webhook module offers a flexible method for external systems, such as marketing automation providers or customer data platforms, to transmit customer information to the loyalty program. The incoming webhook messages are processed and registered as customer events in loyalty members' event histories, following the mapping configured within the module’s editor interface.
To access the configuration page, navigate to the Modules menu and search for Incoming webhooks in the module list. The page will display the list of previously configured webhook settings.
Configuring incoming webhooks
Click the Create new webhook option in the sidebar
Blueprints
Select the Blank card option to define unique settings. If you have a live mParticle integration, you can find pre-filled blueprints for specific scenarios.
Click Create at the bottom of the page
.png)
Name
Enter the name of the new webhook
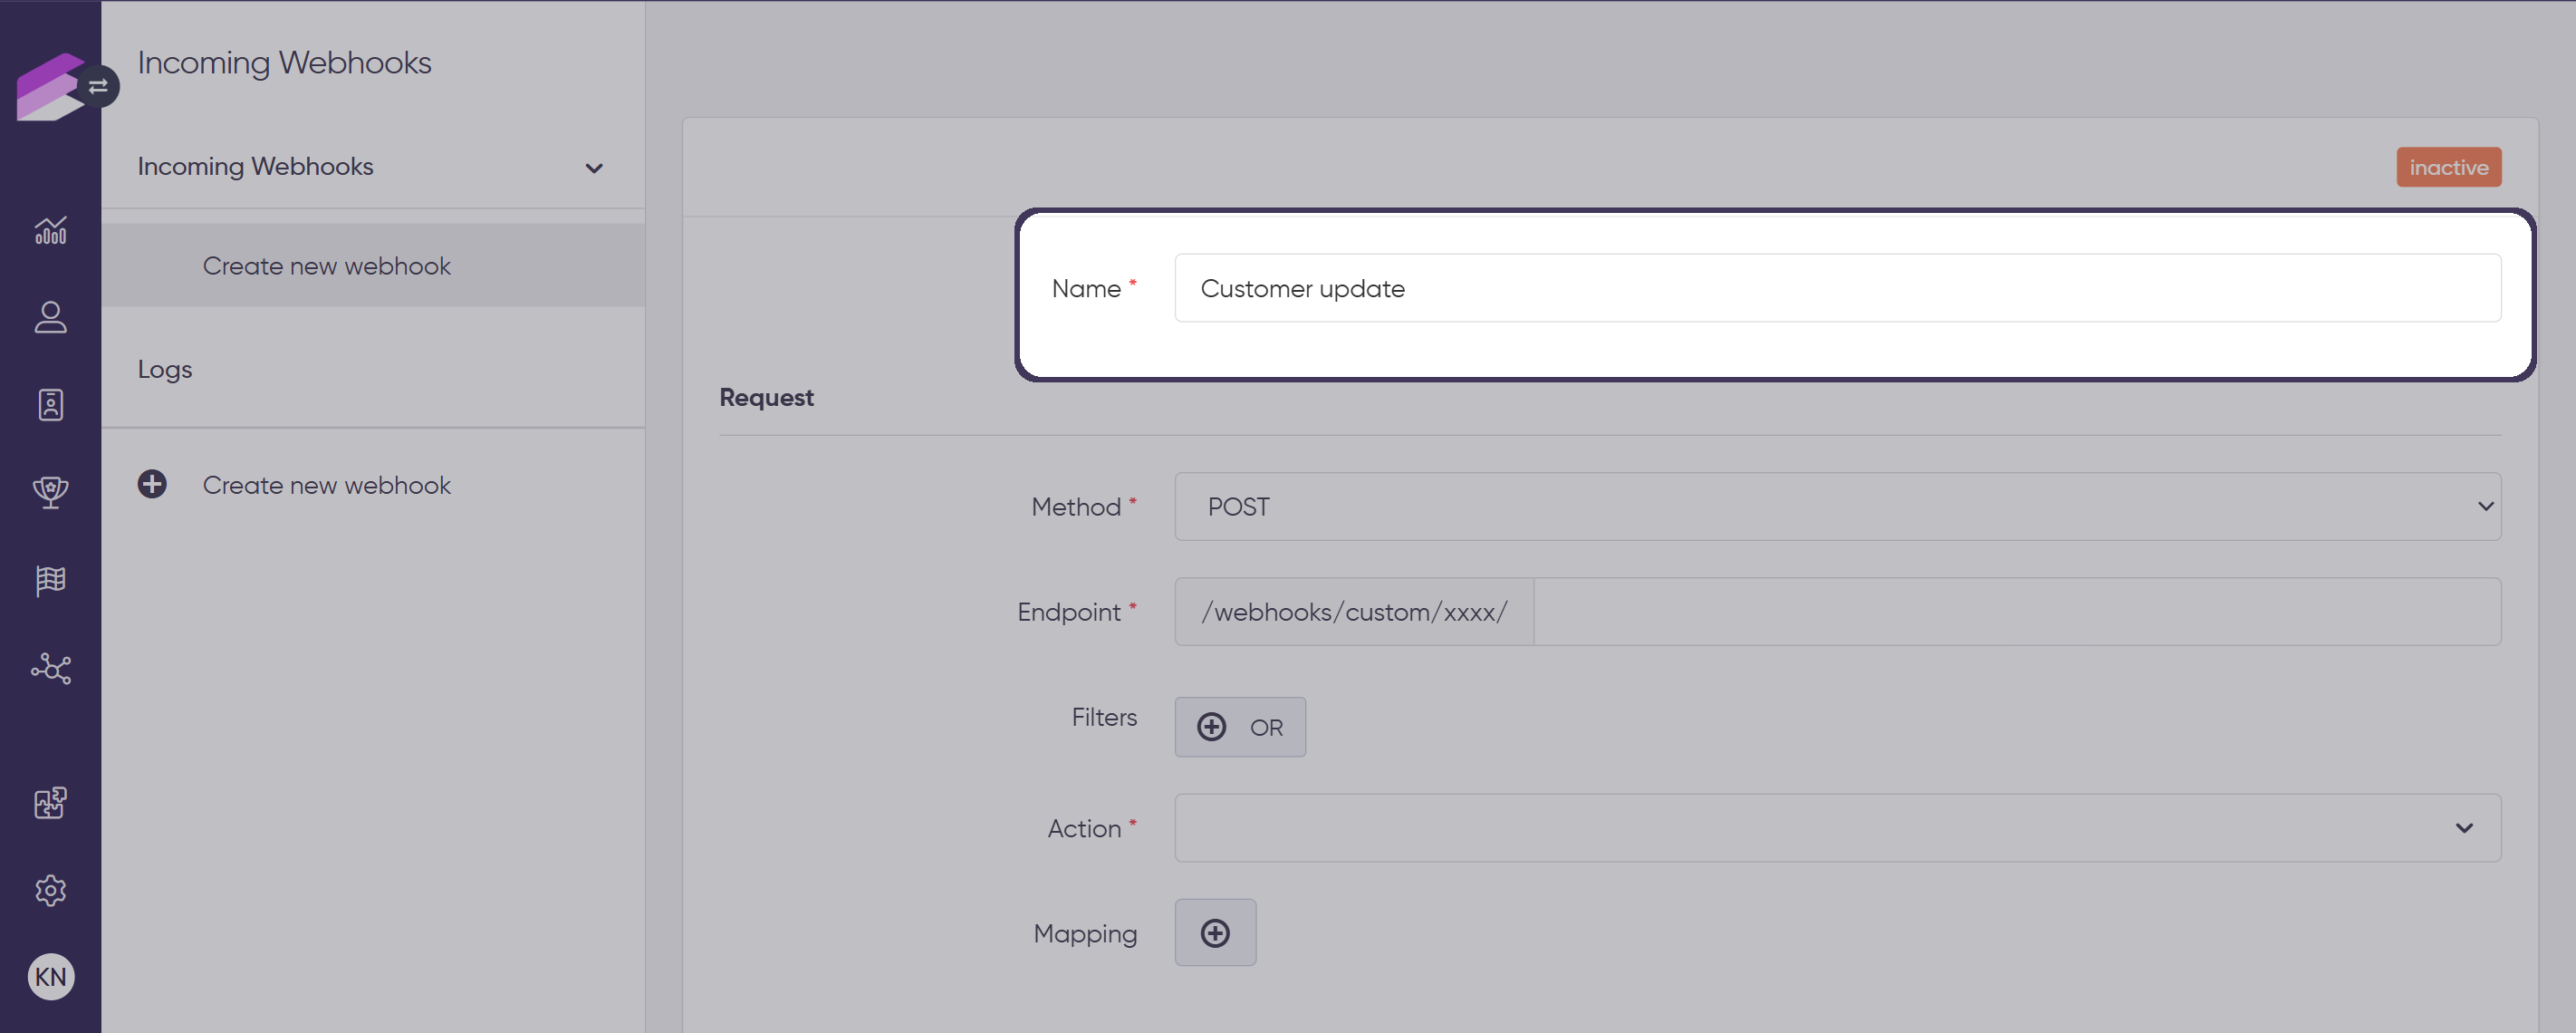
Request
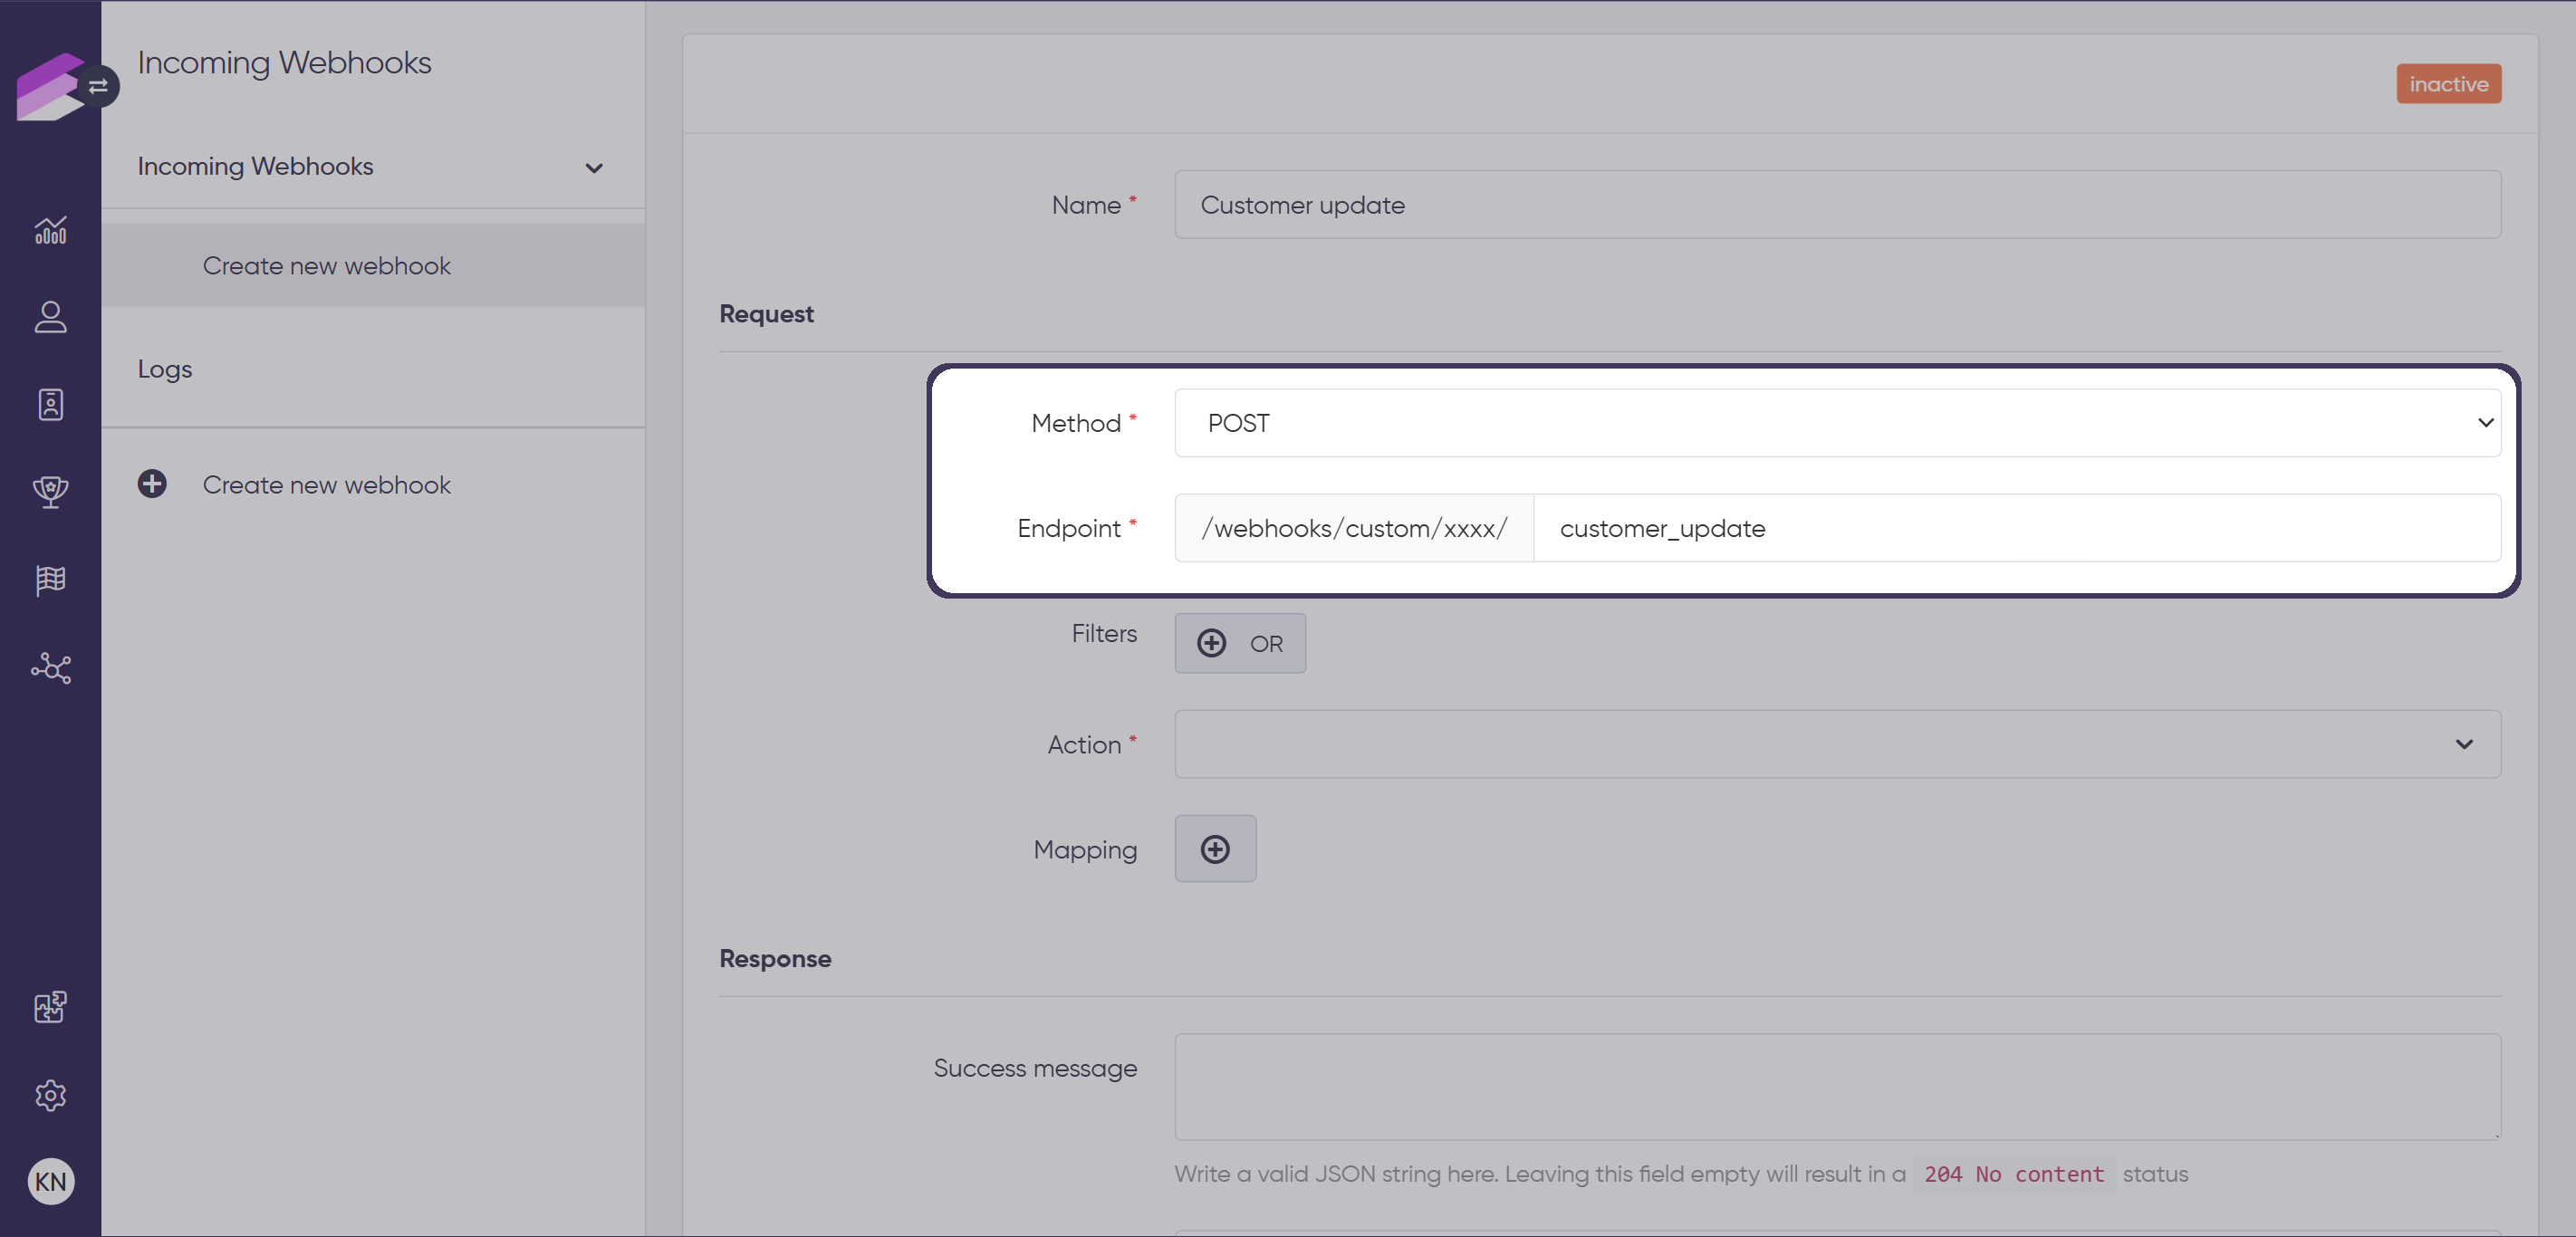
Use the dropdown menu to select the request method. Both PUT and POST methods are available.
Specify the endpoint by entering the name of the endpoint where the request will be sent
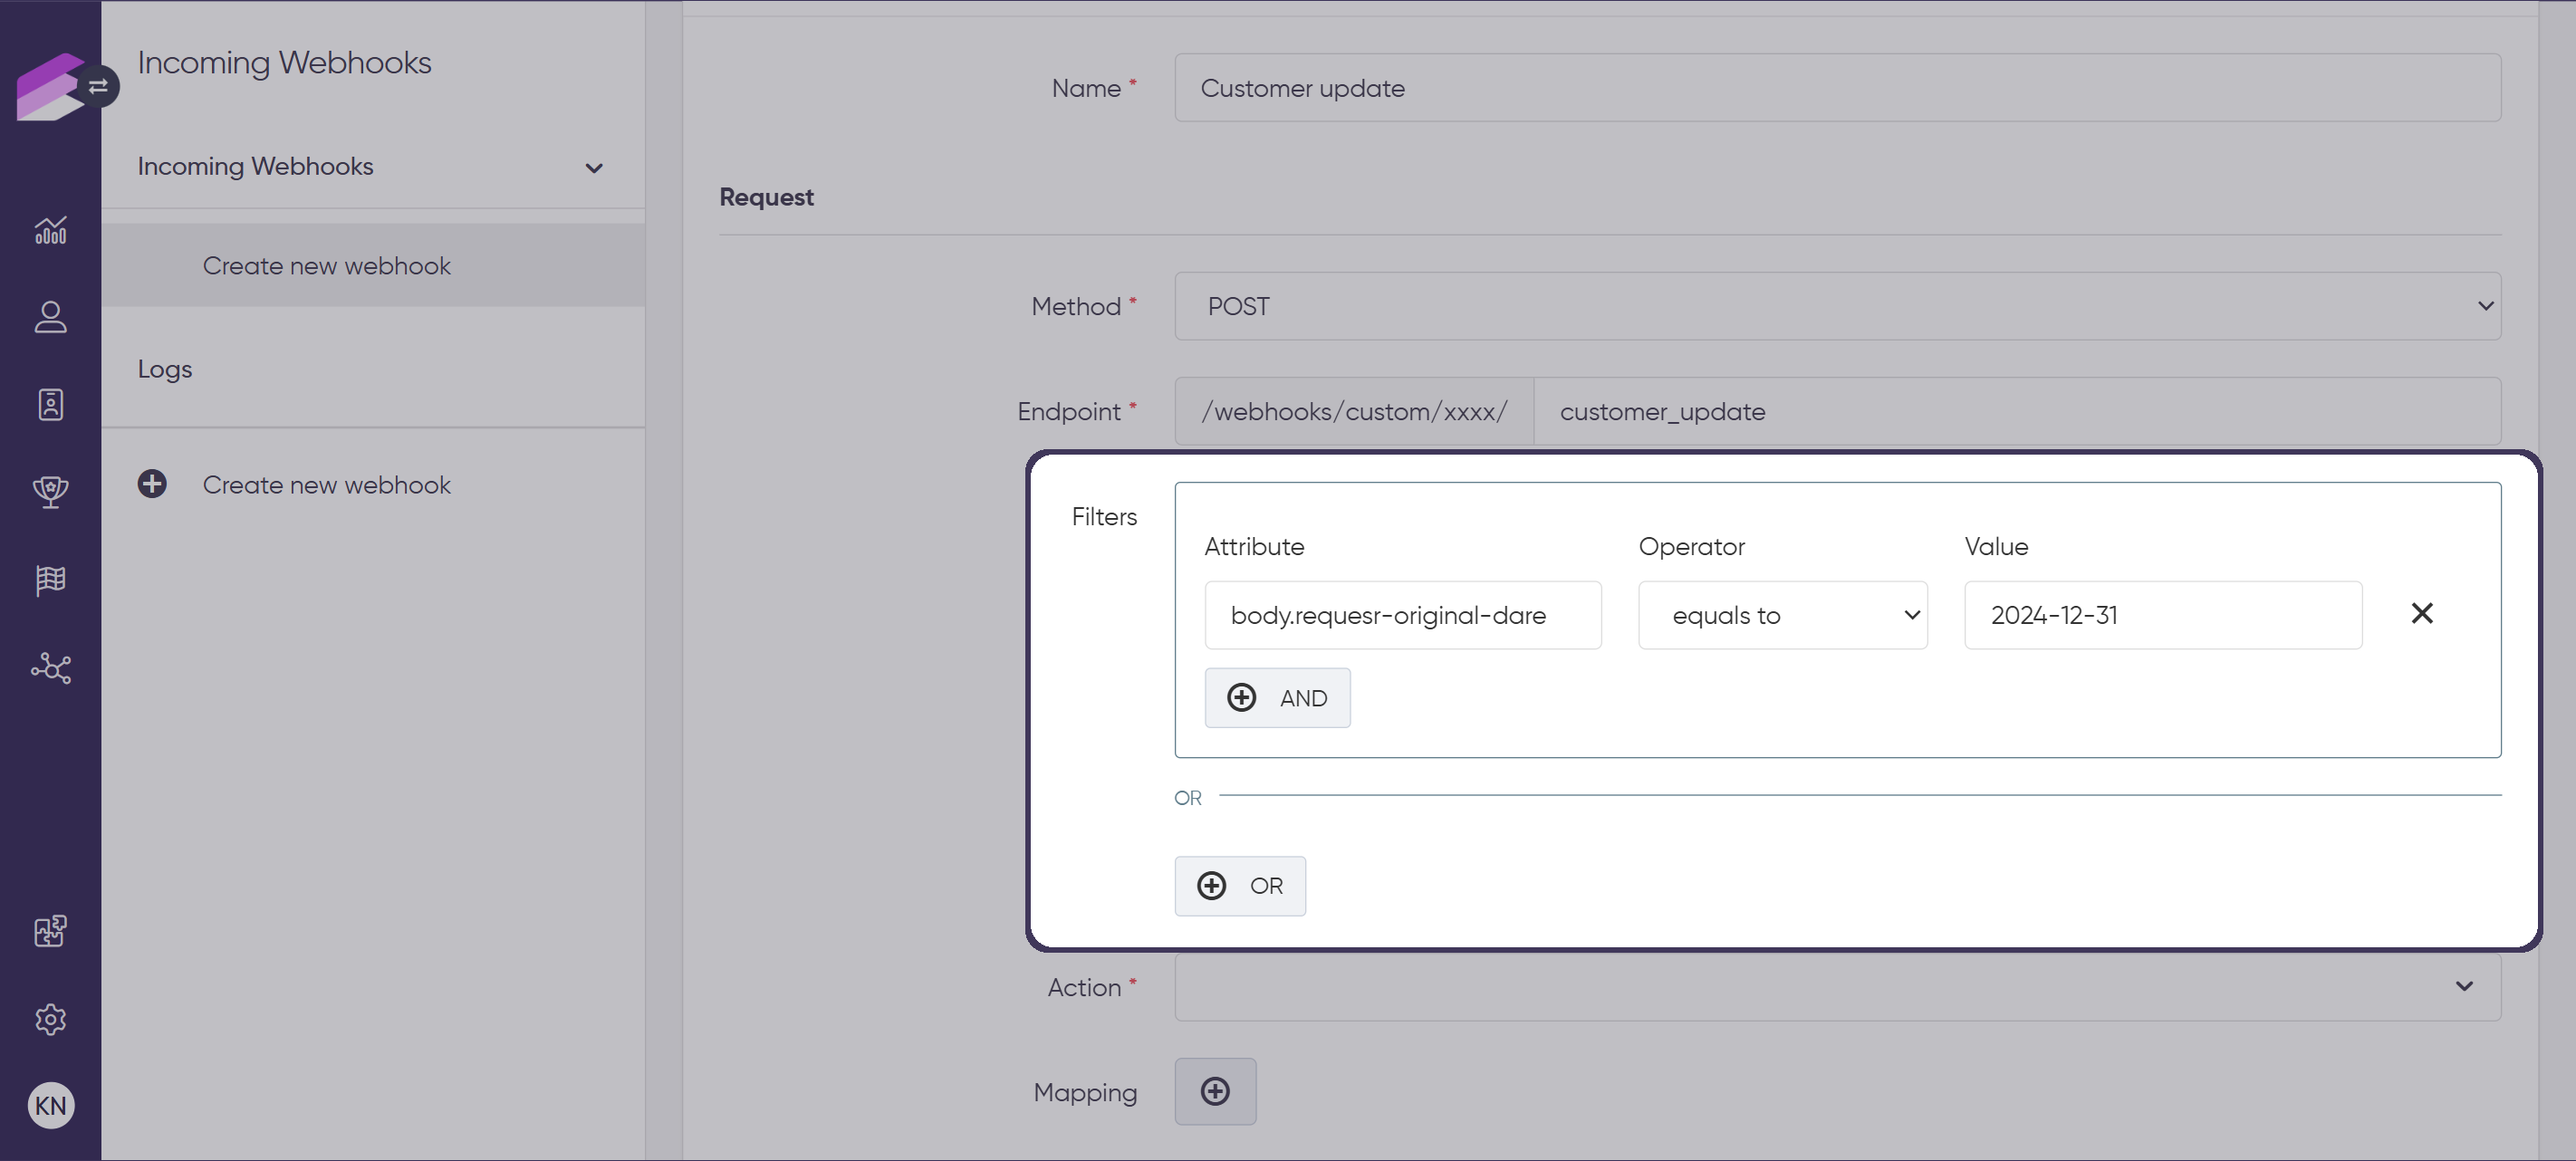
Filters
Adding a filter is not mandatory, but it is recommended to filter the requests coming to the webhook endpoint. This ensures that you catch, route, and process only the correct requests, and also helps the endpoint from being abused with malicious intent.
Click the + button to add a new filter criteria. All request attributes can be accessed in the filters, including headers and those sent in the request body. Use the prefixes headers and body , respectively, to access the attributes.
headersexample: To check for the attribute calledrequest_original_datefrom the header, useheaders.request_original_date.bodyexample: To access the same attribute from the request body, usebody.request_original_dateThe system allows you to combine multiple filter criteria using AND and OR relations.
Using filters for authentication
It’s a good design practice to protect your webhook endpoint by validating a static authorization token or credential sent either in the request header or in the body. While the Incoming Webhooks module does not support standard authentication methods directly, you can achieve access control by adding a filter that checks for a specific static value (e.g., a token or key).
For example, you can set a filter for headers.Authorization or use a custom-named header or body attribute. Only requests containing the exact value you specify will be processed, all others will be ignored. This provides a simple way to restrict access to your webhook endpoint.
For the request attribute where you expect the token to be present, use non-standard naming and rotate the tokens regularly. Always store your tokens securely in a key vault and avoid exposing them to unauthorized personnel.
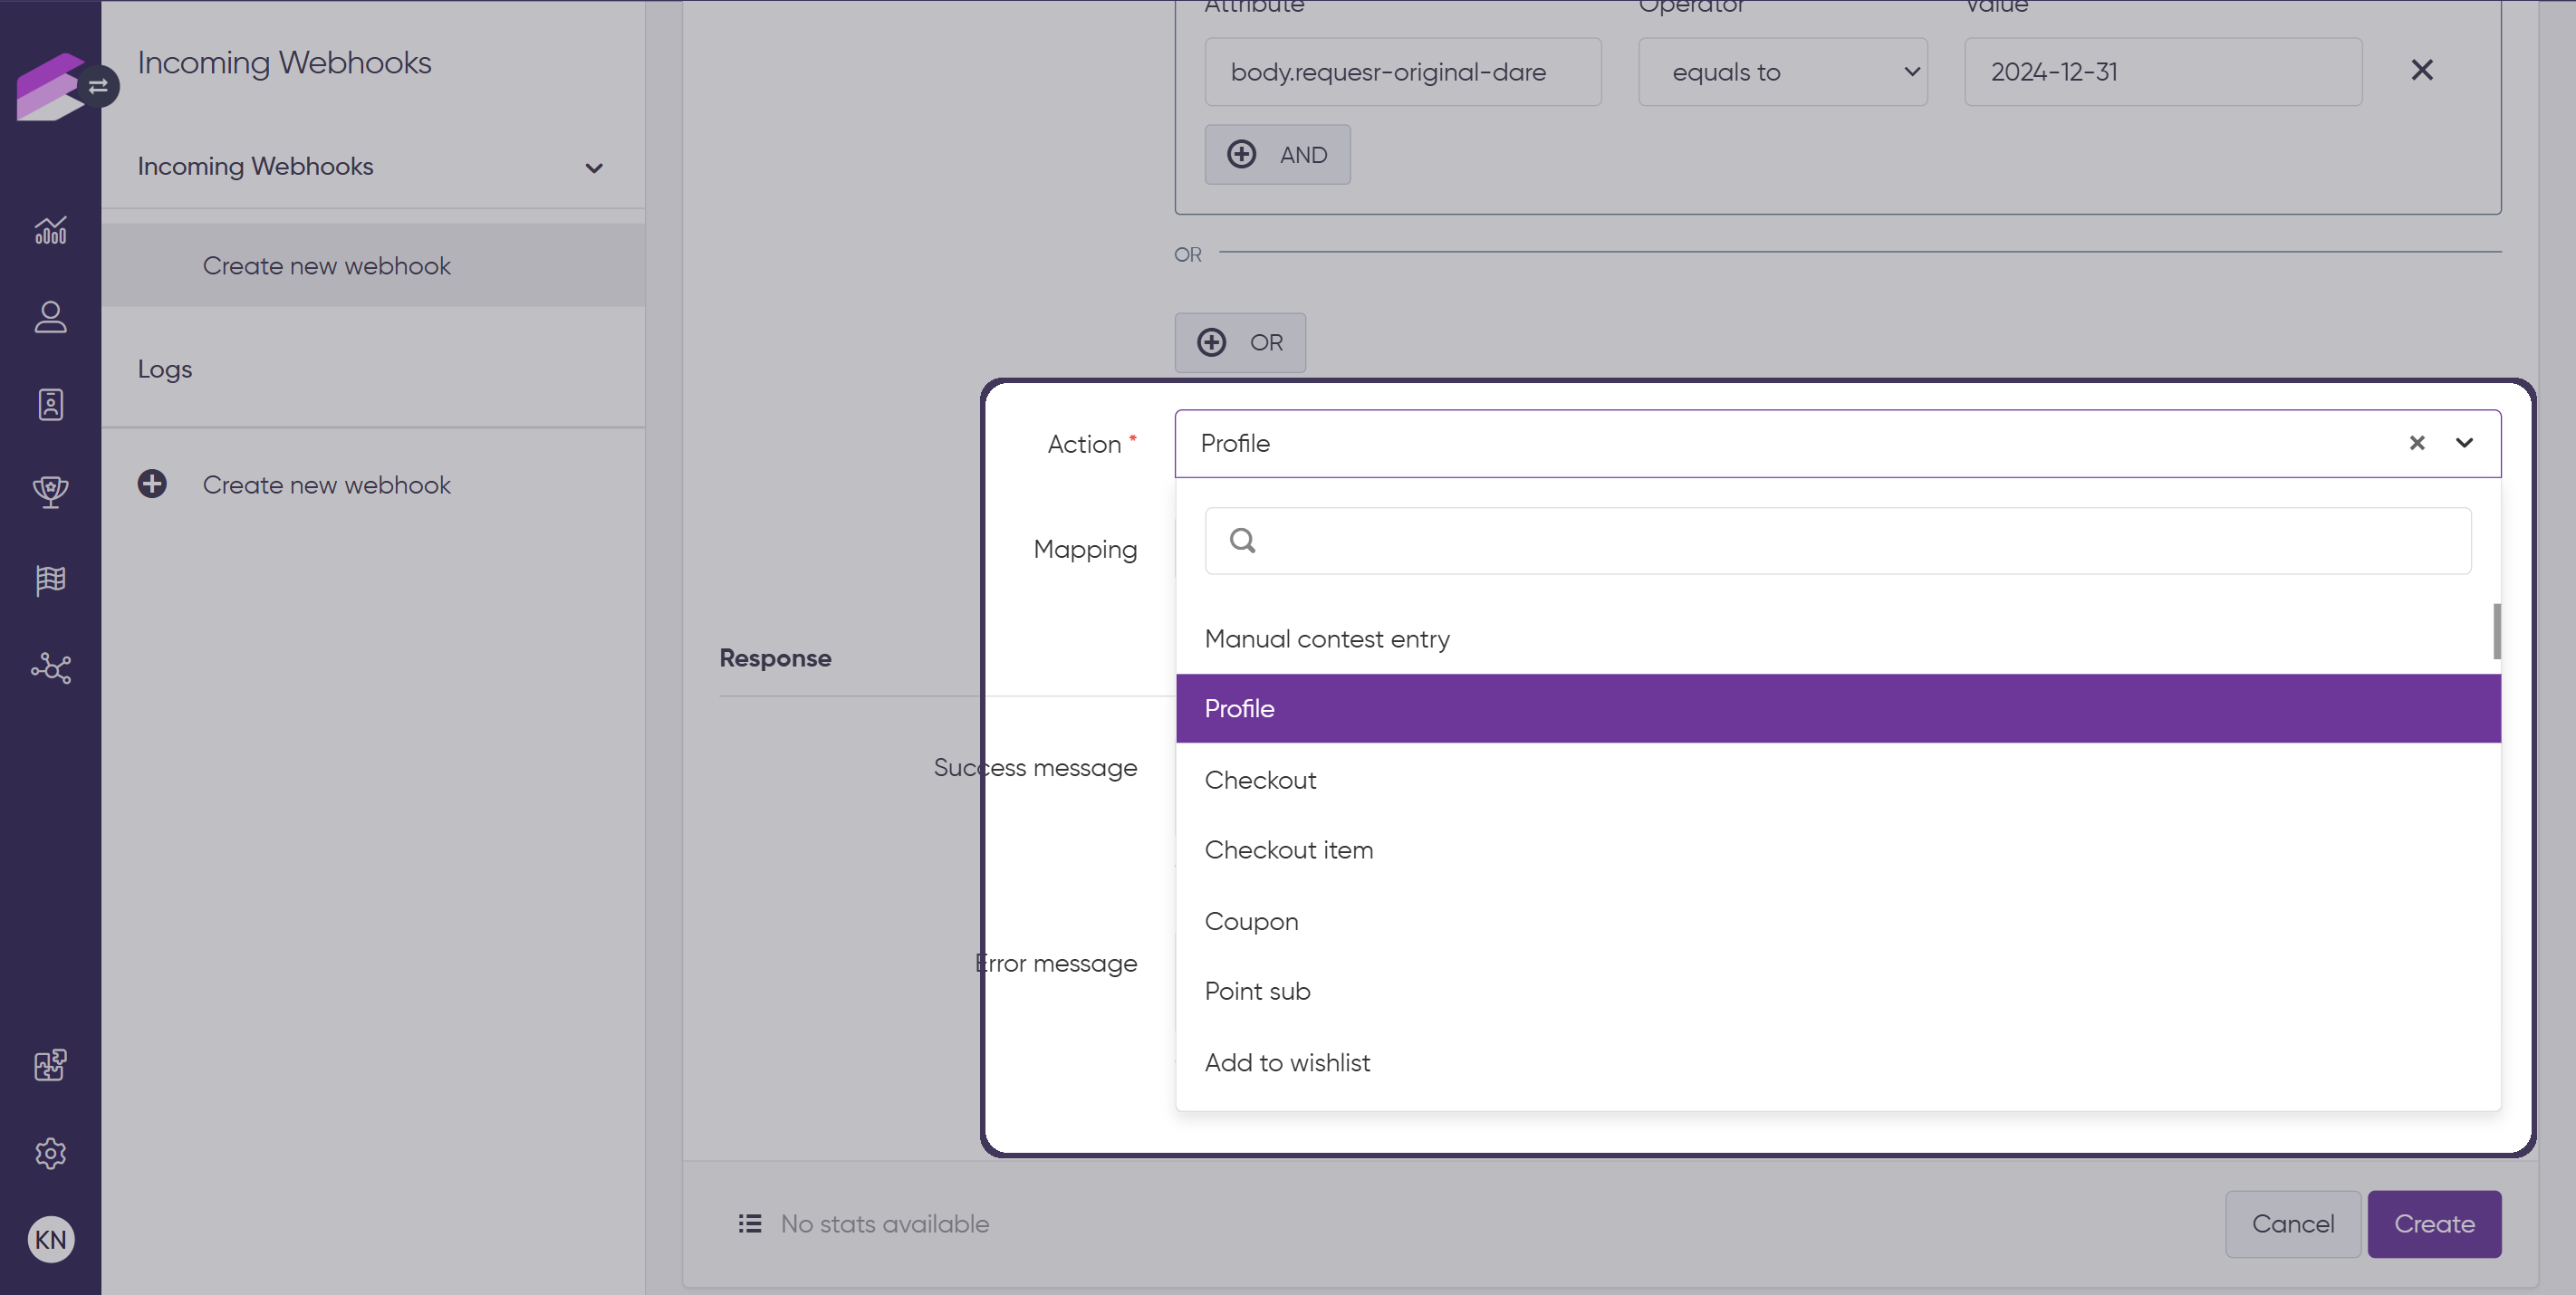
Action
Select an event to be registered
The dropdown list includes all Antavo events that can be triggered.
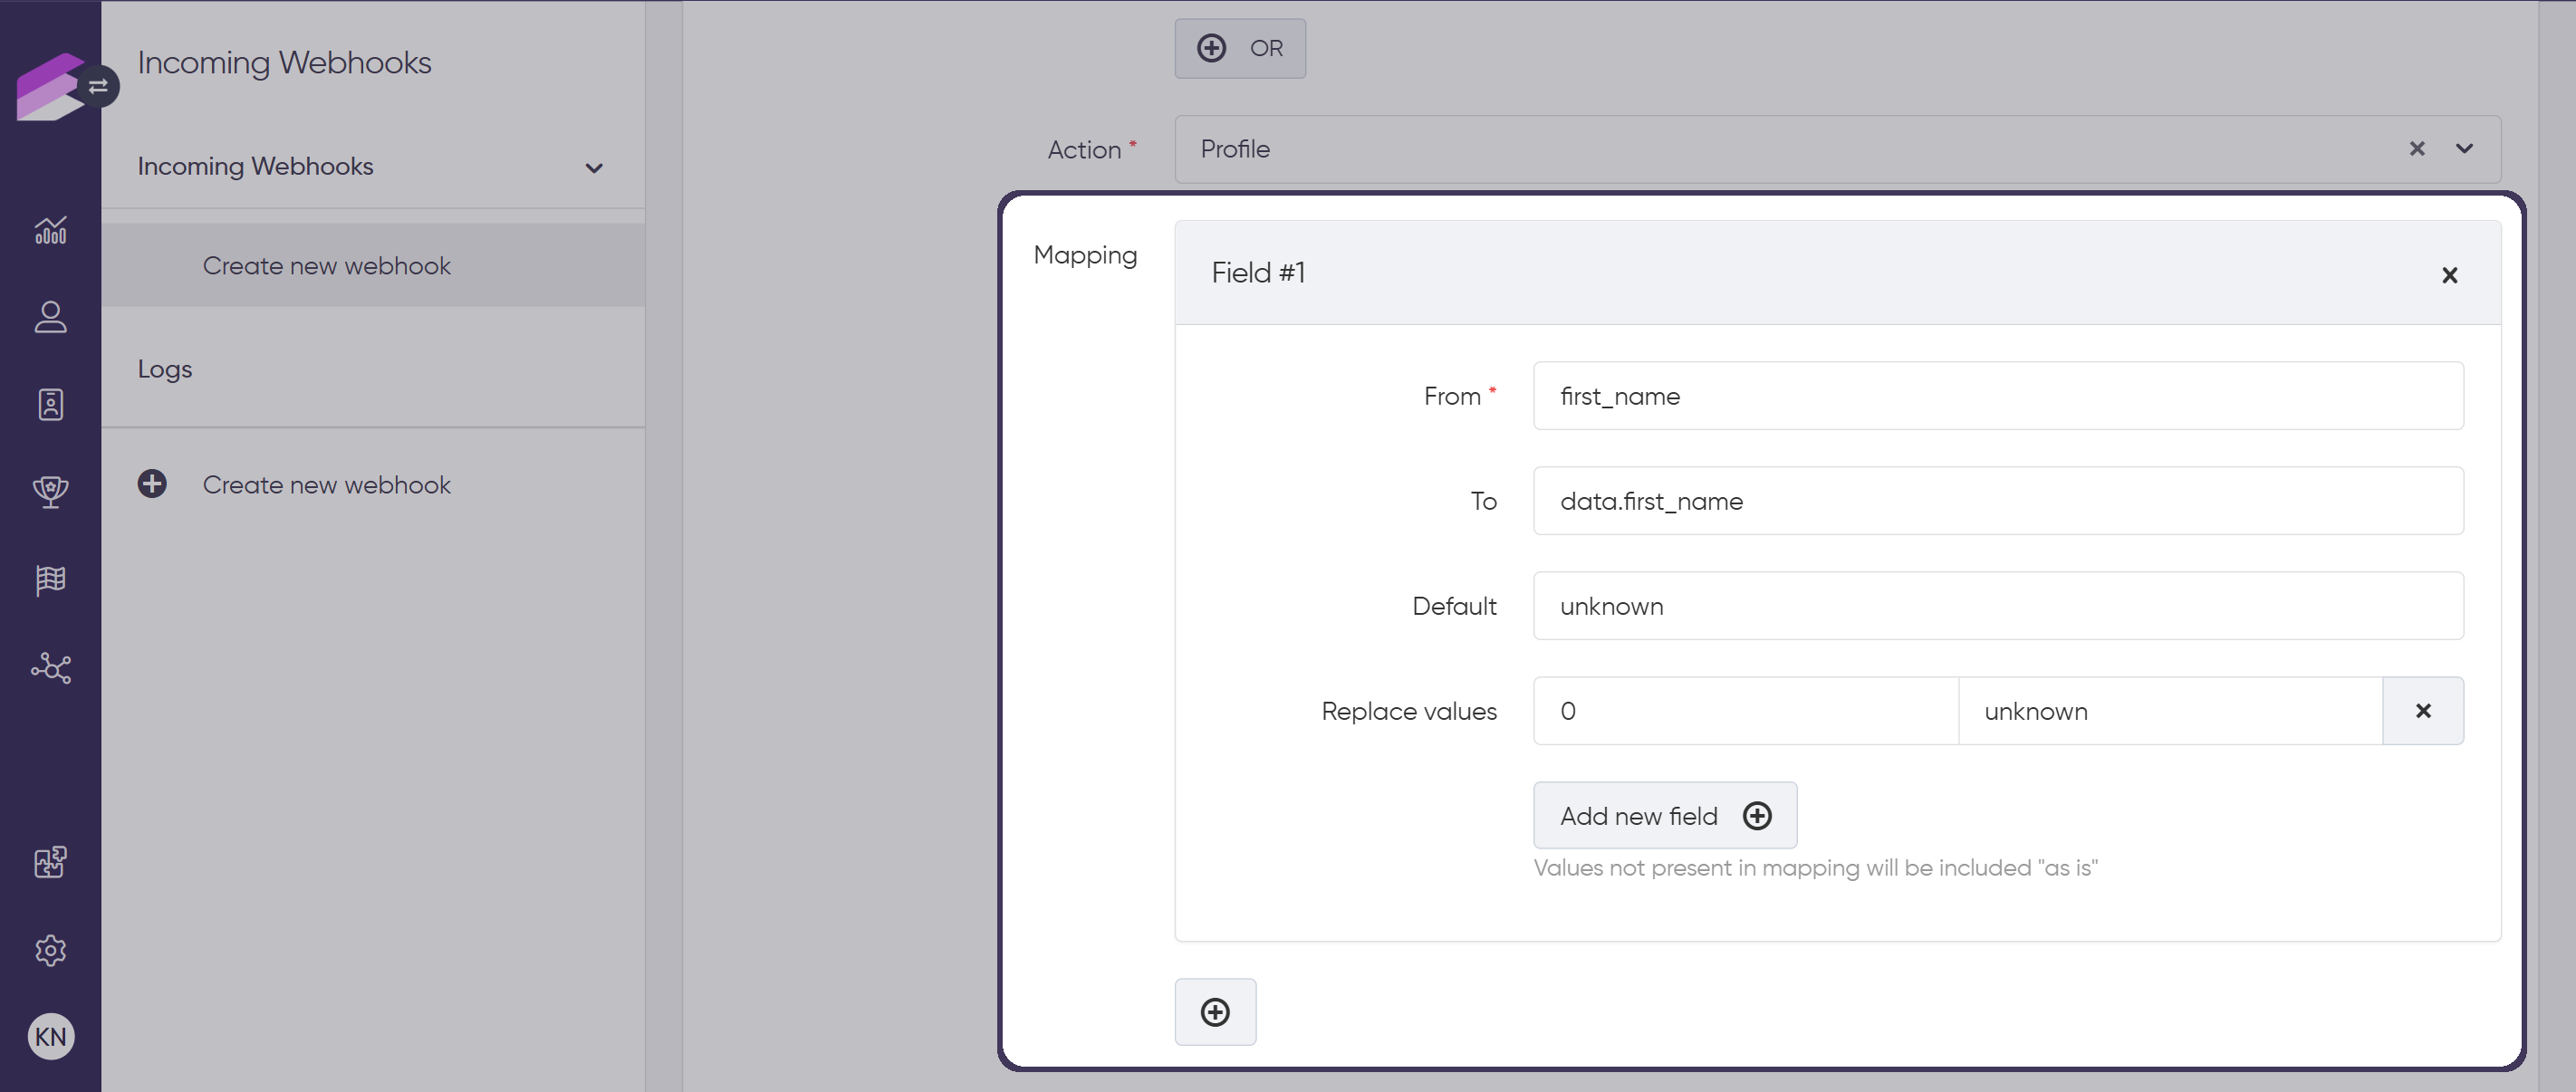
Mapping
Click + to add a new field mapping
From Unlike filters, only attributes of the request body can be used, which suggests that adding a
bodyprefix to the attribute is unnecessary.
Example: To access the variable calledpurchase_valuefrom the body of the webhook message, you will need to typepurchase_valuein the From field.To
You might need to use thedataprefix when mapping your request attribute to an event attribute, as Antavo events contain all information unique to an event under thedataattribute.
Example: if you were to try to recreate theprofileevent and you would like to map thefirst_namefield from the request, you will need to typedata.first_namein the To field instead of simply typingfirst_name.Default
This value will be added to data cells where the field value is empty.Replace values
You can decide to overwrite certain data values in the webhook message with a new value. Use the value to replace and the new value fields to define which value should be replaced and what the target value is.
To map more than one value, click the + button.
Response
Specify the response for successful or unsuccessful operations
Make sure to input a valid JSON string here. If you leave the success and/or error fields empty, the default messages will be included in the response.
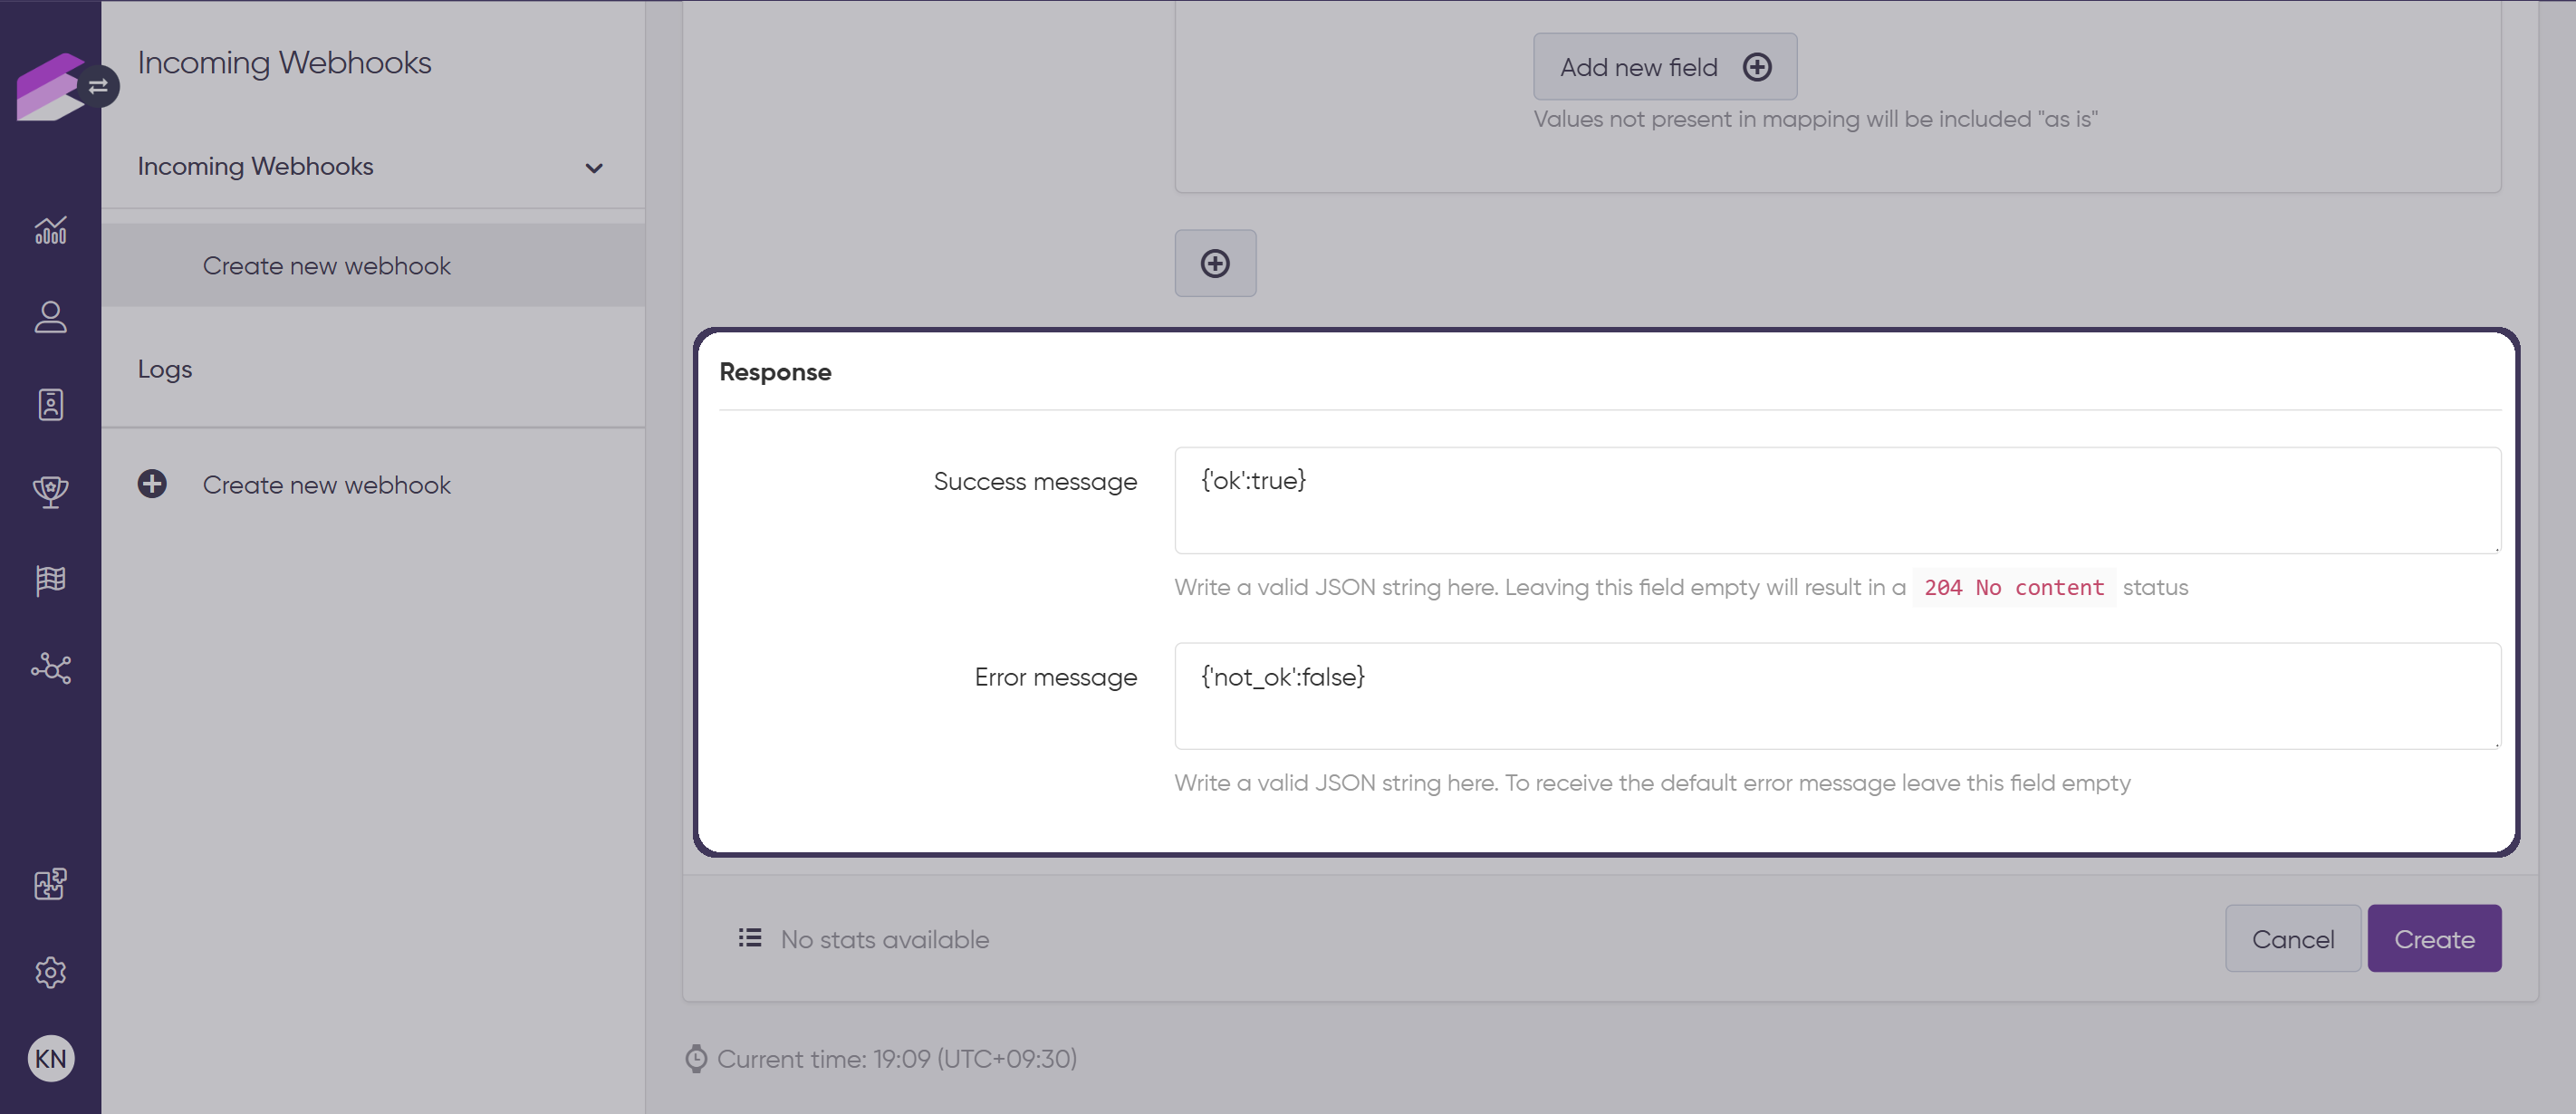
Click Create at the bottom of the page
Activating an incoming webhook
After the initial save, the webhook is created as inactive, meaning the messages will not be operational and will only appear in the list of incoming webhooks in the Management UI. You can activate the webhook immediately by clicking the Set active button on the upper right-hand side of the setup page. Confirm the activation in the dialog that subsequently appears.
Managing incoming webhooks
Edit a webhook
Navigate to the Incoming webhooks page
Click the Edit button of the webhook that you would like to update
Edit your webhook settings
Save your changes by clicking Save
Deactivate a webhook
Navigate to the Incoming webhooks page
Click the Edit button of the webhook that you would like to update
Click Set inactive at the top right corner of the page
Confirm your choice in the dialog that subsequently appears
Inactive webhooks will not be returned by the Display API.
Archive a webhook
You have the option to delete inactive webhooks from the Management UI by archiving them.
Navigate to the Incoming webhooks page
Click the Edit button of the webhook that you would like to update
Click the Archive button located in the upper right-hand side of the page
Confirm your choice in the dialog that appears
Archiving is irreversible. Once a webhook is archived, it cannot be restored anymore.
Use cases
This section provides examples of setting up the point_add, point_sub, checkout_accept,checkout_accept_item events, along with a use case for labeling customers upon loyalty program registration.
Point add
Configuration
Request
Name: Point add
Method:
POSTEndpoint: endpoint1
Action: Point add
Filters:
body.pointaddexists
Mapping
From:
clientIDTo:customerFrom:
reasonTo:data.reasonFrom:
pointstobeaddedTo:data.points
Response
Success message:
{'ok':true}Error message:
{'notok':false}
Activation
Click the Set Active button in the upper right corner
Webhook message
Send the below POST request to the URL
https://api.antavo.com/beta/webhooks/custom/{account_id}/endpoint1
{
	"customer_ID": "ID of your customer",
	"pointstobeadded": "the number of points you wish to add",
	"reason": "reason for adding the points"
}
Point subtraction
Configuration
Request
Name: Point sub
Method:
POSTEndpoint: endpoint2
Action: Point sub
Filters:
body.pointsubis greater than 0
Mapping
From:
clientIDTo:customerFrom:
reasonTo:data.reasonFrom:
pointsubTo:data.points
Response
Success message:
{'ok':true}Error message:
{'notok':false}
Activation
Click the Set Active button in the upper right corner
Webhook message
Send the below POST request to the URL
https://api.antavo.com/beta/webhooks/custom/{account_id}/endpoint2
{
	"customer_ID": "ID of your customer",
	"pointsub": "the number of points you wish to subtract",
	"reason": "reason for adding the points",
}
Checkout accept
Configuration
Request
Name: Checkout accept
Method:
POSTEndpoint: endpoint3
Action: Checkout accept
Filters:
body.checkoutacceptexists
Mapping
From:
clientIDTo:customerFrom:
transaction_idTo:data.transaction_idFrom:
totalTo:data.total
Response
Success message:
{'ok':true}Error message:
{'notok':false}
Activation
Click the Set Active button in the upper right corner
Webhook message
Send the below POST request to the URL
https://api.antavo.com/beta/webhooks/custom/{account_id}/endpoint3
{
	"customer_ID": "ID of your customer",
	"transaction_id": "ID",
	"total": "total value of the transaction"
}
Checkout accept item
Configuration
Request
Name: Checkout accept item
Method:
POSTEndpoint: endpoint4
Action: Checkout accept item
Filters:
body.checkoutacceptitemexists
Mapping
From:
clientIDTo:customerFrom:
transaction_idTo:data.transaction_idFrom:
totalTo:data.totalFrom:
product_idTo:data.product_idFrom:
subtotalTo:data.subtotalFrom:
quantityTo:data.quantity
Response
Success message:
{'ok':true}Error message:
{'notok':false}
Activation
Click the Set Active button in the upper right corner
Webhook message
Send the below POST request to the URL
https://api.antavo.com/beta/webhooks/custom/{account_id}/endpoint4
{
	"customer_ID": "ID of your customer",
	"transaction_id": "ID",
	"total": "total value of the transaction",
	"product_id": "find this string under transaction details",
	"subtotal": "find this under transaction details",
	"quantity": "find this under transaction details"
}
Assigning labels to customers upon opt-in
Configuration
Request
Name: Optin labels
Method:
POSTEndpoint: optin_labels
Action: Opt in
Filters:
body.optin_labelsexists
Mapping
From:
customerIDTo:customerFrom:
optin_labelsTo:data.emailFrom:
first_nameTo:data.first_nameFrom:
last_nameTo:data.last_nameFrom:
labelsTo:data.labels
Response
Success message:
{'ok':true}Error message:
{'notok':false}
Activation
Click the Set Active button in the upper right corner
Webhook message
Send the below POST request to the URL
https://api.antavo.com/beta/webhooks/custom/{account_id}/optin_labels
{
    "customer_id": "Customer_with_webhooklabel",
    "optin_labels": "webhooklabel@antavo.com",
    "first_name": "Hooklabel",
    "last_name": "Webhook",
    "labels": [
        "Webhooklabel"
    ]
}
Logs
The logs are displayed under the Logs tab of the module with the following information:
Timestamp | Date of the webhook message trigger |
Request | POST |
Time | Processing time of the webhook message |
Status codes | Status code provided by the response |
Request | Detailed request |
Response | Detailed response |
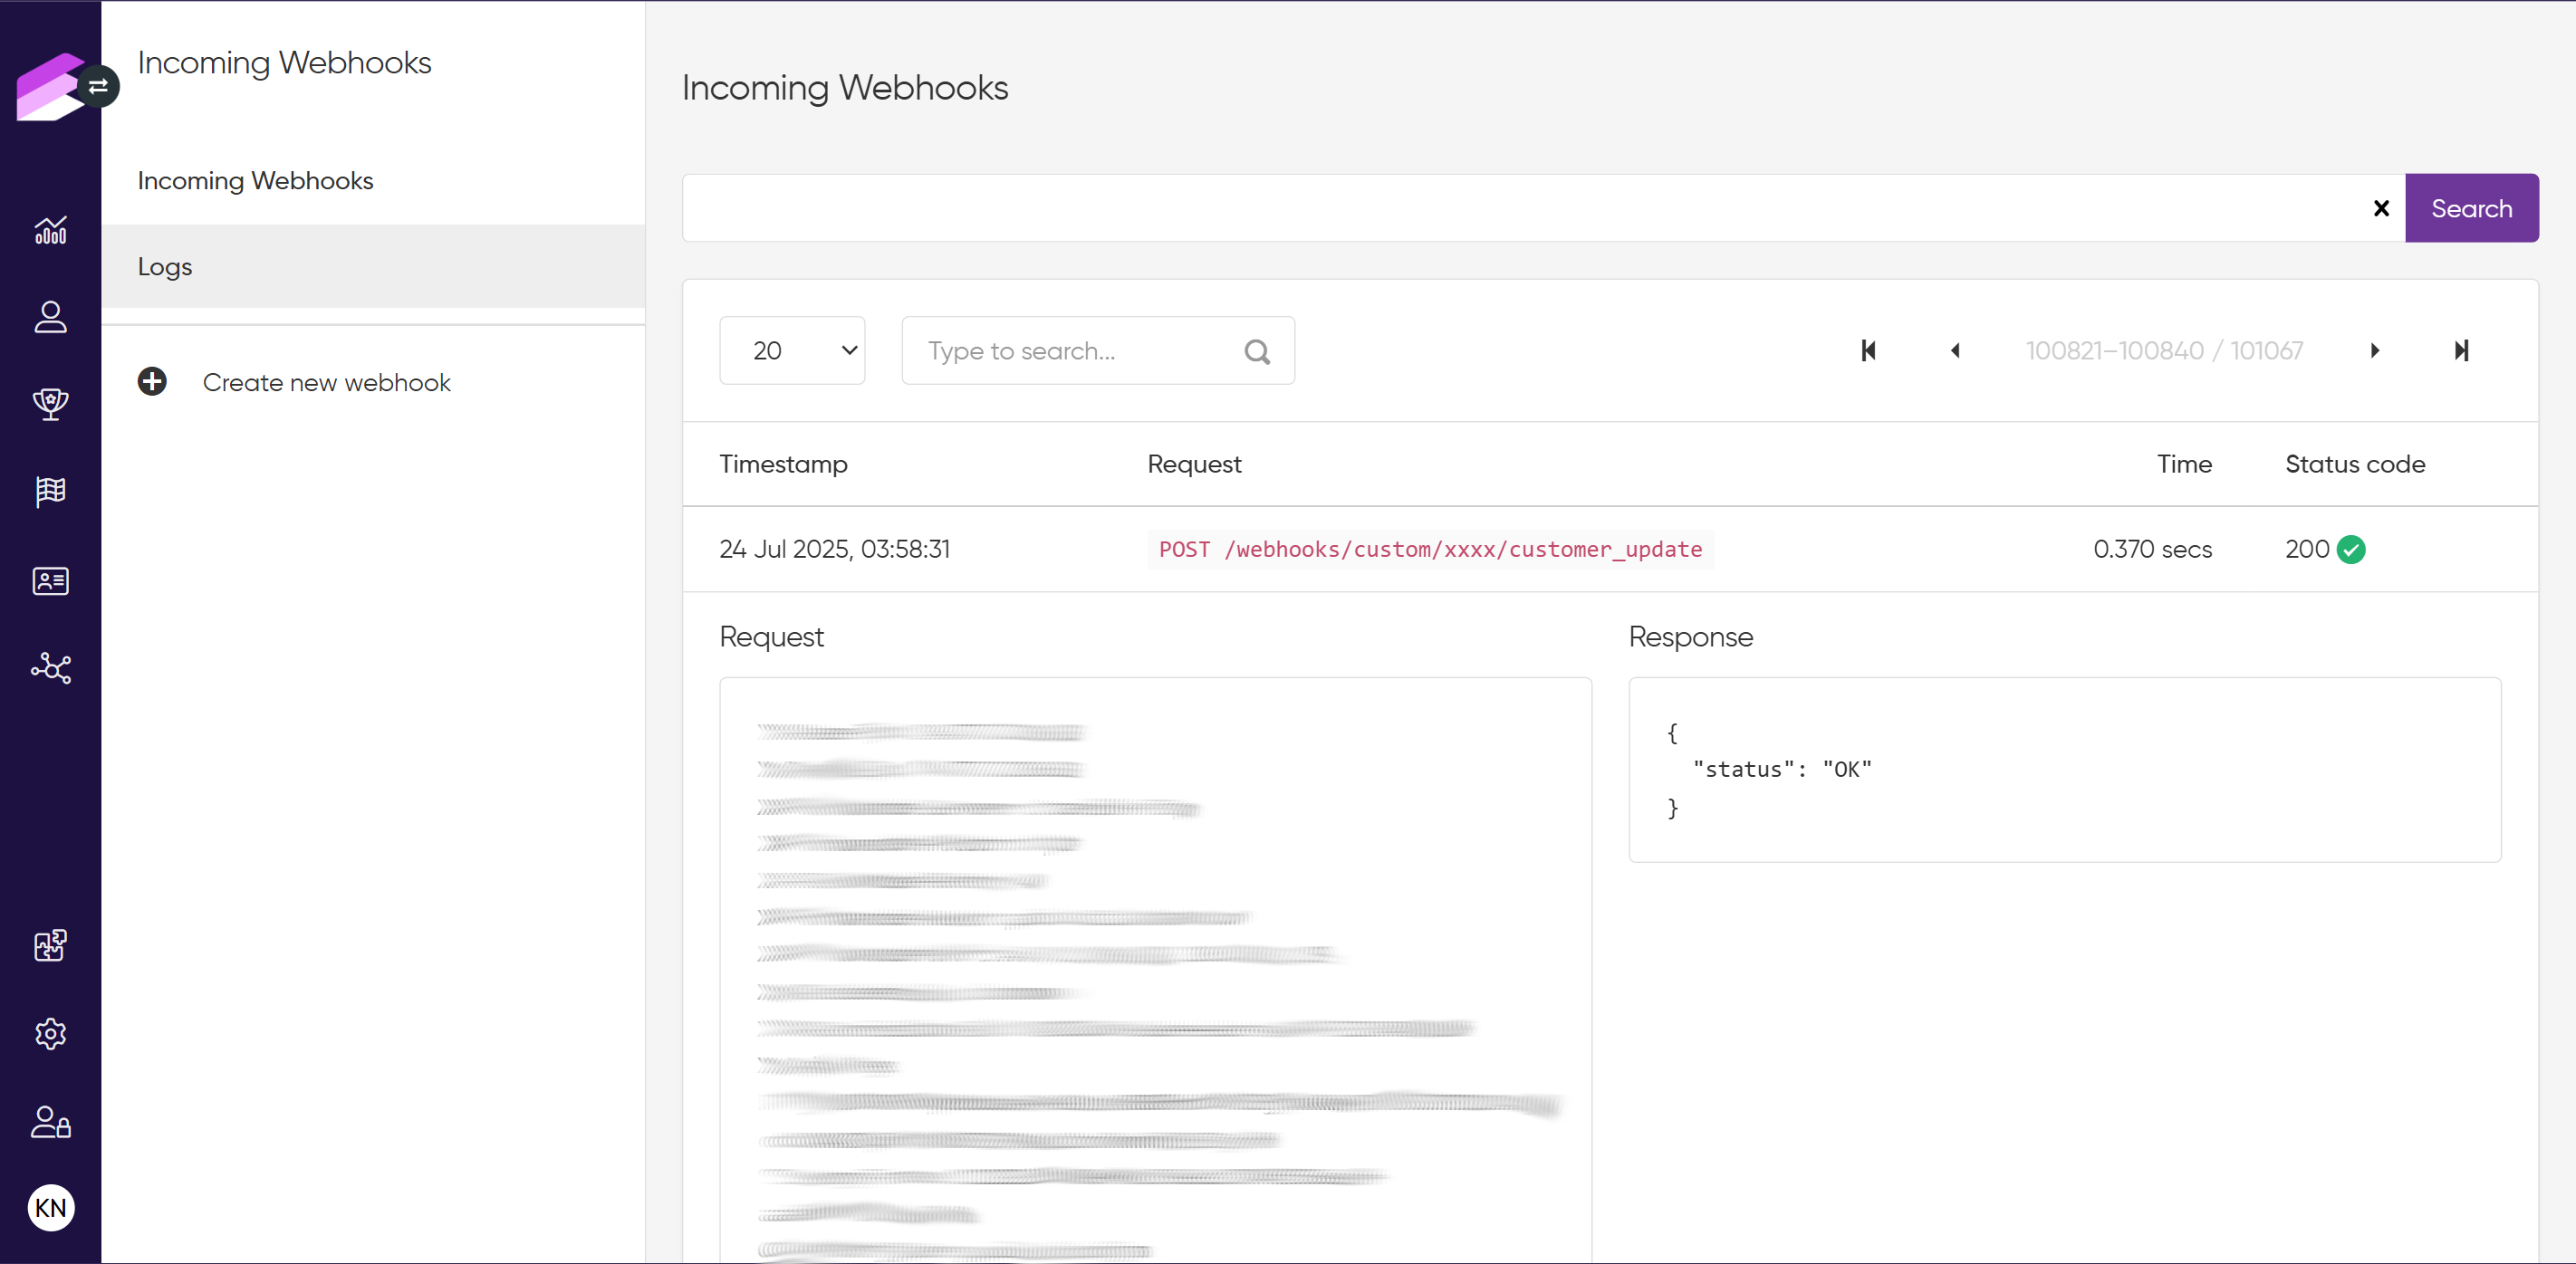
In addition, there is always a possibility to check the event log of the given customer under the Events tab in Customer insights.
