This document outlines the process of connecting Antavo Loyalty Cloud with Salesforce Marketing Cloud (SFMC) and configuring common marketing journeys between the two platforms. The document is structured into three sections:
Connection Setup: This section details the necessary tasks to connect Antavo with Salesforce Marketing Cloud.
Data Synchronization Setup: The second section explains how to establish data synchronization between Antavo and SFMC.
Common use cases: The final section explores three typical scenarios that can be implemented using Antavo and SFMC.
This integration supports one-way synchronization, meaning data can only be sent from Antavo to Salesforce Marketing Cloud, and not the other way around.
Configuring the connection between Salesforce Marketing Cloud and Antavo
Steps to complete in the Salesforce platform
The initial step involves configuring your server-to-server Antavo integration within SFMC. This step is crucial for initiating the synchronization of loyalty data and leveraging this data to create loyalty-focused marketing email communication.
Navigate to the Setup page
Open the Installed Packages page from the sidebar and click New
Add a name to the package, add a description, and then click Save
Click the Add Component button
Select the API integration component type and click Next
Choose the Server-to-server integration type and proceed by clicking Next
Add Journeys and Data Extensions to the Scope, then click Save
With the package registered, you now have all the credentials and settings required to connect the SFMC package to the Antavo Loyalty Cloud.
Steps to complete in the Antavo platform
Once the Salesforce Marketing Cloud integration is enabled in the Management UI, the Salesforce account can be connected.
Navigate to the Modules page and open the Salesforce Marketing Cloud module
Add the components of the SFMC package and click the Connect button
Define the parent folder as Data Extensions and click Install
Setting up Loyalty Data Synchronization
Once your Salesforce account and Antavo workspace are connected, you can find the Integration settings page by opening the Salesforce Marketing Cloud integration in the Management UI. This is where you can add the loyalty events that will trigger loyalty data synchronization into Salesforce data extensions.
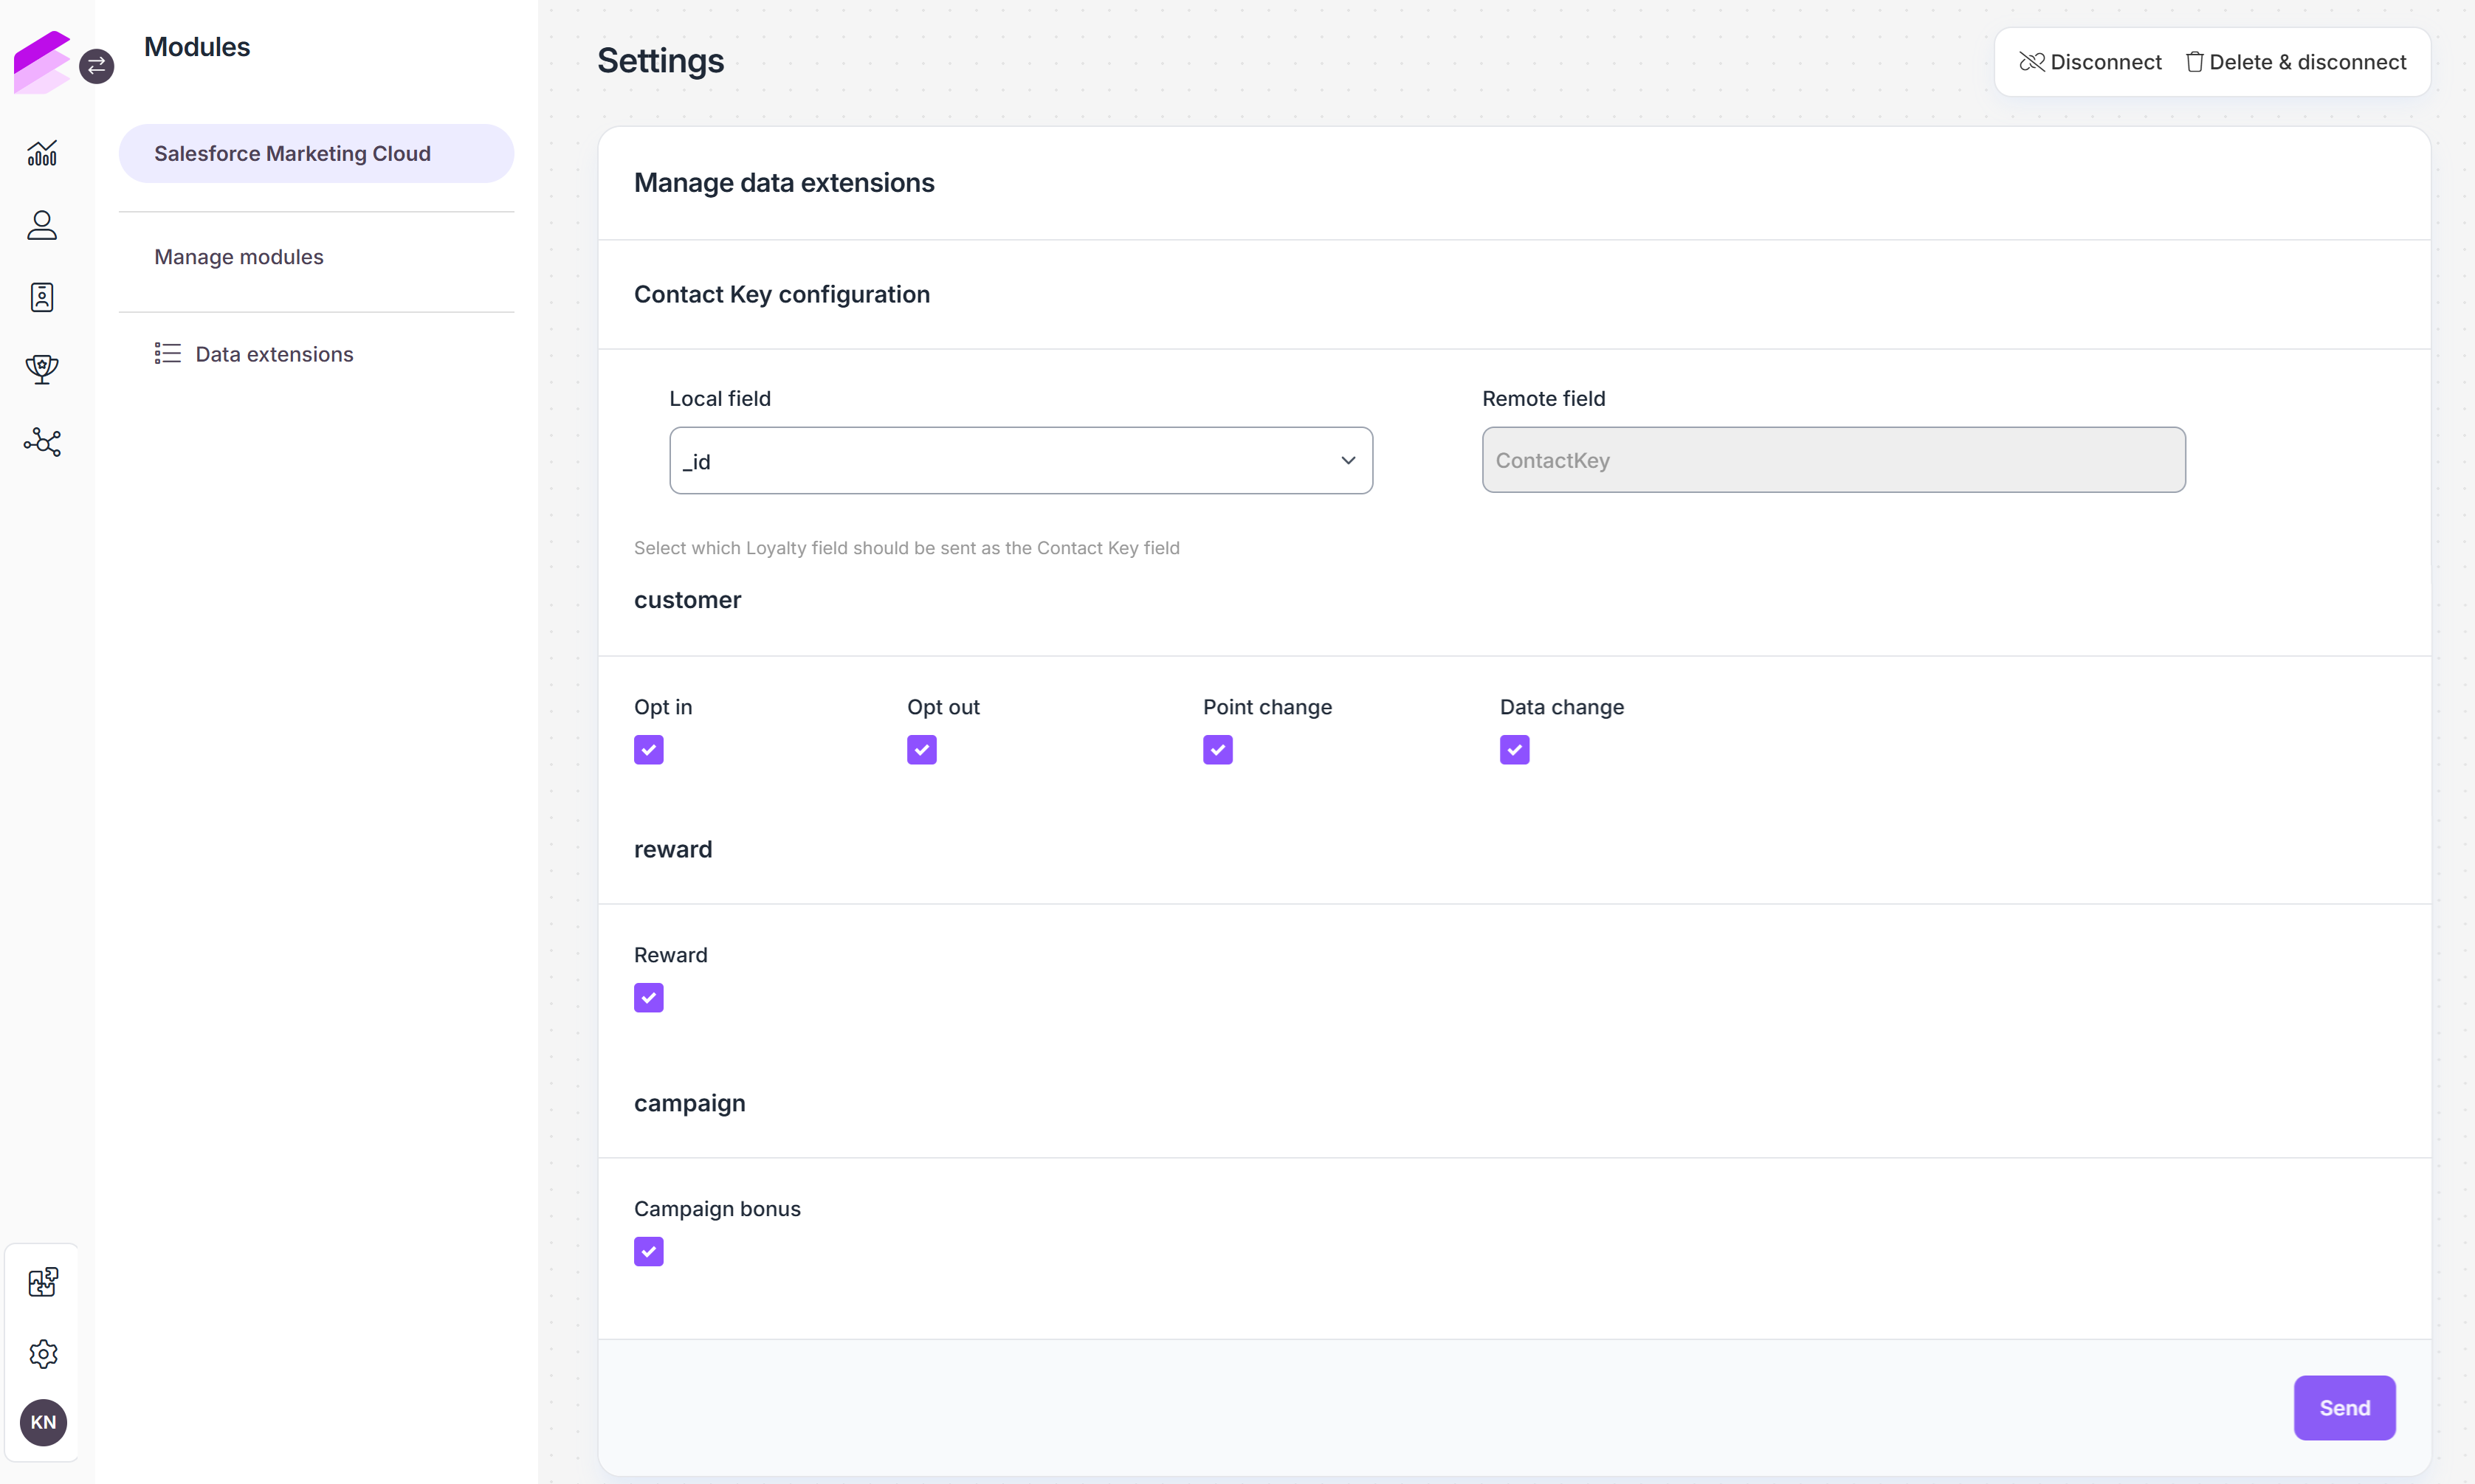
To turn on synchronization, select the Antavo events you want to use in Salesforce Marketing Cloud and click the Save button.
Contact Key Configuration
The integration settings allow you to configure which loyalty field is used as the SFMC ContactKey in triggered messages. This ensures that customer identities remain aligned between Antavo and Salesforce Marketing Cloud.
Local field
Select the Antavo customer attribute to send as the ContactKey. Only attributes tagged with the unique or external_id are available.Remote field
Read-only, pre-filled with ContactKey, representing the field name expected by Salesforce Marketing Cloud.
Customer data extension
Opt in: A customer registers for the loyalty program.
Opt out: A customer leaves the loyalty program.
Point change: A change in a customer’s point balance.
Data change: A change in a customer’s personal data.
The selected events trigger the synchronization of the following customer data:
First name
Last name
Email address
Gender
Date of birth
Age
Language
Currency
Score
Spent points
Spendable points
Pending points
Reserved points
Last login date
Opt-in date
Phone number
Mobile phone number
Opt-out date
The example in the picture shows the data structure that is synchronized when a customer registers into the loyalty program.

Reward data extension
The only event you can sync into the reward data extension is the Reward event, which is registered when customers claim rewards by spending their points in the loyalty program. The event triggers the synchronization of the following data:
Customer ID
Customer name
Name of the reward
URL of the reward image
The ID of the reward
Description of the reward
Terms and Conditions associated with the reward
Reward redemption instructions
Reward type
Date of claim
The point value of the reward
Coupon value
Coupon type
The expiration date of the coupon
Minimum basket value required to use the coupon
Download link for a downloadable reward
The example in the picture shows the data structure that is synchronized when a customer claims a reward in the loyalty program.
.png "sfmc(1).png")
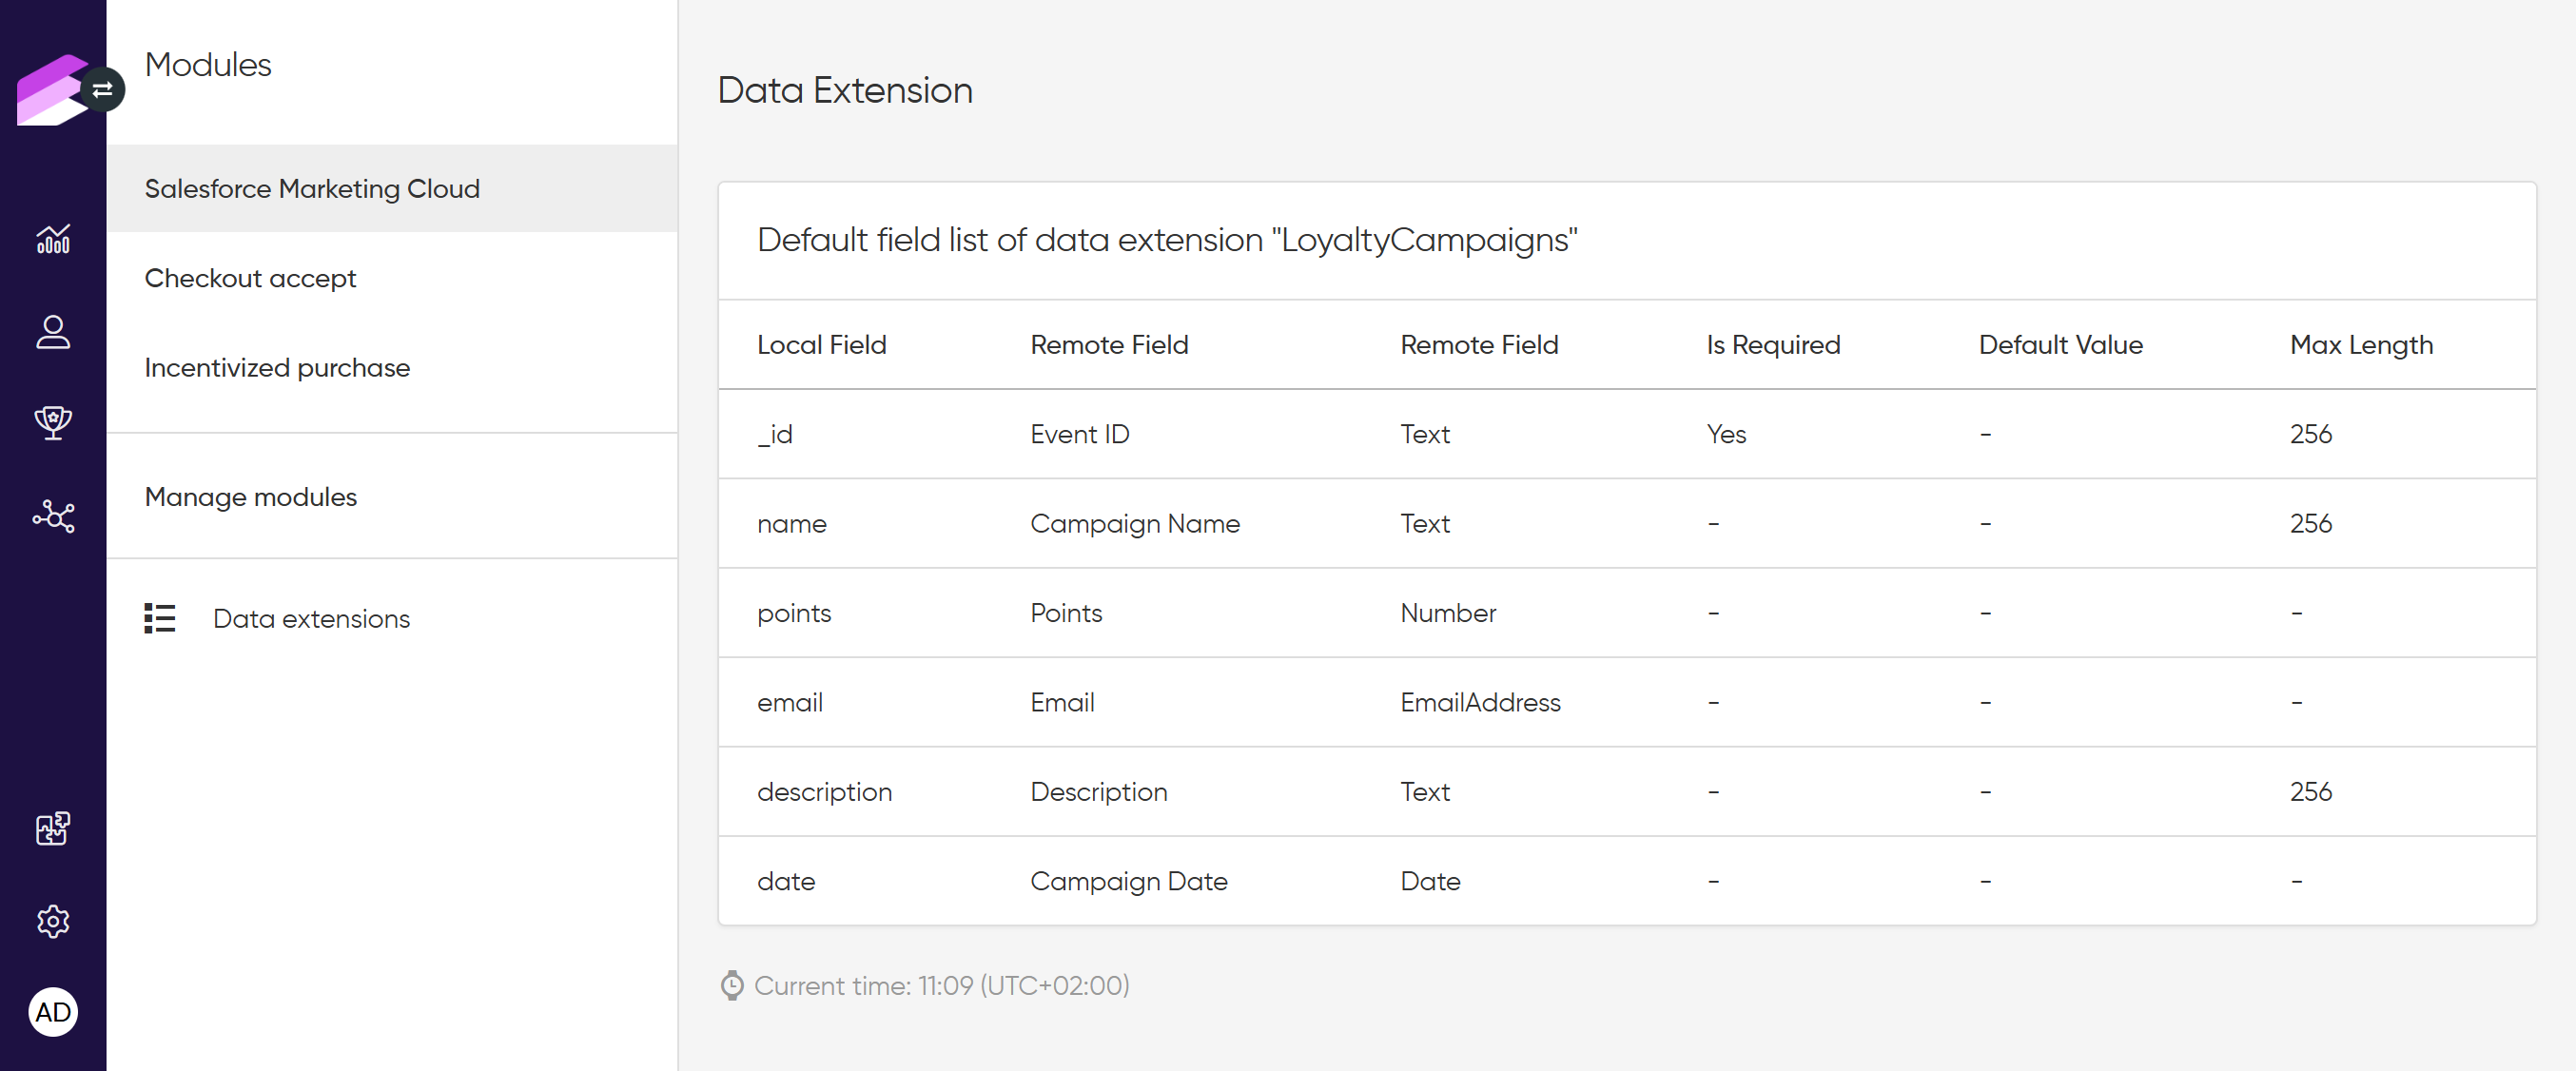
Campaign data extension
The Campaign bonus event gets synced when a customer earns bonus points for participating in a loyalty campaign set up with Antavo’s Workflow editor. The campaign bonus event triggers the synchronization of the following data to the Campaign data extension:
Name of the campaign
Number of bonus points added to the customer’s point balance
Description of the campaign
Date of the campaign
The example in the picture shows the data structure that is synchronized when a customer earns bonus points in the loyalty program.

Viewing Data Extensions
In the Antavo Management UI, under Salesforce Marketing Cloud → Data extensions, you can view the list of data extensions that are part of the integration.
Clicking View next to a data extension shows the fields that are synchronized by default. The list includes both the Local Field (Antavo) and the Remote Field (Salesforce Marketing Cloud), along with details such as field type, whether the field is required, default value, and maximum length.
These default mappings cannot be edited. The view is read-only and serves as a reference for which data is synchronized automatically.
Customizing data extensions with additional attributes
In addition to the default data attributes listed above, you can extend each data extension with custom attributes. This allows you to store and synchronize extra information as needed for your loyalty program.
To add a custom attribute:
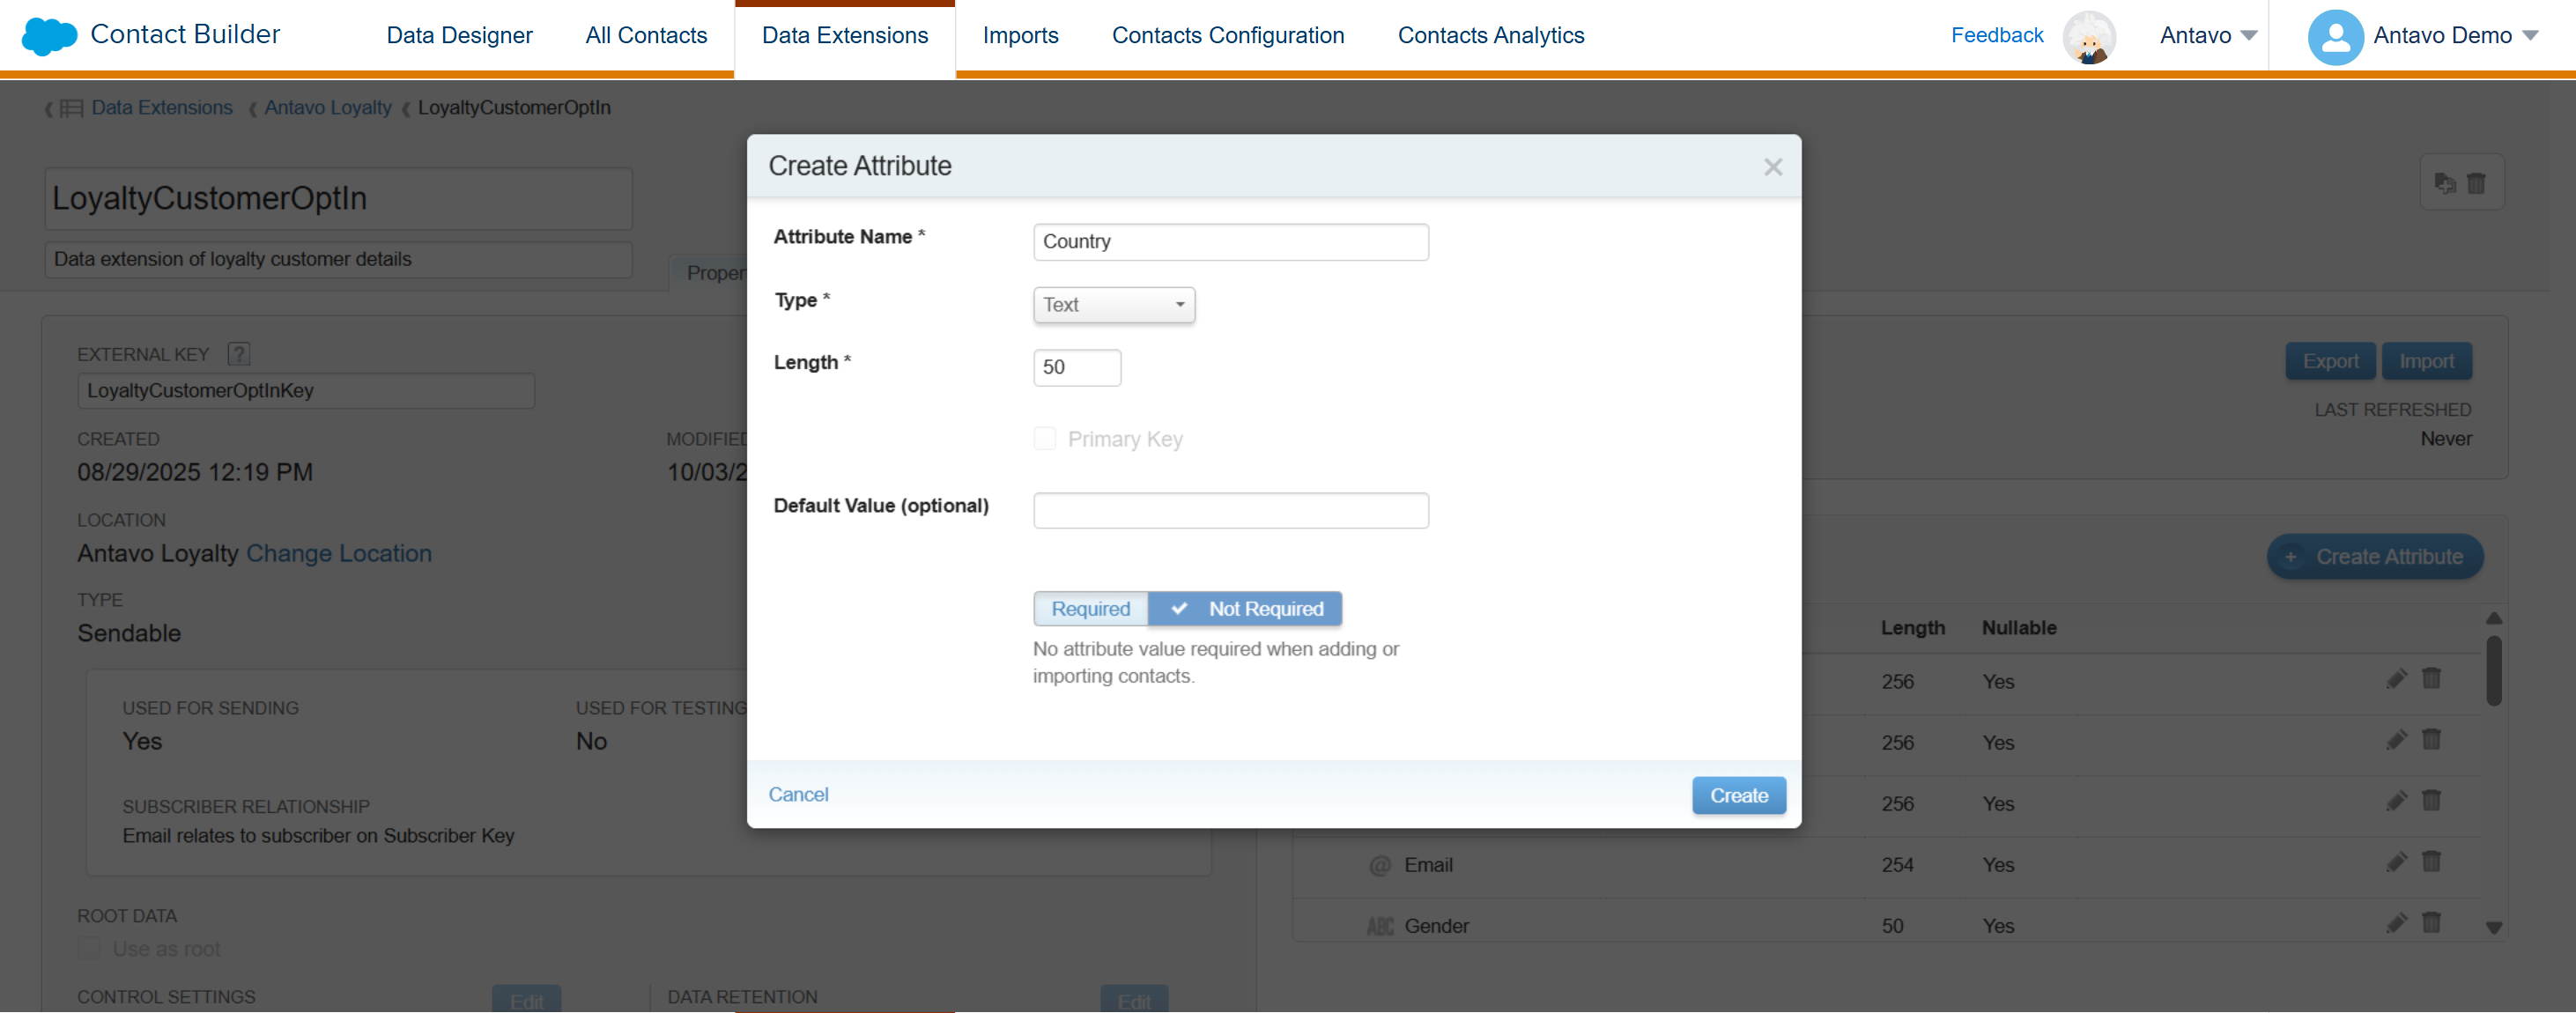
Create a new attribute in Salesforce Marketing Cloud
Open the corresponding data extension in SFMC.
Click the Create Attribute button in the Attributes section.
Fill in the attribute details:
Attribute Name: The name of the new attribute.
Type: Select the data type.
Length: Define the maximum character length.
Default Value (optional): A pre-filled value if no data is provided.
Required / Not Required: Choose whether the attribute is mandatory.
Click Create
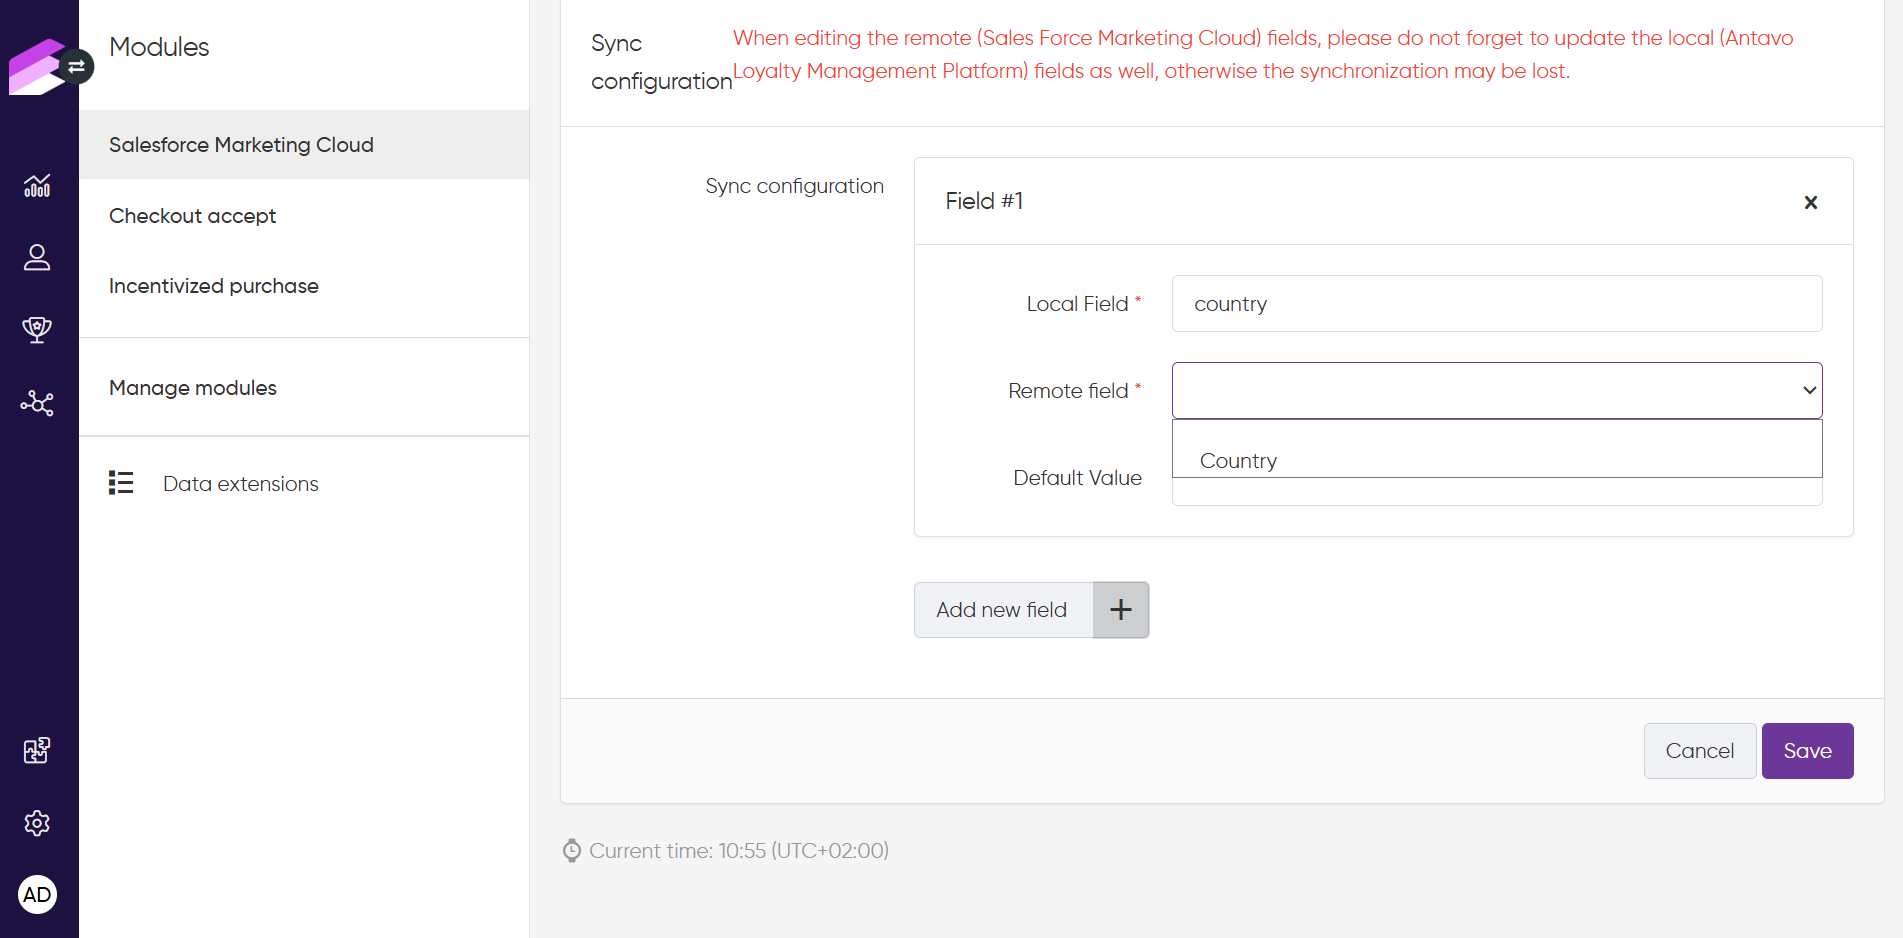
Add the Local Field – Remote Field mapping in Antavo
Open the Salesforce Marketing Cloud integration in the Antavo Management UI.
Navigate to the Data extensions tab and click Edit.
Click + Add new field
In the Local Field, select the matching Antavo attribute.
In the Remote Field, choose the field you previously created in Salesforce Marketing Cloud.
The dropdown automatically lists all available attributes from the selected data extension in SFMC.
Set a Default Value if no data is provided (optional).
Click Save
Use Cases: Loyalty Program-driven Salesforce Journeys
Loyalty program welcome email
The first use case explains how to greet newly registered members in your loyalty program by leveraging the opt-in event sync. Here’s how you can define a Salesforce Journey to send a welcome email when a customer joins the loyalty program:
Open the Salesforce Journey Builder and Create a new journey from Scratch
Add an API event entry source and select the antavo/customer/opt-in event
Add an Email message activity, configure the welcome email, and click Done
Click Save, then Activate the journey
Birthday coupon reward notification
With Antavo’s Salesforce integration, you can leverage customer data to create meaningful touchpoints, providing excellent opportunities to engage with them and foster a strong connection. A prime example is surprising customers with a special reward on their birthdays. Recognizing them on such occasions demonstrates care and helps maintaining high engagement levels. Below you can find the steps to set up a birthday email campaign:
Create a birthday coupon reward
First, access the Rewards module in Antavo to configure the coupon reward. Refer to our article on creating new rewards for guidance. When setting up the reward, make sure to set the point price to 0. This ensures that customers receive the coupon as a complimentary gift.
Use Antavo’s Workflow editor to reward your customers with a 10% off coupon on their birthdays
Open Antavo’s Workflow editor and select Create new workflow
Name the workflow at the top of the canvas
Add an On a date trigger to the canvas
Set the recurrence of the trigger to Monthly so that the workflow runs every month.
Select the first day of the month for issuing the coupon
Choose the time of the day for issuing the coupon
Click Update
Add a Customer attribute filter to the canvas and connect it to the On a date trigger
Select Birth date as the Attribute name
Add the in date operator
Set the value to this month
Click Update
Add a Reward claim action to the canvas and connect it to the Customer attribute filter
Select the Reward that should be assigned to the customer
Click Update
Change the Status to active and click on the disc icon to save the workflow
Define a Salesforce Journey to trigger the birthday email with the coupon code included
Open the Salesforce Journey Builder and select Create Journey from Scratch
Add an API Event entry source and select the antavo/reward/claim event
Click the Edit button next to the Filter Contacts option
Select the Reward Name attribute from the list, use the name of the Antavo reward as the filter value, and click Done
Add an Email activity to the canvas, configure the birthday email with the coupon code, and click Done
Click Save and then Activate the journey
Campaign bonus notification
By introducing point multiplier campaigns in your loyalty program, you can encourage customers to take action and make purchases immediately. The excitement generated by a bonus point event can draw your customers’ attention to specific product categories, new collections, or even new store locations. This use case demonstrates how you can promote awareness of new stores and attract customers by informing them that they can earn double points by purchasing in that specific store.
Use Antavo’s Workflow editor to reward purchases with a double-point bonus
Open the Workflow editor of Antavo and click Create new campaign
Name the campaign workflow at the top of the canvas
Add an Event trigger to the canvas
Select Checkout as the Event type
Set the Start date of your campaign
Set the End date of your campaign
Click Update
Add an Event attribute filter to the canvas and connect it to the action (lower) branch of the Event trigger
Select Store as the Attribute name
Set the Operator to equals with
Enter the store identifier under Value
Click Update
Add a Campaign bonus action to the canvas and connect it to the success (green) branch of the Event attribute filter
Set Points to
{event.points}Fill in the Description field to explain why bonus points were added to the customer’s balance.
Click Update
Change the Status to active and click on the disc icon to save the campaign
Define a Salesforce Journey to trigger a bonus point email with the number of bonus points earned
Open the Salesforce Journey Builder and select Create Journey from Scratch
Add an API event entry source, then select the antavo/campaign/bonus event
Click the Edit button next to the Filter Contacts option
Select the Campaign Name attribute from the list, use the name of the Antavo campaign as the filter value, and click Done
Add an Email activity to the canvas, configure the bonus point email, and click Done
Click Save and then Activate the journey
Disconnecting Salesforce Marketing Cloud from Antavo
If you decide to disconnect SFMC from Antavo, navigate to the Modules page and open the Salesforce Marketing Cloud module. In the upper right corner of the page, you’ll be provided with 2 options:
Disconnect: This option will discontinue the integration between SFMC and Antavo immediately.
Delete & disconnect: This option will discontinue the integration between SFMC and Antavo immediately and permanently delete all the data previously sent by Antavo to SFMC.
When clicking any of these buttons, you need to confirm your action in a dialog that subsequently appears.
Please note that both the Disconnect and Delete & disconnect options are irreversible.