The Rewards module enhances your loyalty program by offering various benefits beyond monetary discounts, introducing experiential and gamification elements.
Using the reward endpoints of the Display API, you can showcase your reward offerings on the membership site, allowing customers to redeem their loyalty points for rewards.
To access the module configuration page, search for Rewards under the Modules menu. The page will display a list of rewards with the following information:
Name | Name of the reward. A label below the unique ID indicates if the reward is active or inactive. |
Type | The type of the reward |
Price | The point price of the reward |

Setting up a new reward
To access and display the configured information on the membership site through the Display API and/or the Entities API, your developers need to implement the necessary calls.
Click the Create new reward option in the module sidebar
Select the type of reward you want to add
Bidding: Allow customers to compete for a reward by outbidding each other.
Bundle reward: Assign multiple coupons at the same time when the customer claims a bundled reward.
Coupon: Assign discount codes that customers can use at checkout.
Content & custom reward: Create custom rewards with the ability to embed HTML in the configuration fields.
Gift card: Assign a prepaid voucher that can be used multiple times until the entire monetary value is spent.
Downloadable item: Reward customers with digital downloadable items like ebooks, sound effects, or wallpapers.
Dynamic coupon: Assign a coupon with a value that depends on the number of points the customer spends to claim the reward
Dynamic reward: Let customers claim rewards of dynamic values without a coupon being assigned.
Physical items: Award gifts from your inventory or branded goods. Note that Antavo does not handle the delivery of physical rewards.
Virtual badge: Introduce fun badges that can help customers feel like a part of your community.
Click Next at the bottom of the page to proceed with the next steps

Common settings of all reward types
In the first three sections, you can define all the required information and the method of reward redemption.
Basic information
Name the reward
Write a description
Add redeem instructions
Add instructions explaining how customers can redeem the reward.Add Terms and Conditions
Specify any terms and conditions associated with claiming and redeeming the reward. We recommend consulting your legal team to ensure compliance with the local regulations.Label the reward claim button
Upload a reward image
Upload a gallery
Upload multiple pictures showcasing the rewards.Select a reward category
Reward categories serve informative purposes in the Management UI.

Analytics
In this section, you can administer the cost of the reward to your business. The currency of the cost value is your default currency that was set during the implementation phase. If you wish to change the default currency, please contact the Antavo Service Desk.
The Reward cost field serves an informative purpose only. This means that it provides insight into the cost of the reward to your business, but it does not directly affect any operations within the loyalty program.

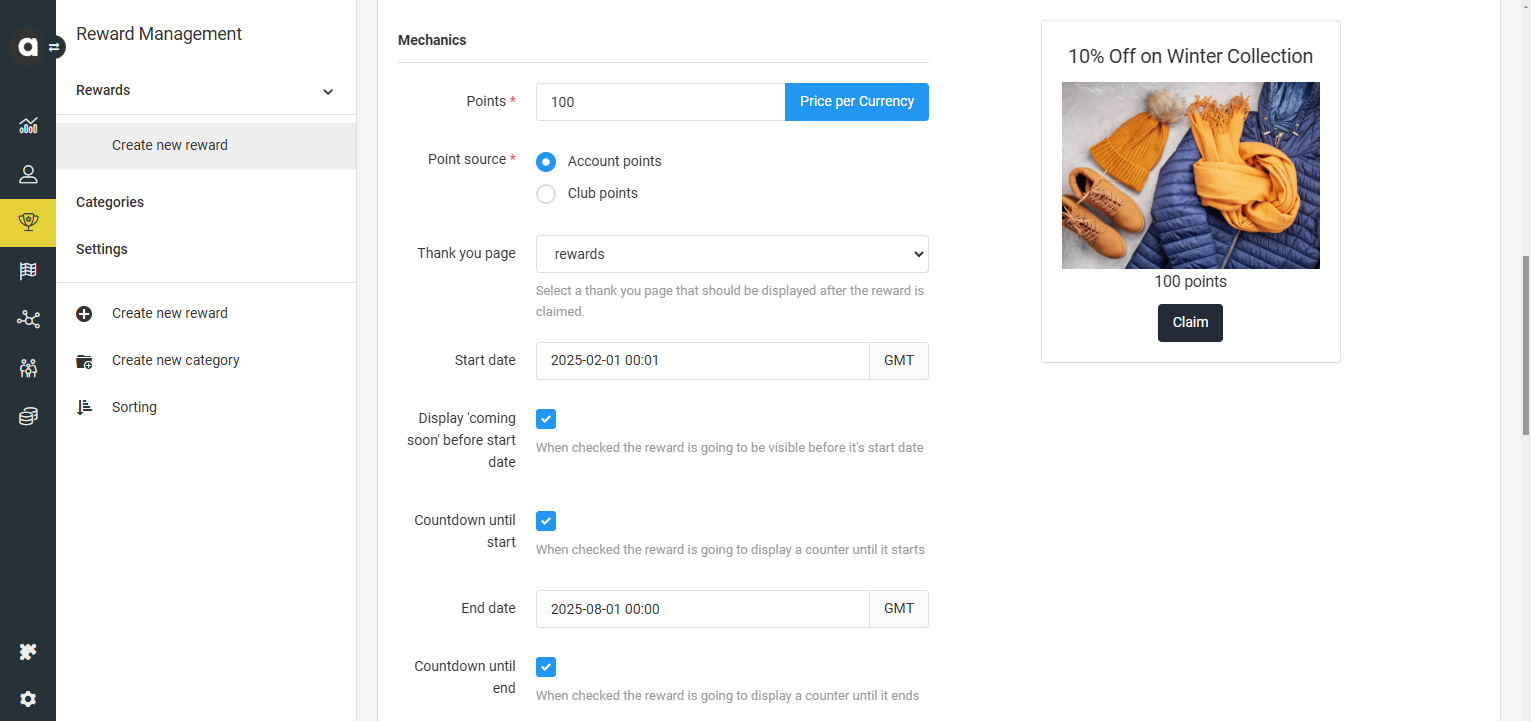
Mechanics
General settings
Set the point price
Specify the number of loyalty points required to claim the reward.
If the deprecated Multicurrency module was enabled in your workspace, you can set different point prices for each currency by clicking the Price per currency button.Select the source of the points that will be used when claiming the reward - only available if the Clubs module is enabled
Account points: If you select this option, the reward can only be claimed using the customer’s account points.
Club points: If you select this option, the reward can only be claimed using club points.
Set a custom Thank you page - applicable to Antavo-built membership sites only
If you have a previously created custom Thank you page, you can select it from the dropdown list provided.Set the start date and the end date
Specify the start and end dates during which customers can claim the reward.Decide if you want to display the reward on the membership site
If the Display ‘coming soon' before start date option is enabled, the Display API will include the reward with scheduled status before the start date.Enable the countdown until the start date and the end date
The countdown is only available if the Antavo-built iframe membership site solution is implemented on your website.
Restrictions
Restrict the reward to segments
Use the dropdown list to select the customer segment and lists for which the reward will be available. You can add multiple segments. This configuration field works with a logical or operator, which means that the reward is accessible to the members of any of the selected segment(s) and list(s).Display the reward only for the selected segments
Tick the box if you want to hide the reward from customers who are not in the selected segments. If not hidden, the Display API that lists the available rewards for each customer will include the reward with restricted status to customers outside of the selected segment(s) with the default restriction message.
Hide the reward from the list of claimable rewards You can create hidden rewards that are not visible to customers through the list of claimable rewards. These rewards can be assigned with the Reward claim action in a workflow as a surprise gift.
Manage stock and claim limits - not applicable to Bidding and Downloadable types of rewards
Turn on the Stock radio button and enter the number of items available if there’s a limited quantity of reward. When the reward runs out of stock, Display API will include the reward with restricted status.
Turn on the Limit radio button to define how many times one customer can claim the reward. When the customer reaches the claim limit, the Display API will include the reward with completed status.
Set a claim repeat interval to specify how often a customer can claim the reward. The interval should be set in the following format: ({number}minute(s)|hour(s)|day(s)|month(s)|year(s)). If a customer has claimed the reward within this interval, the Display API will include the reward with completed status.

Reward transfer
Enable reward transfer
Activate this option to allow individual customers to send their rewards to family members or friends via email or by using the customer ID. If the email address or ID does not exist in Antavo, the system will automatically create a new ghost customer account and assign the reward to this new account.Transfer limit
Specify how many times the reward can be shared. Add 0 to disable the transfer limit. Only the primary assignee can share the reward.Transfer points
Set the number of points to add to the customer who transfers this reward.Transfer coupon expiration
Only applicable to coupon-type rewards. Read more under the Transfer coupon expiration section.
![]()
Restriction messages
To inform customers why they cannot claim the reward and provide restriction messages, follow these steps:
Enter the default message
Input a default message that will be displayed when a customer cannot claim the reward for any reason.Add conditional messages
Select one of the restricting conditions (start date, end date, segment, stock, limit, repeat interval)
Click the + button.
Enter the restriction message
These restriction messages will be included in the error response provided by the Events API when the reward claim fails. If a specific conditional message for the current restricted situation is not configured, the default message will be returned.

Notifications
Enable notifications
Tick the box if you want to send a reward claim notification to customers. This feature requires configuration on Antavo’s side, please contact the Antavo Service Desk for further information.Email notification to the workspace owner
Tick the box if you want to send a notification to the workspace owner about the claim. The workspace owner is set on Antavo’s side. If you’d like to replace the workspace owner, please contact the Antavo Service Desk.

Custom fields
Webhook data
If you use the Webhooks module and have enabled the Reward action in the settings, you can include custom data forwarded within the webhook message. Click the Add new field button to add data fields. Define the name and the value of the data field to be included in the webhook message.
Stores
If you use the Stores module, you can restrict the reward redemption of claimed rewards to specific stores in the Stores field. Ensure you add the Reward item to the list of models and define the fieldset so that the configuration field can be found on the reward editor interface.
Antavo provides the list of stores where the reward has been enabled through the API, allowing you to apply the necessary restrictions and implement validation steps in your systems.

User Groups
If you use the User group module and have enabled the Reward entity in the settings, you must assign a group to the reward. Unauthorized users won’t be able to access the reward in the Management UI and the corresponding reward statistics.
Points economy
If your workspace uses Multi-accounts, select the account from which the spent points should be deducted. The account selector will not be available if Club points are selected as the point source for claiming the reward.

Specific settings of reward types
Certain types of rewards may have type-specific settings in the last section of the reward editor.
Bidding rewards
Set the bid step
This amount will raise the minimum bid value with every bid.Reserve customer points on bid
Tick the box if you want only the highest-bidding customer’s points to be deducted. Otherwise, all bid points will be deducted from customers’ point balances immediately after they bid.

Coupon rewards
Coupon specific settings
The source of a coupon-type reward is a coupon pool previously configured under the Coupons module, which is enabled in the Management UI by default. After you create the coupon pool under Coupons, you can select it from the Coupon pool dropdown field on the Reward editor interface. Once the coupon pool has been selected, the help text under the field displays information about the source, type, and amount settings, as well as the number of coupon code combinations available.
Note: Remote coupon pools are not supported for Rewards. Only uploaded, generated, and bulk generated coupon pools can be used as the source of a coupon-type reward.

In case the default Coupons module is not enabled in your workspace, you need to define the below coupon settings
Select the coupon source
You have four options when defining the source of the coupon code.Upload: Choose the upload option to upload a set of coupons to distribute. You can learn more about uploading coupon codes in the Coupons article.
When 90% of the coupons have been claimed, our system sends a notification to admin users that the coupons are running low.Generate: If you want Antavo to generate codes, define the coupon pattern using placeholder characters:
#for a digit (0-9)@for an alphabet character (a-z)^for a capital alphabet character (A-Z)*for an alphanumeric character$for a capital alphanumeric characterAll other characters should be added as literals (e.g., if you set '@##COUPON’, a generated coupon code could be G11COUPON or T35COUPON).
If you would like to assign a generic coupon code to all customers, don’t use pattern characters, only literals (e.g., if you set SPRINGCOUPON, all coupons codes to each customer claiming the reward will be generated as SPRINGCOUPON)
Remote: If you prefer to manage coupon distribution on your end, you can set a callback URL endpoint to provide Antavo with the coupon codes to assign. If you need us to serve your endpoint with the pattern, you can define it here.
Set a minimum basket value restriction
Set a coupon expiration time
Period: The coupon expiration date will be dynamically set when the coupon reward is claimed and assigned to the customer (e.g., 1 week, 2 months, etc.)
Specific date: The expiration date is a predefined date (e.g., 2024-08-31 23:57). Please note that the date and time must be provided in UTC, as the expiration will take effect based on this timezone, not the workspace timezone.
Set coupon type and value
Decide whether you offer a percentage-off coupon or a fixed-amount discount and specify the value. You can add fraction values (e.g., $0.99). Please note that this information only serves administrative purposes in the Management UI.Enable aggregated coupons
Allow customers to claim and use the same coupon code multiple times. If aggregation is active, the customer’s reward claims will not create multiple coupons but increase the number of times the customer can use the same coupon..png "coupon-settings (1).png")
Please keep in mind that Antavo doesn’t handle coupon validation at checkout. We provide all the information about restrictions and the value of the coupon through the Display API endpoint, but you need to take care of checking the eligibility and reducing the total value of the basket when the customer redeems the coupon code.
Transfer coupon expirations
If your coupon reward has been set as transferable (under Mechanics), you can choose from the following options under the Mechanics section to set the expiration date of the transferred coupon.
Note: The time you set here will be interpreted as UTC, not the workspace timezone.
Remain: The expiration date of the transferred coupon will remain the same as the originally assigned coupon.
Modify: Define the expiration time relative to the date of the transfer. The original expiration date of the assigned coupon will be overwritten with the new expiration date. For example, if the current date is 2023-02-01 and the expiration time is set to 1 month, then the new expiration date is 2023-03-01.
Extend: Extend the original expiration date of the assigned coupon with a specific amount of time
The original expiration date of the assigned coupon will be overwritten with the new expiration date. For example, if the current expiration date is 2023-12-31 and the expiration time is set to 6 months, then the new expiration date is 2024-06-31.
Bundle rewards
Select coupon pools from the dropdown list
Please note that Bundle rewards can only be used with Coupon pools. If the module is not enabled in the Management UI, please contact the Antavo Service Desk.
Dynamic and dynamic coupon rewards
Min price
Minimum points that can be spent on the reward/coupon.Max price
Maximum points that can be spent on the reward/coupon.Price step
The number of points between possible point prices.Exchange rate
The conversion rate of points to the coupon value.Select the coupon pool from the Source dropdown list - only applicable to Dynamic coupon rewards
Only Amount-type coupon pools can be selected. Please note that Dynamic coupon rewards can only be used with Coupon pools. If the module is not enabled in the Management UI, please contact the Antavo Service Desk.
Downloadable item
Use the Downloadable file field to upload the file you want to offer as a reward. The Display API returns the URL endpoint where the file is accessible.
Physical item
If you use the Product catalog module in the loyalty program, you’ll find a Product field at the bottom of the configuration page to select an item from your product inventory as a physical reward.
Use the dropdown menu to select the product. The search bar assists you in finding the item by name or product ID.

Virtual badge
Upload the badge image you want to offer as a reward. The Display API will return the URL endpoint where the file is accessible.
Saving and activating a reward
Once you’ve entered all the required information for the reward, save your settings by clicking the Save button at the bottom of the setup page. Initially, the reward will be saved as inactive, meaning it won’t be available for customers to claim and will only appear in the list of rewards. After saving your new reward, you can activate it immediately by clicking Set active on the upper right-hand side of the reward setup page. Confirm the activation in the dialog that subsequently appears.

In the case of Coupon type rewards, please remember to upload coupons using the Upload option under the Coupons tab or inside the Coupons module interface before activating the reward.
If you prefer not to activate the reward immediately after saving, you can always find the activation button on the reward editor page.
Translate text
In case you use the Multilanguage module in your loyalty program, the Translate buttons are available on the reward editor interface to translate all texts to each language enabled. If you don’t specify custom texts, the base text will be applied to all languages.
Assign pass template
Assuming that you have already created coupon pass templates under the Passes tab of the Wallet module, you can assign one of them to any of the coupon pools. By doing so, customers can redeem coupons in-store using the pass on their mobile devices.
Managing rewards
Edit a reward
Go to the Rewards tab
Click the Edit option under the hamburger button next to the reward
Change the settings as needed
If you are editing a coupon-type reward, the Updating coupons section allows you to maintain control of coupon changes when any reward setting is updated.
Update criteria
Do not update coupons: Only the coupons that are added from now on will inherit the new properties.
Update unassigned coupons: Coupons that have been already created but not yet assigned to a customer will inherit the new properties.
Update not yet redeemed coupons: Coupons that are assigned but not yet redeemed (used at checkout) will inherit the new properties.
Update all coupons: All coupons will inherit the new coupon properties.
Update matching coupons
Enable this option to update only coupons with the same original coupon value as the value set by the current update.
Save your changes by clicking Save at the bottom of the page
Please note that if the Content approval module is active in the Management UI with the Rewards module enabled, only users with approval rights can change reward settings without approval. Other users’ modifications must be submitted for approval, so an approver can review the change before it goes live.
.png "reward-edit-approval (1).png")
Click the Submit for approval button to send the change request for approval.
Clone a reward
If you want to create more rewards with similar settings, you can clone them. This mechanism duplicates all settings.
Go to the Rewards tab
Click the Edit option under the hamburger button next to the reward
In the upper right corner, click Clone
Once done, the editor page of the newly created clone reward is opened with a Reward successfully cloned success message displayed.Change the settings if necessary
Click Save
Deactivate a reward
If you want to remove the reward from the membership site even before the end date, you can deactivate it anytime.
Go to the Rewards tab
Click the Edit option under the hamburger button next to the reward
Click the Set inactive button on the upper right-hand side of the page
Confirm your choice in the dialog that appears
Archive a reward
You can delete inactive rewards from the Management UI by archiving them.
Go to the Rewards tab
Click the Edit option under the hamburger button next to the reward
Click the Archive button on the upper right-hand side of the page
Confirm your choice in the dialog that appears
Archiving is irreversible. Once a reward is archived, it cannot be restored.
Import rewards
Rewards can be created or updated through the Imports module as well. As the import process does not include image upload, please ensure you add the image(s) using the Image field and optionally, the Gallery field to display them to customers.
Sorting of rewards
You can define the order of the rewards on the membership site by selecting the Sorting option in the sidebar. The list of the flows returned by the Display API will be ordered based on the sorting set. Just drag and drop the reward to change the order, and the changes are automatically applied.
If your rewards are categorized on the membership site, please consult the Antavo Service Desk about this functionality.
Filter rewards
Filter your rewards in the Management UI by clicking the Filters button at the top-right corner of the module configuration page. After setting filter conditions (e.g., status, type, point price), click Apply to see the filtered list, or Reset to close the filter menu and see the entire list again.
Best practices
Jot down a list of possible rewards you can offer. Consider what kinds of rewards your customers might expect from you.
Think about rewards your customers can buy in your store and also exclusive specialties like VIP events, personalized goods, workshops, and limited edition items. Exclusive rewards are usually more expensive, but they can create a strong emotional bond between you and your customer, which is the main driver of brand loyalty.
Don’t neglect logistics when planning your rewards. Antavo can trigger an external event to your newsletter provider to notify your customers that they redeemed a reward, but your team must take care of shipping and delivery.
Offer the most valuable rewards to your most valuable customers. Limiting rewards to segments that collect customers of higher tiers, while still making them visible to all members, can encourage lower-tier customers to work their way up to get access to exclusive rewards.